Envelope Card using the Envelope Punch Board and 'How to' Video Tutorial

by Joanne James19. November 2013 20:29

Evening blog readers! I had to do some Christmas shopping today, but managed to squeeze in a quick hour of crafting - still so much to do before I'm ready for my very first Stampin' Up! European Convention in Manchester in 2 days time! I'm very excited (can you tell?!) and am looking forward to spending some quality crafting and partying time with Barbara and Samantha, the two of my team that are accompanying me.

More news of that later in the week, but today I have another video tutorial of you to show you how to make a very simple envelope card using your Envelope Punch Board:

I made a whole bunch of these as thank you cards to pop in with my most recent batch of customer orders; lots of my customers have already bought envelope punch boards, so I'm keen to show them lots of simple and straightforward ways that they can use it for things as well as straightforward envelopes.

Here's a picture of the cards I made, both open and closed:

And here's the link to my YouTube channel to watch the video tutorial if you would like to make your own:


I used Sycamore Street designer series paper for my cards, which is a retired paper but one that is still available currently on the clearance rack for only £3.59 - pop over to my online store by clicking on the image below if you would like to snap some up at this bargain price before its all gone!

Back tomorrow with another project; until then, happy stampin'!


Stampin' Up! Supplies Used:


You Did It Congratulations Card

by Joanne James3. October 2013 21:36

Today I'm sharing a card that I made for a friend of mine who had a very special day today. She is beginning a new chapter in her life and today marked a key milestone - the opening of her new beauty salon. I wanted to make her a card to wish her luck and encourage her look forward and not back. This is the card I made for her:

It's a simple card using the two-stepped stamping of the Too Kind stamp set in Crisp Cantaloupe and Calypso Coral, on a white background that I cut out with a Circle Framelit and part-pierced to add a little interest and draw the eye to the flagged sentiment. The flag is finished with one of the in-colour embellishments. I used the week 139 #10 sketch at Less is More as my inspiration for this card:

As for me, I hand-delivered this card to the recipient today as I was booked in to have a manicure at the same time - too good an opportunity to pass up I think! If you're local to Northampton, I would recommend you check out Pamper Me Beauty - you can link to their Facebook page here and find out more about the services on offer. My nails look lovely; I might have to shoot a video tutorial for you so that I can show them off - any preferences on what you would like to see?

Back tomorrow with another project; until then, happy stampin'!


Stampin' Up! Supplies Used:

 Too KindExpress YourselfEssentials Paper-Piercing PackPaper-Piercing ToolIn Color Boutique DetailsCrisp Cantaloupe Classic Stampin' Pad


 Calypso Coral Classic Stampin' PadSmoky Slate Classic Stampin' PadPear Pizzazz Classic Stampin' Pad

Birthday Clowns!

by Joanne James20. September 2013 20:48

If you're local to Northampton, you will probably have heard about the Northampton Clown - he has been big news here in the last week or so, even reaching the dizzy heights of the national press. He's been trending on Twitter, has his own hashtag and social media page - and he is the inspiration for this birthday card that I made for my Dad, who celebrates his birthday today:

I've had the idea of an abstract face with a moustache ever since I bought my Petite Curly Label Punch and decided to create a clown face, complete with red nose, specs and candy-dot topped party hat. This little trio bear absolutely no resemblance to the Northampton Clown, but were fun to create nonetheless!

Here's a close-up of one of them, showing the piercing I used to give the face shape:

Back tomorrow with the card I made for Grampa from James Juniors; until then many happy returns of the day Dad and to everyone else, happy stampin'!


Stampin' Up! Supplies Used:

 Petite Curly Label PunchPunch Pack - by Stampin' Up!Brights Candy DotsOccasions Paper-Piercing PackPaper-Piercing ToolTypeset Alphabet Bigz Die

Summer Silhouettes Telford Swap

by Joanne James26. August 2013 22:24

Today I have another of the swaps I received at our training event in Telford a little while ago to share with you. This card was made by Jenny Moors and we laughed as we swapped as I had used the same stamp set but taken a completely different creative approach (you can see my Telford swap card here). Here is Jenny's card:

I love the bright colours of this card and there is tons of detail here, right down to the paper pierced edge. It's also a great example of a very well made slider card - here's the inside of the card extended so that you can see what I mean:

If you would like to re-create this card, Jenny has provided a step-by-step tutorial on her blog here. Back with the last of my favourite three swaps I received at Telford next time; until then, happy stampin'!


Stampin' Up Supplies:

Stamps: Summer Silhouettes, Petite Pairs

Cardstock: Tangerine Tango, Rich Razzleberry, Whisper White

Ink/Stampin' Write Markers: Tangerine Tango, Rich Razzleberry, Wild Wasabi

Tools: Paper Piercing Essentials Pack

Finishing Touches: Whisper White Stitched Grosgrain Ribbon, Basics Rhinestones

Tags: , , , , ,

Cards | Stamping | Swaps

Happy 40th Birthday Brother

by Joanne James15. August 2013 16:43

Another brother Birthday card today, but this time for my brother-in-law, who celebrated his 40th birthday recently. I took this card by LeeAnn Greff as my inspiration, changing the colours to use up some of my retired papers and incorporating the necessary changes of sentiment to produce the following card:

A great masculine card, with some Tangerine Tango and Bermuda Bay for pops of colour. Back in a couple of days with the card I made from the children for their uncle; I'll be posting every other day for the next couple of weeks, as I'm having a couple of weeks of dedicated family time before the children go back to school. 

Until then, happy stampin'!


Stampin' Up Supplies:

Stamps: Banner Greetings (hostess)

Cardstock: Basic Grey, Bermuda Bay, Coastal Cabana, Whisper White, Twitterpated DSP (retired), Sycamore Street Designer Series Paper (SAB - retired)

Ink/Stampin' Write Markers: Basic Grey, Tangerine Tango

Tools: Simply Scored, Big Shot, Chevron Textured Impressions Embossing Folder, Typeset Alphabet Die, Paper Piercing Essentials Pack

Finishing Touches: Sycamore Street Ribbon (SAB - retired)


Oh, Whale! Party Invitations

by Joanne James17. June 2013 22:00

So something different today - birthday invitations! I was going to share a birthday card with you today but changed my mind (bloggers prerogative!) As already mentioned this week, it was Rebecca's 8th birthday last Saturday. She is having a swimming pool party next Sunday to celebrate with her friends and so water-themed invitations were the order of the day. She decided that 'Oh, Whale' was to be the stamp set of choice for the task, I saw this lovely Valentine card here and loved the layout, so decided to use this as the basis for my party invitation design. Here are the finished invitations:

I switched out the hearts, went for a darker blue whale and couldn't miss the opportunity to use my Cloudy Day Embossing Folder to add texture to the circle behind the whale. I really like the mix of circle styles on this card and the way the DSP, punched circle and paper piercing bring the whole design together. I then used the 'Make a Wish' set to make light work of the details on the inside of the card (no photo of this though - oops!)

Back tomorrow with another project; until then, happy stampin'!


Stampin' Up Supplies:

Stamps: Oh Whale, Make a Wish

Cardstock: Whisper White, Real Red, Polka Dot Parade Designer Series Paper (Marina Mist)

Ink/Stampin' Write Markers: Night of Navy, Marina Mist, Real Red

Tools: Circles #2 Originals Die, Cloudy Day Textured Embossing Folder, Small Heart Punch, Essentials Paper Piercing Pack, Stamp-a-ma-jig


Help For Heroes Part One - Best of Flowers

by Joanne James2. June 2013 19:42

What a lovely weekend! Today I spent the whole afternoon outside and enjoyed a lovely cycle ride with the rest of the family - I felt like we had to make the most of it; if it's like last weekend, it could be raining cats and dogs tomorrow! As promised yesterday, I have a couple of cards to share with you today featuring one of the stamps from this month's 25th anniversary 'Best of Flowers' stamp set.

In case you're wondering why I headed up this post 'Help the Heroes', these cards, along with two more that I will share tomorrow, were designed in answer to a request from a fellow crafter and member of my wider Stampin' Up! team, whose husband is serving in the RAF and will shortly be departing for another tour of duty to Afghanistan. Our brave serving forces have little or no access to nice cards to send whilst away and so she always sends a box or two so that they can have something a little different to plain paper to write their notes home and wondered if her fellow crafters would be prepared to help out too. All our forces do such a great job and events such as the recent killing of a soldier in Woolwich show just what a dangerous life they lead, both in battle and unfortunately sometimes at home too. I was happy to help, so set to work creating a selection of cards that I could make lots of, but also were post-friendly and didn't have glitter, gems or anything else that could transfer to the sender and potentially make them a target.

So, for the first design, I used the silhouetted daisy stamp from the 'Best of Flowers' set and created two identical cards in different colourways - one pink, one yellow. Here's the card in pink: 

I used the stamp to create a simple 'field of flowers' look by stamping in Melon Mambo and Pink Pirouette and stamping off to create degrees of colour and give the image a sense of depth of field. I then created a scored border and paper-pierced around the image for added interest. I then created a batch of the same card in yellow, using Daffodil Delight and So Saffron inks:

So which colour way do you prefer? I think I prefer the yellow one, just because it is so cheery and bright. I really love this little stamp and can think of lots more ways that I will be using it. I will be making other projects with the stamps in this set, so if the stamps in this set appeal to you, do pop back and see what else I make with them. If you would like to order this set, it costs £13.95 and you can check out the full set of stamps on the image in the side bar of my blog.

Tomorrow I will be sharing the other two cards I made for my Help For Heroes card bundle - two new designs, both using the Summer Silhouettes stamp set. Until then, happy stampin'!


Stampin' Up Supplies:

Stamps: Best of Flowers

Cardstock: Melon Mambo, Whisper White, Daffodil Delight

Ink/Stampin' Write Markers: Melon Mambo, Pink Pirouette, Whisper White, Daffodil Delight, So Saffron

Tools: Essentials Paper Piercing Pack, Piercing Tool, Simply Scored

Tags: , , , , , ,

Cards | Stamping

Summer Silhouettes Swaps

by Joanne James13. May 2013 22:00

As promised, today I'm going to share the swaps I made to take to Telford for the Stampin' Up! regional training day on Saturday; lots of excited crafty ladies (and a few gents!) spent the day crafting, swapping and getting up to speed with all the latest news from Stampin' Up!. As is customary at these events, we all created 'swaps' to share and showcase each other's work. I often find swaps a tricky concept - the desire to create something special, but at the same time simple enough that to create a large volume of them won't take hours or break the bank.

In my wisdom, I decided I would break the seal on a stamp set I bought at the start of the year, but haven't yet used: Summer Silhouettes. I loved the look of this stamp set and have seen many beautiful examples of cards 'random stamped' with the flowers in this set. This was however, my first challenge; as my dear husband so often says to me, "(you) don't do random" - and it would seem this follows me into my stamping. I lost count of the amount of card I cut, stamped and binned before getting to a design I was finally happy with! So I ended up with this as my 'first final design' (I know, bear with me!):

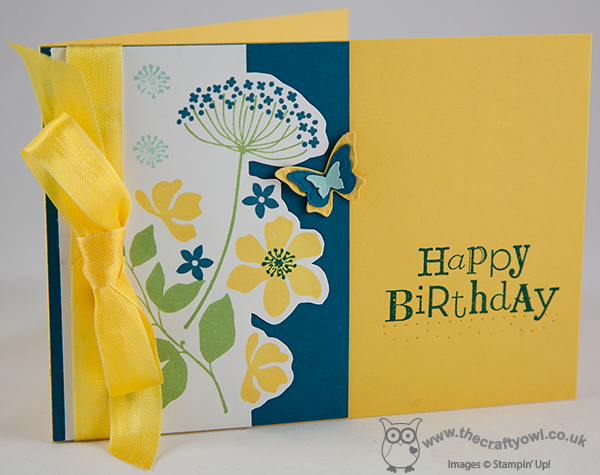
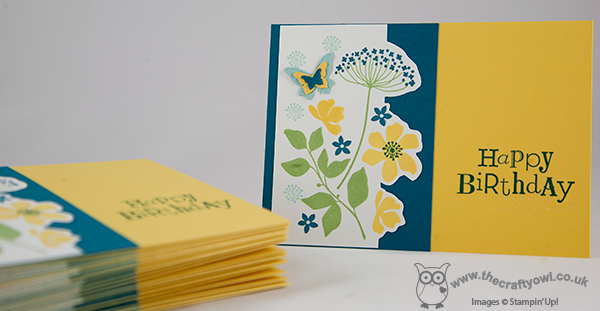
I loved the stamping and fussy cut edge, along with the sentiment and pierced border to ground it. However I didn't like the position of the butterfly, but couldn't move it without removing the ribbon, so here is my final (yes, really!) design:


It took hours to finish them and I still could have made twice as many - there were so many people with great swaps! I will photograph some of my favourites and share those with you later in the week. If you would like to be one of the first to know what's going on in the world of Stampin' Up!, get free products (yes, all still to come!), great training and business advice and a permanent product discount to feed your own crafting habit, then this is a great time to join my team - until May 30th, you can get £155 of products for £99; add in a business supplies pack and you get a whopping £200 of kit for £99 - bargain! Check out the Special Offers box on the right hand side of my page or Contact me to talk about how you can sign up and start benefiting straight away; if you sign up in May, you will be one of the first to preview and order from the new annual catalogue due out on July 1st and you will have the opportunity to attend Stampin' Up's! European Convention in November, which is being held in Manchester in the UK this year.

Pop back tomorrow for another project; I have so much to share this week, including some great cards that we are making at this week's card class. Until then, happy stampin!


Stampin' Up Supplies:

Stamps: Summer Silhouettes, Wacky Wishes

Cardstock: Whisper White, Daffodil Delight, Island Indigo, Pool Party

Ink/Stampin' Write Markers: Daffodil Delight, Island Indigo, Pool Party, Wild Wasabi

Tools: Beautiful Wings Embosslits, Essentials Paper Piercing Pack, Piercing Tool

Finishing Touches: Daffodil Delight Seam Binding Ribbon


Spring Tulips

by Joanne James21. April 2013 20:34

It's the middle of April and finally my tulips in the garden are starting to bud! Still not yet in bloom, unlike my neighbour's daffodils which cheer me up every time I drive on and off the drive. So whilst I'm waiting for the real thing, I thought I would share a tulip card I made:

Can you tell how I made the tulips? Yes, my much beloved Owl Punch was used to create the petals; a whole one (minus feet!) for the base, followed by two sections overlaid for petals. I sponged the edges of the sections in the co-ordinating ink colours to add body and tied the stems with some linen thread for simplicity. I also paper-pierced the background just for added interest; this was so easy with my piercing tool and guide template, yet quite effective I think.

This is just one of many alternative uses for the owl punch. I will be sharing this and many more of them in my next card class on May 15th; if you would like to attend, just contact me at [email protected] for more details. Back tomorrow with another project; until then, happy stampin'!


Stampin' Up Supplies:

Cardstock: Rose Red, Daffodil Delight, Whisper White, Lucky Limeade

Ink/Stampin' Write Markers:  Rose Red, Daffodil Delight

Tools: Owl Punch, Essentials Paper Piercing Pack, Paper Piercing Tool

Finishing Touches: Linen Thread

Tags: , , , , , , ,

Cards | Classes | Punch Art

Mini Catalogue

BROWSE THE CATALOGUE

The mini catalogue is now live! Read and download your copy here.

Shop Online

Access my online shop 24 x 7, 365 days of the year:

Current April hostess code:

VDKNV7BH

Shop Online

Join My Team

It's always a great time to join Stampin’ Up! New team members can get £130 worth of products for only £99 + free business supplies + free shipping + all the fun being a part of Stampin’ Up! Stampin' Up! has something for everyone: join my growing team and benefit from my support to enjoy Stampin' Up! however you choose.

If you're interested, call me for a chat to understand how I can help you realise your goals. Alternatively, if you have already decided to sign up and you just can't wait, please click here for the link to the online form where you can sign up and order your starter kit right away! 

Latest Kit!

Stampin Cut and Emboss

The Rock Legend Kit has all you need to make 8 cards with coordinating envelopes. Along with the new Panda Friends Kit, both are available from January 4th for just £14 each - get yours here!

2023-24 Annual Catalogue

BROWSE THE CATALOGUE

Click on the catalogue for a full list of current SU! supplies - if you would like to order any of the items featured, please drop me a line at [email protected] or give me a call on 07773 421446 - I'd be happy to help.

New Online Exclusives

There are new products available exclusively in the online store from 5 March - check them out here.

About Me

Hi I'm Joanne and live in Northampton and when I'm not looking after my husband and two beautiful children, am an avid crafter with a passion for all things Stampin' Up!

I must confess that I have never been a big rubber stamper - until I discovered Stampin' Up! that is. I love the fact that I can get such great results with co-ordinating stamps, inks, papers and punches - the possibilities are endless! Join me on my stamping journey as I share the things I love and be inspired to create amazing things yourself!

Follow Me

Monthly Newsletter

Box Builder

Click the button above to use Box Buster to create your custom box design using the Envelope Punch Board!

Kits Collection Now Available!

Stampin Cut and Emboss

The new Kits Collection from Stampin' Up! is now available!

Click here to see the current kits available and order yours online today.

I Design For


Stampin' Up Stuff

This is my personal blog and is not endorsed by Stampin’ Up! I hope you find it a plentiful source of ideas and personal inspiration but please don't copy my designs for contest submission or use for classes, publication or sale without express permission.