Garden Impressions Floral Pocket Card

by Joanne James21. August 2018 10:00

It's Tuesday and I have my third post of the week! Today I'm sharing another of the cards that I made in one of my recent technique classes featuring the Garden Impressions Product Suite that is perfect for the current floral challenge over at Inspire.Create:


I made a pocket card featuring one of my favourite Garden Impressions paper designs with an over-the-top diecut embellishment - take a look: 


Here's the low-down on today's card:

Impressionist Inspiration - You now what a fan of designer series paper I am and the Garden Impressions paper is no exception; I just love these bold bright colours and the Impressionistic style of the patterns and florals in this pack. I like each and every pattern in this pack and this is already my most-used papers. Here I used it to decorate the flaps of my pocket card, which I made from co-ordinating Pacific Point cardstock using my trusty Envelope Punch Board and Envelope Expert tool (my finished card measures 10.5cm x 15cm).

Paper-Pieced Springtime Impressions - Not content with the florals on my basic pocket card sleeve, I decided to add the fabulous corner diecut from the Springtime impressions Thinlits set. I diecut a base in Shaded Spruce, then cut the whole thing again in Melon Mambo and Calypso Coral and snipped out some of the flowers and paper-pieced them onto my base piece. This may seem extravagant, but if you keep the offcuts you can use them to create another one in an alternative colourway, so there is very little waste really. I finished the whole thing with a Mango Melody butterfly. Bold? yes. Bright? Absolutely. Yet I love it! 

Abstract Florals - I added my sentiment to a banner tag on the front of my pocket, so that the whole of my inside card is blank for my message. I couldn't leave this piece 'naked' though, so I added a row of bright pink flowers courtesy of the Abstract Impressions stamp set across the bottom. I love this stamp set - so easy to use as it really is easy to line up the images for the two-step stamping required.

Here is the visual summary of the key products used on today's project for you to pin for easy reference:


You can see all of my 'How To' summaries on my 'How To - Tips and Techniques' Pinterest board in case you've missed any. 

Enjoy your day and I'll be back tomorrow with another project. Until then, happy stampin'!


Stampin' Up! Supplies Used:

Table built using Product Table Builder by The Crafty Owl - Independent Stampin' Up! Demonstrator.

Picnic With You Basket of Flowers Exploding Box Card

by Joanne James1. April 2018 18:00

No, it's no April Fools - it's another two-post day today! I have spent a relaxing day being treated to Sunday lunch, along with my fair share of chocolate eggs following this morning's obligatory Easter egg hunt and I wanted to share an exploding box card that I made recently that is just perfect for this week's challenge over at Stamps Ink Paper before it closes this evening:

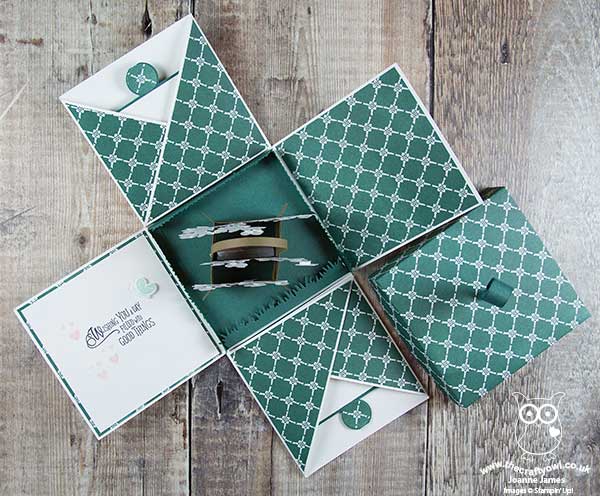
My card looks rather inconspicuous from the outside, just like a simple lidded box. Yet when the lid is removed, my unassuming card 'explodes' and opens up to reveal a 3 dimensional basket of flowers - take a look at this top-down view, showing all of the flaps and pockets - you can also see the layering within my basket:


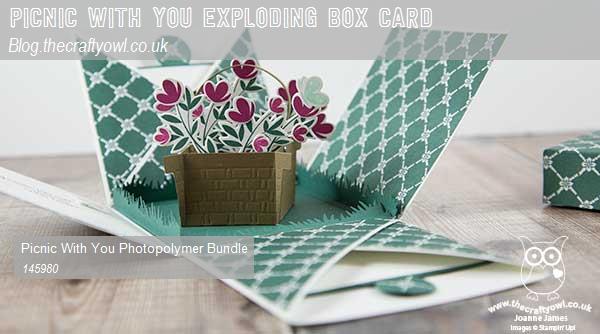
And here you can see properly what the flower basket centrepiece looks like:

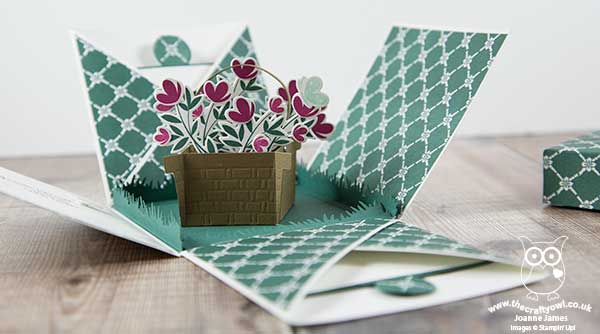
A sweet basket of flowers, complete with butterfly, on a base edged with grass. Isn't that fun?! Here's the low-down on today's card:

Picnic With You - I used the stamps and framelits from the Picnic With You bundle to create my basket, cutting four basket pieces scoring and glueing at the corners to create a 3 dimensional basket to hold my flowers. I love the embossed basket weave detail that is added with the speciality piece in the Picnic Basket Builder Framelit set - it adds great detail and interest.  

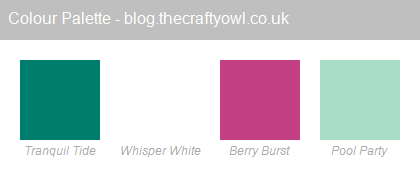
In-Colour Colour Combo - My card features Berry Burst flowers and makes a real feature of the In Color designer series paper in Tranquil Tide. Whilst my main box is made out of Whisper White, the lid is made from Tranquil Tide DSP and I've carried this through for the pockets and mats for the inside of my card. I added a little Pool Party butterfly for an unexpected pop of contrasting colour. I love this deep, yet fresh colour combo - feel free to save it if you would like to use it for your future project inspiration:


Pockets and Tabs - I added a generic message from the Picnic With you stamp set on one of the inner flaps of my card, and another on the right hand side after I took this photo that displayed a 'Happy Mother's Day' message (this card was for my Mother-In-Law for Mother's Day - I knew she would appreciate something a little different and it I could deliver by hand, another bonus!) In addition, the pockets contained two simple slide out cards, with simple tabs courtesy of the Circle Tab Punch (such a useful punch!) - we wrote messages on ours but they would also be a great place to add some photos or even some Memories & More cards perhaps.

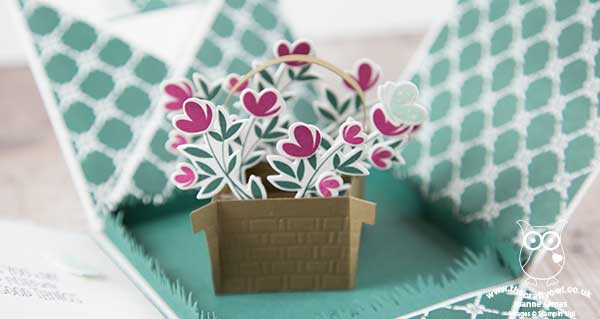
Here's another photo showing the centre of my card in detail: 

Here is the visual summary of the key products used on today's project for you to pin for easy reference:


You can see all of my 'How To' summaries on my 'How To - Tips and Techniques' Pinterest board in case you've missed any. 

I hope you have all enjoyed your day and I'll be back on Tuesday with another project. Until then, happy stampin'!


Stampin' Up! Supplies Used:

Table built using Product Table Builder by The Crafty Owl - Independent Stampin' Up! Demonstrator.

Color Theory Winter Memories And More Scrapbook Layout

by Joanne James4. November 2017 08:00

I have had a busier than usual schedule this week which has necessitated a few blog-free days - I hope you will all bear with me, whilst I like to think I'm organised clearly I'm not organised enough! So much to share and so little time really is my motto at the moment.

Anyway, today I am back with it and I have something a little different for you - this week the team over at Global Design Project have a family theme and CAS-ual Fridays are challenging us to make anything but a card - so I thought I would share one of my recent scrapbooking layouts:


Here is my layout featuring the Color Theory Memories and More card pack:


Here's the low-down on today's project:

A Traditional Layout - Whilst I don't often share my layouts with you here on my blog, I'm a real fan of the pocket-style memory keeping that we introduced with the Project Life range and subsequently with Memories and More. The pocket cards make it so easy to put pages together quickly and I love that I can organise my pages with minimal supplies and 'pretty' them up as I go or add extra detail later. Here I've used the Memories and More cards in a traditional 12" x 12" scrapbook layout as I wanted to show how these cards can be used in a variety of different ways. The pre-printed sentiment cards mean that whatever type of layout you use, Memories and More cards make it easy to create a colourful layout with no stamping required.

Color Theory For All Seasons - This layout is one of four that I created using the Color Theory Memories and More card pack, as I created one for each season. I will share the other layouts in a future blog post; as you can see this page is my Winter layout featuring the rest of the James family on our annual ice skating trip. This is something we love to do every year and make a point of doing together, just the four of us - it has become a tradition and is generally accompanied by different novelty hats each year - in the photo above Rebecca is sporting a Christmas tree whilst Ben's has elf ears! In addition to the Memories and More cards, I used some coloured embossing paste with my Pattern Party Decorative Masks to add some texture and interest to my background, along with some diecut snowflakes courtesy of the Seasonal Layers Thinlits, a little glimmer paper and some glitter enamel dots to add some festive sparkle. I added stickers from the Color theory card pack for additional sentiments and accents.

Hidden Thoughts - My layout features space for journaling on the card above my photograph, but it also features a 'hidden journaling' card concealed beneath the photograph and revealed by pulling the tab on the left hand side attached to the card that says 'Details'. The circle tab punch is great for adding tabs to your journaling cards in this way.

I'll be back tomorrow with another project for this week's challenge over at The Paper Players; until then, happy stampin'!


Stampin' Up! Supplies Used:

Table built using Product Table Builder by The Crafty Owl - Independent Stampin' Up! Demonstrator.

Mini Catalogue

BROWSE THE CATALOGUE

The mini catalogue is now live! Read and download your copy here.

Shop Online

Access my online shop 24 x 7, 365 days of the year:

Current March hostess code:

S9F2XJJW

Shop Online

Join My Team

It's always a great time to join Stampin’ Up! New team members can get £130 worth of products for only £99 + free business supplies + free shipping + all the fun being a part of Stampin’ Up! Stampin' Up! has something for everyone: join my growing team and benefit from my support to enjoy Stampin' Up! however you choose.

If you're interested, call me for a chat to understand how I can help you realise your goals. Alternatively, if you have already decided to sign up and you just can't wait, please click here for the link to the online form where you can sign up and order your starter kit right away! 

Latest Kit!

Stampin Cut and Emboss

The Rock Legend Kit has all you need to make 8 cards with coordinating envelopes. Along with the new Panda Friends Kit, both are available from January 4th for just £14 each - get yours here!

2023-24 Annual Catalogue

BROWSE THE CATALOGUE

Click on the catalogue for a full list of current SU! supplies - if you would like to order any of the items featured, please drop me a line at [email protected] or give me a call on 07773 421446 - I'd be happy to help.

New Online Exclusives

There will be new products available exclusively in the online store from 5 March - check them out here.

About Me

Hi I'm Joanne and live in Northampton and when I'm not looking after my husband and two beautiful children, am an avid crafter with a passion for all things Stampin' Up!

I must confess that I have never been a big rubber stamper - until I discovered Stampin' Up! that is. I love the fact that I can get such great results with co-ordinating stamps, inks, papers and punches - the possibilities are endless! Join me on my stamping journey as I share the things I love and be inspired to create amazing things yourself!

Follow Me

Monthly Newsletter

Box Builder

Click the button above to use Box Buster to create your custom box design using the Envelope Punch Board!

Kits Collection Now Available!

Stampin Cut and Emboss

The new Kits Collection from Stampin' Up! is now available!

Click here to see the current kits available and order yours online today.

I Design For


Stampin' Up Stuff

This is my personal blog and is not endorsed by Stampin’ Up! I hope you find it a plentiful source of ideas and personal inspiration but please don't copy my designs for contest submission or use for classes, publication or sale without express permission.