Blackberry Beauty A Reason To Celebrate CCS 441

by Joanne James12. October 2021 13:00

It's Tuesday and time for a new challenge over at CAS Colours & SketchesThis week's challenge is a sketch challenge and our hostess Vicky has asked that we create a card with a jaunty angle:


Feel free to flip or rotate the sketch when making your card.

I'm also linking up my card today with the team over at AAA cards who are celebrating their 200th challenge since my card has also been made to celebrate something special - take a look:


Here's the low-down on today's card:

A dear blogging friend of mine recently got married to her original childhood sweetheart, having been widowed for the past 11 years. I was delighted to hear this happy news and couldn't wait to create a card to send her my congratulations. I decided the Blackberry Beauty gold foiled paper was the perfect paper to showcase on that jaunty angled piece of the sketch, so I cut it with one of my Basic Borders Dies and added a simple gold embossed 'congratulations' greeting from the Art Gallery set.

Whilst this completed the outside of my card, I had to add some additional decoration to the inside, using both a floral image (stamped in gold) and a sentiment from the retired set 'Wonderful Romance':


I just love this set for wedding cards! I am sending this card overseas, so the flat clean and simple design is perfect. I wanted it to be special for my friend when she opened it though, so I created a custom envelope using shimmer gold vellum with a co-ordinating envelope flap to house her card, that I will then place inside another standard envelope for mailing:


I love the monochrome look for a clean and simple card and this elegant card is great for wedding congratulations I think - and definitely an event to be celebrated!

Here is the visual summary of the key products used on today's project for you to pin for easy reference:


You can see all of my 'How To' summaries on my 'How To - Tips and Techniques' Pinterest board in case you've missed any. 

Enjoy your day and I'll be back tomorrow with another project. Until then, happy stampin'!

Stampin' Up! Supplies Used:

Table built using Product Table Builder by The Crafty Owl - Independent Stampin' Up! Demonstrator.

Clean and Simple Christmas Tree Trio CCS 440

by Joanne James5. October 2021 13:00

It's Tuesday and time for a new challenge over at CAS Colours & Sketches. We are now in October which means a new host and a new guest designer. My CAS-loving friend Vicky is hosting this month and our first challenge is a colour challenge: 


For my card today I decided to go Christmas and use up some of my Sale-A-Bration freebies! I know - these colours aren't a typical festive colour palette, but I think they work - take a look:


Here's the low-down on today's card:

Christmas Tree Trio - I used the Christmas Tree Dies from the 'Whimsy and Wonder' Suite to create my trio of white Christmas trees and incorporated the colour with a set of overlapping inked circles in the challenge colours behind using the round stamp in the Sale-A-Bration 'Textures and Frames' stamp set. This is the kind of set that I struggle to use and am generally doesn't draw me in, much to the amusement of some of my customers and friends who always see the potential of these kinds of sets. I like the idea of using the stamps as a base to showcase something else as I've done here. 

A Whimsical Tree - Not much stamping on the front of my card, but I did use the 'Whimsical Trees' stamp set on the inside of my card for a little extra decoration:


Sparkle and Texture - I couldn't resist adding a sparkly garland to the white Christmas trees on the front of my card using another Sale-A-Bration freebie, the Be Dazzling paper; I love the shimmer and texture it adds, without detracting from the overall clean feel of my card: 

I know the Sale-A-Bration promotion is now over for another year, but hopefully you picked up some of these free items and are still looking for fun ways to use them. 

Here is the visual summary of the key products used on today's project for you to pin for easy reference:


You can see all of my 'How To' summaries on my 'How To - Tips and Techniques' Pinterest board in case you've missed any. 

As a reminder, for our colour challenges, you must use all of the stated challenge colours. You may also use neutral colours; however, the challenge colours should be the most noticeable ones featured on your card. We use Stampin' Up! color names for reference, but you are welcome to use any other companies' products as long as you match the challenge colours as closely as possible.

Enjoy your day and I'll be back tomorrow with another project. Until then, happy stampin'!


Stampin' Up! Supplies Used:

Table built using Product Table Builder by The Crafty Owl - Independent Stampin' Up! Demonstrator.

Blackberry Beauty Three Panel Nature Thank You CCS 439

by Joanne James28. September 2021 13:00

It's Tuesday and time for a new challenge over at CAS Colours & Sketches. Jenny's final challenge this month is a sketch challenge: 


Feel free to flip or rotate the sketch when making your card.

For my card today I decided to feature some designer series paper and went on the hunt for a pattern that lent itself to being split across three panels and accommodating a sentiment. This is where I ended up:


Here's the low-down on today's card:

This design in the Blackberry Beauty specialty designer series paper pack is one of my favourite designs and since all of the pattern is along the outer edges of the paper, it was perfect to cut down for a blank piece behind my sentiment and then two rectangles with pattern below. This paper has beautiful foil detailing, so I decided to add some gold foil mats to my rectangles and behind my sentiment. My 'thanks' is from the Word Wishes die for 'Thanksgiving' where I cut the 'giving' off the end. The dies aren't layered, so I created a gold mat for my diecut by gluing the Early Espresso diecut to gold foil, then carefully trimming around it with my paper snips to leave a layered border: 


The front of my card is stamp-free, so I added some stamping to the inside of my card to remedy that:


Here is the visual summary of the key products used on today's project for you to pin for easy reference:


You can see all of my 'How To' summaries on my 'How To - Tips and Techniques' Pinterest board in case you've missed any. 

Enjoy your day and I'll be back tomorrow with another project. Until then, happy stampin'!


Stampin' Up! Supplies Used:

Table built using Product Table Builder by The Crafty Owl - Independent Stampin' Up! Demonstrator.

Birds and More Anniversary Card CCS 438

by Joanne James21. September 2021 13:00

It's Tuesday and time for a new challenge over at CAS Colours & Sketches. This week Jenny has a great colour challenge for us: 


I love Jenny's fresh colour palette this week! For my card today I decided to dig out one of my rather neglected annual catalogue sets to make an anniversary card for a friend's upcoming celebration:


Here's the low-down on today's card:

I added some Coastal Cabana ink to my cardbase and then added the circular diecut from the Birds and More dies to create an aperture to go over the top. I threaded through a diecut branch in Granny Apple Green and a pair of Misty Moonlight birds popped up on dimensionals, with black matt dots added for eyes. A simple sentiment from the (retired) Itty Bitty Greetings set completes the front of my card:


I used the negative aperture of the branch die to sponge some green ink onto the inside of my card, along with another Itty Bitty Greeting:


Here is the visual summary of the key products used on today's project for you to pin for easy reference:


You can see all of my 'How To' summaries on my 'How To - Tips and Techniques' Pinterest board in case you've missed any. 

As a reminder, for our colour challenges, you must use all of the stated challenge colours. You may also use neutral colours; however, the challenge colours should be the most noticeable ones featured on your card. We use Stampin' Up! colour names for reference, but you are welcome to use any other companies' products as long as you match the challenge colours as closely as possible.

Enjoy your day and I'll be back tomorrow with another project. Until then, happy stampin'!


Stampin' Up! Supplies Used:

Table built using Product Table Builder by The Crafty Owl - Independent Stampin' Up! Demonstrator.

Be Dazzling Stitched Snowflake Slimline Card CCS 437

by Joanne James14. September 2021 13:00

It's Tuesday and time for a new challenge over at CAS Colours & Sketches. This week's challenge is a sketch challenge and Jenny has asked that we create a slimline card, with a rectangular element behind a single focal image:


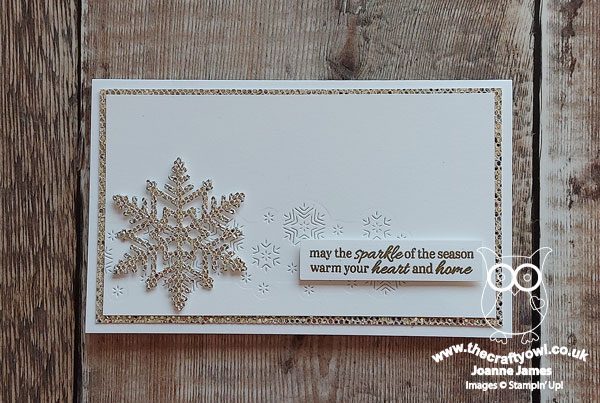
Feel free to flip or rotate the sketch when making your card. For my card today I created a mini slimline card and took the opportunity to combine with my entry for the current Less Is More challenge for a clean and simple card that is all about the sparkle - take a look:


Here's the low-down on today's card:

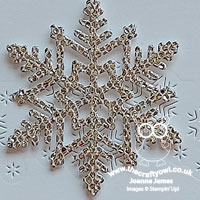
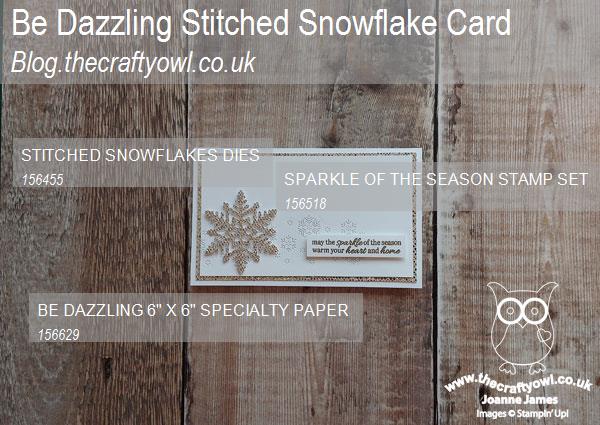
Stitched Snowflakes - I recently picked up the new Stitched Snowflakes dies (I blame my blog friend, the lovely LeAnne Pugliese lol!) having been convinced I can never own too many snowflake dies and these ones also have a lovely stitched detail - bonus! I thought a single diecut snowflake would make a great focal point, and used one of the other dies that cuts a swirl of snowflakes into a flat panel for my rectangular element. 

Be Dazzling - The challenge over at Less Is More currently is 'sparkle' so I just had to cut my snowflake out of Be Dazzling sparkly paper - the ultimate in sparkle and free with a purchase of £45 during the current Sale-A-Bration promotion to boot! I also added a sparkly border between my mat white layers - I mean, you can never have too much sparkle, right?! Well, so long as it's balanced with lots of 'white' space to keep that clean and simple feel ;-) If you would like to get your hands on some 'Be Dazzling' paper, you have until the end of this month or whilst supplies last (whichever comes sooner) to grab some: just hop on over to my online store or give me a call to place an order.


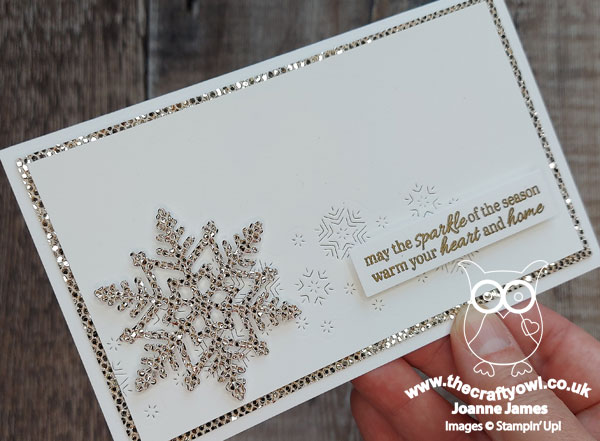
Sparkle of a Different Kind - My sentiment comes from the 'Sparkle of the Season' wreath set - it seemed just right to pair with my sparkling snowflake on today's card.

Here is the visual summary of the key products used on today's project for you to pin for easy reference:


You can see all of my 'How To' summaries on my 'How To - Tips and Techniques' Pinterest board in case you've missed any. 

As a reminder, for our colour challenges, you must use all of the stated challenge colours. You may also use neutral colours; however, the challenge colours should be the most noticeable ones featured on your card. We use Stampin' Up! colour names for reference, but you are welcome to use any other companies' products as long as you match the challenge colours as closely as possible.

That's all from me for now; I have lots to do following yesterday's monthly Stampin' Up! class; on the upside, the forecast is rain all day today so at least I won't be tempted to go out into the garden! Enjoy your day and I'll be back tomorrow with another project. Until then, happy stampin'!


Stampin' Up! Supplies Used:

Table built using Product Table Builder by The Crafty Owl - Independent Stampin' Up! Demonstrator.

Turtle-y Loved Turtle Friends CCS 436

by Joanne James7. September 2021 13:00

It's Tuesday and time for a new challenge over at CAS Colours & Sketches. The lovely Jenny is hosting this month and our first challenge is a colour challenge: 


For my card today I decided to pair a couple of cute turtle friends for a sweet clean and simple card - take a look:


Here's the low-down on today's card:

I thought the two greens would make great turtle colours and the pink a bright accent, so I stamped a little turtle onto my panel, having first run the bottom edge of the panel through my dots embossing folder, added some grass and hearts and a little bird directly to the base before adding a larger turtle which I coloured and punched out and popped on some dimensionals for added lift:


A super simple little scene with a sweet sentiment that makes this a fun school snack box love note for one of the James Juniors as they are headed back to school this week (obviously with the pink toenails this one is headed to Rebecca - definitely wouldn’t suit Ben’s cool kid status to have pink varnished toenails!!)

Here is the visual summary of the key products used on today's project for you to pin for easy reference:


You can see all of my 'How To' summaries on my 'How To - Tips and Techniques' Pinterest board in case you've missed any. 

As a reminder, for our colour challenges, you must use all of the stated challenge colours. You may also use neutral colours; however, the challenge colours should be the most noticeable ones featured on your card. We use Stampin' Up! color names for reference, but you are welcome to use any other companies' products as long as you match the challenge colours as closely as possible.

Enjoy your day. Today it’s my birthday so I will be taking it easy (ish!) And definitely partaking in a Colin the Caterpillar birthday cake at tea time - it’s tradition! I'll hopefully be back tomorrow with another project but my laptop is currently with the IT doctor so it might be Thursday until service is temporarily restored (that post is already written and schedule). Until then, happy stampin'!


Stampin' Up! Supplies Used:

Table built using Product Table Builder by The Crafty Owl - Independent Stampin' Up! Demonstrator.

Bright Whimsical Christmas Tree Trio For CCS 435

by Joanne James31. August 2021 12:00

It's time for this week's new challenge over at CAS Colours & Sketches and since it's the 5th Tuesday of the month it's time for the double: a combination of an old sketch and colour palette, combined. Bhavya has chosen the following combination:


I struggled a little with this week's challenge! I don't have any of those retired colours, so went with my closest current match and after going through a ton of stamp sets and dies, I finally decided to go with an unconventionally coloured Christmas card featuring a trio of skinny trees for my shapes:


Here's the low-down on today's card:

These tree dies are from the Christmas Trees Dies set in the Whimsy and Wonder suite and are the trees that caused me to invest in this set - I love the textured, skinny design. I layered them into the corner of my panel and used a greeting from the Whimsical Trees stamp set in the same bundle, having coloured it with my Stampin' Write Markers so that I could highlight the scripted words in Magenta Madness pink:


Super simple with only four products needed. I quite like the unconventional colour scheme for Christmas, but if you're more of a traditionalist it would work in reds and greens too!

Here is the visual summary of the key products used on today's project for you to pin for easy reference:


You can see all of my 'How To' summaries on my 'How To - Tips and Techniques' Pinterest board in case you've missed any. 

As a reminder, for our colour challenges, you must use all of the stated challenge colours. You may also use neutral colours; however, the challenge colours should be the most noticeable ones featured on your card. We use Stampin' Up! color names for reference, but you are welcome to use any other companies' products as long as you match the challenge colours as closely as possible.

Enjoy your day; we are going swimming and are making meatballs today amongst other things! I'll be back tomorrow with another project. Until then, happy stampin'!


Stampin' Up! Supplies Used:

Table built using Product Table Builder by The Crafty Owl - Independent Stampin' Up! Demonstrator.

Penguin Place CAS Reindeer Christmas CCS 434

by Joanne James24. August 2021 12:00

This week's challenge is a sketch challenge and Bhavya has asked that we overlay a repeating sentiment with a focal point shape. Feel free to flip or rotate the sketch when making your card.


The eagle-eyed amongst you will already have noticed that I used this sketch layout for my CAS Colours & Sketches last week; I really liked this layout and couldn't wait to have a play with it! For my card today I went with a Christmassy theme:


Here's the low-down on today's card:

I stamped a repeating sentiment from the 'Penguin Place' stamp set and a punched penguin, all dressed up as a reindeer, complete with red Rudolf nose:

Super simple and so cute! I really like this layout for a clean and simple card and will definitely be using it again. I can't wait to see what entries we have in the gallery this week!

Here is the visual summary of the key products used on today's project for you to pin for easy reference:


You can see all of my 'How To' summaries on my 'How To - Tips and Techniques' Pinterest board in case you've missed any. 

We are off to visit friends today for lunch and to catch up on our holiday news. Whatever your plans, enjoy your day and I'll be back tomorrow with another project. Until then, happy stampin'!


Stampin' Up! Supplies Used:

Table built using Product Table Builder by The Crafty Owl - Independent Stampin' Up! Demonstrator.

Measure of Love Measure Up CAS Card CC&S 433

by Joanne James17. August 2021 12:00

It's Tuesday and time for a new challenge over at CAS Colours & Sketches. Bhavya is hosting this month and this week it's a colour challenge: 


I love this colour palette and as soon as I saw it I knew which set I wanted to create with - take a look:


Here's the low-down on today's card:

My grandmother had an old-fashioned pair of Pool Party-coloured weighing scales with a red needle and I've been itching to ink up my 'Measure of Love' stamp set in memory of her and the many hours we spent having fun in the kitchen together. I added a yellow bowl of red cherries to my scales, coloured and fussy cut them and placed them over my repeated sentiment to complete my card:

Here is the visual summary of the key products used on today's project for you to pin for easy reference:


You can see all of my 'How To' summaries on my 'How To - Tips and Techniques' Pinterest board in case you've missed any. 

I was having so much fun having made this card, I decided to create another, stepped-up one using the same set, this time adding in green and more black for the brief over at the Paper Craft Crew this week and using the layout over at TGIF Challenges:


Here's my second card:


This time I used a background of buffalo check DSP, that I coloured with my Pool Party ink and a blender brush, added some hearts and cherry stalks to my bowl of cherries and backed this with a circle that I outlined with flowers and added a fussy cut embossed sentiment and cute gingham yellow bow:


So which one do you prefer? Either way, this set makes great cute cards and I'm looking forward to creating more with this set.


As a reminder, for our colour challenges, you must use all of the stated challenge colours. You may also use neutral colours; however, the challenge colours should be the most noticeable ones featured on your card. We use Stampin' Up! color names for reference, but you are welcome to use any other companies' products as long as you match the challenge colours as closely as possible.

Enjoy your day and I'll be back tomorrow with another project. Until then, happy stampin'!


Stampin' Up! Supplies Used:

Table built using Product Table Builder by The Crafty Owl - Independent Stampin' Up! Demonstrator.
 
Table built using Product Table Builder by The Crafty Owl - Independent Stampin' Up! Demonstrator.

Mini Gingerbread And Peppermint Christmas Greetings CCS 432

by Joanne James10. August 2021 12:00

This week's challenge is a sketch challenge and Bhavya has asked that we use four images stacked vertically, interspersed with a sentiment. Feel free to flip or rotate the sketch when making your card.


My card today was completely driven by the need to find four images and a sentiment that would fit on a card front; that and my current phase of fussy-cutting images from designer paper! Here's what I came up with:


Here's the low-down on today's card:

Super simple this one! I fussy cut four of the mini gingerbread images from the Gingerbread and Peppermint designer series paper, along with a base from the same pack to give a little border on each side, and stacked them on dimensionals, interspersing with a sentiment stamped in Real Red taken from the Poinsettia Petals stamp set:


That's all there is to it - super simple and very little stamping too!

Here is the visual summary of the key products used on today's project for you to pin for easy reference:


You can see all of my 'How To' summaries on my 'How To - Tips and Techniques' Pinterest board in case you've missed any. 

As a reminder, for our colour challenges, you must use all of the stated challenge colours. You may also use neutral colours; however, the challenge colours should be the most noticeable ones featured on your card. We use Stampin' Up! color names for reference, but you are welcome to use any other companies' products as long as you match the challenge colours as closely as possible.

This is a big week in the James household, so blogging will be a little less frequent than usual. Today my nephew received his A Level results: an A and two A*s, which he is thrilled with and is testament to his hard work and effort in recent months. Tomorrow it is the turn of the James Junior who turns 14 - we have some exciting surprise birthday celebrations planned which I will share later in the week! Enjoy your day and I'll be back tomorrow with another project. Until then, happy stampin'!


Stampin' Up! Supplies Used:

Table built using Product Table Builder by The Crafty Owl - Independent Stampin' Up! Demonstrator.

Mini Catalogue

BROWSE THE CATALOGUE

The mini catalogue is now live! Read and download your copy here.

Shop Online

Access my online shop 24 x 7, 365 days of the year:

Current April hostess code:

VDKNV7BH

Shop Online

Join My Team

It's always a great time to join Stampin’ Up! New team members can get £130 worth of products for only £99 + free business supplies + free shipping + all the fun being a part of Stampin’ Up! Stampin' Up! has something for everyone: join my growing team and benefit from my support to enjoy Stampin' Up! however you choose.

If you're interested, call me for a chat to understand how I can help you realise your goals. Alternatively, if you have already decided to sign up and you just can't wait, please click here for the link to the online form where you can sign up and order your starter kit right away! 

Latest Kit!

Stampin Cut and Emboss

The Rock Legend Kit has all you need to make 8 cards with coordinating envelopes. Along with the new Panda Friends Kit, both are available from January 4th for just £14 each - get yours here!

2023-24 Annual Catalogue

BROWSE THE CATALOGUE

Click on the catalogue for a full list of current SU! supplies - if you would like to order any of the items featured, please drop me a line at [email protected] or give me a call on 07773 421446 - I'd be happy to help.

New Online Exclusives

There are new products available exclusively in the online store from 5 March - check them out here.

About Me

Hi I'm Joanne and live in Northampton and when I'm not looking after my husband and two beautiful children, am an avid crafter with a passion for all things Stampin' Up!

I must confess that I have never been a big rubber stamper - until I discovered Stampin' Up! that is. I love the fact that I can get such great results with co-ordinating stamps, inks, papers and punches - the possibilities are endless! Join me on my stamping journey as I share the things I love and be inspired to create amazing things yourself!

Follow Me

Monthly Newsletter

Box Builder

Click the button above to use Box Buster to create your custom box design using the Envelope Punch Board!

Kits Collection Now Available!

Stampin Cut and Emboss

The new Kits Collection from Stampin' Up! is now available!

Click here to see the current kits available and order yours online today.

I Design For


Stampin' Up Stuff

This is my personal blog and is not endorsed by Stampin’ Up! I hope you find it a plentiful source of ideas and personal inspiration but please don't copy my designs for contest submission or use for classes, publication or sale without express permission.