Christmas Cutie Elf in The Snow

by Joanne James12. October 2015 09:00

As promised on Sunday, here's the other card I made using this week's colour combination over at The Paper Players:

It's another card using the Christmas Cuties stamp set, featuring the happy little elf:

I used extra thick Whisper White for my card base, with a mat of Real Red and another piece of Whisper White embossed with the Softly Falling Embossing Folder. I added a couple of circles in Real Red and Cucumber Crush, then added a large Whisper White circle stamped with the elf image in Archival Black and then coloured in using my aqua painter and Real Red and Cucumber Crush inks, with a little Crushed Curry for his hair and jingle bells and a touch of Pink Pirouette for his face and hands. To finish I added a trio of white sequins from the Metallics Sequin Assortment to the circle.

The new extra thick Whisper White is just lovely and a joy to watercolour on - especially if you use the Archival Black ink for your stamped outline; this prevents bleeding or running of ink as you paint. 

I've had a busy day today with the second of this month's technique classes. We created some fabulous cards using the Embellished Ornaments set and Delicate Ornaments Thinlits Dies which I will share with you in due course. If you like these colours, be sure to link up your creations with us over at The Paper Players - we would love to see them!

Back tomorrow with another project; until then, happy stampin'!


Stampin' Up! Supplies Used:

Table built using Product Table Builder by The Crafty Owl - Independent Stampin' Up! Demonstrator.


Christmas Cuties Jingle Bell Elf

by Joanne James11. October 2015 10:00

Good morning everyone! Thank you to everyone who joined in my Halloween theme challenge over at The Paper Players last week - the gallery entries were fantastic! This week it is the turn of my fellow Brit turned American, the lovely Jaydee, to host, and she has a great colour challenge for you to play along with:

Once I'd got past wanting to make a set of traffic lights with these colours, I settled on another card using the Christmas Cuties stamp set, this time featuring the happy little elf:


I used Cucumber Crush for my card base - this is such a great bright green colour for Christmas! - and created a panel of red detail below my image, where I embossed a piece of Real Red cardstock with the Stylish Stripes embossing folder and edged it with a band of the red striped pattern from the Holiday Homes Fancy Foil Designer Vellum. Lastly, I tied my panel with a piece of Real Red striped ribbon, tied with a little jingle bell from my 'bits and bobs' drawer, just like the ones on the elf's outfit. To finish, I added a Very Vanilla circle stamped with the elf image in Archival Black and then coloured in using my aqua painter and Real Red and Cucumber Crush inks, with a little Crushed Curry for his hair and jingle bells and a touch of Pink Pirouette for his face and hands.  

I love the cute little images in this set - such fun! I made another card using the same colours and a Whisper White base panel for my alternate design, which I'll share later in the week.

Before you reach for your ink and papers, check out what our amazing team has created to inspire you this week:

The Paper Players Design Team
Anne Marie Hile - on leave
 
 
Here's a quick recap of our challenge rules:
 
1.  Create a new paper project
2.  Upload your creation to your blog with a link back to us and provide a direct link to the post featuring your challenge submission.
3.  Please link your card to no more than three challenges, TOTAL.
4.  Have FUN! 


I look forward to seeing how you interpret our colour palette this week. I'm off for a morning of basketball and we still have some homework to do; we spent a chunk of yesterday visiting senior schools - can't believe in 12 months time the eldest of my James juniors will be heading off to senior school - eek! Hoping to then get some time to craft this afternoon; that would be nice!

Back tomorrow with another project; until then, happy stampin'!


Stampin' Up! Supplies Used:

Table built using Product Table Builder by The Crafty Owl - Independent Stampin' Up! Demonstrator.


Howl-o-Ween Treat Matchbox Style Halloween Pop Up Card

by Joanne James4. October 2015 10:00

Did you have fun celebrating World Card Day yesterday? I sent the afternoon crafting, but making home decor rather than cards as Rebecca had a friend round and we spent a couple of hours putting together our Witching Decor Project kits. It did rather put me in the mood for today's new challenge over at The Paper Players! This week it's my turn to host again and since it's the first Sunday in October I have a fun theme challenge for you:


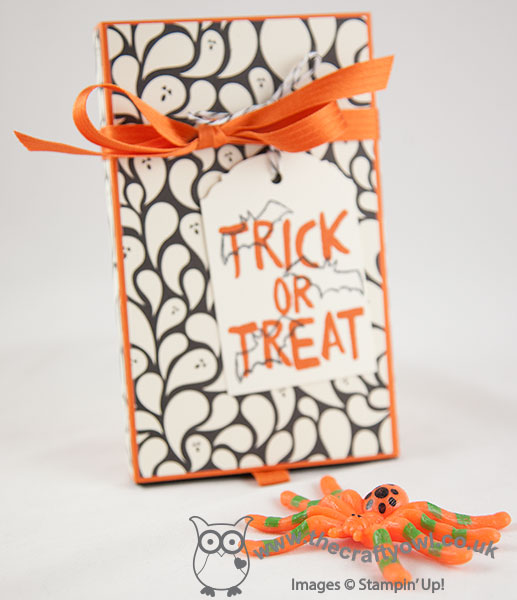
Yes that's right - it's Halloween! I took the opportunity to have some fun with my Howl-o-ween Treat Stamp set and the co-ordinating Boo To You framelits and created something that's been on my general 'to do' list for ages - a matchbox style pop up card. Lots of photos today - here's my card from the outside:


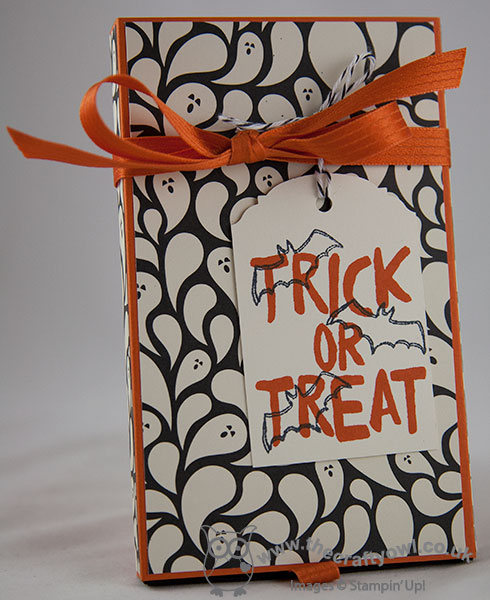
My outer box sleeve is made from Tangelo Twist cardstock decorated with the fun ghost patterned paper from the Happy haunting DSP set - I've been wanting to use this pattern for ages! - and a tag punched with the Ornate Tag Topper punch attached with some Tangelo Twist satin ribbon available on the Clearance Rack currently while stocks last!) My tag is decorated with some bats courtesy of the Project Life Seasonal Snapshot 2015 set and the Trick or Treat sentiment from the Howl-o-Ween treat set. The question is though, which will it be - trick or treat? Let's take a look inside the box:


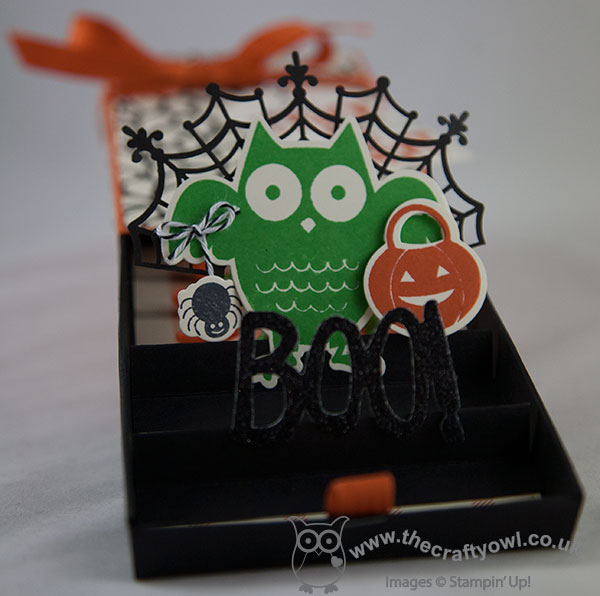
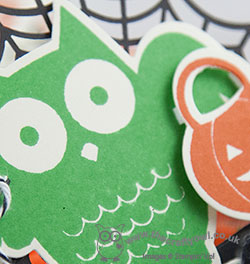
 I made the drawer tray using Basic Black cardstock and my trusty Envelope Punch Board, and lined it with more Happy Haunting DSP. I used my framelits to cut a 'Boo!' out of black glimmer paper - so perfect for Halloween projects - and stamped a bright green owl, complete with pumpkin basket and spider hanging down from a piece of black baker's twine. Here's another view - oh and I backed my owl with a partial spider web doily too: 


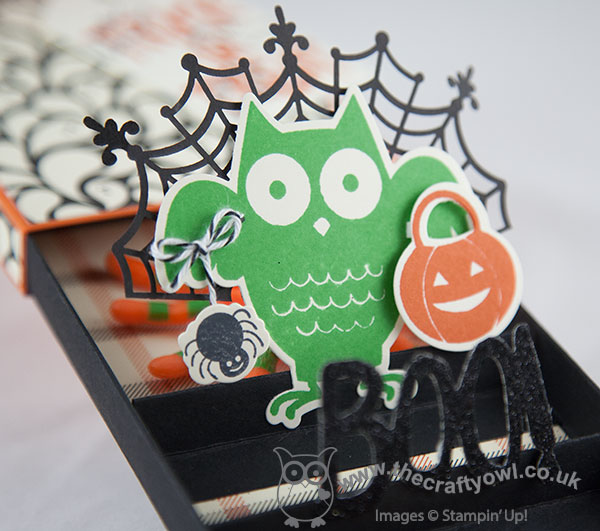
I made my box quite large so that I could accommodate both my pop up owl and greeting and a little something behind. If you look closely in the photo above you can just catch a glimpse of what it is - it also determined the colour of my owl. Can you see what it is? How about a brightly coloured spider to scare your nearest and dearest:

This time more trick than treat (although I've a feeling there are plenty of little ones out there who may think otherwise, given the potential for the odd practical joke or two!), however you could always include a bar of chocolate instead. I hope you like my fun Halloween card - I think the bright orange spider is my favourite!

Before you reach for your ink and papers, check out what our amazing team has created to inspire you this week:

The Paper Players Design Team
Anne Marie Hile - on leave
 
 
Here's a quick recap of our challenge rules:
 
1.  Create a new paper project
2.  Upload your creation to your blog with a link back to us and provide a direct link to the post featuring your challenge submission.
3.  Please link your card to no more than three challenges, TOTAL.
4.  Have FUN! 


I look forward to seeing your Halloween-themed cards this week. I'm off for a morning of basketball and then home for birthday lunch - today it's my husband who's celebrating; I'll share his birthday cards with you later this week.

Back tomorrow with another project; until then, happy stampin'!


Stampin' Up! Supplies Used:

Table built using Product Table Builder by The Crafty Owl - Independent Stampin' Up! Demonstrator.


Soon It Will Be Christmas Tree Card

by Joanne James29. September 2015 21:48

I've a super-quick post today to share another of my stamp-a-stack cards featuring the lovely Home for Christmas designer series paper and stamp from the 'Cup of Cheer' stamp set - take a look:

This is a layout I've used before, with a very similar card here that explains in more detail the items used - I just changed up the paper and colours so that I can use some of the lovely Christmas tree paper - this paper makes me think of Christmas day and opening all of the lovely present beneath the Christmas tree.

If you are as in love with this season's new designer series papers as I am, you may want to consider joining my paper share; I am currently doing my second round of paper and accessory shares from the seasonal catalogue - you can find all the details along with links to order in the original blog post here

I also have another stamp-a-stack Christmas card class planned for 10th November; if you would like to come along and make your Christmas cards ready for posting then you would be more than welcome - email or call me to book your place!

Back tomorrow with another project and this week's Weekly Deals. Until then, happy stampin!


Stampin' Up! Supplies Used:

Table built using Product Table Builder by The Crafty Owl - Independent Stampin' Up! Demonstrator.


Home For Christmas Jolly Reindeer Card

by Joanne James28. September 2015 22:14

Happy Monday everyone! Today I have another of the cards that I designed for my recent Christmas stamp-a-stack featuring an adorable reindeer from the Home For Christmas designer paper. This clean and layered card is just perfect for the challenge over at The Card Concept this week, which is to feature a forest friend on your card:

Isn't that inspiration photo just the cutest? Here's the reindeer forest friend that features on my card:

I used a Soft Suede base and a couple of patterned pieces of Home for Christmas DSP, then punched a 2" circle of Very Vanilla and adhered my fussy cut reindeer on the top. I stamped the 'Have a' and 'Christmas' parts of my sentiment from the Holly Jolly Greetings set in Memento Black onto Very Vanilla, then cut a 'jolly' out of red glimmer paper using my Big Shot and Christmas Greetings Thinlits Dies and adhered all of my sentiments with dimensionals for a little extra height. I just love the Home For Christmas Designer Series Paper - the retro designs are fantastic and the reindeers and santas are all decorated differently and in slightly different poses that are great for fussy cutting, although I'm not sure my ladies agreed after cutting out six of these little fellas!

That's all from me today; back tomorrow with another project. Until then, happy stampin'!


Stampin' Up! Supplies Used:

Table built using Product Table Builder by The Crafty Owl - Independent Stampin' Up! Demonstrator.


Merry Moments Jolly Reindeer Paper Clip Christmas Card

by Joanne James27. September 2015 10:00

It's Sunday and you know what that means: time for a new challenge over at The Paper Players! This week it's the turn of my talented friend the lovely Claire to host and she has a great sketch challenge for you:


Claire loves layers and this sketch certainly has lots! I decided to go with a showcase of Merry Moments Christmas DSP on mine, although that wasn't where I started out with this card - I saw that button and just knew it was the perfect opportunity to showcase one of my reindeer paper clips! Take a look:


I used two of the Merry Moments DSP patterns along with a Real Red spotted paper (this one is retired but very similar to the pattern in the Brights DSP stack), matted on either Chrry Cobbler or Mossy Meadow. I added a band and scalloped edge in Real Red, but the stars of today's card are most definitely that 'jolly' sentiment cut from red foil (I built this up on 3 layers of cardstock to give added depth) and that oh-so-cute reindeer clip, complete with Cherry Cobbler enamel dot - well, what's a Rudolf without a red nose?!

A no-stamp card that uses layers and embellishment for pattern and interest - perfect for the festive season. As for the reindeer paper clip - how cute!

Before you reach for your ink and papers, check out what our amazing team has created to inspire you this week:

The Paper Players Design Team
Anne Marie Hile - on leave
 
 
Here's a quick recap of our challenge rules:
 
1.  Create a new paper project
2.  Upload your creation to your blog with a link back to us and provide a direct link to the post featuring your challenge submission.
3.  Please link your card to no more than three challenges, TOTAL.
4.  Have FUN! 


I look forward to seeing how you interpret our sketch in your card designs. I'm off for a morning of basketball and hoping to spend a little time tidying up in the garden this afternoon, along with some baking to make use of some of our home grown raspberries - yum! 

Back tomorrow with another project; until then, happy stampin'!


Stampin' Up! Supplies Used:

Table built using Product Table Builder by The Crafty Owl - Independent Stampin' Up! Demonstrator.


Merry Christmas Ornament Card

by Joanne James26. September 2015 22:33

A quick - and late! - post from me today, but since I didn't post yesterday I thought I'd better squeeze one in today! I was fundraising at a MacMillan Coffee morning yesterday and have been busy with the usual flurry of household chores, homework and swimming clubs that generally occupy a Saturday in the James household today. The lovely ladies over at Less Is More have a challenge for 'something shiny' this week and I have the perfect CAS creation to fit - here's my card:

I used a simple base of Real Red and a mat of Whisper White, onto which I stamped 'have a' and 'Christmas' in red around a gold foil 'Merry' diecut, formed using my Christmas Greetings thinlits (I am so in love with these!) I cut an ornament shape out of gold foil using my Delicate Ornament Thinlits Dies and my Big Shot and backed this with a 1 3/4" circle of red glimmer paper (well what is shine without a little sparkle too?!), added a gold cord trim bow and adhered the ornament slightly off the edge of the card to look as if it was hanging from the 'y' of 'merry'. 

I designed this card as one of the makes for my all day Christmas stamp-a-stack this week and the ladies present loved it, although having to remove the tiny pieces from the ornament was proving tedious by the time they had made six of them! I'm also using the ornament dies in my October technique class in a couple of weeks time and can't wait - combined with the Embellished Ornaments stamp set (another 15% off bundle when you buy the two together!) they really are very versatile.

Back tomorrow with my card for this week's new challenge over at The Paper Players; come back then, you won't want to miss it!

Until then, happy stampin'!


Stampin' Up! Supplies Used:

Table built using Product Table Builder by The Crafty Owl - Independent Stampin' Up! Demonstrator.


Reason For The Season Decoupage Poinsettia Card

by Joanne James17. September 2015 08:05

Today it's time for a new challenge over at Create With Connie and Mary and this week we have a great sketch challenge for you:


I decided to use the lovely 'Reason For The Season' stamp set on my card again today. Here's my card: 


I decided to use the tone on tone stamping on my Real Red card base as it was so popular on my earlier card here. I used a band of Garden Green and a Garden Green mat for my Whisper White oval, cut with my Big Shot and Oval Framelits, and added a band of Real Red striped Holiday Fancy Foil Designer Vellum to the central band to add a little shine. I stamped my sentiment in black and then for my embellishment, I stamped the poinsettia three times on Whisper White and fussy cut each one, creating different layers of petals as I did so, so that when they were adhered on top of each other they have a real 3D effect. I also coloured some pearls with a yellow Sharpie and added those to the centre of my flower. Here's a closeup of the detail:


I love the effect you get with some good old fashioned fussy cutting and layering and for this card, no punch required. This set really is so versatile!

Do visit the other Design Team members to see how they used this week's challenge sketch; there's lots of inspiration over on their blogs too!

Enjoy your day and I'll be back tomorrow with another project; until then, happy stampin'!


Stampin' Up! Supplies Used:

  • Reason For The Season Photopolymer Stamp Set
  • Holidays Fancy Foil Designer Vellum
  • Ovals Collection Framelits Dies
  • Big Shot
  • Whisper White A4 Cardstock
  • Real Red Classic Stampin' Pad
  • Real Red A4 Cardstock
  • Garden Green Classic Stampin' Pad
  • Garden Green A4 Cardstock
  • Pearl Basic Jewels


Mirrored Lighthearted Leaves Autumn Card

by Joanne James10. September 2015 08:05

Today it's time for a new challenge over at Create With Connie and Mary and this week we have a great colour challenge for you:


Delightful Dijon is probably the most under-utilised of my current in-colours, so today's card was a good opportunity to redress the balance a little. I thought these colours would work well for an Autumn/Fall card, so that's where I went with this combination. Here's my card: 


I am loving the new Lighthearted Leaves set, so perfect for colouring, and a doddle to cut out with the co-ordinating Leaflets Framelits! I was inspired to create a card with a rather geometric yet zentangle feel having been browsing on Pinterest (as you do ;-). For today's card, I used a Delightful Dijon base with a mat of Night of Navy then a further layer of So Saffron. I cut a strip of Delightful Dijon lengthways at half the width, then stamped three leaves in Night of Navy and cut them out using the Leaflets framelits. I coloured a couple of these with my blender pen and Night of Navy ink, then having positioned the negative die cut on top of the So Saffron layer, I stamped three additional leaves in Navy onto the So Saffron layer in the spaces. I coloured these leaves using a blender pen and my Night of Navy and Delightful Dijon markers. 

To complete the design, I adhered the negative die cut to my card base using dimensionals, then aligned two of the cut-out leaves to the right side top and bottom, again using dimensionals, then stamped the sentiment in navy directly onto the So Saffron layer in the centre of the card. 

Do visit the other Design Team members to see how they used this week's challenge colours; there's lots of inspiration over on their blogs too!

Enjoy your day and I'll be back tomorrow with another project; until then, happy stampin'!


Stampin' Up! Supplies Used:

  • Lighthearted Leaves Photopolymer Stamp Set
  • Leaflets Framelits Dies
  • So Saffron A4 Cardstock
  • Night Of Navy Classic Stampin' Pad
  • Night Of Navy A4 Cardstock
  • Delightful Dijon A4 Cardstock
  • 2015-2017 In Color Stampin' Write Markers
  • Blender Pens
  • Big Shot
  • Magnetic Platform


Snow Place Sneak Peek Penguin Christmas Card

by Joanne James27. August 2015 08:05

Today it's time for a new challenge over at Create With Connie and Mary and this week we have a great colour challenge for you:


Here's my card: 


I am loving these cute little penguins (and the snowmen!) in the 'Snowplace' stamp set and the co-ordinating framelits make cutting them and their accessories out a cinch! For today's card, I used a Pool party base with a strip of Whisper White, onto which I stamped my penguins directly using the new Basic Black Archival ink. Each of them is peeking out of a hole punched with my 1 1/2" circle punch into a strip of School House DSP and their accessories stamped in a combination of Basic Black and Watermelon Wonder, which are popped up on dimensionals for a little added lift. I customised the sentiment as it wouldn't fit as per the stamp onto my card front; I continued the remainder inside, where I also added a few festive snowflakes to pretty things up a bit:


Isn't that fun? I have used this set so much already and I just know that I will get lots more use from it - it's already a favourite with my daughter!

Do visit the other Design Team members to see how they used this week's challenge colours; there's lots of inspiration over on their blogs too!

Enjoy your day and I'll be back tomorrow with another project; until then, happy stampin'!


Stampin' Up! Supplies Used:

* Snow Place - available September 1st

* Snow Friends Framelits - available September 1st

  • Big Shot
  • Magnetic Platform
  • 1-1/2" Circle Punch
  • Schoolhouse Designer Series Paper
  • Pool Party A4 Cardstock
  • Pool Party Classic Stampin' Pad
  • Watermelon Wonder Classic Stampin' Pad
  • Whisper White A4 Cardstock


Mini Catalogue

BROWSE THE CATALOGUE

The mini catalogue is now live! Read and download your copy here.

Shop Online

Access my online shop 24 x 7, 365 days of the year:

Current March hostess code:

S9F2XJJW

Shop Online

Join My Team

It's always a great time to join Stampin’ Up! New team members can get £130 worth of products for only £99 + free business supplies + free shipping + all the fun being a part of Stampin’ Up! Stampin' Up! has something for everyone: join my growing team and benefit from my support to enjoy Stampin' Up! however you choose.

If you're interested, call me for a chat to understand how I can help you realise your goals. Alternatively, if you have already decided to sign up and you just can't wait, please click here for the link to the online form where you can sign up and order your starter kit right away! 

Latest Kit!

Stampin Cut and Emboss

The Rock Legend Kit has all you need to make 8 cards with coordinating envelopes. Along with the new Panda Friends Kit, both are available from January 4th for just £14 each - get yours here!

2023-24 Annual Catalogue

BROWSE THE CATALOGUE

Click on the catalogue for a full list of current SU! supplies - if you would like to order any of the items featured, please drop me a line at [email protected] or give me a call on 07773 421446 - I'd be happy to help.

New Online Exclusives

There will be new products available exclusively in the online store from 5 March - check them out here.

About Me

Hi I'm Joanne and live in Northampton and when I'm not looking after my husband and two beautiful children, am an avid crafter with a passion for all things Stampin' Up!

I must confess that I have never been a big rubber stamper - until I discovered Stampin' Up! that is. I love the fact that I can get such great results with co-ordinating stamps, inks, papers and punches - the possibilities are endless! Join me on my stamping journey as I share the things I love and be inspired to create amazing things yourself!

Follow Me

Monthly Newsletter

Box Builder

Click the button above to use Box Buster to create your custom box design using the Envelope Punch Board!

Kits Collection Now Available!

Stampin Cut and Emboss

The new Kits Collection from Stampin' Up! is now available!

Click here to see the current kits available and order yours online today.

I Design For


Stampin' Up Stuff

This is my personal blog and is not endorsed by Stampin’ Up! I hope you find it a plentiful source of ideas and personal inspiration but please don't copy my designs for contest submission or use for classes, publication or sale without express permission.