No One Loves Like Grandma And A Special Announcement AYSI209

by Joanne James13. September 2019 13:00

It's Friday - hurrah! Who else is ready for the weekend? Today before I share my card with you, I have an exciting announcement: I am joining the As You See It Challenge Team as one of their new designers! Those of you who follow my blog will know how much I enjoy playing along with the AYSI fortnightly challenges, so I was delighted when the lovely Heather Cooper asked me to join their team, especially as it includes a number of my fellow blogger friends, including Jan Clothier of Thinking Stamping and my faithful team mate over at The Paper Players, the lovely LeAnne Pugliese of WeeInklings fame. So today's card is my first for the AYSI team and we have a great theme for you this week - check it out here:


This one was a really easy one for me - my most-used tool in my craft room (after my die-cutting machine) is my set of Stitched Shapes Dies, specifically my Stitched Circles Dies; I use them all of the time! I love the way they add just the right amount of detail to a sentiment shape and that is how I used it today on my card, based on the current Global Design Project #GDP206 sketch (included at the bottom of today's post). Here's my card:


Here's the low-down on today's card:

Grandma's House - Whilst lots of the team created Christmas cards this week, not me: September is the month of birthdays in my family with many of us, myself included, who are celebrating. This does mean it is a super-busy time for cardmaking and keeps me working on non-Christmassy things too at this time of year! Yesterday it was the turn of my Mother-In-Law, who is also the much-loved Granny to my James Juniors and has another 2 grandchildren to boot. As soon as I saw the 'Grandma's House' stamp set in the annual catalogue, I knew that I would have to get it - so many of the sentiments in this set apply to our very own Grandma!  

Stitched Shapes For Everything - I used my Stitched Circle to house my sentiment at the centre of the main focal point of my card. I just love these Stitched Shapes - I use them in so many ways (just search 'Stitched Shapes Dies' on my blog and you will get a ton of inspiration!) and think that extra detail finishes off an ordinary shape perfectly.  

A Festive Flower - I decided that instead of just leaving my stitched circle as a single layer, I would use it as the centre of a flower to tie it in with my floral border that is stamped with another of the stamps in the 'Grandma's House' set and coloured with my Blends. I added a punched circle for a thin border then created a bunch of petals using ... can you tell what punch I used? It's actually the Christmas Bulb Builder punch (top marks if you spotted it!!) I punched a few then snipped through the base of each approx. 1cm and overlapped the ends and glued them in place, then added them to my centre to create a slightly dimensional flower. I added a little wooden heart from my stash that I heat embossed with (retired) Lovely Lipstick coloured embossing powder and a couple of enamel dots to finish my card front. I love these fresh colours, courtesy of the current challenge over at SUO Challenges, carried my design through to the inside of my card too:


Here is the visual summary of the key products used on today's project for you to pin for easy reference:


You can see all of my 'How To' summaries on my 'How To - Tips and Techniques' Pinterest board in case you've missed any. 

So what is your 'go to' die or punch? Do leave me a comment below - I would love to know what your favourite item is and why! Why not make something with it and share with us over at As You See It too - you can check out the inspiration from the other As You See It team members whilst you're there and see if they share your favourites.  

Enjoy your day and I'll be back tomorrow with another project. Until then, happy stampin'!


Stampin' Up! Supplies Used:

Table built using Product Table Builder by The Crafty Owl - Independent Stampin' Up! Demonstrator.
 

Detailed Deer Craft Retreat Pillow Gift and Christmas Card

by Joanne James20. November 2018 19:00

I've been busy decorating today so I'm a little later with my post again. Hopefully it's worth the wait though: I'm sharing another of the pillow gifts that the lucky ladies received on my Creative Escapes Craft Retreat a few weeks ago, and a co-ordinating card that I made to go with it since I decided I liked the box design so much! Firstly, here is the pillow gift box:


I liked the box so much when I got home I made another one and decided to make a card using same design to co-ordinate with it:


Here's the low-down on today's projects:

Luscious Layers - There's so much I love about this card! My most favourite thing is the layering of the diecuts to create the focal point. I used a Stitched Label, the jumping deer from the Detailed Deer Thinlits and a 'merry' in copper foil from the Merry Christmas Thinlits dies. Gorgeous, even if I say so myself!

And More Joyous Noel - The paper I used that inspired my centrepiece is from the gorgeous copper-foiled Joyous Noel paper pack. This paper is now sold out across the globe, so I hope you already have a stash as it's my favourite this season and I still have projects using it to share with you.  

Merry Christmas In Many Ways - The Merry Christmas To All bundle allows you to create many different festive sentiment combinations for the holiday season with a combination of stamps and dies. I used two different combinations for my card and box to give you a flavour of the flexibility it offers. the diecuts are quite large and perfect if a statement sentiment is the order of the day. 

I'm linking my card up with the current challenges over at Just Add Ink where they are looking for big bold sentiments and Fusion where the sketch inspired the layout for today's Christmas card (I flipped it and used the mirror image).


Here is the visual summary of the key products used on today's project for you to pin for easy reference:


You can see all of my 'How To' summaries on my 'How To - Tips and Techniques' Pinterest board in case you've missed any. 

Finally here is a photograph of both of my projects together:

Enjoy your evening and I'll be back tomorrow with another project. Until then, happy stampin'!


Stampin' Up! Supplies Used:

Table built using Product Table Builder by The Crafty Owl - Independent Stampin' Up! Demonstrator.

Country Lane Happy Harvest Blessings PP409

by Joanne James9. September 2018 09:00

I took a few days away from my blog - call it a little birthday gift to myself as I was celebrating being another year older on Friday! It hasn't stopped me creating though and as it's Sunday you all know what that means: it's time for this week's new challenge over at The Paper Players! It's the turn of our returning Player, the lovely Anne Marie Hile, to host this week and she has a gorgeous colour challenge for you to work with:

    No automatic alt text available.

These colours were asking for something natural and autumnal and I decided to do another make using products from one of my current favourite suites, the Country Lane Suite, for my card today and I used the current sketch over at Inspire.Create for the layout of my card - take a look:


Here's the low-down on today's card:

My Colour Of Choice - I decided to use the Country Lane designer series paper that you see as the two outer vertical border strips as the starting point for my card today, so decided that my colour of choice in addition to the Mint Macaron, Crumb Cake and Blackberry Bliss chosen by Anne Marie would be Early Expresso - a rich, dark brown that outlines the cotton on the paper. I used it to heat emboss the outlines of my jug and floral stem arrangement, and to ink my Pinewood Planks embossing folder for my background stitched circle, then finally for my sentiment strip. Whilst there is a lot of white elsewhere on my card, I am counting this as a neutral rather than a colour in its own right.

Lots of Layers -  I couldn't resist adding lots of layers to my focal point; in addition to my fussy cut flower jug, I added an embossed stitched circle and a stitched label in Blackberry Bliss. Sometimes it just has to be the way to go!

An Embellishment or Two - I finished my card with some Blackberry Bliss natural twine and faceted jewels; this adds a bold pop of colour in addition to the purple berries in my floral jug. 

Here is the visual summary of the key products used on today's project for you to pin for easy reference:


You can see all of my Product and 'How To' summaries on my 'How To - Tips and Techniques' Pinterest board in case you've missed any. 

I really love this Country Lane set - it is so versatile and lends itself to lots of great autumn-inspired cards and the blooms are great for a spot of colouring with Blends too.

Before you reach for your ink and papers, check out what our amazing team has created to inspire you this week:

Here's a quick recap of our challenge rules:
 
1.  Create a new paper project
2.  Upload your creation to your blog with a link back to us and provide a direct link to the post featuring your challenge submission.
3.  Please link your card to no more than four challenges, TOTAL.
4.  Have FUN!

I can't wait to see what you create with this week's colours and look forward to visiting your blogs this week! Enjoy the rest of your weekend as it will be over all too quickly. I'll be back tomorrow with another project; until then, happy stampin'!


Stampin' Up! Supplies Used: 

Table built using Product Table Builder by The Crafty Owl - Independent Stampin' Up! Demonstrator.

Fairies and Cherries For The Paper Players PP406

by Joanne James19. August 2018 09:00

Another week of school summer vacation in the James household this week! Today it's Sunday and time for this week's new challenge over at The Paper Players. It's the first challenge for our returning Paper Players designer, the lovely Anne-Marie Hile, this week so be sure to pop by her blog with a friendly 'hello'. It's the turn of the super-talented Sandy to host this week and she has a clean and simple challenge for us to work with:
    

Remember in addition to the theme of "fruits and vegetables", this week is a Clean-and-Simple (CAS) challenge!  What do we mean by CAS?

  • Minimal layers and embellishments
  • Plenty of open space, aka "white" space
  • Simple and uncluttered

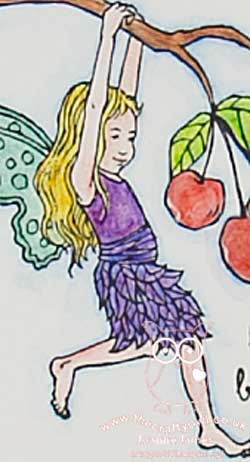
Having trawled through my collection of current stamps, it turns out I have very few with fruit (or veg!) for that matter, so a little creative stamping was called for. I actually found some fruit 'hidden' in the Fairy Celebration stamp set - take a look:
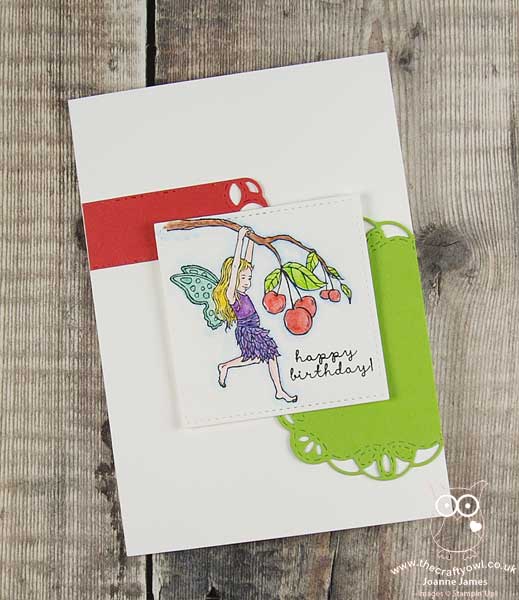
 

Here's the low-down on today's card:

This little fairy happens to be hanging from a cherry tree, so a little watercolouring using my new watercolour pencils and an aquapainter (I am so happy that we have more of these now, the new colours in the second pack available exclusively this month extend the variety of colours and allow much greater flexibility - don't leave it too late to get yours!) was all I needed to create a focal point for my card. I added some clear Wink of Stella to the fairy wings and some fine tip glue to the cherries to give them a glossy finish - both of which are difficult to see from the photos, but add subtle detail in real life.

I decided to use the sketch over at CAS(E) This Sketch this week for my layout, and used a couple of pieces cut with my Stitched Labels Framelits then trimmed to add interest behind my main image. I have seen these Stitched Labels Framelits used on some fabulous cards elsewhere on the internet and hold my Paper Player team mate LeAnne responsible for me 'needing' to add them to my own collection (check out her blog for some great examples of how to use them!) so thought I would try something a little different with them. The two blocks of colour mirror the colouring on my cherries and leaves and add detail, without encroaching too much into my white space and maintaining my overall clean and simple feel.

And that's all there is to it: clean and simple - done!

Here is the visual summary of the key products used on today's project for you to pin for easy reference:
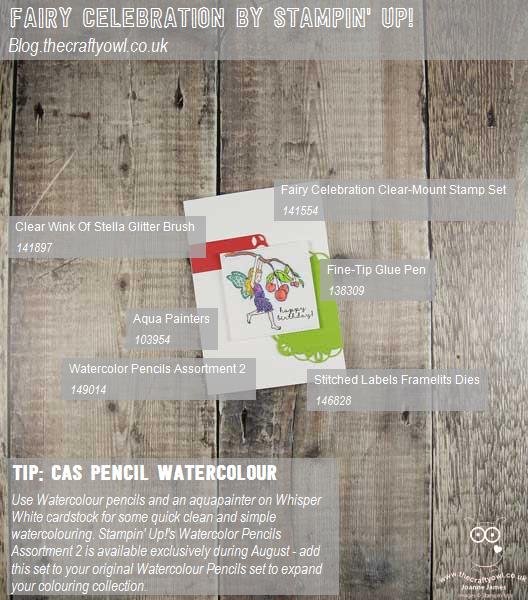
 

You can see all of my Product and 'How To' summaries on my 'How To - Tips and Techniques' Pinterest board in case you've missed any. 

Before you reach for your ink and papers, check out what our amazing team has created to inspire you this week:

Here's a quick recap of our challenge rules:
 
1.  Create a new paper project
2.  Upload your creation to your blog with a link back to us and provide a direct link to the post featuring your challenge submission.
3.  Please link your card to no more than four challenges, TOTAL.
4.  Have FUN!

You can see all of my 'How To' summaries on my 'How To - Tips and Techniques' Pinterest board in case you've missed any. 

Enjoy your day and I'll be back tomorrow with another project: a Christmas card featuring some sneak peeks of some great new products from the forthcoming seasonal catalogue. Do come back then, you won't want to miss it. Until then, happy stampin'!


Stampin' Up! Supplies Used: 

Table built using Product Table Builder by The Crafty Owl - Independent Stampin' Up! Demonstrator.

New Online Exclusives

There are new products available exclusively in the online store from 5 November - check them out here.

Latest Kits!

Stampin Cut and Emboss

The Layered Landscapes Kit and Nature's Paintings Kit are the latest kits in the online store - get yours here!

Shop Online

Access my online shop 24 x 7, 365 days of the year:

Current November hostess code:

9NKXDTTR

Shop Online

Mini Catalogue

BROWSE THE CATALOGUE

'Tis The Season - the new Stampin' Up! Mini Catalogue is here! For more details and to download your copy click here

Scrapbooking

Stampin' Up! has introduced a new range of 12x12" scrapbooking product and kit - the full range is now available to purchase online. To download a copy of the new digital Scrapbooking Catalogue click here.

2024-25 Annual Catalogue

BROWSE THE CATALOGUE

Click on the image to download your copy of the 2024-25 annual catalogue. For a full list of current SU! supplies, go to my online store. If you would like any help or advice, please drop me a line at joanne@thecraftyowl.co.uk or give me a call on 07773 421446 - I'd be happy to help.

Join My Team

It's always a great time to join Stampin’ Up! New team members can get £130 worth of products for only £99 + free business supplies + free shipping + all the fun being a part of Stampin’ Up! Stampin' Up! has something for everyone: join my growing team and benefit from my support to enjoy Stampin' Up! however you choose.

If you're interested, call me for a chat to understand how I can help you realise your goals. Alternatively, if you have already decided to sign up and you just can't wait, please click here for the link to the online form where you can sign up and order your starter kit right away! 

About Me

Hi I'm Joanne and live in Northampton and when I'm not looking after my husband and two beautiful children, am an avid crafter with a passion for all things Stampin' Up!

I must confess that I have never been a big rubber stamper - until I discovered Stampin' Up! that is. I love the fact that I can get such great results with co-ordinating stamps, inks, papers and punches - the possibilities are endless! Join me on my stamping journey as I share the things I love and be inspired to create amazing things yourself!

Follow Me

Monthly Newsletter

Box Builder

Click the button above to use Box Buster to create your custom box design using the Envelope Punch Board!

Kits Collection Now Available!

Stampin Cut and Emboss

The new Kits Collection from Stampin' Up! is now available!

Click here to see the current kits available and order yours online today.

I Design For


Stampin' Up Stuff

This is my personal blog and is not endorsed by Stampin’ Up! I hope you find it a plentiful source of ideas and personal inspiration but please don't copy my designs for contest submission or use for classes, publication or sale without express permission.