Bright Secret Garden Blooms

by Joanne James3. May 2014 21:56

What a lovely day - the weather here in the UK today has been glorious! We went to a restaurant for family breakfast, I baked and I even managed to get a little gardening done today; all in all a great start to the Bank Holiday weekend. Today's card uses the sketch layout over at Freshly Made Sketches and the colour combination of clashing pinks and oranges over at Colour Q this week:

 I based my card on the dress in the colour inspiration photo - here is my card:

 I used the retired Pretty in Pink for the card base and stamped a border across the bottom in the same colour using the butterfly from the 'This Day Forward' stamp set to add some background pattern. I used a doily semi-circle for shape and used a trio of flowers stamped from the Secret Garden stamp set and cut out with the co-ordinating framelits. I wanted to keep the flowers bold and bright, so I stamped them on the same colour cardstock and then used my aquapainter to wash more ink across the petals. I tucked in some Old Olive leaves behind and finished the flowers with some pearl centres and a Calypso Coral statement bow.

This card is much more feminine and girly than my usual style, but I like the way it turned out.

Back tomorrow with another card; until then, happy stampin'!


Stampin' Up! Supplies Used:

Table built using Product Table Builder by The Crafty Owl - Independent Stampin' Up! Demonstrator.

Tags: , , , , , , ,

Cards | Stamping

Video Tutorial: For My Mother Flowerpot Card

by Joanne James10. April 2014 21:48

Good evening everyone! If you are a regular reader of my blog, you will remember the flowerpot card I designed for the Pals Paper Arts Colour Challenge a few weeks ago (click here if you would like to see the card). I was thrilled that this card was chosen as a Pals Paper Arts Top Pick that week (check out my Pinterest Board here if you would like to see which of my other cards are challenge winners!). I made this card with Mother's Day in mind, but it would work equally well for a female birthday card for someone special.

Well, I got so many email requests for a tutorial on how I made this card, I made another card in an alternative colourway and recorded a video tutorial as I made it to show you exactly how it's done. It has taken me a little while to get it online, because although I recorded the video promptly the editing then took a back seat, along with a few other tutorials that are still waiting for the magic touch! Anyway, all done now and better still - the Secret Garden Framelits are available at the bargain discount price of £15.71 this week as part of the Stampin' Up! Wednesday Weekly Deals offers, so if you fancy having a go at making this card now is the time to snap them up! Here is a picture of my second version of my flowerpot card:

My original card was made in Crumb Cake, Rose Red, So Saffron and Wild Wasabi; this alternative version is made in Sahara Sand, Perfect Plum, Blushing Bride and Old Olive. The finished card measures 6" x 6" square and will fit a standard envelope (make sure you don't stick the central leaf shape too high!). The video also shows what the card looks like on the reverse (especially for you, Cindy B ;-) ) in case you're curious.

So without further ado, here is the video tutorial - enjoy!


Back tomorrow with another project; until then, happy stampin'!


Stampin' Up! Supplies Used:

Table built using Product Table Builder by The Crafty Owl - Independent Stampin' Up! Demonstrator.


Flowerpot Fun

by Joanne James17. March 2014 21:45

I've had a great start to my week today with a pleasant morning smelling fragrances and catching up with some good friends. Today I'm sharing my entry for this week's Paper Pal Arts Colour Challenge:

When I saw these colours, I immediately thought how lovely they would be for a spring flower bouquet. I decided to get out my Secret Garden stamp set and framelits and start creating - here's my card:

Not quite a bouquet, granted - I went for a Crumb Cake flowerpot instead! I then stamped a variety of flowers, colouring some of them with ink and a blender pen and layered them, raising some of them on dimensionals, to fill my flowerpot. A few Wild Wasabi leaves to add some green and a 'For my mother' gift tag complete my card. I think this would make a lovely Mother's Day card and the flowers would certainly last longer than the real thing.

Only two more weeks until Mothering Sunday here in the UK, so if you haven't thought about your cards yet, you'd better get started! I hope you liked today's card - back tomorrow with another project; until then happy stampin'!


Stampin' Up! Supplies Used:

Table built using Product Table Builder by The Crafty Owl - Independent Stampin' Up! Demonstrator.


Mixed Bunch Meets Gorgeous Grunge

by Joanne James28. February 2014 21:01

Today I have a quick card for you which was inspired by both the sketch over at The Paper Players this week and last week's trio of colours over at Dynamic Duos. Here is Jaydee's sketch over at the Paper Players:

And here is my card:

I toyed with going with a literal interpretation of the sketch using nothing more than various papers for the design, but instead I decided to go down a different route and use a combination of washi tape to create my 'stripes', with a tone-on-tone Mixed Blossom flower as my focal point. I then used one of my Gorgeous Grunge stamps to add some interest to the background. This card was something of an experiment but I love the bright, bold colours and the addition of a green stem is just enough to lift the other key colours. I'm also just in time to link up with 'Less is More' where the challenge this week is to add metal to your card - whilst there is only one candy dot brad on my card, I think it serves an important purpose in bringing the whole design together.

That's all from me today; back tomorrow with another project. until then, happy stampin'!


Stampin' Up! Supplies Used:

Table built using Product Table Builder by The Crafty Owl - Independent Stampin' Up! Demonstrator.


Scalloped Tag Meets Hardwood

by Joanne James26. February 2014 14:09

Today I've a card quite different to yesterday's - I finally caved and purchased the Hardwood background stamp, having seen so many beautiful samples of it on other people's cards and projects. I almost didn't, as I already own Woodgrain and the Wood embossing folder; but I loved the panelled effect so in my basket it went and I have inked it up for the very first time for this project. I am taking my colour inspiration from CAS Colours and Sketches this week and the tag focal point of my card was inspired by the sketch over at Retrosketches, where tags are the order of the day:

So without further ado, let me share my card with you:


With the Hardwood stamp as my neutral whitewashed background, I used a combination of Secret Garden flowers along with a little pink one from Petite Petals to decorate my tag, the tag itself being punched with the Scalloped tag Topper Punch (such a versatile punch!). I then decorated my tag with a doily, an in-colour embellishment in Strawberry Slush, a Daffodil Delight candy dot and some lovely Smoky Slate Chevron Ribbon tied with some yellow seam binding ribbon along with a double-layered sentiment tag. I'm hoping I didn't get too carried away to qualify for CAS Colours and Sketches this week - I ended up with more layering and detail than I originally intended when I started out with this card, but I must say I really like the effect and love the colour combination.

That's all from me today - back tomorrow with another project. until then, happy stampin'! 

Stampin' Up! Supplies Used:

Table built using Product Table Builder by The Crafty Owl - Independent Stampin' Up! Demonstrator.


Happy 70th Birthday Ann!

by Joanne James3. September 2013 21:51

Today I'm sharing a birthday card commission that I made for my sister-in-law's very special Mum, who celebrates her 70th birthday today. I decided to use a combination of some of my favourite of this year's in-colours and the lovely Secret Garden framelits. Here's the finished card:
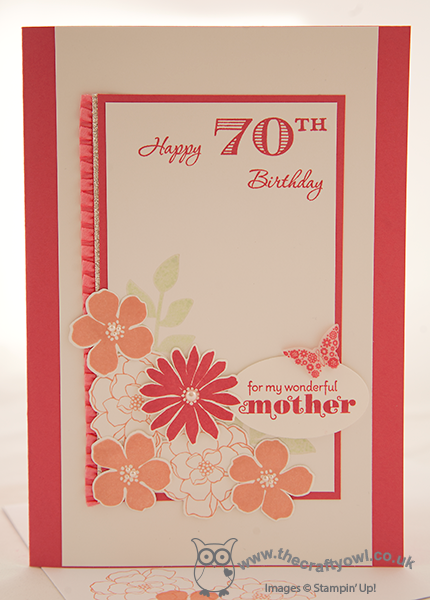
I love the pretty ruffle trim ribbon and added a tiny sliver of silver glimmer paper to add a little sparkle. I must confess to having had a few failed attempts before producing a card that I was really happy with - I needed this card to be 'just right' and am pleased to say I was happy with the finished result. Here's a quick picture of the card I made for Ann to wish her a special 70th birthday: 
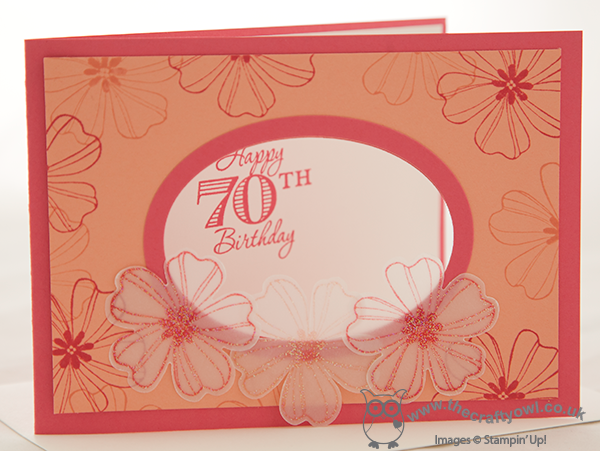
Not the best of photographs, I'm afraid - when flat you can see the sentiment through the aperture cut with an oval framelit - but hopefully good enough to give you an idea. This one uses a similar colour scheme and the Flower Shop stamp set - check out the vellum flowers on the front, which I stamped then heat embossed with Iridescent Ice for a lovely sparkle.

One last thing on my original card: did you notice the little butterfly stamped on vellum that highlighted my label? Here's a close-up:
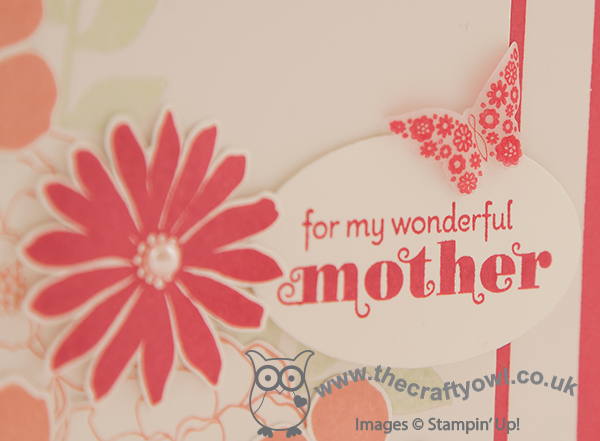
 

This is one of the butterflies in the Papillion Potpourri stamp set, punched out with the Bitty Butterfly punch - these are the items on offer at 15% off when you buy them together before 30th September - you can read more about this offer here.

Both James Juniors are back at school tomorrow; whilst I'll miss them not being at home, I can't deny that I'm looking forward to getting back into my craft room for a bit more creating - lots to do!

Do come back in the next day or so to see what I've been creating; I'm looking forward to sharing some of my Christmas ideas and September is a month of birthdays for me, so I'll have lots on this front too. Until next time, happy, stampin'!


Stampin' Up Supplies:

Stamps: Secret Garden, Delightful Dozen, Memorable Moments, Papillion Potpourri

Cardstock: Whisper White, Strawberry Slush, vellum

Ink/Stampin' Write Markers:  Strawberry Slush, Crisp Cantaloupe, Pistachio Pudding

Tools: Secret Garden Framelits, Oval Framelits, Bitty Butterfly Punch, Stamp-a-ma-jig

Finishing Touches: Strawberry Slush Stretch Ribbon Trim, Silver Glimmer Paper, Basics Pearls

Secret Garden One Sheet Wonder - Part Two

by Joanne James20. June 2013 22:00

Today I'm sharing another of the cards from last week's Secret Garden One Sheet Wonder class with you. This card also uses single stamped images of three of the flowers in the set which are then cut out using the co-ordinating framelits and layered onto a smaller piece of patterned cardstock as a background:

This card has more detailed to it with lots of layering and looks very crisp on a white background. We had a lot of fun creating our cards using the One Sheet Wonder and the nice thing is that even though we all followed the same basic layout, everyone's cards looked different.

I really enjoyed the One Sheet Wonder - look at how many cards you can make with just one sheet of patterned stamped paper:


Come back tomorrow to see another project. Until then, happy stampin'!


Stampin' Up Supplies:

Stamps: Secret Garden, Sassy Salutations

Cardstock: Whisper White, Pink Pirouette, Old Olive

Ink/Stampin' Write Markers:  Raspberry Ripple, Pink Pirouette, Old Olive

Tools: Secret Garden Framelits

Finishing Touches: Basics Pearls


Secret Garden One Sheet Wonder - Part One

by Joanne James19. June 2013 21:00

Today I'm going to share a couple of the cards that I made with the ladies in my card classes last week. This month we decided to make a One Sheet Wonder using the Secret Garden stamp set and co-ordinating framelits. For those of you reading this who've never tried it, a One Sheet Wonder is where you create your own sheet of patterned paper using a variety of stamps and colours, then cut this into sections and use these as the basis to decorate your cards. You can cut your patterned sheet into lots of different shapes and sizes and depending on the dimensions you choose, you can make between 2 and 10 cards. I used a template based on a layout by LeAnn Greff, although modified slightly to suit my purposes. Our template made 10 cards in total. Here are the 4 cards we made in class:

And here's a close up of one of the cards in our set:

This is quite a simple card and quick to pull together - by carefully choosing the colours and adding some luxurious ribbon it turns it from something ordinary into something classic.

Come back tomorrow to see the other cards in the set. Until then, happy stampin'!


Stampin' Up Supplies:

Stamps: Secret Garden, Sassy Salutations

Cardstock: Whisper White, Raspberry Ripple, Pink Pirouette, Old Olive

Ink/Stampin' Write Markers:  Raspberry Ripple, Pink Pirouette, Old Olive

Tools: Secret Garden Framelits, Scallop Edge Border Punch

Finishing Touches: Raspberry Ripple 3/8" Stitched Satin Ribbon


New Online Exclusives

There are new products available exclusively in the online store from 5 November - check them out here.

Latest Kits!

Stampin Cut and Emboss

The Layered Landscapes Kit and Nature's Paintings Kit are the latest kits in the online store - get yours here!

Shop Online

Access my online shop 24 x 7, 365 days of the year:

Current November hostess code:

9NKXDTTR

Shop Online

Mini Catalogue

BROWSE THE CATALOGUE

'Tis The Season - the new Stampin' Up! Mini Catalogue is here! For more details and to download your copy click here

Scrapbooking

Stampin' Up! has introduced a new range of 12x12" scrapbooking product and kit - the full range is now available to purchase online. To download a copy of the new digital Scrapbooking Catalogue click here.

2024-25 Annual Catalogue

BROWSE THE CATALOGUE

Click on the image to download your copy of the 2024-25 annual catalogue. For a full list of current SU! supplies, go to my online store. If you would like any help or advice, please drop me a line at joanne@thecraftyowl.co.uk or give me a call on 07773 421446 - I'd be happy to help.

Join My Team

It's always a great time to join Stampin’ Up! New team members can get £130 worth of products for only £99 + free business supplies + free shipping + all the fun being a part of Stampin’ Up! Stampin' Up! has something for everyone: join my growing team and benefit from my support to enjoy Stampin' Up! however you choose.

If you're interested, call me for a chat to understand how I can help you realise your goals. Alternatively, if you have already decided to sign up and you just can't wait, please click here for the link to the online form where you can sign up and order your starter kit right away! 

About Me

Hi I'm Joanne and live in Northampton and when I'm not looking after my husband and two beautiful children, am an avid crafter with a passion for all things Stampin' Up!

I must confess that I have never been a big rubber stamper - until I discovered Stampin' Up! that is. I love the fact that I can get such great results with co-ordinating stamps, inks, papers and punches - the possibilities are endless! Join me on my stamping journey as I share the things I love and be inspired to create amazing things yourself!

Follow Me

Monthly Newsletter

Box Builder

Click the button above to use Box Buster to create your custom box design using the Envelope Punch Board!

Kits Collection Now Available!

Stampin Cut and Emboss

The new Kits Collection from Stampin' Up! is now available!

Click here to see the current kits available and order yours online today.

I Design For


Stampin' Up Stuff

This is my personal blog and is not endorsed by Stampin’ Up! I hope you find it a plentiful source of ideas and personal inspiration but please don't copy my designs for contest submission or use for classes, publication or sale without express permission.