Driving Home For Christmas Card

by Joanne James21. September 2017 05:00

Today I'm sharing a card for this week's TGIF Challenge and uses the sketch layout over at Fusion:


I'm back with a Christmas card today featuring another of the festive Christmas Around The World DSP patterns - take a look:


Here's the low-down on today's card:

Driving Home For Christmas - I'm still in Christmas mode as far as my card making is concerned, but that didn't stop me joining with the TGIF team this week - with sleighs, donkeys and so much more besides, there are festive transportation options a-plenty! I decided to have another crack at using the Christmas Around The World designer series paper and specifically another of the larger designs featuring festive cars and bicycles, all transporting Christmas trees and piles of luggage and festive gifts across the sheet. The design on this sheet of paper totally makes me think of the Christmas song made famous by Chris Rea called 'Driving Home For Christmas' - I made this card and was humming the tune for ages afterwards (apologies if that's you now having read today's post!) Whilst I used a smaller piece of the paper compared to my nutcracker card earlier this week (you can see that card here), I still made sure I cut a piece that fitted with the theme of my card so that the little cards and bikes  are clearly identifiable.  

And Hearts Too - I matched my paper with a sentiment from the 'Hearts Come Home' stamp set, which also fit perfectly with my theme. I stamped it on a stitched circle and added a couple of Real Red enamel hearts and a trio of snowflakes from the 'Hang Your Stockings' set across the bottom for additonal decoration. 

There's Always Room For  A Bow - Lastly, I added a wooden bow from the co-ordinating Christmas Around The World embellishment set. A nice finishing touch to bring the elements together. 

Here is the visual summary of the key products used on today's project for you to pin for easy reference:


You can see all of my 'How To' summaries on my 'How To - Tips and Techniques' Pinterest board in case you've missed any. 

I have another busy day today so enjoy your day and I'll be back tomorrow with another project. Until then, happy stampin'!


Stampin' Up! Supplies Used:

Table built using Product Table Builder by The Crafty Owl - Independent Stampin' Up! Demonstrator.

Softly Falling And Hang Your Stocking - A Perfect Pair

by Joanne James11. December 2016 09:00

It's Sunday and time for a new challenge over at The Paper Players! Before I get into my post, I must just give a shout out to the lovely Linda, Hannelie and Colleen who have been the most awesome guest designers with us for the last six months; these ladies have done a fabulous job and I will miss your contributions and do hope you continue to play along with us from time to time. Thank you for sharing your designs and creativity with us! Whilst we are sad to see these ladies leave, it also means we will have some new guest designers joining us too; watch out for more news on this with my mid-week reminder post on Wednesday to see who will be joining us to kick off 2017!

Meanwhile, it's the turn of the lovely Jaydee to host this week and she has a glamorous colour challenge for us to work with:
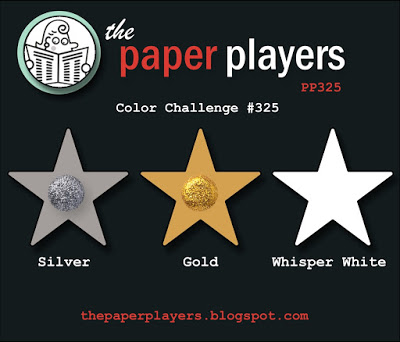
    

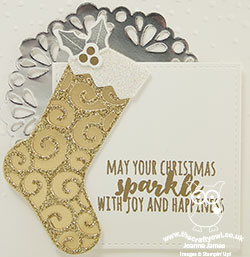
All the sparkle of silver and gold, paired with brilliant white! I decided that a glamorous stocking was going to be my focal point today and I also used Amy's sketch over at Freshly Made Sketches for my layout - here's my card:
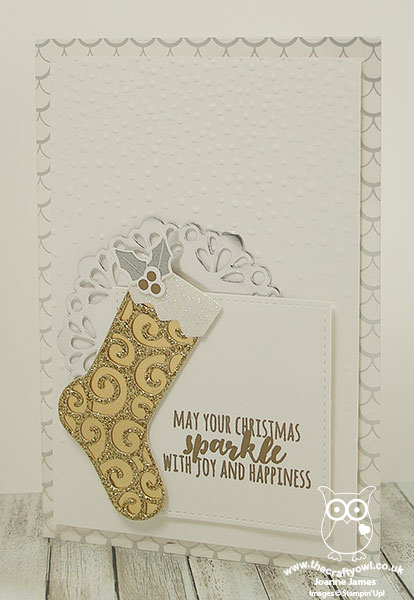
 

My card today is another one with lots of layers and a variety of foil and glimmer paper to add lots of sparkle: my diecut stocking is gold foil layered with gold glimmer and a white glimmer top with embossed holly decoration, I layered a silver foil doily behind and added a piece of silver foil acetate between my white cardbase and mat, which I embossed with my favourite embossing folder of all time, Softly Falling, for added detail. I used my Stitched Shape Framelits for my sentiment square (you will be pleased to know theses will be available to order again early January in time for Sale-A-Bration - yay!) and chose a sentiment from the Christmas Pines stamp set to complete my card as this seemed the most appropriate, which I also heat embossed in gold.

This is the kind of stocking I imagine someone like Joan Collins to own (or maybe Donald Trump, since he seems to be a fan of all things glitzy and gold!) - either way, definitely all about the luxury! I'm more of a traditional red and white girl myself :-)

Here is the visual summary of the key products used on today's project for you to pin for easy reference:
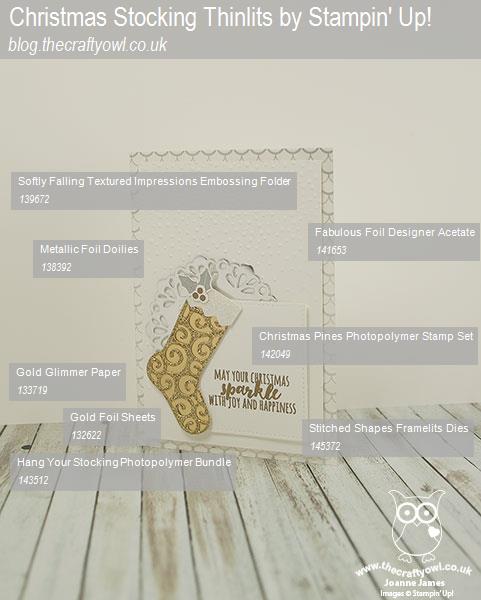
 

You can see all of my Product and 'How To' summaries on my 'How To - Tips and Techniques' Pinterest board in case you've missed any. 

Before you reach for your ink and papers, check out what our amazing team has created to inspire you this week:

The Paper Players Design Team
 
 
Here's a quick recap of our challenge rules:
 
1.  Create a new paper project
2.  Upload your creation to your blog with a link back to us and provide a direct link to the post featuring your challenge submission.
3.  Please link your card to no more than four challenges, TOTAL.
4.  Have FUN! 


I look forward to seeing what you create with this colour palette this week. This morning I will be recovering from a Christmas night out yesterday and this afternoon we are officially decorating the James household for Christmas. My wreath is made and hanging proudly on my front door already, so with the tree up and the rest of the decorations in place, I'm sure it will start to feel like Christmas is well and truly on its way!

Enjoy the rest of your weekend as it will be over all too quickly; I'll be back tomorrow with another project; until then, happy stampin'!


Stampin' Up! Supplies Used:

Table built using Product Table Builder by The Crafty Owl - Independent Stampin' Up! Demonstrator.

Noel, Noel - Hang Your Christmas Stocking!

by Joanne James17. November 2016 08:05

Today it's time for a new challenge over at Create With Connie and Mary and this week we have a sketch for you:


I decided this sketch was perfect to hang my stocking - literally! Take a look:


Here's the low-down on today's card:

Hang Your Stocking - My diecut stocking is cut using the Christmas Stocking Thinlits Dies. This set has lots of fun pieces to create stockings in three different sizes and add decorative trims - so many creative possibilities! It also comes with this great Noel diecut - perfect for edging a mantlepiece or adding a border trim to patterned paper, as I've done on my card today.

A Trio of Stamp Sets For Less - The diecut stocking is the clear winner on today's card, but this creation is by no means stamp-free; in fact, I used three stamps from three different stamp sets on my holiday card, all of them available this month at 25% off - what a bargain! You can read about the offer in full here along with the details of our new stitched framelit dies (these have been incredibly popular and will only now be orderable until 21st November before orders are put on hold whilst stocks are replenished - so you need to order them in the next few days to be assured of a timely delivery); in the meantime, did you spot them all? They are the stocking heel, toe and cuff detail and mini snowflakes from Hang Your Stocking, the large snowflake from Tin of Tags and the snowflake splatter from Christmas Pines. My stamping is subtle, yet each stamp contributes to the finished card.

Sparkle and Shine - I used Heat and Shine and Dazzling Diamonds along with the snowflake splatter stamp in the Christmas Pines set to add sparkle to the white section of my card. Difficult to photograph, but in real life so pretty! My Noel is also cut from a piece of red foil cardstock that I found in my scrapbox for a little extra shine and I added a sprinkle of rhinestones to finish. I love this festive colour combination, inspired by the Presents and Pinecones Designer Series Paper set - feel free to save it if it's one you like too:

Here is the visual summary of the key products used on today's project for you to pin for easy reference:


You can see all of my 'How To' summaries on my 'How To - Tips and Techniques' Pinterest board in case you've missed any. 

Do visit the other Design Team members to see what they did with this week's sketch; there's lots of inspiration over on their blogs too!

Enjoy your day and I'll be back soon with another project; until then, happy stampin'!


Stampin' Up! Supplies Used:

Table built using Product Table Builder by The Crafty Owl - Independent Stampin' Up! Demonstrator.

New Stitched Shapes Framelits and 25% Off Stamp Sets

by Joanne James1. November 2016 07:00

I'm back today with some great news for the start of November: from today we have the early release of a new product from the 2017-18 annual catalogue, Stitched Shapes Framelits, and a product promotion!

StitchFramelit_DemoHeader_SPUK

A Great New Product

Let’s start with the Framelits: the Stitched Shapes Framelits Dies are a set of 12 dies that include four circles, four ovals and four squares that coordinate with our Layering Circles, Ovals and Squares.  Brilliant!

These new dies are available for purchase beginning November 1 – that’s today!

So, what makes these Framelits a necessity?  When run through the Big Shot, these dies leave a detailed stitch around the edge of the Framelit.  The stitched look is so on-trend right now and will add a great extra touch to your stamped projects. Here’s a video with details about the new dies and some great project ideas:


Aren't they great? You are definitely going to want to add these to your framelit collection.

Here are the measurements for these new shapes:

Circles:  1-3/8″, 1-7/8″, 2-3/8″, 2-7/8″

Squares: 1-3/16″, 1-5/8″, 2-1/8″, 2-5/8″

Ovals: 1-3/4″ x 13/16″, 2-1/4″ x 1-5/16″, 2-3/4″ x 1-13/16″, 3-1/4″ x 2-5/16″


25% Off Selected Stamp Sets

What's more, there's a promotion to run alongside the launch of these new framelits too! As if the new Stitched Shapes Dies weren’t great enough…there is also a long list of stamp sets from the Autumn-Winter Catalogue and Annual Catalogue are available for 25% off during November.  Yes, you heard it - 25% OFF! here's the complete list:


Right - I'm off to put in my order for these fabulous new framelits and then get on with my busy day of back-to-back classes. I will be back later with today's project blog post; until then, happy shopping! Oh and don't forget to use this month's hostess code SQN297RD when placing your order online to get a little thank you in the post from me!

Table built using Product Table Builder by The Crafty Owl - Independent Stampin' Up! Demonstrator.


New Online Exclusives

There are new products available exclusively in the online store from 5 November - check them out here.

Latest Kits!

Stampin Cut and Emboss

The Layered Landscapes Kit and Nature's Paintings Kit are the latest kits in the online store - get yours here!

Shop Online

Access my online shop 24 x 7, 365 days of the year:

Current November hostess code:

9NKXDTTR

Shop Online

Mini Catalogue

BROWSE THE CATALOGUE

'Tis The Season - the new Stampin' Up! Mini Catalogue is here! For more details and to download your copy click here

Scrapbooking

Stampin' Up! has introduced a new range of 12x12" scrapbooking product and kit - the full range is now available to purchase online. To download a copy of the new digital Scrapbooking Catalogue click here.

2024-25 Annual Catalogue

BROWSE THE CATALOGUE

Click on the image to download your copy of the 2024-25 annual catalogue. For a full list of current SU! supplies, go to my online store. If you would like any help or advice, please drop me a line at joanne@thecraftyowl.co.uk or give me a call on 07773 421446 - I'd be happy to help.

Join My Team

It's always a great time to join Stampin’ Up! New team members can get £130 worth of products for only £99 + free business supplies + free shipping + all the fun being a part of Stampin’ Up! Stampin' Up! has something for everyone: join my growing team and benefit from my support to enjoy Stampin' Up! however you choose.

If you're interested, call me for a chat to understand how I can help you realise your goals. Alternatively, if you have already decided to sign up and you just can't wait, please click here for the link to the online form where you can sign up and order your starter kit right away! 

About Me

Hi I'm Joanne and live in Northampton and when I'm not looking after my husband and two beautiful children, am an avid crafter with a passion for all things Stampin' Up!

I must confess that I have never been a big rubber stamper - until I discovered Stampin' Up! that is. I love the fact that I can get such great results with co-ordinating stamps, inks, papers and punches - the possibilities are endless! Join me on my stamping journey as I share the things I love and be inspired to create amazing things yourself!

Follow Me

Monthly Newsletter

Box Builder

Click the button above to use Box Buster to create your custom box design using the Envelope Punch Board!

Kits Collection Now Available!

Stampin Cut and Emboss

The new Kits Collection from Stampin' Up! is now available!

Click here to see the current kits available and order yours online today.

I Design For


Stampin' Up Stuff

This is my personal blog and is not endorsed by Stampin’ Up! I hope you find it a plentiful source of ideas and personal inspiration but please don't copy my designs for contest submission or use for classes, publication or sale without express permission.