Punch Art Angry Birds Bookmarks

by Joanne James14. April 2013 21:38

I've been enjoying a quarterly training day with my wider Stampin'Up! team today, so have lots of lovely new craft things to share with you over the next week or so. The theme of our swaps today was 'masculine'; I'll share mine with you in the next day or two when I have a half-decent photo. Meanwhile, to get you in the mood another non-card project today, keeping with the masculine theme: I made these Angry Bird punch art bookmarks a while a go and for the 'little men' in my life, they were certainly a big hit:

Aren't they just the cutest? They take a little while to make and use lots of different punches, but they're really effective. Guaranteed to make even the most reluctant reader want to open their storybook! They also make a great party bag gift for a child's birthday, either ready made or in kit form: contact me at [email protected] if you are interested in either of these. I made lots of these so here's one more picture of the whole collection:

Back tomorrow with another project; until then, happy stampin'!


Stampin' Up Supplies:

Cardstock: Real Red, Daffodil Delight, Gumball Green, Basic Black, Whisper White, Tangerine Tango

Tools: Heart Punch, 1 3/4" Circle Punch, Small Heart Punch, Owl Punch

Tags: , , , , , , ,

3D Projects | Punch Art

Summer Smooches Meets Blossom Punch!

by Joanne James12. April 2013 16:58

Every once in a while I get a little bit more creative than usual and make something different to a card or box. I've been wanting to have a go at a paper wreath for a while and initially wanted to make a spring wreath in pastel shades, however when I received my Summer Smooches designer paper I fell in love with the bright colours and decided they would definitely enable me to create something that would brighten things up. So, after much punching, piercing and gluing, here's what I came up with: 

I used a combination of Summer Smooches and Brights designer series papers, mixed in with some solid colours, all finished off with some co-ordinating brads and a lovely piece of wide vanilla and Rich Razzleberry ribbon, sadly now retired. I love the overall fiished effect - perfect to brighten up a dull corner of the house - and not a stamp or ink pad in sight!

Here's a close up of some of the flowers: 

I think the layered flowers look really effective; another great example of what you can do with the blossom punch. You can also make a variety of stemmed flowers using this punch, but that's a blog post for another time! Meanwhile, if you would like to see more of this punch and the co-ordinating Mixed Bunch stamp set in action, join me for next week's Card and Technique class on Wednesday 17th April. The details are included in yesterday's post - if you'd like to come along, just drop me a line at [email protected].

I'll be back tomorrow with another project; until then, happy stampin'!


Stampin' Up Supplies:

Cardstock: Real Red, Tempting Turquoise, Daffodil Delight, Lucky Limeade, Island Indigo, Rich Razzleberry, Tangerine Tango, Summer Smooches DSP

Tools: Blossom Punch, 1" Circle Punch, 3/4" Circle Punch, hot glue gun

Finishing Touches: Brights Brads, Razzleberry Ribbon (retired)

Tags: , , , ,

3D Projects | Classes

Mixed Bunch Blue Quartet

by Joanne James11. April 2013 20:18

It's rained pretty much all day today, so I thought I'd share a blue card for a 'blue' mood, at least as far as the weather is concerned! This is a card I designed and made for a recent team 'Rainbow Swap'. Across my wider team, we all chose one of the colours of the rainbow, then made five cards with that colour as the basis for the colour scheme and sent them to the others in the same colour group. In return, we received a 'swap' of a different design but with the same colour scheme. I was in the Blue colour group; here is the card I made: 

I used one of the flower stamps from the Mixed Bunch stamp set and the co-ordinating Blossom Punch for my bold all-blue card. I used Pool Party as my base card, then layered flowers across the front in Island Indigo, Pool Party, Island Indigo and Midnight Muse. A simple greeting for any occasion and some ruffled ribbon and rhinestone detail on the uppermost flower added just enough sparkle to turn this card into something special. I got a lovely set of cards in return (but unfortunately haven't had the chance to photograph them - I will share them another time).

The Mixed Bunch stamp set and Blossom punch used to make this card is the stamp set that will feature in my card and technique class next week. The class will be held on Wednesday 17th April, 7.30-9.30pm. The class costs £10: we will be making four cards using the various stamps in this set and learning a number of new techniques along the way. All stamps, punches, cardstock and embellishments will be provided; all you need to bring is a basic toolkit (wet/dry adhesives, pencil, ruler, rubber, scissors, bone folder and cutter if you have one). If you would like to attend this class or any of the others currently planned, please contact me at [email protected] for more details.

I'll be back tomorrow with a 3D project made using the Blossom Punch. Until then, happy stampin'!


Stampin' Up Supplies:

Stamps: Mixed Bunch, Tea Shoppe

Cardstock: Whisper White, Pool Party

Ink/Stampin' Write Markers: Pool Party, Island Indigo, Midnight Muse

Tools: Blossom Punch

Finishing Touches: Ruffled Ribbon, basics Rhinestones

Tags: , , , , , , ,

Cards | Classes | Stamping | Swaps

Layered Spring Sampler Trio

by Joanne James10. April 2013 22:16

So all busy here in the James household; it's the Easter holidays, so something has to give and yesterday it was the blog! Back with it today, with the layered version of yesterday's Spring Sampler trio one layer card: 

It's amazing what another couple of layers and some ribbon makes, isn't it? The design is still simple, but the overall effect quite different. The layer of Melon Mambo cardstock is lifted on dimensionals to still give the 3D window effect, but unlike yesterday's card the detail is all on the front. I love the Sunshine and Sprinkles designer paper on this card and the Melon Mambo striped organdy ribbon makes it just that little bit special. I think this would make a lovely birthday card for a little girl; in fact, I have just the person in mind - better make sure I stamp a birthday greeting inside!

Back tomorrow with more stamping loveliness; until then, happy stampin'!


Stampin' Up Supplies:

Stamps: Spring Sampler

Cardstock: Whisper White, Melon Mambo, Sunshine and Sprinkles Designer Series Paper

Ink/Stampin' Write Markers: melon Mambo, Daffodil Delight, Marina Mist

Tools: 1 1/4" Square Punch

Finishing Touches: 3/8" Striped Organdy Ribbon

Tags: , , , , ,

Cards | Stamping

Another Spring Sampler Trio

by Joanne James8. April 2013 21:13

I've been really busy in my craft room today, creating swaps for a training event next weekend; not yet finished, so will share later in the week. Meanwhile, with another simple Spring Sampler card - this time a trio of stamps on a one layer card:

In order to achieve a 'false' layering effect, the three stamped images are on the 'inside' of the card and pop through the windows at the front which are outlined to give definition. The front of the card is then stamped with the sentiment 'Bloomin' Marvelous' - retired Sale-A-Bration I know, but seemed to fit so well with my gardening pictoral story/theme. Lastly, I added a rhinestone to the tulip in the bottom frame to add interest.

As much as I love simple cards, I do find one layer cards such a challenge! Tomorrow I'll show you another one I made with a similar layout to this one, but with more layers; you can compare and see the difference. Until then, happy stampin'!


Stampin' Up Supplies:

Stamps: Spring Sampler, Bloomin' Marvelous (Sale-A-Bration 2013 - retired)

Cardstock: Whisper White

Ink/Stampin' Write Markers: Raspberry Ripple, Gumball Green, Crumb Cake

Tools: 1 1/4" Square Punch, Stamp-a-ma-jig

Finishing Touches: Basic Rhinestones


Four Seasons: Spring

by Joanne James7. April 2013 19:50

A short departure from my love affair with my Spring Sampler set today to bring you a card made with the Spring stamp in the Four Seasons set. I know it's already officially British Summer Time, but the weather seems to have only reached Spring-like proportions this week, so I don't think I'm too tardy:

I used a So Saffron card base and used a section of one of the Print Poetry Designer Paper sheets as a background for interest, but only across half of the card so that it didn't overwhelm or detract from the stamp whihc is the focal point. The Print Poetry papers in the Spring-Summer catalogue are great value: 48 sheets of 11.4 x 16.5 cm paper, 4 each of 12 designs for just £6.25 and the perfect size for card making. To add depth to the Spring stamp, I firstly inked the centre circle with my marker pens and cut out using a 1 1/4" punch. Then I inked the stamp in Gumball Green and punched out with the Scalloped Circle punch, then removed the centre with the 1" punch and overlaid on the original nesting bird using Dimensionals.

I coloured this little bird blue as I'm hoping he will be a good omen: last year we had a family of blue tits nesting in the cavity wall of our house and as blue tits are known to return to nesting sites year after year, this year we mounted a nest box with bird cam over the hole in the wall. This week we have seen definite signs that the bird box has been visited, so here's hoping we get to see a blue tit family in the making - I'll keep you posted!

I'll be featuring the other stamps in the Four Seasons set in coming months; this set is exclusive to hostesses and is one of a number of products that can be yours free* if you host a party. So if you'd like to get you're hands on one, simply give me a call or contact me at [email protected] and invite your friends round for a night of creativity, shopping and fun!

Back tomorrow with another card - until then, happy stampin'!


Stampin' Up Supplies:

Stamps: Four Seasons: Spring (hostess set)

Cardstock: So Saffron, Whisper White, Print Poetry Designer Series Paper

Ink/Stampin' Write Markers: Gumball Green, Easrly Espresso, Crumb Cake, Marina Mist, So Saffron, Wild Wasabi

Tools: 1" Circle Punch, 1 1/4" Circle Punch, 2 3/8" Scallop Circle Punch


*Hostess sets are products available exclusively to party hostesses. Hostess credits are awarded on a sliding scale based on overall party sales. See online catalogue for more details.


Tags: , , , , , , ,

Cards | Host a Party | hosting | Stamping

Up, Up and Away!

by Joanne James6. April 2013 13:42

Back to blog normality to day after all the excitement of the last few days - with an earlier post than usual, as my daughter is in a swimming gala this evening so I won't be at my laptop this evening as usual. I've got a pair of cards to share with you today, both of which are one layer cards. I really struggle with one layer cards - with all the lovely cardstock, designer paper, ribbon and embellishments that Stampin' Up! offers, just to use one sheet of card is often impossible! Anyway, I challenged myself to come up with some one layer designs and so using my Spring Sampler set again - LOVE this set! - I came up with this:

I'm really quite pleased with the result - the clouds give the image lots of interest, even though it's one layer. If you look closely, you'll see that I also scored around the masked image to add depth and definition, allowing the sentiment to 'flow' over the top. The words are from a retired birthday hostess set, but were perfect for this card - they added movement and I think make it look as if the words are being carried on the wind with the balloon. Spurred on by this card, I then made a second one to the same design but using the kite stamp in the Spring Sampler set:

The scored line is more difficult to see on this one - photographing almost wholly white cards also presents something of a challenge, but you get the idea I'm sure. You could also use the Bitty Banners set for a wavy sentiment, although when I tried one I couldn't resist cutting it out and putting it on a dimensional - so no longer a one but two layer card!

Hope you like this pair of cards - I really like them and they spurred me on to consider other one layer options and not be put off by one layer cards in the future. I'm off to get ready for the gala; back tomorrow with more stamping loveliness, but until then - happy stampin'!


Stampin' Up Supplies:

Stamps: Spring Sampler, Happiest Birthday Wishes (hostess - retired)

Cardstock: Whisper White

Ink/Stampin' Write Markers: Rose Red, Wild Wasabi, Bashful Blue

Tools: Simply Scored

Tags: , , , , , ,

Cards | Stamping

My First Stampin' Up! Online Video Tutorial - How To Mount Stamps

by Joanne James5. April 2013 20:03

Another big news day today - although this is more of a personal milestone for me: I have filmed my first online video tutorial!! Videos are useful for sharing all kinds of tips and techniques and I'm hopeful this will be the first of many.

I decided my first video would be a 'basics' introduction to stamps and in particular how to mount your wood and clear mount stamps, along with some tips and hints to get the best results from clear mount stamps. Whilst this may seem obvious to a seasoned stamper, I've spoken to a few people recently who are new to stamping and this is something that they would definitely have benefited from. So ladies, this is for you!

It also features a quick notecard made using the Petite Curly Label Punch; this punch, previously a Sale-A-Bration item, is now available to purchase in the main catalogue until June 30th. Along with either the Pretty Petites Sale-A-Bration stamp set or the Ciao, Baby! stamp set featured in the Spring-Summer seasonal catalogue, this punch is great for layering with the larger label punch or using on its own to create super quick cards. 

So, here is the link to my video, which is hosted on my YouTube video channel:

Here is a picture of a thank you card I made recently to pop in with a customer order, using the same punch:
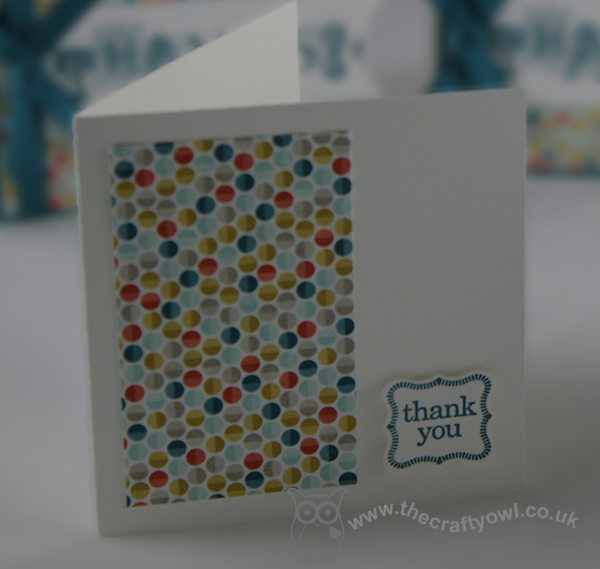
This kind of punch is great if you've got lots of cards to make or just want to add some detail to a 3" square.

Do leave me a comment to let me know what you think of my first video; if there's anything else you would like to see a video tutorial on, then do let me know.

Back tomorrow with more stamping delights - until then, happy stampin'!


Stampin' Up Supplies:

Stamps: Ciao, Baby!, Pretty Petites (Sale-A-Bration - retired)

Cardstock: Whisper White, Regal Rose, Melon Mambo, Pink Pirouette, Pretty in Pink, Sycamore Street DSP (Sale-A-Bration - retired)

Inks: Island Indigo, Melon Mambo

Tools: Petite Curly Label Punch, 1 1/4" Square Punch


Stampin' Up! Colour Refresh - New Colour Families Announced & 10 Colours to be Discontinued

by Joanne James4. April 2013 22:22

A change of blog plan today: Stampin' Up! has been very busy and has today announced it's first full colour refresh in 5 years. The overall colour families will stay the same, but there will be 10 new colours included and 10 colours discontinued. The new colour family colours include 6 colours that have previously been 'in colours' (highlighted in red - 4 of these are from the 2011-12 set that would otherwise have been discontinued at the end of June) and 4 are brand new Stampin' Up! colours (highlighted in grey):

These new colour families will be introduced along with the new 2013-14 Annual Catalogue on 1st July. Meanwhile, the important thing to note is that the following colours are retiring and will only be available while stocks last:

Once current ink, cardstock, etc. of these 10 colours is gone, Stampin' Up! will not be replenishing stock levels. So if you're a fan of Regal Rose, can't live without Not So Navy or any of the other crossed out colours above, I would advise you to place an order as soon as possible to avoid disappointment - contact me at [email protected] to stock up before it's too late!

Back tomorrow with another exciting blog post - it's all happening here! Until then, happy stampin'!


Tags: ,

Catalogues

Spring Sampler Baby Card

by Joanne James3. April 2013 22:15

I've another Spring Sampler card today, this time using the cute little duck stamp to create my own background for a new baby card. I saw something similar to this on Pinterest, but now can't find the original; if it was yours, then do let me know so I can update my post and give you due credit. So here's what I came up with:

I think the cute little duck stamped randomly makes a great background for the bold typeset 'BABY'. Finished off with a button and ome of the lovelynew Melon Mambo organza ribbon from the Spring catalogue - what a lovely welcome to the world for a new baby. This design would look equally great in blue and yellow for a baby boy.

Back tomorrow with more Spring Sampler ideas; until then, happy stampin'!


Stampin' Up Supplies:

Stamps: Spring Sampler

Cardstock: Pretty in Pink, Melon Mambo, Whisper White

Ink/Stampin' Write Markers: Daffodil Delight, Pretty in Pink

Tools: Typeset Alphabet die

Finishing Touches: 3/8" Striped Organdy Ribbon - Melon Mambo, Designer Buttons - Brights

Tags: , , , , ,

Cards | Stamping

Shop Online

Access my online shop 24 x 7, 365 days of the year:

Current May hostess code:

VDKNV7BH

Shop Online

2024-25 Annual Catalogue

BROWSE THE CATALOGUE

Click on the image to download your copy of the 2024-25 annual catalogue. For a full list of current SU! supplies, go to my online store. If you would like any help or advice, please drop me a line at [email protected] or give me a call on 07773 421446 - I'd be happy to help.

Join My Team

It's always a great time to join Stampin’ Up but during May it's even better! New team members can get £78.25 of new In Color products for FREE! That's in addition to another £130 worth of products of your choice for only £99 + free business supplies + free shipping + all the fun being a part of Stampin’ Up! Stampin' Up! has something for everyone: join my growing team and benefit from my support to enjoy Stampin' Up! however you choose.

If you're interested, call me for a chat to understand how I can help you realise your goals. Alternatively, if you have already decided to sign up and you just can't wait, please click here for the link to the online form where you can sign up and order your starter kit right away! 

Latest Kits!

Stampin Cut and Emboss

The City Sights Kit has all you need to make 8 cards with coordinating envelopes for £20. Along with the new Happy Hollyhocks Kit, a no stamping kit including 9 cards for just £14, both are available from May 1st - get yours here!

New Online Exclusives

There are new products available exclusively in the online store from 5 March - check them out here.

About Me

Hi I'm Joanne and live in Northampton and when I'm not looking after my husband and two beautiful children, am an avid crafter with a passion for all things Stampin' Up!

I must confess that I have never been a big rubber stamper - until I discovered Stampin' Up! that is. I love the fact that I can get such great results with co-ordinating stamps, inks, papers and punches - the possibilities are endless! Join me on my stamping journey as I share the things I love and be inspired to create amazing things yourself!

Follow Me

Monthly Newsletter

Box Builder

Click the button above to use Box Buster to create your custom box design using the Envelope Punch Board!

Kits Collection Now Available!

Stampin Cut and Emboss

The new Kits Collection from Stampin' Up! is now available!

Click here to see the current kits available and order yours online today.

I Design For


Mini Catalogue


The next mini catalogue will be live in September! 

Stampin' Up Stuff

This is my personal blog and is not endorsed by Stampin’ Up! I hope you find it a plentiful source of ideas and personal inspiration but please don't copy my designs for contest submission or use for classes, publication or sale without express permission.