Rain or Shine?

by Joanne James27. March 2013 23:13

Whilst my blog title today reminds me of a pop song of my childhood ('Five Star' were the band I believe - showing my age now!!), it also sums up perfectly today's card. With weather possibly the top conversation for Britons this week - we've had more snow, sub zero temperatures and icy winds with no signs of things letting up any time soon. It's the official start of British Summertime this Sunday - hard to believe I know!! - so I thought I would make a simple weather card with more colour than we seem to find in reality at the moment, but there we are:

I've been experimenting with one layer cards and my Spring Sampler set this week. I find one layer cards a real challenge and having made a version of this card as a one layer card originally, I preferred this version with the cloud and sun punched and raised with a couple of dimensionals - so not one layer after all, although some of my other experiments were more successful - I'll share them another time.

Anyone wondering how I created my rainbow? I actually used the guide sheet for my Simply Scored Borders Plate and used one of the curved lines as a stencil, rather than as a scoring guide - this enabled me to get perfectly aligned curves every time. That said, my rainbow is technically incomplete - I stopped short of including violet as it looked a little grey on my concept card but isn't that the joy of making your own cards - you can make them just as you like!

This card could be used for all kinds of occasions, so great to have on standby in the 'stash box'. That's all from me today - hopefully back tomorrow with another Spring card for you. Until then, happy stampin'!


Stampin' Up Supplies:

Stamps: Spring Sampler, Bloomin' Marvelous (retired)

Cardstock: Whisper White

Ink/Stampin' Write Markers: Real Red, Tangerine Tango, Daffodil Delight, Gumball Green, Tempting Turquoise, Elegant Eggplant

Tools: Simply Scored Borders Plate


Tags: , , , , ,

Cards | Stamping

Which came first: the chick or the egg?

by Joanne James26. March 2013 21:51

Today I'm sharing one of my favourite Easter projects with you. I think the new oval framelits in the Spring-Summer seasonal catalogue were crying out to be made into an Easter gate-fold card, so here's my version: 

I used oval framelits 1-4 and 6 to create an Easter egg on the outside; I deliberately chose to keep the front quite simple with some paper piercing for interest and a large paper bow to tie the whole thing together. The outer oval lifts up to release the fold and reveal the surprise on the inside:

A cute punch art chick with a happy Easter message! So for this card at least, the egg came first. One last photo of a close up of the bow - a dramatic focal point for this card and I love it:


Hope you like it. Back tomorrow with more Spring loveliness; until then, happy stampin'!


Stampin' Up Supplies:

Stamps: Wacky Wishes

Cardstock: Daffodil Delight, Melon Mambo, Tangerine Tango, Old Olive

Ink: Tangerine Tango

Tools: Oval Framelits, Oval Paper Piercing Template, 1 3/4" Circle Punch, Two Step Bird Punch (for wings), Heart Punch (for feet - retired)


Tags: , , , , , , , ,

3D Projects | Cards | Punch Art

Easter Egg Treat Holder

by Joanne James25. March 2013 22:07

Today I have a lovely treat holder for you, the perfect size for a Creme Egg or something similar as a great way to 'dress up' your egg into something a little bit special. I made something similar when experimenting with wedding favour boxes a few weeks ago (I will photograph these and share another time!) and modified my original design slightly to accommodate a small Easter egg:


They were so easy: an open box base, sandwiched between two of the bookmark-style tags from the Two Tags Die set. A small hole punched for a handle, tied with some co-ordinating ribbon and a little tag made with one of the Hearts A Flutter framelits and decorated with the basket of Easter eggs stamp from the Spring Sampler set. The photo below just shows the eggs inside so you can see in more detail:

I'd like to say the eggs were still around, but ... well it is nearly Easter, right??! Might need to buy a couple more before I gift these to anyone!

Back tomorrow with another Easter project; until then, happy stampin'!


Stampin' Up Supplies:

Stamps: Spring Sampler, Bitty Banners

Cardstock: Calypso Coral, Pool Party

Ink/Stampin' Write Markers: Island Indigo, Calypso Coral, Lucky Limeade, Wisteria Wonder, Pool Party

Tools: Hearts A Flutter Framelits, Bitty Banners

Finishing Touches: Pool Party and Calypso Coral Ruffled Ribbon, Bakers Twine


Tags: , , , , , ,

3D Projects | Boxes | Stamping

Thanks A Ton!

by Joanne James23. March 2013 21:00

Sale-A-Bration is over for another year, so today I'm sharing a thank you card designed by Bekka Prideaux at our last team training session using one of the free Sale-A-Bration sets, Patterned Occasions: 

I SO love this elephant and the colour combination of the Daffodil Delight with the Rich Razzleberry is really zingy I think. So to all of my Sale-A-Bration customers, thanks a ton - this one's for you!

Until next time, happy stampin'!


Stampin' Up! Supplies:

Cardstock: Daffodil Delight, Rich Razzleberry, Whisper White, Sycamore Street DSP

Stamps: Patterned Occasions

Ink/Stampin' Write Markers: Rich Razzleberry, Daffodil Delight, Gumball Green

Finishing Touches: 1/4" Rich Razzleberry Stitched Grosgrain Ribbon

Tools: Stamp-a-ma-jig, Scallop Border Punch

Tea Shoppe Centre Step Card

by Joanne James22. March 2013 21:37

I'm behind with my Easter photography, so a break from Easter cards today and another of the Tea Shoppe cards that I've been making to share with you. This is a case of a card by Michelle Last (you can see her version here), albeit in a completely different colourway: 

This card involves a lot of cutting out by hand of the cups, but it's worth it I think for the overall effect. I used some of my 'Tea for Two' DSP to provide the background paper and I love the flower trim - it really makes this card, don't you think? I coloured the edges of my flowers by dipping in some Pretty in Pink reinker; I think it ties them into the overall colour scheme really well. You can do this with any ink colour to co-ordinate with your project, so it makes them really versatile. Here's a close up of the flowers so that you can see the effect in detail: 

So pretty! I love the vintage feel of this card, even though I'm generally a clean lines, modern design kind of girl. This would be a lovely birthday card or even special invitation to an afternoon tea party - I can almost hear the china tea cups and saucers chinking together ...

Back tomorrow with more Easter fun; until then, happy stampin'!


Stampin' Up Supplies:

Stamps: Tea Shoppe

Cardstock: Very Vanilla, Rose Red, Tea for Two DSP

Ink: Pretty in Pink, Rose Red

Tools: Scallop Oval Punch, Large Oval Punch, Two-Step Bird Punch (for the leaves), Stampin' Dimensionals, Trimmer

Finishing Touches: 5/8" Flower Trim

Tags: , , , , , , , ,

Cards | Stamping

Peepo Bunny Rabbit Punch Art

by Joanne James21. March 2013 22:06

So today's card was a case of something similar I saw on Pinterest which I actually made as a birthday card for a special 7 year old recently who is just mad about rabbits. I thought I would share today as it could just as easily be adapted to an Easter card. This is the front:

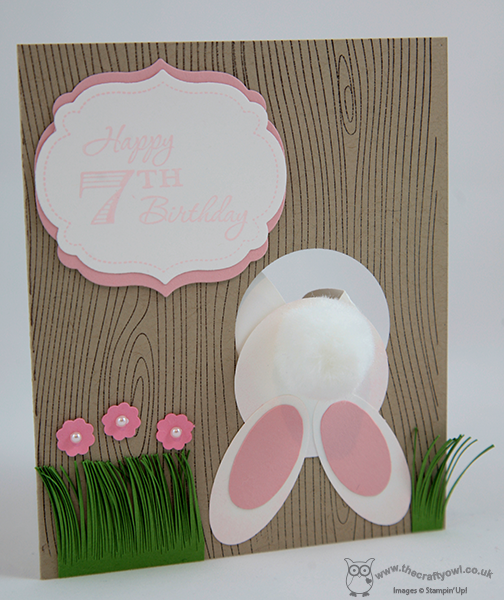
I used the 'Memorable Moments' stamp set to create the 'Happy 7th Birthday' - this is a great set that allows you to create custom birthday and anniversary greetings for pretty much any number combination. The outline stamp also fits the Labels Framelits perfectly. I love the idea of the rabbit hopping into his hidey-hole, only to open the card and see him reappear on the inside.


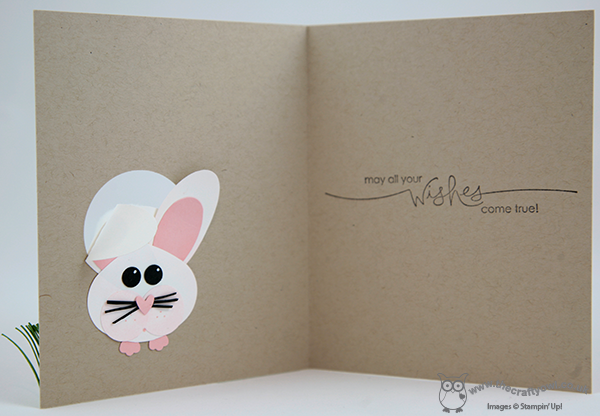
Here's a close-up of the inside: 

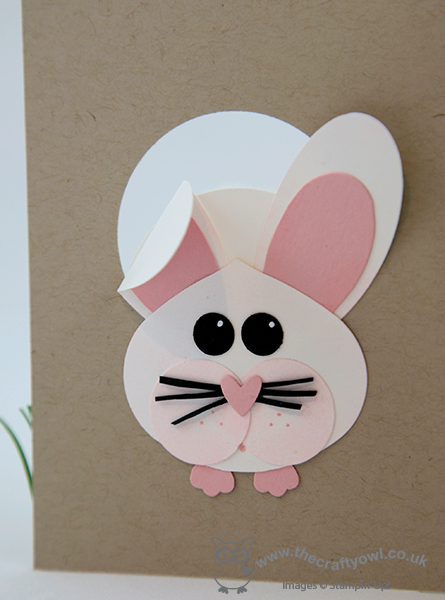
You can see the detail of his face and the subtle sponging just adds texture and character to his features. My favourite has to be the extra-large pompom tail on the front though I just love it!

So only one more day of Sale-A-Bration left - if you have an order to place or would like to sign up for the enhanced starter kit, you've got less than 24 hours to get in touch with me, so don't delay!

Back tomorrow with more Easter ideas - might even show something using one of the Sale-A-Bration sets, for all you early-birds who already have your free stamp sets and are looking for more great ways in which to use them. Until then, happy stampin'!


Stampin' Up Supplies:

Stamps: Memorable Moments, Woodgrain. Inside greeting is from a retired set - the current set 'A Word For You' is very similar though.

Cardstock: Crumb Cake, Whisper White, Basic Black, Pretty in Pink, Gumball Green

Inks: Pretty in Pink, Chocolate Chip

Tools: Itty Bitty Punches, Large Oval, Small Oval, Circle Punch (various sizes), Ornament Punch, Owl Punch (for nose), Labels Framelits, Trimmer

Finishing Touches: Basics pearls.


Two Minute Tuesday Easter Card

by Joanne James20. March 2013 22:14

Well, the weather outside has been raining on and off all day - so much for the first day of Spring! I have another Easter card for you today, a 4" square card that literally took only a couple of minutes to make: 

I wanted something plain and simple, but with some bold colour to remind me of brighter days. The images are from the Spring Sampler set in the Spring-Summer catalogue. I love the versatility of this set and have lots more to share with you over the coming days, so stay tuned. The sentiment is a partial stamp from the Wacky Wishes set again - this is the only Easter sentiment I own, so I warn you now you'll definitely be seeing more of this!

I have had a busy couple of days, with a day in London at the Biscuiteers Icing Cafe icing Easter biscuits yesterday and a 'Sounds of Spring' music concert at school this evening - I am willing the weather to get warmer and hoping it will soon oblidge! A class assembly tomorrow based on the musical 'Matilda', which should be fun and another Easter concert next week - don't you just love the end of term?

Also, whilst I remember - there was a video link about the new borders scoring plate missing from my last post; this has now been fixed, so if you'd like to see it, it's there now. One last reminder - Sale-a-bration finishes this Friday, so if you would like to place a £45 order and receive one of the 17 free gifts, or if you would like to sign up as a demonstrator and take advantage of the 25% extra free offer where you receive £162.50 worth of product on your starter kit for £99, you only have 2 days left to do so. Hopefully back tomorrow with some more Easter treats; until then, happy stampin'!


Stampin' Up Supplies:

Stamps: Spring Sampler, Wacky Wishes

Cardstock: Whisper White, Tempting Turqouise, Melon Mambo, Daffodil Delight

Ink: Tempting Turqouise, Melon Mambo, Daffodil Delight

Tools: 1 1/4" circle punch, circle die


Easter Chicks Simply Scored

by Joanne James17. March 2013 21:50

So I thought it was about time I started with some Easter cards, otherwise it will be here before we know it and I won't have shared any ideas with you. I took the opportunity to play with my Simply Scored Borders scoring plate today and used it to decorate some Easter eggs for my newly hatched chicks:


It's taken me a while to get used to the new scoring plate, but now that I have I'm finding it useful for all kinds of things. Stampin' Up! have made a great video tutorial showing how to use the new plate, which does work differently to the other plates as it has an overlay guide too - click on the video link here if you'd like to know more.

In case you're wondering where the chicks came from - they are the bird from the two-step bird punch, sponged around the edges to add definition. I love punches like this that have multiple uses!

The children had a Spring Fayre at school yesterday and won a runner-up prize in the Easter Egg Hunt of a chocolate egg and a chocolate rabbit - they were delighted and as they devoured the egg this afternoon, decided Easter has officially begun! I'll be back tomorrow with another Easter card; until then, happy stampin'!


Stampin' Up Supplies:

Stamps: Wacky Wishes

Cardstock: Crumb Cake, Wisteria Wonder, Island Indigo, Calypso Coral, Lucky Limeade, Daffodil Delight

Ink: Daffodil Delight, Island Indigo

Tools: Simply Scored Borders Scoring Plate, Ovals Framelits, Two-Step Bird Punch

Finishing Touches: Linen Thread

Tags: , , , , , , , , ,

Cards | Punch Art

Comic Relief Red Nose Punch Art

by Joanne James15. March 2013 20:35

Something different for today: anyone who lives in the UK will know today is 'Red Nose Day' or Comic Relief Day, where we all don red noses, host bake sales and generally do something funny for money. You can find out more about Comic Relief and their work, including make an online donation, here but meanwhile having sent my two children to school dressed as heroes, made 35 red nose cake pops (with faces!) and chocolate mini muffins with red noses, of course, I thought I would create my very own red nose punch art card to celebrate the good work that Comic Relief does both at home and abroad. So here it is:

I made my own punch art versions of this year's red Noses with Toes: TSpex, Triceytops and Dinomite. The sentiment is from a retired set, but I thought it was perfect for this card - laughter and smiles is what Comic Relief is all about.

I hope you've all had plenty of red-nose fun today - I'm off to tune into the BBC1 coverage now for the rest of the evening. Just watching Peter Kay's exploits travelling by couch from Belfast to London - hilarious!!

Until next time, happy stampin'!


Stampin' Up Supplies:

Stamps: Sprinkled Expressions (retired)

Cardstock: Whisper White, Basic Black, Real Red

Stampin' Write Markers: Basic Black, Real Red

Tools: Itty Bitty Punches, Scallop Circle Punch, Mixed Bunch Punch, Circle Punch (various sizes), Merry Minis Ornament Punch, Stampin' Dimensionals, Trimmer

Tags: , , , , , , ,

Punch Art

Tea Cup Trio

by Joanne James12. March 2013 18:52

Today we are back to tea cups! This time another modern card in some bright colours to get me in the mood for spring, rather than the freezing sub-zero temperatures outside - I'm trying to think myself warm! This is my finished card:


I used Very Vanilla and Gumball Green as my main colours, with some So Saffron and Melon Mambo on the other two cups. I used my square scallop-edged punch for the first time today and I think it gives a really nice mount for the tea cups - what do you think? Another Itty Bitty flower and pearl and some co-ordinating ribbon for a finishing touch and done - this card could be used for so many occasions; I'm not a huge fan of green, but I took this suggested colour combination from my colour coach and I love it! One more tea cup card for tomorrow I think - a fancy fold card, then it's time to move on to Spring proper.

So until then, happy stampin'!


Stampin' Up Supplies:

Stamps: Tea Shoppe

Cardstock: Very Vanilla, Gumball Green, Melon Mambo, So Saffron

Ink: Gumball Green, Melon Mambo, So Saffron

Tools: Itty Bitty Punches, Scallop Square Punch, Stampin' Dimensionals, Simply Scored, Trimmer

Finishing Touches: Pearl Basic Jewels, 3/8" Stitched Satin Ribbon


Tags: , , , , ,

Cards | Stamping

Mini Catalogue

BROWSE THE CATALOGUE

The mini catalogue is now live! Read and download your copy here.

Shop Online

Access my online shop 24 x 7, 365 days of the year:

Current April hostess code:

VDKNV7BH

Shop Online

Join My Team

It's always a great time to join Stampin’ Up! New team members can get £130 worth of products for only £99 + free business supplies + free shipping + all the fun being a part of Stampin’ Up! Stampin' Up! has something for everyone: join my growing team and benefit from my support to enjoy Stampin' Up! however you choose.

If you're interested, call me for a chat to understand how I can help you realise your goals. Alternatively, if you have already decided to sign up and you just can't wait, please click here for the link to the online form where you can sign up and order your starter kit right away! 

Latest Kit!

Stampin Cut and Emboss

The Rock Legend Kit has all you need to make 8 cards with coordinating envelopes. Along with the new Panda Friends Kit, both are available from January 4th for just £14 each - get yours here!

2023-24 Annual Catalogue

BROWSE THE CATALOGUE

Click on the catalogue for a full list of current SU! supplies - if you would like to order any of the items featured, please drop me a line at [email protected] or give me a call on 07773 421446 - I'd be happy to help.

New Online Exclusives

There are new products available exclusively in the online store from 5 March - check them out here.

About Me

Hi I'm Joanne and live in Northampton and when I'm not looking after my husband and two beautiful children, am an avid crafter with a passion for all things Stampin' Up!

I must confess that I have never been a big rubber stamper - until I discovered Stampin' Up! that is. I love the fact that I can get such great results with co-ordinating stamps, inks, papers and punches - the possibilities are endless! Join me on my stamping journey as I share the things I love and be inspired to create amazing things yourself!

Follow Me

Monthly Newsletter

Box Builder

Click the button above to use Box Buster to create your custom box design using the Envelope Punch Board!

Kits Collection Now Available!

Stampin Cut and Emboss

The new Kits Collection from Stampin' Up! is now available!

Click here to see the current kits available and order yours online today.

I Design For


Stampin' Up Stuff

This is my personal blog and is not endorsed by Stampin’ Up! I hope you find it a plentiful source of ideas and personal inspiration but please don't copy my designs for contest submission or use for classes, publication or sale without express permission.