Remember When...?

by Joanne James13. June 2013 22:37

Last night's card class was fun as always but too late for a blog post and today has been another busy day making birthday cards for the young lady of the house and some Father's Day cards, ahead of the big birthday weekend. I'll share these in the next few days, but meanwhile tonight I thought I'd share the last of the Golden Anniversary cards I made recently. This one is quite different to the previous two; instead of leading with a 50th Anniversary sentiment, I used one of the stamps from the retiring Word Play set as the focus:

I've never used this stamp before, as it never seemed right for anything I was designing. I have toyed with using it as a feature stamp on a scrapbook page (a project for another time though!) then as I was thinking about what it would be like to celebrate 50 years of marriage myself (believe me, that is a LONG way off!) and it struck me how appropriate this stamp would be for a milestone anniversary card - 50 years is a lot of memories!

I decided to use white and brushed gold cardstock again and leave the layout quite simple, with Oval and Label Framelits making light work of the layered front. You can see the lovely gold embossing in this photo too - it adds a real shine. I finished the front with a fussy organza double bow then stamped the inside with my congratulatory anniversary message:

So that's all my Golden Anniversary cards for the time being - which one do you prefer? The other big news of the day is that registration for this year's Stampin' Up! European Convention opened today. Better still, this year convention is being held in Manchester in the UK. I've signed up already; if you would like to enjoy two days of stampin' fun from 22nd-23rd November, contact me for a chat about this and the other benefits being a Stampin' Up! demonstrator can offer.

Back tomorrow with another project - until then, happy stampin'!


Stampin' Up Supplies:

Stamps: Word Play, Memorable Moments

Cardstock: Whisper White, Brushed Gold

Ink/Stampin' Write Markers: Versamark

Tools: Ovals Framelits, Labels Framelits, Stamp-a-ma-jig

Finishing Touches:  Gold Embossing Powder, Whisper White 5/8" Organza Ribbon

Hearts of Gold

by Joanne James11. June 2013 22:48

Very late post from me today, but having had a day out on a geography field trip, one of the children's classmates round for tea and a Parents' Association fete planning meeting, this feels like the first time I've sat down since breakfast! I've the second of my Golden Wedding Anniversary cards to share today, this one using the Hearts A Flutter stamps and framelits:

For this card I used a white card base with a raised brushed gold and white layered panel, with two gold embossed hearts. I have used the Hearts A Flutter stamps and framelits in many ways and love the versatility of this set. I used more gold embossing for the sentiment across the bottom of the card. So, quite different to yesterday's card but this is also on it's way to another couple celebrating 50 years of marriage - some achievement, for sure.

Back tomorrow with the last of the golden anniversary cards; until then, happy stampin'!


Stampin' Up Supplies:

Stamps: Hearts A Flutter, Memorable Moments

Cardstock: Whisper White, Brushed Gold

Ink/Stampin' Write Markers: Versamark

Tools: Hearts a Flutter Framelits, Stamp-a-ma-jig

Finishing Touches:  Gold Embossing Powder, Whisper White 5/8" Organza Ribbon

Tags: , , , , , , , , ,

Cards | Stamping

Golden Wedding Anniversary

by Joanne James10. June 2013 21:53

Better late than never today, but lots going on in the James household this week: the first of this week's monthly card classes this afternoon, followed by a school field trip tomorrow and an 8th birthday to prepare for at the end of the week. So on to today's card! I've had three Golden Wedding Anniversary cards to make this month and although none of the recipients are known to each other, I made three different cards for each. I'm sharing the first of these with you today. This is the most simple of the 3 finished designs:


I used brushed gold card for the base and die cut number 50, which I popped on dimensionals so that it would stand out a little; this card has a lovely matt shimmer to it, which is somewhat lost in the photograph. I then used gold embossing powder and heat embossed the 'Happy Anniversary' either side of this. I used the Delicate Designs embossing folder and large scallop edgelits die to create a layered edge, finished with a piece of white Organza ribbon. So nothing too fussy, but classic (and post-friendly).

Back tomorrow with another of my Golden Anniversary cards I think; until then, happy stampin'!


Stampin' Up Supplies:

Stamps: Memorable Moments

Cardstock: Whisper White, Brushed Gold

Ink/Stampin' Write Markers: Versamark

Tools: Large Scallop Edgelits Die, Delicate Designs Embossing Folder, Typeset Alphabet Die, Stamp-a-ma-jig

Finishing Touches:  Gold Embossing Powder, Whisper White 5/8" Organza Ribbon


Welcome to Your New Home

by Joanne James8. June 2013 18:55

The changeover in annual catalogues brings with it mixed feelings; excitement at the thought of lots of new stamp sets and accessories to play with, but it's also a time to say goodbye to some old ones. Today I'm sharing a 'Welcome to your new home' card that I made recently for my fellow crafty friend Issy recently when she moved house. The card uses the Hoop La La stamp set and the Comfort Café designer series papers:

This set appeals to me because it reminds me of my other hobby, cross stitch, and there are some lovely little images in this set, including a needle and embroidery hoop. I coloured the house image with markers in colours that coordinated with the Comfort Café paper, using my Stamp-a-ma-jig to get them perfectly aligned, then created a focal point by making a feature of the final house placing on a raised circle and adding a cute little heart from my trusty owl punch for good measure. This time I even remembered to decorate the envelope too - something I often intend to do, but often forget when I'm busy focusing on the card itself.

Back tomorrow with another project; until then, happy stampin'!


Stampin' Up Supplies:

Stamps: Hoop La La

Cardstock: Very Vanilla, Midnight Muse, Summer Starfruit, Cajun Craze, Comfort Café DSP

Ink/Stampin' Write Markers: Midnight Muse, Pool Party, Cajun Craze, Summer Starfruit

Tools: Stamp-a-ma-jig, 1 3/4" circle punch, Circles #2 Originals Die, Owl Punch


Elements of Style Birthday Mannequin

by Joanne James7. June 2013 19:51

A change from the masculine theme today, to something much more feminine: a birthday card using my much-loved Dress Up framelits and a couple of soon to be retired products. So here is my card:


The design of the card was inspired by a card kit that has recently been on sale to Stampin' Up's American customers, but not available here in the UK. So have you worked out the retiring products yet? The mannequin is made from the First Edition Specialty Designer Series Paper, which has been partially overstamped with the floral stamp from the Elements of Style set. This has then been coloured with Stampin' Right Markers in Perfect Plum and Elegant Eggplant. This has been layered with a paper doily beneath the dark background oval to add to the vintage feel - well, this is about as vintage as I get! The card has been finished with a birthday sentiment banner that has been attached with a lovely vintage brad, to add to the overall effect.

I liked the finished result and made another card using the same design but in a blue colourway using Marina Mist and Night of Navy, which you can see below:

If you would like to own Elements of Style or get your hands on some First Edition paper, then act now as they will only be available until the end of the month (or until stocks last).

Back tomorrow with another project using more retiring goodies; until then, happy stampin'!


Stampin' Up Supplies:

Stamps: Elements of Style, Happiest Birthday Wishes (retired)

Cardstock: Whisper White, Perfect Plum, Elegant Eggplant, Marina Mist, Night of Navy, First Edition Specialty DSP

Ink/Stampin' Write Markers: Basic Black, Perfect Plum, Elegant Eggplant, Marina Mist, Night of Navy, Daffodil Delight, Wild Wasabi

Tools: Dress Up Framelits, Oval Framelits, Blender Pen

Finishing Touches: Paper Doily, Antique Brads

Number One Dad Card

by Joanne James6. June 2013 22:00

Keeping with the Father's Day theme, another quick Dad card from me today. This time I went with a rosette for a Number One Dad:

I went with a Cherry Cobbler base to match my designer paper. The striped paper actually comes from the Christmas Be of Good Cheer paper stack (retiring this month), but it is neutral enough to work well on a masculine card. I made a rosette in double-quick time using my Simply Scored score board, then layered my 'Number One' stamp with a couple of scalloped circles to balance the size. I quite like this card, although if I made it again I would substitute the green scalloped circle with a vanilla one; I don't know whether it's psychological or not, but adding the green into the colour combo makes it look more 'Christmassy', which isn't quite the effect I was after!

Back tomorrow with another project; until then, happy stampin'!


Stampin' Up Supplies:

Stamps: Ciao Baby!, For My Family

Cardstock: Cheery Cobbler, Very Vanilla, Be of Good Cheer DSP

Ink/Stampin' Write Markers: Cherry Cobbler

Tools: Simply Scored, 7/8" Scallop Circle Punch, 1 1/4" Scallop Circle Punch, 1 3/4" Scallop Circle Punch

Finishing Touches: Cherry Cobbler Baker's Twine

An Abstract Card for the Man in your Life!

by Joanne James5. June 2013 20:39

I have been such a busy bee and my date with the ironing basket didn't leave me time for a blog post yesterday, but I'm back on track today and have so much to share I'm almost spoilt for choice! I've been spending much of today preparing for next week's classes: we are doing a 'One Sheet Wonder' using the Secret Garden stamp set and framelits. If you would like to attend this or any of my other classes, or get together with some friends and host a private class of your own, do get in touch via [email protected]

But  for today, with Father's Day just around the corner I will be spending the next week or so sharing some masculine cards with you, interspersed with some lovely cards featuring products and accessories on the retiring lists and a few cards featuring this months 'Best of Flowers' anniversary set. Today's cards were inspired by a birthday card shown on page 14 of the Spring-Summer seasonal catalogue:

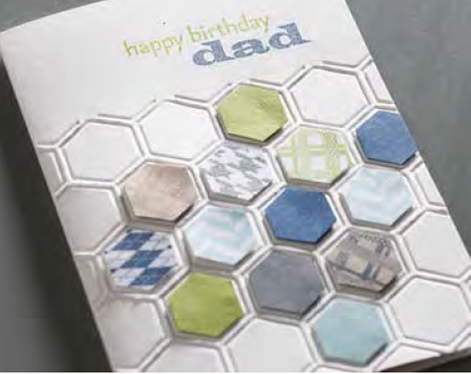
There were a number of things I liked about this card, in no particular order:

  • the partial embossing using the hexagon embossing folder
  • the use of patterned paper to build the design
  • the simple sentiment

So taking these things as my starting point, I developed two similar but slightly different designs. The first one a Father's Day card:

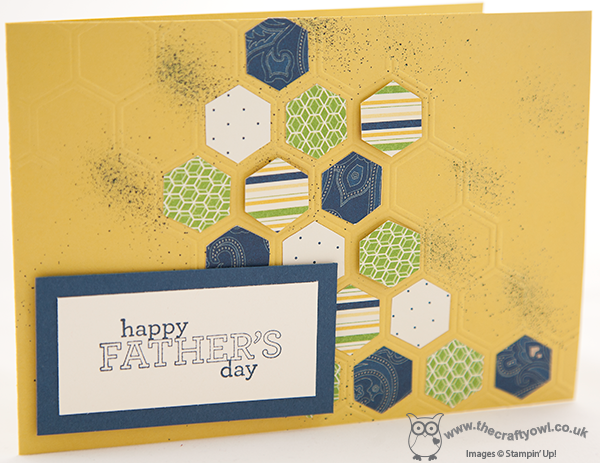
I used the current in-colours and with a Summer Starfruit base, used a number of the patterned papers from the Print Poetry DSP for my patterned hexagons. Some of them I stuck flat, and some of them are adhered using dimensionals. This DSP has a nice variety of papers, with some lovely spots and stripes, which work well for masculine cards. I also spritzed the base card with Midnight Muse so that it didn't look too 'yellow'. I decided to partially emboss a diagonal section across the card and use the unembossed corner for the sentiment.

I then created a second version along the same lines, but this time adhered the Summer Starfruit embossed panel to a Midnight Muse card base and used a simple 'Dad' sentiment on a flag:

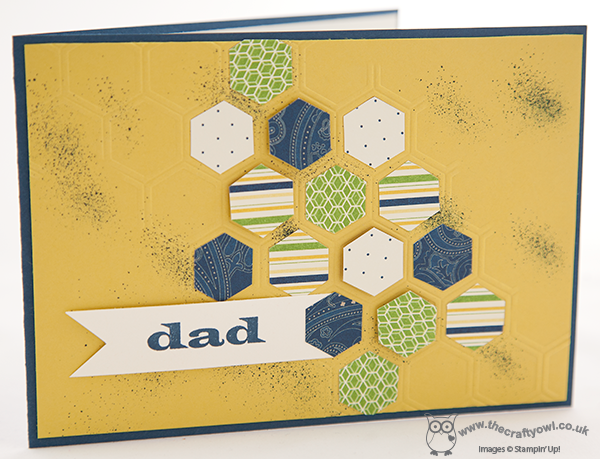
This card could be used for any masculine occasion by altering the sentiment inside the card to suit. The 'Dad' stamp I used here is part of the retiring 'For My Family' stamp set that is one of my 'go to' stamp sets for personalising a card - if this is a set you've had your eye on, it will only be available until the end of the month so get your order to me soon.

So what do you think of these cards? My husband said it reminded him of The Gold Run on the 80's quiz show 'Blockbusters' ("I'll have a 'P' please, Bob"!) which I think is rather cheeky of him - he won't be receiving either of these cards then!! Personally, I'm quite pleased with how they turned out - especially for someone who doesn't 'do' masculine cards for anyone other than the under 12s!

Back tomorrow with another card - until then, happy stampin'!


Stampin' Up Supplies:

Stamps: Delightful Dozen, For My Family

Cardstock: Summer Starfruit, Midnight Muse, Very Vanilla, Print Poetry DSP

Ink/Stampin' Write Markers: Midnight Muse

Tools: Textured Impressions Honeycomb Embossing Folder, Colour Spritzer Tool


Help For Heroes Part Two - Summer Silhouettes

by Joanne James3. June 2013 20:08

As promised, today I have the second two designs for my post-friendly Help For Heroes cards that will shortly be winging their way to Afghanistan to our serving troops, for them to send their precious letters home. I decided to use my Summer Silhouettes stamp set to create cards 3 and 4 - I love this set and am getting better at 'random stamping' with it, I think! I decided to use a slightly more muted colour scheme for these cards, just to provide some variety and came up with two slightly different designs for each.

For the first card, I chose a brown/blue colour scheme:


For the final card, I was back with the pinks, but subtle compared to yesterday's bright pink card and I changed the orientation of the card to landscape as it suited this alternative design: 

This stamp set is great for creating a full card front without the need for a sentiment; in this case I deliberately left the cards without one, so that they can be used for pretty much any occasion - or even just to send a note on a nice card. These cards could easily be jazzed up with a few rhinestones or pearls and some ribbon, but I think they are equally fine without. So, to the service men and women who will be receiving these cards - stay safe and know that we are thinking of you and appreciate the sacrifices you make; I'm so glad I was able to help in this small way to show how much your efforts are appreciated.

Back tomorrow with another project; until then, happy stampin'!


Stampin' Up Supplies:

Stamps: Summer Silhouettes

Cardstock: Pool Party, Whisper White, Raspberry Ripple

Ink/Stampin' Write Markers: Pool Party, Crumb Cake, Early Espresso, Raspberry Ripple, Pink Pirouette, Gumball Green

Tags: , , , ,

Cards | Stamping

Help For Heroes Part One - Best of Flowers

by Joanne James2. June 2013 19:42

What a lovely weekend! Today I spent the whole afternoon outside and enjoyed a lovely cycle ride with the rest of the family - I felt like we had to make the most of it; if it's like last weekend, it could be raining cats and dogs tomorrow! As promised yesterday, I have a couple of cards to share with you today featuring one of the stamps from this month's 25th anniversary 'Best of Flowers' stamp set.

In case you're wondering why I headed up this post 'Help the Heroes', these cards, along with two more that I will share tomorrow, were designed in answer to a request from a fellow crafter and member of my wider Stampin' Up! team, whose husband is serving in the RAF and will shortly be departing for another tour of duty to Afghanistan. Our brave serving forces have little or no access to nice cards to send whilst away and so she always sends a box or two so that they can have something a little different to plain paper to write their notes home and wondered if her fellow crafters would be prepared to help out too. All our forces do such a great job and events such as the recent killing of a soldier in Woolwich show just what a dangerous life they lead, both in battle and unfortunately sometimes at home too. I was happy to help, so set to work creating a selection of cards that I could make lots of, but also were post-friendly and didn't have glitter, gems or anything else that could transfer to the sender and potentially make them a target.

So, for the first design, I used the silhouetted daisy stamp from the 'Best of Flowers' set and created two identical cards in different colourways - one pink, one yellow. Here's the card in pink: 

I used the stamp to create a simple 'field of flowers' look by stamping in Melon Mambo and Pink Pirouette and stamping off to create degrees of colour and give the image a sense of depth of field. I then created a scored border and paper-pierced around the image for added interest. I then created a batch of the same card in yellow, using Daffodil Delight and So Saffron inks:

So which colour way do you prefer? I think I prefer the yellow one, just because it is so cheery and bright. I really love this little stamp and can think of lots more ways that I will be using it. I will be making other projects with the stamps in this set, so if the stamps in this set appeal to you, do pop back and see what else I make with them. If you would like to order this set, it costs £13.95 and you can check out the full set of stamps on the image in the side bar of my blog.

Tomorrow I will be sharing the other two cards I made for my Help For Heroes card bundle - two new designs, both using the Summer Silhouettes stamp set. Until then, happy stampin'!


Stampin' Up Supplies:

Stamps: Best of Flowers

Cardstock: Melon Mambo, Whisper White, Daffodil Delight

Ink/Stampin' Write Markers: Melon Mambo, Pink Pirouette, Whisper White, Daffodil Delight, So Saffron

Tools: Essentials Paper Piercing Pack, Piercing Tool, Simply Scored

Tags: , , , , , ,

Cards | Stamping

Bird Cages - Without the Birds!

by Joanne James1. June 2013 20:39

This week is turning out to be busy, busy, busy! Yesterday the list of retiring stamp sets and accessories were announced: these featured in yesterday's post and the lists can be found in the box on the right hand side of my page. I will be sad to see some of these sets go; I'll be sharing cards featuring some of these retiring sets in my posts this month and first up I want to share a card made with the Aviary stamp set:

So, bird cages but no birds?! Bird cages are very 'on trend' in home décor right now, and after seeing an amazing display at a recent wedding fair with a table centre made with a bird cage filled with flowers, I was keen to try and achieve the same effect on a card. This design is actually not where I started out at all, but after several iterations this is the design I settled on and am post happy with. Three simple bird cages, then using the flower stamp from the Create a Cupcake stamp set I used my marker pens to colour and stamp flowers randomly through the cages. I left this card sentiment-free, as I sometimes do until I'm ready to send.

A post about the Aviary stamp set really wouldn't be complete without a card that shows some birds too - here's a wedding invitation I designed a while ago, that would also make a lovely Valentine's or anniversary card:

Remember the sets on the retiring list are only available until 1st July or whilst stocks last, so if you don't own the Aviary stamp set and it's on your wish list, contact me to place your order before it's too late.

Back soon with more exciting news from the world of Stampin' Up! Until then, happy stampin'!


Stampin' Up Supplies:

Stamps: Aviary (card 1&2), Create a Cupcake (card 1)

Cardstock: Rose Red, Whisper White (card 1); Pool party, Island Indigo, Whisper White (card 2)

Ink/Stampin' Write Markers: Rose Red, Baja Breeze, Bashful Blue, Pink Pirouette, So Saffron, Perfect Plum, Wild Wasabi (card 1); Basic Grey, Pool Party, Night of Navy, Rose Red (card 2)

Tools: Stamp-a-ma-jig


Tags: , , , , , , ,

Cards | Stamping

Shop Online

Access my online shop 24 x 7, 365 days of the year:

Current May hostess code:

VDKNV7BH

Shop Online

2024-25 Annual Catalogue

BROWSE THE CATALOGUE

Click on the image to download your copy of the 2024-25 annual catalogue. For a full list of current SU! supplies, go to my online store. If you would like any help or advice, please drop me a line at [email protected] or give me a call on 07773 421446 - I'd be happy to help.

Join My Team

It's always a great time to join Stampin’ Up but during May it's even better! New team members can get £78.25 of new In Color products for FREE! That's in addition to another £130 worth of products of your choice for only £99 + free business supplies + free shipping + all the fun being a part of Stampin’ Up! Stampin' Up! has something for everyone: join my growing team and benefit from my support to enjoy Stampin' Up! however you choose.

If you're interested, call me for a chat to understand how I can help you realise your goals. Alternatively, if you have already decided to sign up and you just can't wait, please click here for the link to the online form where you can sign up and order your starter kit right away! 

Latest Kits!

Stampin Cut and Emboss

The City Sights Kit has all you need to make 8 cards with coordinating envelopes for £20. Along with the new Happy Hollyhocks Kit, a no stamping kit including 9 cards for just £14, both are available from May 1st - get yours here!

New Online Exclusives

There are new products available exclusively in the online store from 5 March - check them out here.

About Me

Hi I'm Joanne and live in Northampton and when I'm not looking after my husband and two beautiful children, am an avid crafter with a passion for all things Stampin' Up!

I must confess that I have never been a big rubber stamper - until I discovered Stampin' Up! that is. I love the fact that I can get such great results with co-ordinating stamps, inks, papers and punches - the possibilities are endless! Join me on my stamping journey as I share the things I love and be inspired to create amazing things yourself!

Follow Me

Monthly Newsletter

Box Builder

Click the button above to use Box Buster to create your custom box design using the Envelope Punch Board!

Kits Collection Now Available!

Stampin Cut and Emboss

The new Kits Collection from Stampin' Up! is now available!

Click here to see the current kits available and order yours online today.

I Design For


Mini Catalogue


The next mini catalogue will be live in September! 

Stampin' Up Stuff

This is my personal blog and is not endorsed by Stampin’ Up! I hope you find it a plentiful source of ideas and personal inspiration but please don't copy my designs for contest submission or use for classes, publication or sale without express permission.