More Angry Birds!

by Joanne James29. August 2013 07:21

Today it's time for another Angry Birds birthday card - well, it must be at least a few weeks since I shared the last one! This is another card I made a while ago for one of Ben's friends, who is officially Angry Birds number one fan! I took my inspiration from a tiered birthday cake I saw on Pinterest and decided on a bird tower with a pig on top. Here is the finished card:

I decided to make the features 3D to add interest and character to the faces. Just as I was punching the pieces for the final piece, the green pig, which I had absolutely intended to be a king pig, complete with crown, I had a visit to my craft room by young Master James who came to check on progress. He politely asked what I was doing, then announced, "Oh no, Mummy - it can't be a King Pig; it has to be a Grandpa Pig - they are Zak's absolute favourite!" A quick consult of my Angry Birds Visual Dictionary and some minor modifications, and Grandpa Pig was born. Check out the moustache: 

That has to be one of the best things about making your own cards - you can make exactly what you want and it can be completely personalised to the recipient, even if the requirement isn't always known until the last minute!

Back soon with another project; until then, happy stampin'!


Stampin' Up Supplies:

Cardstock: Marina Mist, Real Red, Daffodil Delight, Gumball Green, Whisper White, Basic Black, Tangerine Tango, Cajun Craze

Tools: Itty Bitty Punch (circle), Owl Punch, 1" Circle Punch, 3/4" Circle Punch

Tags: , , , , , , ,

Cards | Punch Art

It's A Boy!

by Joanne James28. August 2013 07:30

Today I'm sharing a recent commission card I made for a friend of mine who wanted to welcome the latest addition to her extended family, another in a long line of little boys! The brief was 'simple classic' and we agreed a bib style card would be perfect. I made a 6" square card, using the new Circles Framelits to create the bib: 

 I scored the central section on the reverse at 1/2" intervals and finished with tiny pearls for added detail. I added took the opportunity to create a layered label using my new baby Label Love stamp and co-ordinating Artisan Label punch - here's a close up:

How cute is this? I love how easy it is to create the background layer which in this instance added just enough colour to pop this off the front of this largely white card. I used some of my retired Bashful Blue card stock - I will miss this colour for baby boy cards, it's such a perfect shade. 

Back tomorrow with another project; until then, happy stampin'!


Stampin' Up Supplies:

Stamps: Label Love

Cardstock: Whisper White, Bashful Blue (retired)

Ink/Stampin' Write Markers: Bashful Blue (retired)

Tools: Artisan Label Punch, Circles Framelits, Simply Scored

Finishing Touches: Whisper White 5/8" Organza Ribbon, Basics Pearls

Tags: , , , , , , ,

Cards | Punch Art | Stamping

Summer Silhouettes Telford Swap

by Joanne James26. August 2013 22:24

Today I have another of the swaps I received at our training event in Telford a little while ago to share with you. This card was made by Jenny Moors and we laughed as we swapped as I had used the same stamp set but taken a completely different creative approach (you can see my Telford swap card here). Here is Jenny's card:

I love the bright colours of this card and there is tons of detail here, right down to the paper pierced edge. It's also a great example of a very well made slider card - here's the inside of the card extended so that you can see what I mean:

If you would like to re-create this card, Jenny has provided a step-by-step tutorial on her blog here. Back with the last of my favourite three swaps I received at Telford next time; until then, happy stampin'!


Stampin' Up Supplies:

Stamps: Summer Silhouettes, Petite Pairs

Cardstock: Tangerine Tango, Rich Razzleberry, Whisper White

Ink/Stampin' Write Markers: Tangerine Tango, Rich Razzleberry, Wild Wasabi

Tools: Paper Piercing Essentials Pack

Finishing Touches: Whisper White Stitched Grosgrain Ribbon, Basics Rhinestones

Tags: , , , , ,

Cards | Stamping | Swaps

Oh Happy Day - A New Crafty Owl has joined the Team!

by Joanne James24. August 2013 08:26

I was recently fortunate to gain another member to my growing team of Crafty Owls, so as is customary I like to make a card and gift to welcome them into the fold. Here is the card I made to welcome Samantha to my team:


This card was inspired by one I saw on Splitcoast Stampers by Pretty Paper Cards. I cheated a little with the background, using my retired spritz tool and the 'grunge' stamp from the retired 'French Foliage' set, as I have yet to invest in the grunge stamps in the new annual catalogue. I took the opportunity to use another of the lovely new in-colours - this time Crisp Cantaloupe. I also made a co-ordinating decorated notebook for those all important notes, dates and business tips that will be heading Samantha's way; when you're new to Stampin' Up!, there can be a lot to remember, even with a helpful upline in place to guide and support you. You can see the book in the picture below:

If you would like to join my team, whatever your motivation, then do get in touch. Stampin' Up! can be a great way to earn an income whilst doing something you really enjoy, whilst also making new friends and providing you with access to some of the best paper crafting products on the market at a substantial discount. I can support you, whether you wish to build a profitable business or simply become a hobby demonstrator and feed your crafting habit! If you are interested in joining my team and would like to benefit from the incentives and training opportunities that Stampin' Up! has to offer, please give me a call or drop me a line for a chat about what's involved ato how to take the next step. 

There is also a Stampin' Up! Creative Tour coming to a town near us soon; if you would like to 'try before you buy' and experience first hand some of the corporate benefits that Stampin' Up! offers its demonstrators, then I would be happy to take you along as my guest - get in touch if you would be interested in taking advantage of this exciting opportunity. 

Back soon with another project; until then, happy stampin'! 


Stampin' Up Supplies:

Stamps: Happy Day, French Foliage (retired)

Cardstock: Crumb Cake, Crisp Cantaloupe, Very Vanilla

Ink/Stampin' Write Markers: Crumb Cake, Crisp Canteloupe

Tools: Stamp-a-ma-jig, Honeycomb Embossing Folder

Finishing Touches: Basics Pearls, Linen Thread, Crumb Cake Seam Binding Ribbon, Tea Lace Paper Doily

Dinoroar Card and Gift Wrap

by Joanne James22. August 2013 20:26

As my regular blog followers will know, my son recently shared a birthday party with one of his school friends. The gift for his friend had a dinosaur theme, so we decided to dust our favourite dinosaur stamp set down from the shelf and make a card and our very own wrapping paper to match. Here it is:

The card is a case of a Julie Kettlewell card I saw on Pinterest, with one or two additions. I decorated the envelope too just to add a nice finishing touch and you can just see the wrapped gift in the background with its co-ordinating paper. I love the bright colours and think it makes such a fun design for a 6 year old. 

The wrapping paper was fun to make too; a great summer holiday activity for the kiddies. I'm actually wondering whether I should get them started on making my Christmas wrapping - now there's a thought...!

Back soon with another project; until then, happy stampin'!


Stampin' Up Supplies:

Stamps: Dinoroar (retired)

Cardstock: Crumb Cake, Night of Navy, Brights Designer Series Paper (retired)

Ink/Stampin' Write Markers: Old Olive, Night of Navy, Tangerine Tango, So Saffron, Pink Pirouette, Basic Grey

Tools: 1" Square Punch, 1 1/4" Square Punch

Finishing Touches: Old Olive Grosgrain Ribbon (retired)


Tags: , , , , , ,

Cards | Stamping

2013-15 In Colour Comparisons

by Joanne James20. August 2013 20:30

This year's 'in colours' have been around for a couple of months now and I find myself using them more and more. I prepared some colour comparison cards with my Mosaic Madness stamp set and punch to show how the new colours compare tonally with other SU colours in the same colour ranges some time ago, but I haven't shared them until now as I was waiting on a back order of two of the blue colours, then when they finally arrived I was so busy playing I totally forgot about finishing and blogging the card set! I tidied my desk this week and rediscovered them, so thought I would share them as I still get asked questions about how these colours blend. So one by one, here they are:

The blue collection:

Coastal Cabana is a lovely turquoise blue, darker than Pool Party but not as intense as the returning Bermuda Bay.

The orange collection:

Crisp Cantaloupe is a fresh pink-peach colour, very like the melon that inspired its name. It's the lightest in the orange colour range.

The green collection:

Pistachio Pudding is a pale green, again lighter than its nearest green neighbours.

The brown collection:

Baked Brown Sugar is a lovely rich shade of brown, more intense than Crumb Cake but not as dark as Soft Suede.

The pink collection:

Strawberry Slush is a lovely vibrant pink, brighter than Primrose Petals but again not as intense as Melon Mambo. the other great thing about this year's in-colours is they all co-ordinate beautifully together, as well as complimenting many of the existing colours. Here is the complete card set including each of the card colour sets:

So what do you think: which in-colour is your favourite and what's your favourite in-colour combination? Post me a comment below, or better still, pop over to my Facebook page and share a picture of something you've made in your favourite in-colour combination. Back soon with another project; until then, happy stampin'! 

Stampin' Up Supplies:

Stamps: Mosaic Madness

Cardstock: As detailed above

Ink/Stampin' Write Markers: 2013-15 In Colours

Tools: Mosaic Punch


Tags: , , ,

Cards | Stamping

Look Who's Turning 40!

by Joanne James18. August 2013 20:08

Another 40th birthday card today, this one showcasing lots of new products. This was the birthday card from my children to their uncle, so I wanted it to fauna fun design; this is what I came up with:

I used the Birthday Basics Designer Series Paper as the inspiration for the colour scheme for this card - that and the fact that I already had Bermuda Bay out on my desk (I love this new colour!) I built the sentiment from my Simply Sketched Alphabet stamps and added a fun element by replacing the 'OO' with a pair of spectacles and googly eyes. I stamped the spectacles by inking up one pair on my 'Spectacular' single stamp - I have been having lots of fun with this stamp (as a specs wearer it really appealed to me!); this, and the other single stamps, are still available to purchase until the end of the month. See the box on the right of my blog page for more details and make sure you contact me before the end of the month if you'd like to order one.

My children thought this card was really funny, although I'm not sure that I would have got away with it as far as my specs-wearing brother-in-law is concerned, were I not a specs wearer myself!

Back soon with another project; until then, happy stampin'!


Stampin' Up Supplies:

Stamps: ABC-123 Sketch Alphabet and Numbers, Spectacular

Cardstock: Summer Starfruit, Bermuda Bay, Raspberry Ripple, Very Vanilla, Birthday Basics Designer Series Paper (SAB - retired)

Ink/Stampin' Write Markers: Bermuda Bay, Raspberry Ripple

Tools: Simply Scored, Big Shot, Typeset Alphabet Die, Stamp-a-ma-jig

Finishing Touches: Googly eyes (non SU)


Happy 40th Birthday Brother

by Joanne James15. August 2013 16:43

Another brother Birthday card today, but this time for my brother-in-law, who celebrated his 40th birthday recently. I took this card by LeeAnn Greff as my inspiration, changing the colours to use up some of my retired papers and incorporating the necessary changes of sentiment to produce the following card:

A great masculine card, with some Tangerine Tango and Bermuda Bay for pops of colour. Back in a couple of days with the card I made from the children for their uncle; I'll be posting every other day for the next couple of weeks, as I'm having a couple of weeks of dedicated family time before the children go back to school. 

Until then, happy stampin'!


Stampin' Up Supplies:

Stamps: Banner Greetings (hostess)

Cardstock: Basic Grey, Bermuda Bay, Coastal Cabana, Whisper White, Twitterpated DSP (retired), Sycamore Street Designer Series Paper (SAB - retired)

Ink/Stampin' Write Markers: Basic Grey, Tangerine Tango

Tools: Simply Scored, Big Shot, Chevron Textured Impressions Embossing Folder, Typeset Alphabet Die, Paper Piercing Essentials Pack

Finishing Touches: Sycamore Street Ribbon (SAB - retired)


Pop Up Lego City Fireman Birthday Card

by Joanne James11. August 2013 21:36

A busy weekend of birthday celebrations in the James family this weekend: yesterday my brother-in-law celebrated his 40th birthday (I was back too late and had drunk too many cocktails to blog when I arrived home yesterday evening; I will share his cards later in the week!) and today was my 'baby' the not-so-little Benjamin's 6th birthday.

I had something of a quandary when trying to decide what kind of card to make Ben; I needed something special but this birthday featured so many of the things that he loves that choosing was difficult. One of the things that he really wanted for his birthday was a Lego City Coastguard Patrol boat - he loves all kinds of Lego, but his first and enduring love is for the fire brigade - the only reason this wasn't on the wishlist is because I think he must own every mortal piece of the Fire Department and then some! His big sister bought him a Lego City Fire Chief alarm clock for his birthday and this ultimately became the inspiration for my pop-up card. This is the card from the outside:

A Lego brick number 6 (lots of glue dots used to get the pins on the bricks just right!). Then on the inside, this cheery little fellow:

I used my Pop 'n' Cuts base and modified my dress form insert to accommodate my fire chief mini figure in front of his desk. I am very pleased with how he turned out and doubly so when Ben opened it this morning and deemed his card 'totally awesome - the best card you've ever made!' Praise indeed!!

Back tomorrow with another of Ben's birthday cards - from his big sister. Until then, happy stampin'!


Stampin' Up Supplies:

Stamps: Make a Wish

Cardstock: Real Red, Basic Black, Daffodil Delight, Whisper White, Basic Grey, Crumb Cake

Ink: Real Red

Tools: Pop 'n' Cuts Base, Pop 'n' Cuts Dress Form, Big Shot, Stamp-a-ma-jig, Small Oval Punch, 1 1/4" Circle Punch, 1 3/4" Circle Punch, Itty Bitty Shapes Punch (circle), Corner Punch


Oh, Whale Party Invitations and Thank Yous - Take Two

by Joanne James5. August 2013 18:11

Today I am having a brief interlude in sharing the festive makes from my weekend Christmas workshop, to share with you another party invitation and co-ordinating thank you card made with the 'Oh, Whale!' stamp set. As I mentioned in yesterday's post, my youngest celebrated his forthcoming 6th birthday with a swimming pool party held jointly with one of his classmates, whose 6th birthday was last week. Having used the 'Oh, Whale' set for Rebecca's party a couple of months ago (you can see her invites here), it seemed the obvious choice, although a different design was required. Here is what I came up with:

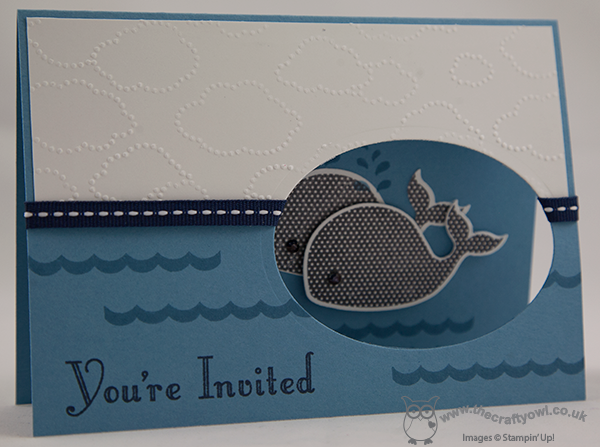
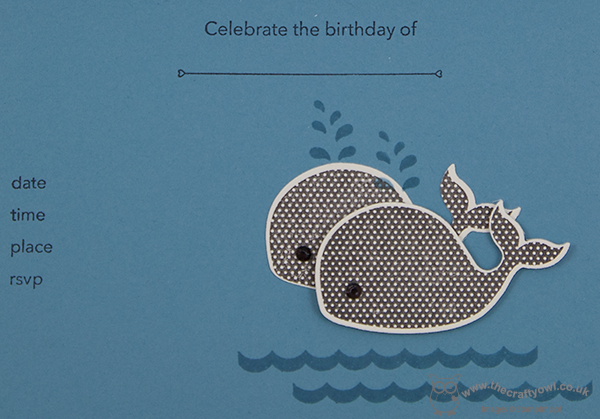
This time 2 whales were the order of the day and they were attached to the inside of the card, visible through an aperture cut with an oval framelit. Here's the view of the inside of the card; the 'Make a Wish' set is great for creating party invitations and makes it really easy:

Luckily for me, the classmate who was celebrating his birthday jointly with Ben was no other than the son of one of my downlines, Barbara, so between us we managed to get a great production line going and knocked out these invitations in super quick time. We also created our co-ordinating thank you postcards, which we pre-printed with a short thank you message (well, have you ever tried to get two six year old boys to write a bunch of thank you cards from scratch during the school summer holidays? We needed to give them a helping hand!). Here's the finished card:

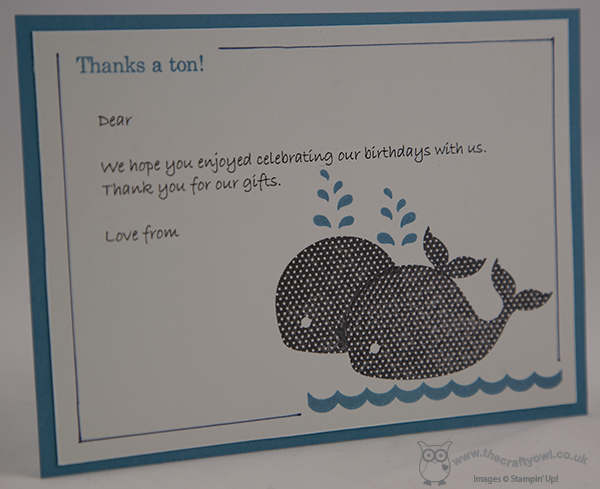
This time I created a mask to enable me to stamp two whales without the need to cut out and layer and I printed the text using MDS.

That's my last set of 'Oh, Whale' party invitations for a while. Back tomorrow with another of the projects we made in our Christmas workshop. Until then, happy stampin'!


Stampin' Up Supplies:

Stamps: Oh Whale, Make a Wish

Cardstock: Whisper White, Marina Mist

Ink/Stampin' Write Markers: Night of Navy, Marina Mist, Basic Grey

Tools: Cloudy Day Textured Embossing Folder, Ovals Framelits, Happy Whale Clearlits, Stamp-a-ma-jig

Finishing Touches: 1/4" Night of Navy Stitched Grosgrain Ribbon, Basics Rhinestones (coloured black with a Sharpie)

Shop Online

Access my online shop 24 x 7, 365 days of the year:

Current May hostess code:

3NR3FB9W

Shop Online

2024-25 Annual Catalogue

BROWSE THE CATALOGUE

Click on the image to download your copy of the 2024-25 annual catalogue. For a full list of current SU! supplies, go to my online store. If you would like any help or advice, please drop me a line at [email protected] or give me a call on 07773 421446 - I'd be happy to help.

Join My Team

It's always a great time to join Stampin’ Up but during May it's even better! New team members can get £78.25 of new In Color products for FREE! That's in addition to another £130 worth of products of your choice for only £99 + free business supplies + free shipping + all the fun being a part of Stampin’ Up! Stampin' Up! has something for everyone: join my growing team and benefit from my support to enjoy Stampin' Up! however you choose.

If you're interested, call me for a chat to understand how I can help you realise your goals. Alternatively, if you have already decided to sign up and you just can't wait, please click here for the link to the online form where you can sign up and order your starter kit right away! 

Latest Kits!

Stampin Cut and Emboss

The City Sights Kit has all you need to make 8 cards with coordinating envelopes for £20. Along with the new Happy Hollyhocks Kit, a no stamping kit including 9 cards for just £14, both are available from May 1st - get yours here!

New Online Exclusives

There are new products available exclusively in the online store from 5 March - check them out here.

About Me

Hi I'm Joanne and live in Northampton and when I'm not looking after my husband and two beautiful children, am an avid crafter with a passion for all things Stampin' Up!

I must confess that I have never been a big rubber stamper - until I discovered Stampin' Up! that is. I love the fact that I can get such great results with co-ordinating stamps, inks, papers and punches - the possibilities are endless! Join me on my stamping journey as I share the things I love and be inspired to create amazing things yourself!

Follow Me

Monthly Newsletter

Box Builder

Click the button above to use Box Buster to create your custom box design using the Envelope Punch Board!

Kits Collection Now Available!

Stampin Cut and Emboss

The new Kits Collection from Stampin' Up! is now available!

Click here to see the current kits available and order yours online today.

I Design For


Mini Catalogue


The next mini catalogue will be live in September! 

Stampin' Up Stuff

This is my personal blog and is not endorsed by Stampin’ Up! I hope you find it a plentiful source of ideas and personal inspiration but please don't copy my designs for contest submission or use for classes, publication or sale without express permission.