Cool Treats Ice Cream Sundae Birthday Card

by Joanne James7. May 2017 09:00

It's Sunday and time for this week's new challenge over at The Paper Players! The lovely LeAnne is hosting host this week and she has a fun theme for us to work with:


Sweet treats - yummy! So many delicious possibilities; I'm a real lover of ice-cream so decided to break out my Cool Treats Suite and using this week's sketch over at Mojo Monday created my very own ice-cream sundae - of the paper variety, of course! Take a look at what I came up with:


Here's the low-down on today's card:

Lots of Layers - I was attracted to this week's Mojo Monday sketch and all those lovely layers - I've used 10 in total on my card! I am often wary about mixing paper patterns however the Tasty Treats papers have some great co-ordinating patterns that make mixing and matching easy. I used three different ones on today's card sticking to one small pattern design, one larger design and a banner of stripes. Neither one overwhelms another so can be used together effectively to create a cohesive design.

Tasty Treats - I took the colour scheme for my card directly from the Tasty Treats Specialty Designer Series Paper and instead of a square for one of the layers of the sketch I used my Frozen Treat Thinlits to create a three-scoop ice cream sundae, complete with sprinkles and glossy hot fudge sauce (courtesy of my fine tip glue pen). Such a shame we are soon to say goodbye to this paper, however I'm thrilled that the stamp set and thinlits are being carried over to the new annual catalogue.

Two-Tone Sentiment - I finished with a two-tone sentiment by masking and inking my stamp with Watermelon Wonder and Early Espresso respectively. I gave the same treatment to my sentiment on the inside and added a cherry, because, well every sundae needs one, even if it's on the inside:


This card is a great example of what I love about Stampin' Up! - effortless colour and product co-ordination. Inks that match stamps that match cardstock that match paper - there's nothing better! 

Here is the visual summary of the key products used on today's project for you to pin for easy reference:


You can see all of my Product and 'How To' summaries on my 'How To - Tips and Techniques' Pinterest board in case you've missed any. 

Before you reach for your ink and papers, check out what our amazing team has created to inspire you this week:

The Paper Players Design Team
 
 
Here's a quick recap of our challenge rules:
 
1.  Create a new paper project
2.  Upload your creation to your blog with a link back to us and provide a direct link to the post featuring your challenge submission.
3.  Please link your card to no more than four challenges, TOTAL.
4.  Have FUN! 


I look forward to seeing what you create with this week's theme. Enjoy the rest of your weekend as it will be over all too quickly; we are embarking on exam season here in the James household, so it will be revision and not a lot else here today. I'll be back tomorrow with another project; until then, happy stampin'!


Stampin' Up! Supplies Used: 

Table built using Product Table Builder by The Crafty Owl - Independent Stampin' Up! Demonstrator.

Window Box Thinlits Happy Birthday Candle Card

by Joanne James5. May 2017 20:00

Did you miss me? I've been away from my blog this week simply because, well, life got in the way! I've been busy preparing for a big team training event that I'm hosting the weekend after next and I've had preparation for next week's classes to take care of, so whilst I've content prepared for both that I will share in due course, I seem to have struggled to find the time to write any posts.

Anyways, I'm here a little earlier this evening and thought I would share with you one of the makes from one of last month's technique classes, featuring the Window Box Thinlits dies. In addition to using them to make an Easter basket and a pretty box, we also made a simple card that featured the co-ordinating Window Shopping stamp set and one of the decorative pieces. Here it is:


The card features the bright colours that are a feature of the candle-printed designer series paper from the Party Animal Suite: Tangerine Tango, Pacific Point, Emerald Envy, Crushed Curry. A bold happy birthday sentiment, along with a Stitched Framelit square that w as run through the Big Shot for a second time with the candle die from the Window Box thinlit set form the basis of the central panel. Wondering how I coloured my candles? I used Party Animal Washi Tape, just running a few strips across the base before adding the diecut popped up on dimensionals. You can see the detail more closely here:


This is one of those 'go to' cards - quick and easy to put together and in this colour combination pretty much suitable for anyone. A great standby card or one to make if you're short on time and need a card in a hurry!

I'm so glad that the Window Shopping stamp set and Window Box Thinlits are carrying over into the new annual catalogue - they are so useful. The current discounted bundle price won't carry over though, so if you would like get the 10% bundle discount for purchasing before products, be sure to purchase before the end of May.

Here is the visual summary of the key products used on today's project for you to pin for easy reference:


You can see all of my 'How To' summaries on my 'How To - Tips and Techniques' Pinterest board in case you've missed any. 

I'll be back tomorrow with one of the other projects from last month's technique class featuring the Window Box Thinlits. If you live in or around Northampton, I would love to see you at one of my classes. You can see the current list here but do check back regularly for updates as new classes are added from time to time. Until tomorrow, happy stampin'!


Stampin' Up! Supplies Used:

Table built using Product Table Builder by The Crafty Owl - Independent Stampin' Up! Demonstrator.

Eastern Palace Suite Early Release - FREE PDF TUTORIAL

by Joanne James1. May 2017 13:00

For all of you who have been patiently awaiting the arrivial of the new annual catalogue, I have some great news: from today you are able to get your hands on the colourful and exotic products from the Eastern Palace Suite a whole month before they’re released in the 2017-2018 annual catalogue! These products are being made available in two exclusive bundles, each of which includes a free product. Whilst these products will be available individually in the new Stampin' Up! 2017-18 Annual Catalogue, each of these exclusive bundles will be available for the month of May only:


 The following video from Stampin' Up! also shows just how easy these suites are to make beautiful cards (bear with it at the beginning as it is a little slow to start - keep watching to see the new products in action):

https://youtu.be/qF02FybBBO8

Whether you are a beginner or avid crafter, this really is a set with endless combinations and possibilities. Each bundle also contains ink pads in three of the new in-colours too. The other good news is that this bundle is also available as part of the Stampin' Up! starter kit and this is a great time to sign up as a demonstrator - as a demonstrator you will also get the opportunity to pre-order other items from the new Stampin' Up! 2017-18 Annual Catalogue too starting tomorrow! Do get in touch if you would like to chat with me about joining my team - I would love to welcome you to my Stampin' Up! family or alternatively click on the 'Join My Team' link in the sidebar. 

What's more, if you purchase either of the Eastern Palace Suite bundles from me this month, either in person or online using this month's hostess code  DXFJQZPN you will also receive a free full-colour PDF tutorial with complete instructions to make the following three cards:

Aren't they gorgeous? That's all from me today - you can see today's creative post here if you missed it - otherwise, I will be back tomorrow with another project. Until then, happy shopping!


Links to my online store:

Table built using Product Table Builder by The Crafty Owl - Independent Stampin' Up! Demonstrator.

Rainbow Watercolour Butterfly Thinlit Card

by Joanne James1. May 2017 11:00

Happy Monday everyone, and for those of you in the UK a Bank Holiday too! Lots happening today - first things first, I'm sharing a card for the current Fusion challenge (photo inspiration) using this week's sketch over at Freshly Made Sketches:


I loved the look of the rainbow watercolouring of the inspiration photo so thought I'd have a go at this fun technique - take a look at my finished card:


Here's the low-down on today's card:

Watercolour Rainbow - I masked off the circle shape in the sketch using a round post it on a piece of retired music note paper that I had in my stash and then using my aquapainter, allowed the colours to flow and bleed into one another and away from the masked area. It really wasn't tricky; the most important thing is to not over-blend the colours so that they remain true and don't end up all brown and muddy. The paper did warp a little, but I used Fast Fuse liberally to adhere it to my mat when dry and this seemed to do the trick.

A Sparkly Butterfly - I used my Butterfly Thinlits to cut out a simple butterfly in Basic Black cardstock and brushed it liberally with clear Wink of Stella. You can see a little of the shine in the photogragh, but believe me in real life this is super sparkly and looks great against the rainbow coloured background.

Just A Note - My sentiment is from the Flourishing Phrases stamp set - it seemed appropriate with the musical background paper! I added a Pumpkin Pie enamel shape heart for an added pop of colour against the black.

So a fun card that wasn't overly difficult to create and looks so very pretty in real life.

Here is the visual summary of the key products used on today's project for you to pin for easy reference:


You can see all of my 'How To' summaries on my 'How To - Tips and Techniques' Pinterest board in case you've missed any. 

This is one of two posts today - you can read my second post regarding the early release of some great new Annual Catalogue product - the Eastern Palace Suite - here. 

Enjoy your day and I'll be back tomorrow with another project. Until then, happy stampin'!


Stampin' Up! Supplies Used:

Table built using Product Table Builder by The Crafty Owl - Independent Stampin' Up! Demonstrator.

Nailed It #GDP084

by Joanne James30. April 2017 20:00

I've had a busy day - we have today welcomed 4 new additions to the James Family - yet still managed to find time to photograph this little number that I made yesterday for this week's challenge over at The Global Design Project. Thank you for to the GDP team for choosing my card last week as a GDP Winner  - I'm honoured. If you missed it, you can see that card here. This week the challenge is to case one of their design team, the lovely Michelle Last, and this is her inspiration card:


I liked the way Michelle embossed the whole front panel, as this isn't something I do on a card often, and combined it with the focal point frame and I wanted to retain these elements. I considered using butterflies but a quick glance at the gallery showed lots of other examples so I went through my box of embossing folders for inspiration and this is what I came up with:


Here's the lowdown on today's card:

Pick A Pattern - I chose to use the Hexagons Dynamic Textured Impressions Embossing Folder for my background and that formed the basis of the masculine theme for my card. This folder creates such a deep impression with wonderful dimension it makes a great background.

A Creative Frame - I decided to create a frame shaped like a nut to tie in with my masculine hexagonal theme. The hexagonal shape in the Build It Framelits was too small for my card, so I just punched a 2" circle into a piece of cardstock and freehand cut my hexagon around it. It is not perfectly proportioned because I needed a larger hole in order to accommodate my sentiment, so a little creative licence used.

Nailed It - The real feature of my card has to be the tools from the Nailed It bundle. I was so surprised and disappointed to see that this set and the Build It Framelits were not carrying over into the new annual catalogue. It's a great set and I haven't used it much on my blog yet as I was building up to Father's Day in June. The framelits have unfortunately already sold out but at the moment the stamp set is still available. I would really recommend it as it makes a great masculine set and the main tools can be easily fussy cut my hand. I watercoloured my tools with ink and an aquapainter to reflect the style of the card I was casing - a quick and easy way to add a splash of colour.

The fun thing about casing someone else's card is that you can take lots of basic elements that are the same - the embossed background, fancy frame and watercoloured image - yet make them your own to produce something completely different. My card is a completely different theme to the challenge card, but similar in many other ways and it's clear to see where I did a 'Copy And Selectively Edit' of Michelle's original. Thanks Michelle for the inspiration this week!

Here is the visual summary of the key products used on today's project for you to pin for easy reference:


You can see all of my 'How To' summaries on my 'How To - Tips and Techniques' Pinterest board in case you've missed any. 

I'll be back tomorrow with a new project. Until then, happy stampin'!


Stampin' Up! Supplies Used:

Table built using Product Table Builder by The Crafty Owl - Independent Stampin' Up! Demonstrator.

So In Love Freestyle Collage Card

by Joanne James30. April 2017 09:00

It's Sunday and time for this week's new challenge over at The Paper Players! The lovely Jaydee is the hostess this week and as it's the fifth week of the month she has a fun tic tac toe board for us to work with:


I decided to go across the bottom row - pink, leaves and flower - and took the opportunity to create a card with a modern collage feel, a little different to my usual style. Take a look:


Here's the low-down on today's card:

So In Love Watercolouring - I heat embossed the large flower from 'So In Love' onto Shimmery White cardstock and used my aquapainter and a variety of pink inks to watercolour it. When dry, I added a liberal brush of clear Wink of Stella for added sparkle. I used the same outline flower for some tone-on-tone stamping and added some white diecut leaves.

Bits And Pieces - I love collage-style cards, but find them such a challenge to create and have them look natural! I gathered lots of bits and pieces - ribbon, sequins, doilies and a wooden flower - and set to work. I also gave my finished card a liberal flick of Wink of Stella - you can't see the shine on the photograph, but this card is oh so pretty in real life!

Freestyle Collage - So the trick with this kind of freestyle collage card is to somehow take an eclectic selection of items and bring them together into a cohesive design. This card took me longer than it should have, as I was very considered with my elements, however I'm really pleased with the result - a lovely, feminine card that would work for a variety of different occasions. I am also linking up with the ladies over at SUO Challenges today with this card where there theme is 'all that's feminine'.

Here is the visual summary of the key products used on today's project for you to pin for easy reference:


You can see all of my Product and 'How To' summaries on my 'How To - Tips and Techniques' Pinterest board in case you've missed any. 

Before you reach for your ink and papers, check out what our amazing team has created to inspire you this week:

The Paper Players Design Team
 
 
Here's a quick recap of our challenge rules:
 
1.  Create a new paper project
2.  Upload your creation to your blog with a link back to us and provide a direct link to the post featuring your challenge submission.
3.  Please link your card to no more than four challenges, TOTAL.
4.  Have FUN! 


I look forward to seeing what you create with our tic tac toe board this week. Enjoy the rest of your weekend - we have a long one as tomorrow is a Bank Holiday here in the UK, so we are all enjoying the extra day that comes with a public holiday - let's just hope the weather stays fine! I'll be back tomorrow with another project; until then, happy stampin'!


Stampin' Up! Supplies Used:

Table built using Product Table Builder by The Crafty Owl - Independent Stampin' Up! Demonstrator.

A Sneak Peek - Delightful Daisy Thank You Card

by Joanne James28. April 2017 20:15

Today I've a quick post to share some sneak peeks with you for some lovely new products that are appearing in the new Stampin' Up! annual catalogue that is due out on the 1st June - 6 in fact! Take a look:


Today's card features some great new products from the Delightful Daisy Suite, featuring some delicate and elegant florals, including:

  • A pretty new stamp set, Daisy Delight
  • A co-ordinating Daisy Punch
  • Delightful Daisy Designer Series Paper
  • 1/4" Daffodil Delight Double-Stitched Ribbon
  • Faceted Gems

It also features one of the new in-colours - the sentiment, also from the Daisy Delight stamp set, is stamped in Tranquil Tide.

This is such a pretty set - I'm really looking forward to creating more with it. I can't wait to share the new catalogue with you; if you are a customer of mine that has purchased from me within the last 6 months you will automatically receive an annual catalogue from me. If you haven't purchased from me within the last six months but would like to receive a copy of the new catalogue and don't already have a Stampin' Up! demonstrator, then please get in touch with me here to reserve your copy.

Here is the visual summary of the key products used on today's project for you to pin for easy reference:


You can see all of my 'How To' summaries on my 'How To - Tips and Techniques' Pinterest board in case you've missed any. 

I'll be back tomorrow with another project. Until then, happy stampin'!


A Bike Ride With Two New In-Colours

by Joanne James25. April 2017 12:00

Today I'm sharing a card for this week's new challenge over at CAS Colours and Sketches where this is the last of my guest designer posts this month. This week it's a sketch challenge: 
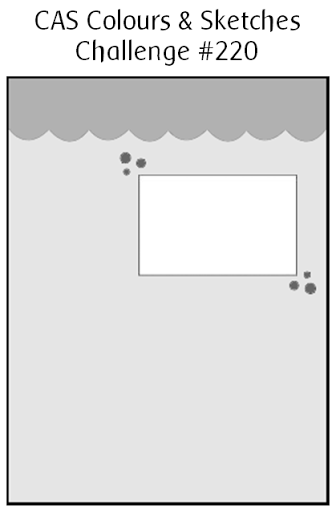
    

I also decided to use the inspiration photo over at Fusion as a starting point for my card today, which features another sneak peek of the forthcoming 'Bike Ride' stamp set and a few other new products besides - take a look:
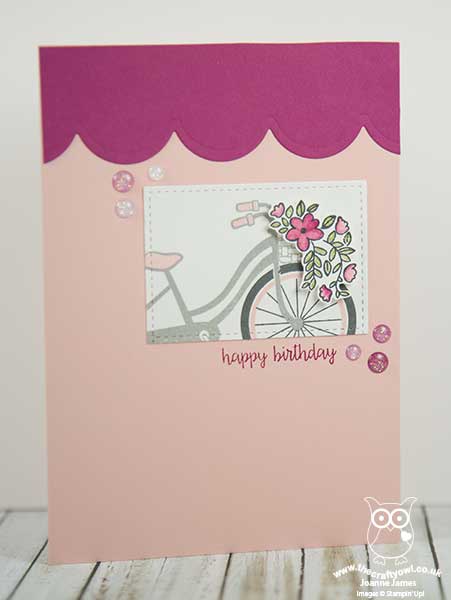
 

 Here's the low-down on today's card:

New Stamps - Not one, but two new stamps from the forthcoming new Stampin' Up! annual catalogue on my card today! The lovely Bike Ride bicycle, this time in Smoky Slate (not quite a truck, but still transport, right?) with a cascade of flowers in the front basket. I stamped and fussy cut these so that I could pop them onto a dimensional; not tricky, but I'm still looking forward to ordering my co-ordinating framelits! The sentiment is from a new set too called 'Happy Birthday Gorgeous' that has some wonderful sentiments in pretty scripts and fonts - more on this another day.

New In-Colours - Two new in-colours on my card today too: my cardbase and bicycle highlights are the new Powder Pink, a delicate soft pink that is almost a neutral, and Berry Burst - a rich, berry red with warm undertones, the colour that I used for my scalloped top border and enamel dots. Did you spot those lovely new accessories too? Glitter enamel dots, in various sizes and shades of Berry, with a wonderful glittery sparkle. I am going to need a TON of these!

New Tools - Wondering how I made that scalloped border? Yes, another something 'new' from the Seasonal Layers Thinlits is a scalloped border edge thinlit; I know this will be useful for all kinds of projects.

Isn't that a whole lot of new loveliness for a clean and simple card?!

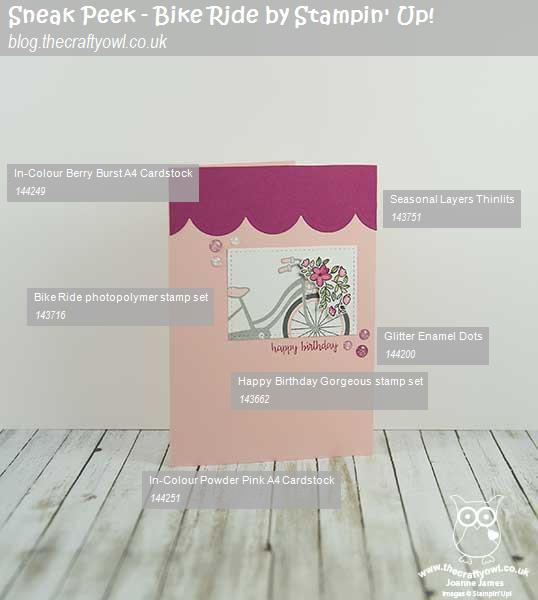
Here is the visual summary of the key products used on today's project for you to pin for easy reference:
 

You can see all of my 'How To' summaries on my 'How To - Tips and Techniques' Pinterest board in case you've missed any. 

Be sure to check out the other DT cards over at CAS Colours and Sketches and look out for me in the gallery from next week onwards!

Enjoy the rest of your day; the James Juniors are (finally) back to school so today I am loooking to move mountains and get into the thick of my significant 'to do' list. I'll be back tomorrow with another project. Until then, happy stampin'!


Stampin' Up! Supplies Used: No product table today, as most of the items on today's card will not be available to purchase until the new catalogue launches. Item numbers are included on the visual above though, so why not add this to your Pinterest board and contact me when the catalogue is live to place your order?

Attention All Bargain Hunters - The Stampin' Up! Clearance Rack Has Updated!

by Joanne James25. April 2017 09:00


What a great start to a Tuesday - I logged on this morning to find a surprise update to the Clearance Rack. There are now lots of new items available, some with as much as 60% off. As is always the case, popular items will sell out quickly, so don't spend too long deliberating - get in there quick! There are some great paper bargains, including many designer series papers, accessories, kits, framelits and even a few punches. My favourite Warmth and Cheer DSP stack is there along with those gorgeous Petals & Paisleys Designer Series Papers too - I could go on, but the best thing you can do is hop on over and take a look.

Click here to go the clearance rack in my online store and grab a bargain whilst stocks last! You might also want to check out this week's round of new weekly deals too and pop one or two of those in your basket - you can find them here. Don't forget to include the current hostess code Y2MKPTP6 make sure that 'allow your demonstrator to contact you' is ticked in order that you receive your special 'thank you' in the post from me. 

Race you to the shop - first one there gets the bargains! Happy shopping! 

Sunshine Wishes Glimmer Wedding Card PP341 and #GDP083

by Joanne James23. April 2017 21:02

A quick post with my second card today; you can see my card for this week's Paper Players Challenge here - this card is my second entry this week for the challenge over at Global Design Project and also happens to use this week's Paper Players sketch:


Whilst I loved my earlier entry for this week's Global Design Project challenge - you can see it here in case you missed it - I wanted to have another go with much more obvious sparkle and bling and this is what I came up with:


A little Falling In Love designer series paper, a Falling Petals embossed vellum overlay and not one but two glimmer papers: Blushing Bride for my Sunshine Wishes heart and Gold for my sentiment diecut from the same set and border. A gold metallic enamel heart shape, some gold thread and a little gold heat embossing finish my card. Very blingy for me and much more in keeping with the GDP challenge this week!

Here is the visual summary of the key products used on today's project for you to pin for easy reference:


You can see all of my 'How To' summaries on my 'How To - Tips and Techniques' Pinterest board in case you've missed any. 

It's the last day of the Easter school holidays here tomorrow; I'll be back on Tuesday with another project. Until then, happy stampin'!


Stampin' Up! Supplies Used:

Table built using Product Table Builder by The Crafty Owl - Independent Stampin' Up! Demonstrator.

Mini Catalogue

BROWSE THE CATALOGUE

The mini catalogue is now live! Read and download your copy here.

Shop Online

Access my online shop 24 x 7, 365 days of the year:

Current April hostess code:

VDKNV7BH

Shop Online

Join My Team

It's always a great time to join Stampin’ Up! New team members can get £130 worth of products for only £99 + free business supplies + free shipping + all the fun being a part of Stampin’ Up! Stampin' Up! has something for everyone: join my growing team and benefit from my support to enjoy Stampin' Up! however you choose.

If you're interested, call me for a chat to understand how I can help you realise your goals. Alternatively, if you have already decided to sign up and you just can't wait, please click here for the link to the online form where you can sign up and order your starter kit right away! 

Latest Kit!

Stampin Cut and Emboss

The Rock Legend Kit has all you need to make 8 cards with coordinating envelopes. Along with the new Panda Friends Kit, both are available from January 4th for just £14 each - get yours here!

2023-24 Annual Catalogue

BROWSE THE CATALOGUE

Click on the catalogue for a full list of current SU! supplies - if you would like to order any of the items featured, please drop me a line at [email protected] or give me a call on 07773 421446 - I'd be happy to help.

New Online Exclusives

There are new products available exclusively in the online store from 5 March - check them out here.

About Me

Hi I'm Joanne and live in Northampton and when I'm not looking after my husband and two beautiful children, am an avid crafter with a passion for all things Stampin' Up!

I must confess that I have never been a big rubber stamper - until I discovered Stampin' Up! that is. I love the fact that I can get such great results with co-ordinating stamps, inks, papers and punches - the possibilities are endless! Join me on my stamping journey as I share the things I love and be inspired to create amazing things yourself!

Follow Me

Monthly Newsletter

Box Builder

Click the button above to use Box Buster to create your custom box design using the Envelope Punch Board!

Kits Collection Now Available!

Stampin Cut and Emboss

The new Kits Collection from Stampin' Up! is now available!

Click here to see the current kits available and order yours online today.

I Design For


Stampin' Up Stuff

This is my personal blog and is not endorsed by Stampin’ Up! I hope you find it a plentiful source of ideas and personal inspiration but please don't copy my designs for contest submission or use for classes, publication or sale without express permission.