Zany Zebras Circles Boy Birthday Card TTT112

by Joanne James6. May 2021 17:00

It's Thursday and time for a new challenge over at TicTacToe! It's the turn of Team X to host this week and the lovely Betty is our featured designer this week. This is the fun board that we are playing along with: 


I went down the third column with Heat Embossing/Diecuts/Circles and made another boy's birthday card with my now retired 'Zany Zebras' stamp set that I used on my Paper Players card earlier this week (if you missed it, you can see that card here) - take a look:


Here's the low-down on today's card:

I used a ton of retired product on my card today: Zany Zebras, Playing with Patterns paper, Stitched Shapes Dies, enamel stars and Large Dot embossing folder to name but a few, but I think they were totally fitting for the grid and they combine to make a fun birthday card for a boy. Check out the hat on my zebra with oversized tassle too:

I also added some words and another fun zebra to the inside of my card:


No visual summary of the key products used on today's project today or supplies list as so much came from the storecupboard!

A tictactoe board offers so many creative possibilities - how does this week's board inspire you? Why not have a go? We would love to see you in the gallery and who knows - you might be selected for Designer's Choice and be eligible to be a guest designer on a future challenge.

I'm also linking today's card up over at the Festive Friday Challenge where I chose red, blue and emboss as my 3 (I realise I also have stitching too with my circle!) and am making another entry over at SUO Challenges for their 'animals' theme.

Enjoy your evening; I'll be back tomorrow with another project. Until then, happy stampin'!

This card was a Festive Faves Winner for #FF0083

FF#001 Festive Friday Faves

Stampin' Up UK 2021-23 In Color Club Now Open - Book Your Space!

by Joanne James5. May 2021 12:00

With a new Stampin' Up! catalogue, new in-colours always feature on a new wish list - why wouldn't they? The new 2021-23 In Colors will be with us for the next 2 years and this year's in-colours are very on-trend and co-ordinate beautifully with each other and the other colours in the Stampin' Up! colour families:


To help you spread the cost and gradually grow your new in-colour collection, I am offering an in-colour club (UK customers only). It begins this month and runs for the next 5 months, up to and including September. Each month, you will receive a collection of products for one of the colours, with each month featuring a different colour. You will be sent a reminder on the 1st of the month, and your in-color club invoice will need to be paid by the 15th of the month in order that items can be ordered in good time.

Each month, you will receive: 

  • 1/2 pack of A4 cardstock (12 sheets)
  • 1/2 roll of 3/8" (1cm) In Color Open Weave Ribbon
  • 1 ink pad
  • 1 ink refill
  • 1 Stampin' Write Marker
  • 20 In Color Jewels
  • Eight 6”X6” In-Color DSP sheets
  • Two 6"x6" pieces In-Color Shimmer Vellum
  • 20 Loose Flower Flourishes 
  • A hand stamped card featuring your in-colour of the month

Since all of the colours are also available as Stampin' Blends, there is the option to add on a Stampin' Up! Blends Marker Combo Pack each month for an additional £8.50.   

Details:

Basic Pack Cost: £27 plus postage and packaging (Royal Mail 2nd Class Signed For) every month May through September. If you are local, you can avoid the cost of shipping and arrange to collect. 

Enhanced Pack Cost: £35.50 plus postage and packaging (Royal Mail 2nd Class Signed For) every month May through September. If you are local, you can avoid the cost of shipping and arrange to collect. 

Payment can be made by Paypal or bank transfer (or cash/cheque for local customers).

If you would like to join my new colour club this month, then you can email me to sign up here.

True Love Striped Floral Thank You Card

by Joanne James5. May 2021 08:00

Today I'm sharing a card using the colour palette over at Fab Friday:


I was intrigued by their colour combo for this challenge as it wasn't one that I would normally use, but I thought it would give me the opportunity to try a colouring technique that I've seen in blogland recently - take a look at my card and I'll explain:


Here's the low-down on today's card:

I featured two more black and white patterns from the True Love designer paper pack on my card today - I just love these papers! I used a striped panel for my background and coloured some of the stripes in each of the challenge greens, and added a thin line of Terracotta Tile to the widest green stripe. I then added some simple panels and a sentiment on a stitched oval, that I embellished with some ribbon loops and a pair of flowers fussy cut from another piece of True Love DSP - and so to my experiment! I've seen some great examples of florals coloured with a 'flicking' technique, where after colouring the main blossom a contrasting colour is added with a thin pen. This paper was a great place to start as I simply followed the lines of the print:

This was also a good choice since I could use my Stampin' Write marker to add this detail, as this colour doesn't exist as a Stampin' Blend. The eagle-eyed amongst you might also recognise the layout I used for my card; this was the sketch for the previous Fab Friday challenge which I didn't manage to take part in, but I thought it would be perfect for my card today - so a double thank you, Fab Friday team for your inspiration!

Here is the visual summary of the key products used on today's project for you to pin for easy reference:


You can see all of my 'How To' summaries on my 'How To - Tips and Techniques' Pinterest board in case you've missed any. 

Enjoy your day and I'll be back tomorrow with another project. Until then, happy stampin'!


Stampin' Up! Supplies Used:

Table built using Product Table Builder by The Crafty Owl - Independent Stampin' Up! Demonstrator.

Pantone-Inspired Pierced Blooms You're Amazing Card CCS 418

by Joanne James4. May 2021 12:00

It's Tuesday and time for a new challenge over at CAS Colours & Sketches. Samantha is hosting for the month of May and our first challenge is a colour challenge: 


Samantha's chosen colours this week are very reminiscent of the 2021 Pantone Colour of the Year pairing of grey and yellow so are very contemporary and on point. I wanted the yellow to be my 'white space' on my card as I wanted to use white as part of my design, so I grabbed this week's Global Design Project sketch layout and set to work with my 'In Bloom' stamp set and co-ordinating Pierced Blooms Dies - take a look:


Here's the low-down on today's card:

I used the label from the Pierced Blooms dieset for my sentiment which I stamped in Basic Grey, then added a cluster of diecut flowers and leaves in the challenge colours and white to mimic the circular shape of the sketch. In order to preserve a feeling of CAS and my all-important white (or yellow!) space, I resisted the urge to add any additional embellishments to my card:


I had a spare diecut flower leftover so I added that to the inside too:


Here is the visual summary of the key products used on today's project for you to pin for easy reference:


You can see all of my 'How To' summaries on my 'How To - Tips and Techniques' Pinterest board in case you've missed any. I really love this dieset and am thrilled that it has carried over to the new annual catalogue too so will be with us beyond the end of June when the mini catalogue leaves us. I can see me getting lots more use from it!

As a reminder, for our colour challenges, you must use all of the stated challenge colours. You may also use neutral colours; however, the challenge colours should be the most noticeable ones featured on your card. We use Stampin' Up! color names for reference, but you are welcome to use any other companies' products as long as you match the challenge colours as closely as possible.

Enjoy your day and I'll be back tomorrow with another project. Until then, happy stampin'!

Stampin' Up! Supplies Used:

Table built using Product Table Builder by The Crafty Owl - Independent Stampin' Up! Demonstrator.

Friendly Silhouettes Happy Day Card

by Joanne James3. May 2021 15:13

Happy Bank Holiday Monday everyone! As is typical it's raining here in the UK so it's a great day for crafting! Today I'm sharing a card that I made using this week's colours over at Color Throwdown for an ombre blended background for another crack at the challenge over at TGIF Challenges this week. I also used the sketch over at Inspired By:


Here's my card that also bids farewell to another retiring stamp set:


Here's the low-down on today's card:

I created an ombre background using all three colours and my blending brushes, then over-stamped this with the floral stem from the 'Friend Like You', adding the flowers to my Pear Pizzazz stems in Calypso Coral and Blushing Bride. I added a pair of black dragonflies in place of the circle on the sketch, although in hindsight I wish I'd masked off a circle to give it more prominence. I added a black diecut for an additional silhouette of meadow flowers over the top and finished with a sentiment from the same set. I adhered the diecut at the base only, allowing the diecut piece to float freely:


So today's card is a final reminder that this evening is the last time you will be able to order those products that are retiring from the annual catalogue as a new one goes live tomorrow. Many items have sold out, but there are still bargains to be had - check them out in the online store here, but you have to be quick!

Here is the visual summary of the key products used on today's project for you to pin for easy reference:


You can see all of my 'How To' summaries on my 'How To - Tips and Techniques' Pinterest board in case you've missed any. 

Enjoy your day; following a quick visit to the garden centre this morning in what felt like arctic winds, it has rained constantly all day. So I've put gardening on hold in favour of crafting! I'll be back tomorrow with another project for this week's new challenge over at CAS Colours & Sketches and of course the launch of the new Stampin' up! annual catalogue - I can't wait!  Until then, happy stampin'!


Stampin' Up! Supplies Used:

Table built using Product Table Builder by The Crafty Owl - Independent Stampin' Up! Demonstrator.

Zany Zebras Meets Playing With Patterns Birthday Cards For Boys PP539

by Joanne James2. May 2021 09:00

Today it's Sunday and time for this week's new challenge over at The Paper Players! It's my turn to host this week and I have a fun theme challenge for you to work with:


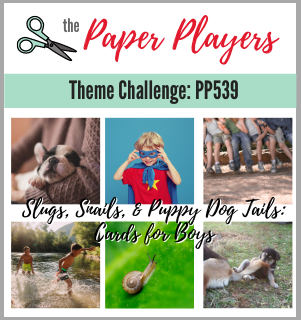
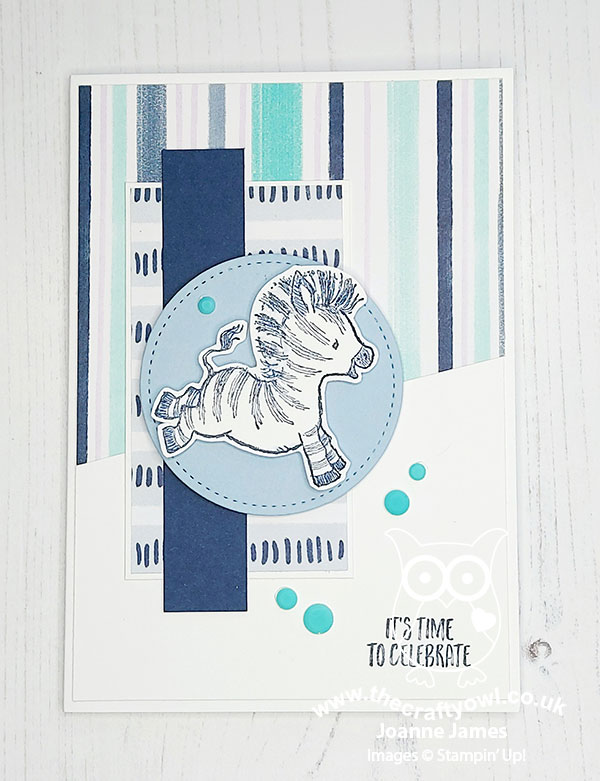
Are you familiar with the nursery rhyme: 'What are little boys made of?' It inspired my theme this week and the fabulous badge that our teamie Nance made illustrates it perfectly. So whether you choose to feature snails, puppy dogs, superheroes, or anything else that works for you, my theme this week is cards for boys. I'm making the most of the last couple of days of retiring favourites before the new annual catalogue arrives, so I chose to go with a zany zebra (or two!) for my card, using Julee's current Mojo Monday sketch layout which was great for some simple layering of retiring papers too - take a look:


Here's the low-down on today's card:

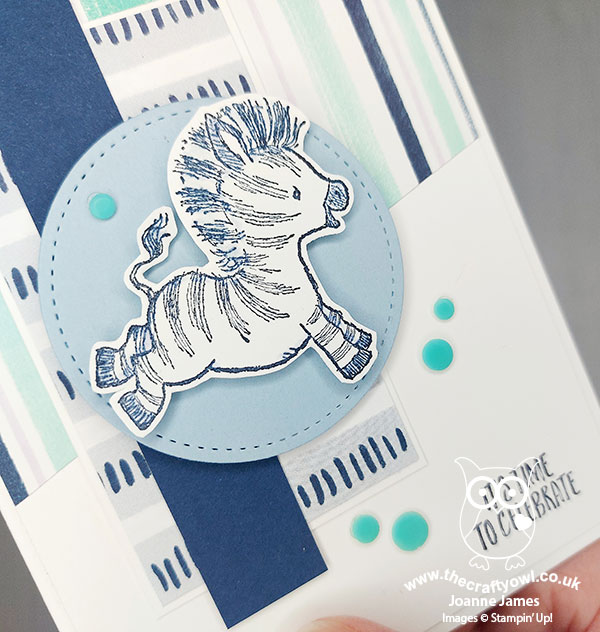
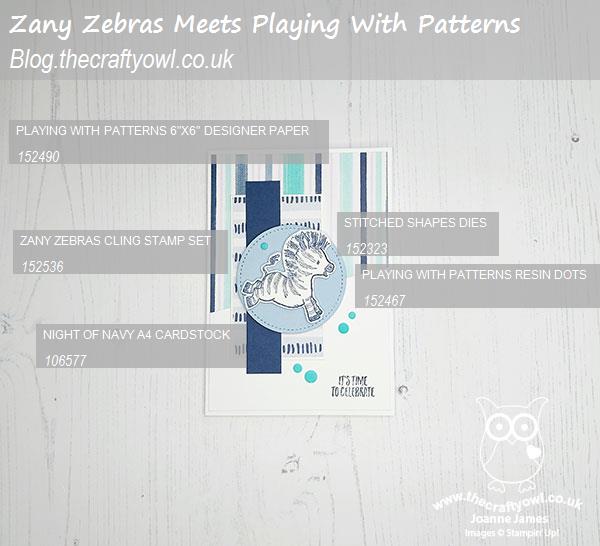
I used a mix of Playing With Patterns DSP for my layers as I think these colours have a fun masculine feel and stamped one of the zebras from the 'Zany Zebras' stamp set in Night of Navy, adding some Wink of Stella to his mane, then fussy cut it before adding to my card. A sprinkle of resin dots finished my card front:

I added another of the zebras, this time with a party hat, to decorate the inside of my card:


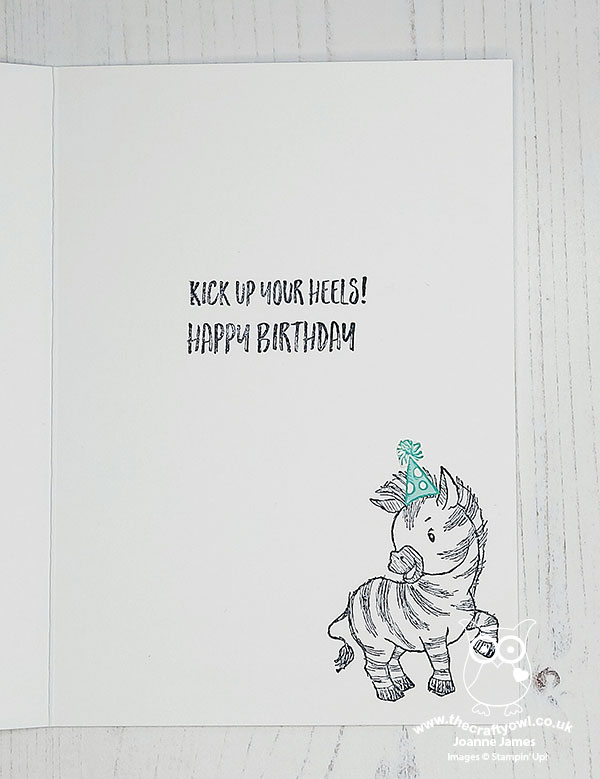
I love these cute zebras and think they make fun a fun birthday card for a young boy. If you're a fan too, you have until tomorrow to get your hands on a set before they are gone forever! I will have another card for boys using them later this week - they might be retiring, but I'm not ready to part with mine just yet!

Here is the visual summary of the key products used on today's project for you to pin for easy reference:


You can see all of my Product and 'How To' summaries on my 'How To - Tips and Techniques' Pinterest board in case you've missed any. 

I actually made a second card for our challenge this week that was altogether more clean and simple. It is based on last week's Freshly Made Sketches sketch and uses another of my favourite retiring sets, Silhouette Scenes:


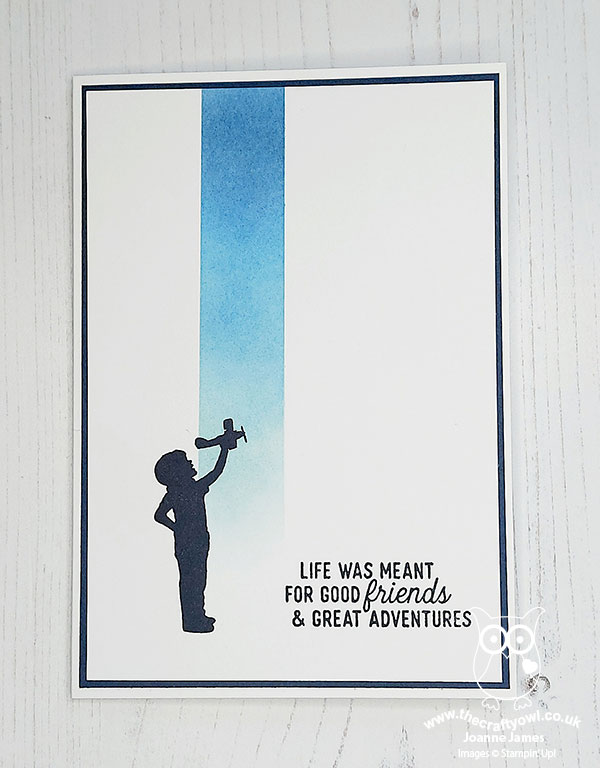
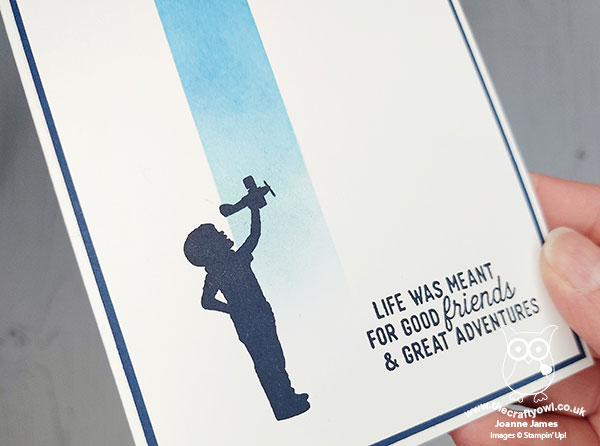
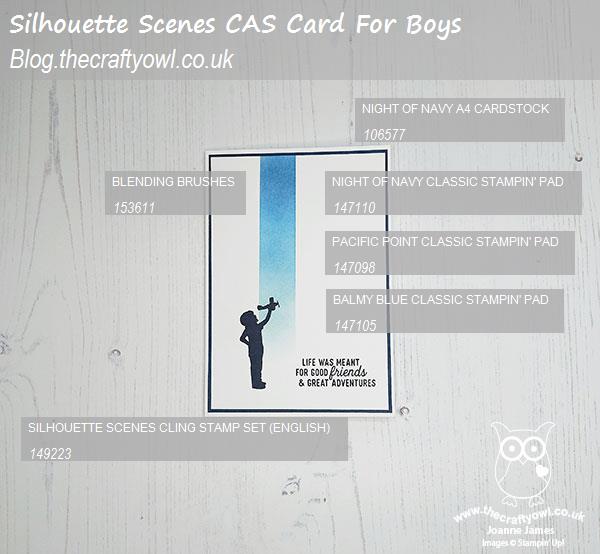
I masked off a column and created an ombre blended strip of sky using Balmy Blue, Pacific Point and Night of Navy inks and my blending brushes, and added the little boy with a toy aeroplane and a sentiment from the same set in Night of Navy, then added a simple 'Happy Birthday' sentiment to the inside using a stamp from 'Itty Bitty Greetings'. I love the simplicity of this card, and the way that the silhouette image overlays the ombre blended panel:


Here is the visual summary of the key products used on today's project for you to pin for easy reference:


You can see all of my Product and 'How To' summaries on my 'How To - Tips and Techniques' Pinterest board in case you've missed any. 

I love this card - so full of nostalgia! I'm linking this one up over at The Spot where the challenge is ink blending and TGIF Challenges where they are looking for ombre this week.


Before you reach for your ink and papers, check out what our amazing team has created to inspire you this week:

Here's a quick recap of our challenge rules:
 
1.  Create a new paper project
2.  Upload your creation to your blog with a link back to us and provide a direct link to the post featuring your challenge submission.
3.  Please link your card to no more than four challenges, TOTAL.
4.  Have FUN!

You can see all of my 'How To' summaries on my 'How To - Tips and Techniques' Pinterest board in case you've missed any. 

Enjoy your day; we have a long weekend here in the UK this weekend so are planning on making the most of it by taking things easy, especially since Rebecca starts her final round of GCSE exam assessments this week. I'll be back tomorrow with another project. Until then, happy stampin'!


Stampin' Up! Supplies Used: 

Table built using Product Table Builder by The Crafty Owl - Independent Stampin' Up! Demonstrator.


Table built using Product Table Builder by The Crafty Owl - Independent Stampin' Up! Demonstrator.

Kangaroo and Company Card For Mum AYSI 249

by Joanne James30. April 2021 12:00


Today I'm sharing my design team card for our new challenge over at As You See It where it's time for a sweet colour challenge:


Don't those macarons look delicious? I love those sugary colours and thought they would look perfect combined with the photo inspiration over at Fusion this week! I don't have a mum & baby giraffe pair in my stash, but I do have...kangaroos! So I set to work and this is what I came up with:


 Here's the low-down on today's card:

Kangaroo and Company - You've seen me use this set before for Valentine's, but it is perfect for cute cards for a range of occasions. There is a baby joey that fits in the mummy's pouch, but today I went in favour of the younger freestanding kangaroo who has just delivered his mum a beautiful big bunch of flowers, coloured in our challenge colours. 

Strong and Beautiful - Mother's Day has been and gone here in the UK, but I decided to choose a sentiment from the retiring 'Strong and Beautiful' stamp set (now available for the bargain price of £9.20!) that works for mums, or any special person, that you want to give a special thank you to. I love the sentiments in this set - they really are wonderful for celebrating special women in the broadest sense. I sat my young kangaroo on my sentiment strip so that he didn't look like he was floating in mid air, and I like that this makes him more central to the design than he would otherwise have been at floor level. 

A Hidden Message - Whilst my main sentiment is the one I talked about above, I couldn't resist adding another to the fun 'reveal' when you pull out the flowers from the pouch:

I know this feature has more appeal on cards for youngsters, but I think my Mum will find it fun too! It's so easy to do, as the Kangaroo Dies cut the slit in the pouch perfectly - no added effort required. I'm also linking today's card up with the ladies over at SUO Challenges where the theme is 'Animal Kingdom' and they are asking us to feature animals big and small on our cards.

Here is the visual summary of the key products used on today's project for you to pin for easy reference:


You can see all of my 'How To' summaries on my 'How To - Tips and Techniques' Pinterest board in case you've missed any. 

Here's a summary of our challenge rules:

  • Create any card, scrapbooking page, 3D project or packaging project that fits the challenge.
  • Please include the challenge graphic and link back to the challenge in your blog post. Turn off word verification so we can leave you lots of lovely comments. Make sure you link the post not the whole blog to the Linky. Use #AYSIXXX when uploading to a public gallery.
  • If you’re unsure about ‘the rules’, check the details under the Challenge Guidelines tab on the As You See It Challenge homepage.
  • In a colour challenge, black or other neutral can be used in outlines and sentiments but no other colours should be included. Stampin’ Up colours are used for reference but colours that are a close match are welcome.

Enjoy your day; my Fridays are always busy, so I'll keep this short and see you again tomorrow with another project. Until then, happy stampin'!

Stampin' Up! Supplies Used:

Table built using Product Table Builder by The Crafty Owl - Independent Stampin' Up! Demonstrator.

Under My Umbrella Rainbow Scraps Card CCS417

by Joanne James27. April 2021 13:00

It's Tuesday and time for a new challenge over at CAS Colours & Sketches. This week's challenge is a sketch challenge and Wei has asked that we get creative with diagonals this week:


Feel free to flip or rotate the sketch when making your card - which I did this week! I looked at those diagonals and thought that if I rotated the base through 180 degrees, they would make a rainbow! Take a look to see what I mean:


Here's the low-down on today's card:

I used a selection of 5mm wide offcuts from my scrapbox in a selection of rainbow colours (see below) and glue them across the diagonal of my Balmy Blue card base. I extended the Highland Heather piece across the card front, then took a piece of Basic White and cut an angled border with my clouds die from the retiring Happy Dies set for my top panel:

A simple sentiment from the also retiring 'Under My Umbrella' stamp set in Pacific Point finished my card - and not an umbrella in sight!

Our lovely DT member Vicky is also the hostess over at Addicted to CAS this week where she has chosen the code word 'sky' so I'm linking up there too - with sky, rainbow and clouds, my card today doesn't have anything else!!

Here is the visual summary of the key products used on today's project for you to pin for easy reference:


You can see all of my 'How To' summaries on my 'How To - Tips and Techniques' Pinterest board in case you've missed any. 

As a reminder, for our colour challenges, you must use all of the stated challenge colours. You may also use neutral colours; however, the challenge colours should be the most noticeable ones featured on your card. We use Stampin' Up! color names for reference, but you are welcome to use any other companies' products as long as you match the challenge colours as closely as possible.

Enjoy your day and I'll be back tomorrow with another project. Until then, happy stampin'!


Stampin' Up! Supplies Used:

Table built using Product Table Builder by The Crafty Owl - Independent Stampin' Up! Demonstrator.

Under My Umbrella Hello Sunshine and Green Wellies

by Joanne James26. April 2021 19:17

It's Monday and the start of a new week! Today was class day for me so I'm a little later with my blog post. Today's card is totally inspired by the inspiration photo over at Just Us Girls this week and also uses the Paper Craft Crew sketch:


I couldn't resist those green wellies and spring flowers! So I combined with some clouds and sunny yellow cardstock to create a cheery card using the retiring stamp set 'Under My Umbrella' that will be leaving us next week - take a look:


Here's the low-down on today's card:

I went with a rather abstract interpretation using some of the elements in the photo, paper-piecing some dotty green wellies onto a stitched circle and filling them with some fussy cut, colourful spring blooms. I sponged some clouds onto my Whisper White card base using my trusty Happy Dies cloud stencil and some Balmy Blue ink and a blending brush, then added a layer of Daffodil Delight, which I bordered using one of the Curvy Dies (also retiring in June) and stamped my sentiment directly onto this layer, next to my popped-up circle - 'Hello Sunshine' seemed like the most appropriate sentiment from this set for today's card! Are those wellies not just so much fun? Who wouldn'y love to go romping in the great outdoors in those?!


Here is the visual summary of the key products used on today's project for you to pin for easy reference:


You can see all of my 'How To' summaries on my 'How To - Tips and Techniques' Pinterest board in case you've missed any. 

I seem to be having a run of clouds on my cards, having featured them on Saturday's card and they pop up on tomorrow's card too - as does the 'Under My Umbrella stamp set!

Do come back tomorrow to see what I created. Until then, happy stampin'!


Stampin' Up! Supplies Used:

Table built using Product Table Builder by The Crafty Owl - Independent Stampin' Up! Demonstrator.

Pansy Petals Suite Hello Card PP538

by Joanne James25. April 2021 09:00

Today it's Sunday and time for this week's new challenge over at The Paper Players! It's the turn of the fabulous Claire to host this week and she has a sketch challenge for us to work with:


I embraced the layers of Claire's sketch this week and decided to play with some more new goodies from the forthcoming 2021 Annual Catalogue to bring you another 'sneak peek' - this time featuring the Pansy Petals Suite - take a look:


This is what I affectionately like to call a 'kitchen sink' card - because it uses pretty much everything but the kitchen sink! It features three new in-colours: Soft Succulent, Evening Evergreen and Polished Pink, along with the Pansy Patch stamp set and co-ordinating Pansy Dies, two different patterns of Pansy Petals designer series paper, some Polished Pink open weave ribbon and even a little gold Bumblebee trinket:


I wanted to get to grips with the layering of the pansy dies so this card was a great way to do that. I did go to town with my new goodies this week - I just couldn't help myself!! I'm linking today's card up with the team over at SUO Challenges where the theme is designer series paper; I really should have used it as an opportunity to use up some of my retiring paper, but when I came to make my card the pansies won out! Are you excited for the arrival of the new annual catalogue? Just over a week to go until it's here - copies will be going out in the post to everyone who has shopped with me in the last 6 months this week. If you would like a copy and you aren't on my mailing list, please get in touch. Meanwhile, I will have more goodbyes to retiring products to share this week!

Here is the visual summary of the key products used on today's project for you to pin for easy reference:


You can see all of my Product and 'How To' summaries on my 'How To - Tips and Techniques' Pinterest board in case you've missed any. 

Before you reach for your ink and papers, check out what our amazing team has created to inspire you this week:

Here's a quick recap of our challenge rules:
 
1.  Create a new paper project
2.  Upload your creation to your blog with a link back to us and provide a direct link to the post featuring your challenge submission.
3.  Please link your card to no more than four challenges, TOTAL.
4.  Have FUN!

You can see all of my 'How To' summaries on my 'How To - Tips and Techniques' Pinterest board in case you've missed any. 

Enjoy your day; I'll be spending mine in the garden enjoying the lovely weather that we've been lucky enough to experience here in the UK this week. I'll be back tomorrow with another project. Until then, happy stampin'!


Mini Catalogue

BROWSE THE CATALOGUE

The mini catalogue is now live! Read and download your copy here.

Shop Online

Access my online shop 24 x 7, 365 days of the year:

Current April hostess code:

VDKNV7BH

Shop Online

Join My Team

It's always a great time to join Stampin’ Up! New team members can get £130 worth of products for only £99 + free business supplies + free shipping + all the fun being a part of Stampin’ Up! Stampin' Up! has something for everyone: join my growing team and benefit from my support to enjoy Stampin' Up! however you choose.

If you're interested, call me for a chat to understand how I can help you realise your goals. Alternatively, if you have already decided to sign up and you just can't wait, please click here for the link to the online form where you can sign up and order your starter kit right away! 

Latest Kit!

Stampin Cut and Emboss

The Rock Legend Kit has all you need to make 8 cards with coordinating envelopes. Along with the new Panda Friends Kit, both are available from January 4th for just £14 each - get yours here!

2023-24 Annual Catalogue

BROWSE THE CATALOGUE

Click on the catalogue for a full list of current SU! supplies - if you would like to order any of the items featured, please drop me a line at [email protected] or give me a call on 07773 421446 - I'd be happy to help.

New Online Exclusives

There are new products available exclusively in the online store from 5 March - check them out here.

About Me

Hi I'm Joanne and live in Northampton and when I'm not looking after my husband and two beautiful children, am an avid crafter with a passion for all things Stampin' Up!

I must confess that I have never been a big rubber stamper - until I discovered Stampin' Up! that is. I love the fact that I can get such great results with co-ordinating stamps, inks, papers and punches - the possibilities are endless! Join me on my stamping journey as I share the things I love and be inspired to create amazing things yourself!

Follow Me

Monthly Newsletter

Box Builder

Click the button above to use Box Buster to create your custom box design using the Envelope Punch Board!

Kits Collection Now Available!

Stampin Cut and Emboss

The new Kits Collection from Stampin' Up! is now available!

Click here to see the current kits available and order yours online today.

I Design For


Stampin' Up Stuff

This is my personal blog and is not endorsed by Stampin’ Up! I hope you find it a plentiful source of ideas and personal inspiration but please don't copy my designs for contest submission or use for classes, publication or sale without express permission.