Last Chance 2022 July-December Mini Catalogue Retiring Products Announced and Clearance Rack Update!

by Joanne James30. November 2022 20:00

Heads up everyone: the list of products that will be retiring from this year's July-December mini catalogue has been announced and will be live from 11pm tonight!

You can see and download the full list of items retiring from the current July-December mini catalogue, and their discounts, by CLICKING HERE.

Retiring products are only available WHILE STOCKS LAST, so if you've still items on your wish list from this year's July-December mini catalogue, you need to check the retiring lists and if they're on it put an order in pronto! Don't forget to add this month's online hostess code: Q7VHHWQD

Hop online to get the latest on stock availability and place your orders. Some retiring items are discounted by up to a massive 60% so these may well be snapped up quickly. 


As if that wasn't enough for you, the Clearance Rack will also update. There are some great bargains to be had, including dies previously offered during the Perfect Partners Promotion! With discounts up to 60% off, you can get the die sets that coordinate with the still-available stamp sets at a great price. You can see everything that is on offer HERE.

I will be back tomorrow with a creative post and an update on the retiring list; until then, happy shopping!

Last Chance Products From The January-June 2022 Mini Catalogue

by Joanne James31. May 2022 08:00

It's nearly time to see all of the lovely items that will be retiring from the current 2022 January-June Mini Catalogue on 30th June!  I'm just popping by to let you know that the Last-Chance Products promotion will go live at 11pm this evening, UK time. All items retiring will be available for LAST CHANCE purchase, with some items that can be discounted by up to 50% - yay for a bargain!

In order for you to get organised, the list has been released in advance - here's the link to the full list so you can filter by language/category/price etc. and I've also included a couple of visuals below:


So get those shopping lists ready and if you're shopping online remember to add the current host code for an extra thank you in the post from me!

Back later with today's creative post - until then, enjoy writing those shopping lists!

Waves of The Ocean Pocket Edge To Edge Shaker Card

by Joanne James2. May 2022 10:00

Happy Bank Holiday Monday to my UK readers! Today I'm sharing a card that uses the colour palette over at Hand Stamped Sentiments

I'm loving all of the blue colour palettes that are about at the moment, especially since I have been giving my Waves of The Ocean Suite a workout and the two pair perfectly! I thought the HSS colours were perfect for a little project that I've been wanting to have a go at for a while - an edge to edge pocket shaker card. My good blog friend and fellow Tic Tac Toe challenge team member Stef Perry over at Perry Papercrafts made this fabulous card a while ago and I have been wanting to have a go and thought that the Waves of Inspiration bundle would be just the thing to make my own version - take a look:


Here's the low-down on today's card:

Waves Of The Ocean - Since this card is really all about the shaker, the stamping is fairly simple. I used all three ink colours to create my blended seascape background using my blending brushes and stamped a single wave in Versamark and heat embossed it in white; this forms the base of my shaker. 

A Pocket Shaker - creating the shaker itself is rally easy. You just need a flimsy acetate pocket - the wrapping that your new dies come in is perfect for this - then you attach it to the back of the panel on three sides to form a pocket, fill with the sequins on your choice (I used some retired ones from the Whale of a Time suite, minus the pink shells, along with some clear, white and silver ones) before taping the fourth side shut. You then mount this panel on your card front, and add any additional diecuts to the front of your card; I layered a Coastal Cabana foil and white cardstock pair of waves cut with the Waves Dies over my stamped image, and snipped a sentiment and added it to the opposing corner:


The sequins still move around the front of the card, although a little less freely than with a traditional shaker. On the upside there is less bulk though so this kind of card is great for posting. I just love this idea and am really happy with how this card turned out - thanks Stef for the inspiration, I knew I'd get around to making one eventually!

Going, Going, Gone - Today is your final reminder that lots of things are ending today - it is the last day that the following items will be available:

  • Last Chance Products, stamps and accessories from the current 2020-21 Stampin' Up! Annual Catalogue
  • All Together exclusive paper, stamps and dies (only the skin tone Blends are carrying over to the new annual catalogue)
  • Waves of The Ocean Suite exclusive papers, foils and embellishments (only the stamp set and dies are carrying over to the new annual catalogue)

When tomorrow comes, it will be all about the new annual catalogue so if any of the above are still on your list, you best click the links below and hop over to the online store today! 

Here is the visual summary of the key products used on today's project for you to pin for easy reference:


You can see all of my 'How To' summaries on my 'How To - Tips and Techniques' Pinterest board in case you've missed any. 

Enjoy your day; I will be back later with one (maybe two!) posts as I have a few makes 'in progress' on my desk along with news of a great new joining offer that will be starting tomorrow to coincide with the new annual catalogue launch - exciting stuff! Until then, happy stampin'!


Stampin' Up! Supplies Used:

Table built using Product Table Builder by The Crafty Owl - Independent Stampin' Up! Demonstrator.

Playful Alphabet Brilliant Rainbow and Sequins CAS Shaker Cards CCS 467

by Joanne James26. April 2022 13:00

00It's Tuesday and time for a new challenge over at CAS Colours & Sketches. This week it's our final challenge for the month of April and Bhavya has asked that we create something with three distinct sentiment elements for her final sketch challenge:
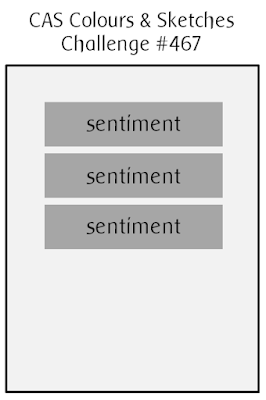
 

Feel free to flip or rotate the sketch when making your card. For my card today I ended up creating not one, not two but three cards! I'm sharing my favourite one first - a clean and simple shaker card - take a look:
 

Here's the low-down on today's card:

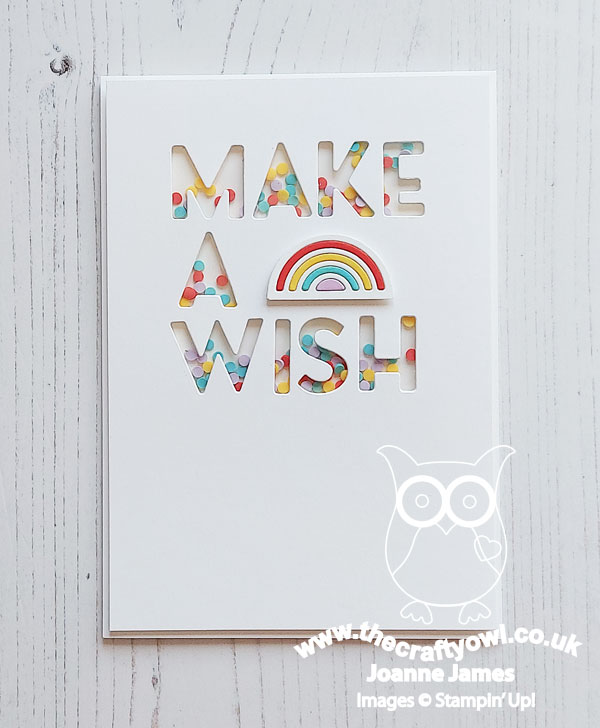
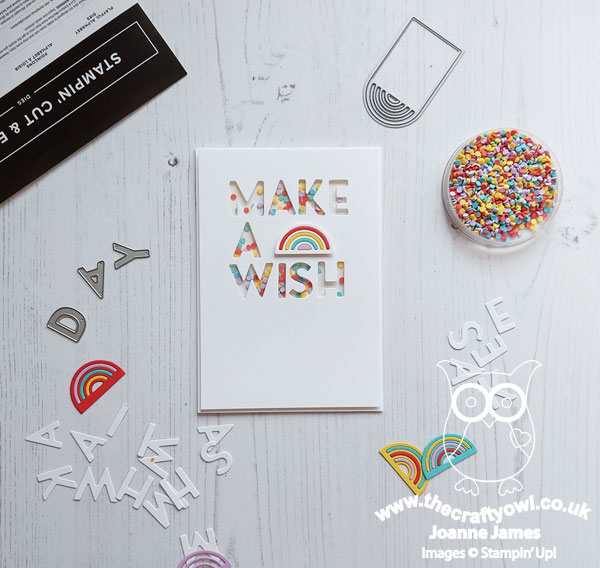
Farewell Playful Alphabet Dies - Time to say goodbye to a craftroom staple - the Playful Alphabet Dies! Yes, they are retiring with current annual catalogue next week and newsflash - there are NO alphabet die sets in the new annual catalogue, so not only will I be hanging on to my set, if you don't have them you have just one week to nab a set! I can't recommend them highly enough: they are so useful for personalising cards, but also to create bespoke messages or greetings. Use them flat or on dimensionals, or as I've done here to create a bespoke message that I then backed with window sheet to create a fun clean and simple shaker card! How cool is this?
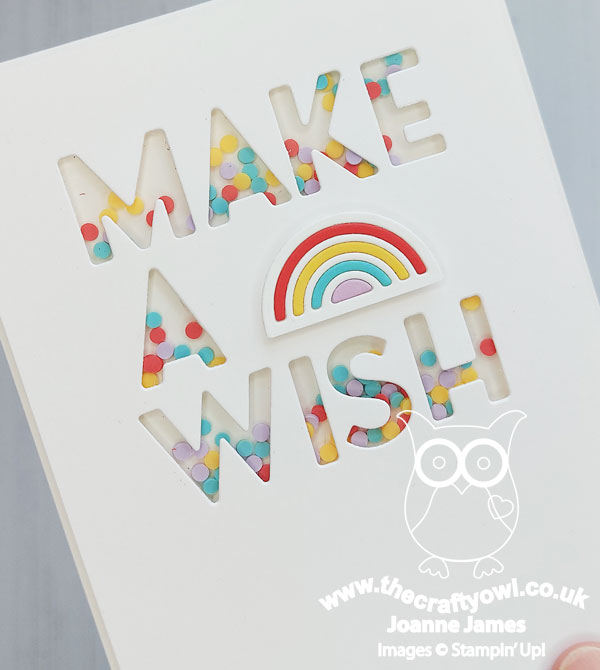
 

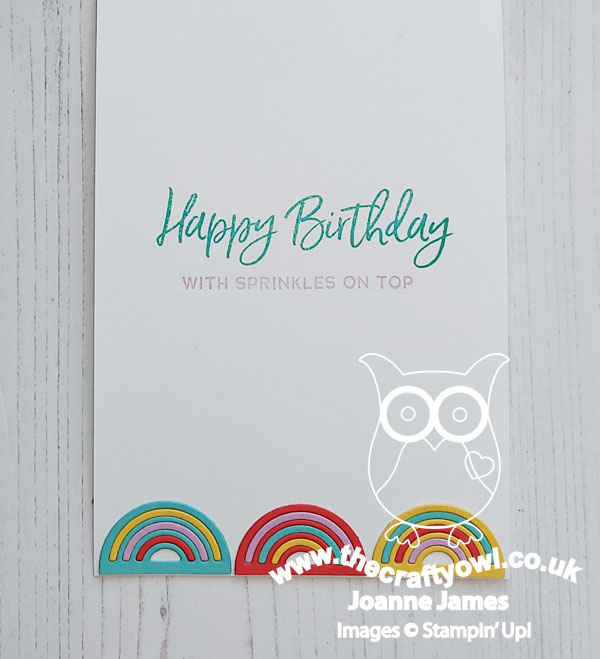
Rainbows or Candles? - My initial shaker was inspired by the inspiration challenge of 'make a wish - rainbows' over at TGIF Challenges this week and I paired my simple message with a paper-pieced rainbow made using my Beautiful Rainbow Dies and some scraps of cardstock in Poppy Parade, Daffodil Delight, Coastal Cabana and Fresh Freesia to co-ordinate with the (retired) Ice Cream Shaker Sprinkles that I used inside my shaker. I used my rainbow offcuts to add a decorative border to the inside of my card, along with a sentiment from the retiring 'Sweet Ice Cream' stamp set:
 

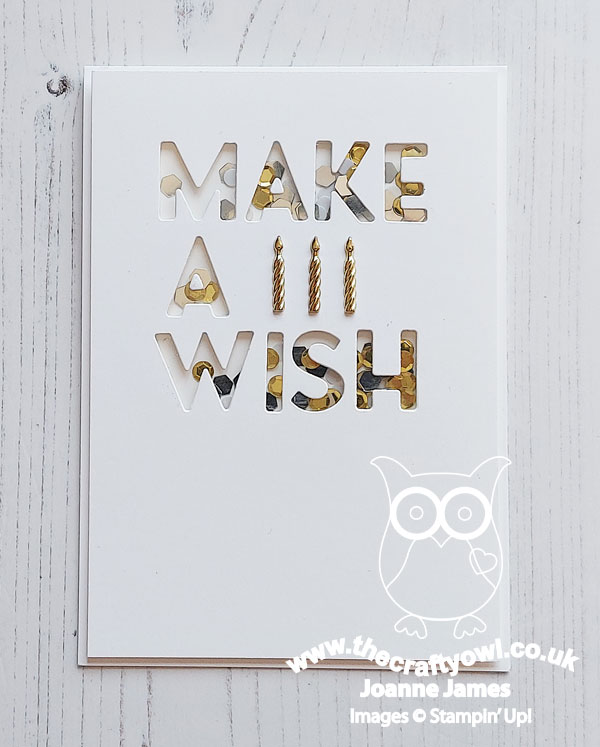
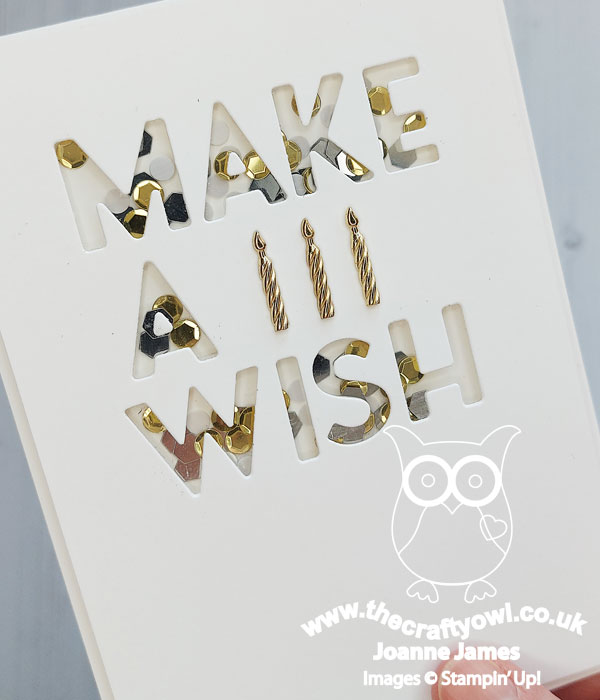
I liked this card so much, I made another one, this time using the retiring white, gold and silver Sequins For Everything (currently half price) for my shaker and a trio of (retired) gold Candle Embellishments I found on my shelf:
 

Check out the sparkles - how fun!
 

Here are both shakers together - which one do you prefer?
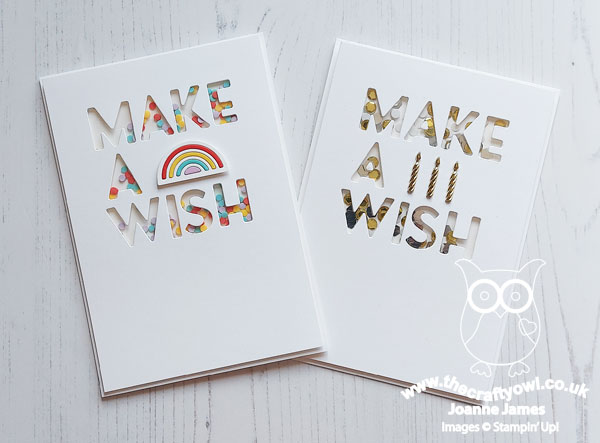
 

I honestly can't decide - I love this design so much I think I'm going to make a whole bunch more!!

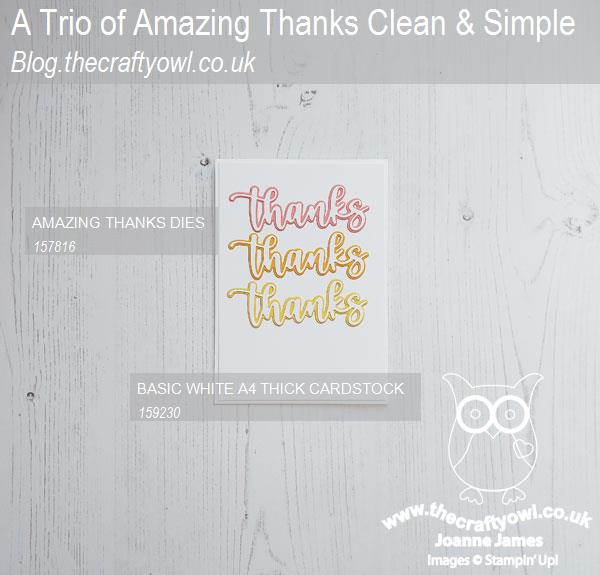
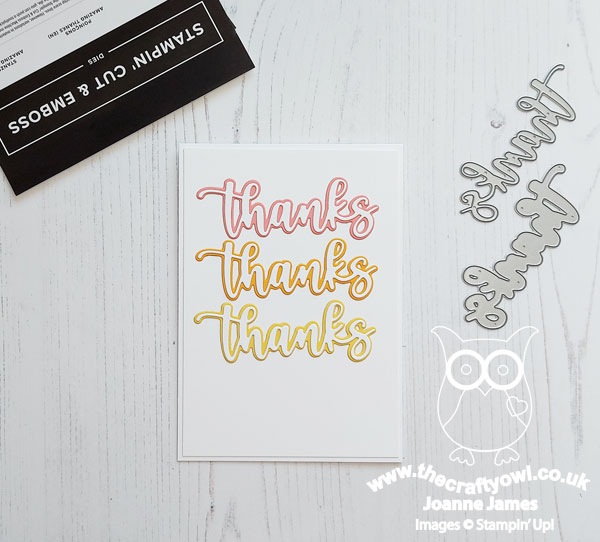
A CAS Thankyou Trio - Finally I have one extra 'bonus' card for you, that was the one I made before my shakers - a super simple repeating 'thanks' sentiment using a trio of dies cut with the Amazing Thanks Dies, with each one backed by the fresh colours of the current Color Dare challenge:
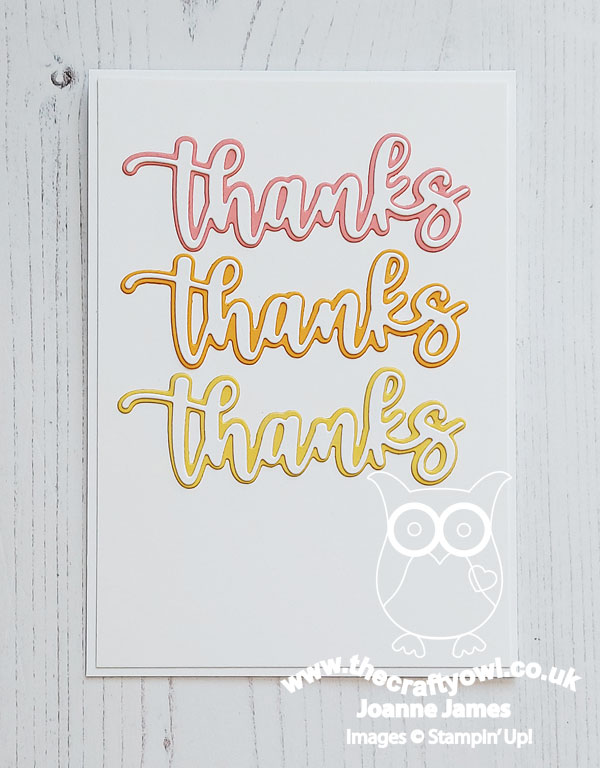
 

By using the colour for the base layer of the diecut and making the top layer white, it allows for a white base and preserves the clean and simple feel with all that 'white space'. This is a great way to use up scraps and whilst I love the fresh colour combo I used on today's card - Flirty Flamingo, Mango Melody, Daffodil Delight - this simple layout would work with whatever colours you have available.

Here are the visual summaries of the key products used on today's projects for you to pin for easy reference:
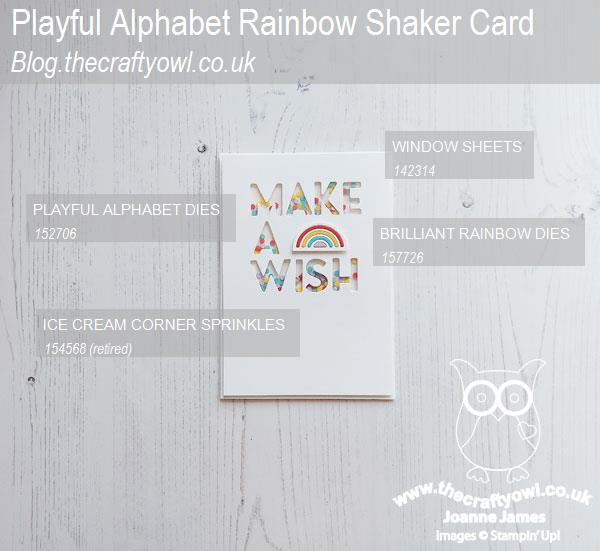
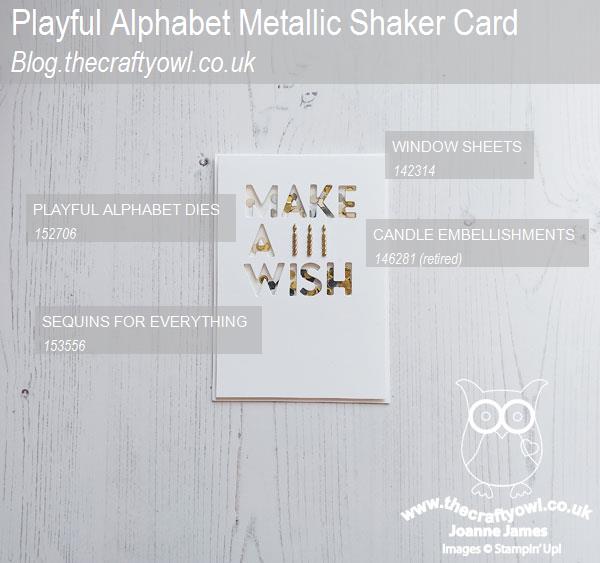


You can see all of my 'How To' summaries on my 'How To - Tips and Techniques' Pinterest board in case you've missed any. 

I actually made four cards for today's challenge; the first one was mediocre at best; I had an idea that just didn't look right when I made it - so much so, I'm not even going to share it with you!  So I left it and when I went back to desk 24 hours later, I started fresh and came up with my thankyou trio, quickly followed by my fun shaker cards - suddenly I was on a creative roll! Does that ever happen to you when your creating? How do you combat that feeling you get when you've made something but are just not 'feeling' it? Do leave me a comment below - I'd love to hear from you!

Enjoy your day; the James Juniors are both back to school today following the Easter break so I will be aiming to get more work done this week. This is a super-busy term, with everything from cricket fixtures to the school musical production, internal exams, speech days, university open days and lots more besides! I really do need to get organised!! On that note, I'll be back tomorrow with another project. Until then, there's work to do - happy stampin'!
    

Stampin' Up! Supplies Used:

Table built using Product Table Builder by The Crafty Owl - Independent Stampin' Up! Demonstrator.


A Clean and Simple Easter Chick

by Joanne James20. April 2022 09:00

Today I'm sharing another clean and simple card that was inspired by a few challenges:


I wouldn't normally gravitate towards the spring pastel palette over at Sunday Stamps, but the minute I saw it I couldn't help thinking it would be perfect for an Easter chick. So I paired it with the current challenge over at AAA Cards where they are looking for 'small and few' paired with Easter or spring for a fluffy chick (perfect for the CASology cue word too) and a few pastel Easter eggs hidden in the grass - take a look:


Here's the low-down on today's card:

I used my blending brushes to create a blended corner panel of yellow 'sunrays' and a little green across the bottom for the base of my scene, then added some diecut eggs from the retired Chick Dies in two shades of pale pink behind some grass, cut using one of the Horizon dies. My Easter chick is courtesy of the Birthday Chick Dies - I had completely overlooked this little diecut chick and discovered it when I was using these dies on this card earlier this month and thought it would make the perfect tiny Easter chick:


An Easter sentiment from the retired set 'Welcome Easter' completes my card. I know Easter has already been and gone, but it's always good to have a few cards set aside for next year - when Easter rolls around I never seem to have enough!

Here is the visual summary of the key products used on today's project for you to pin for easy reference:


You can see all of my 'How To' summaries on my 'How To - Tips and Techniques' Pinterest board in case you've missed any. 

Enjoy your day and I'll be back tomorrow with another project. Until then, happy stampin'!


Stampin' Up! Supplies Used:

Table built using Product Table Builder by The Crafty Owl - Independent Stampin' Up! Demonstrator.

Measure of Love Clean and Simple CCS 466

by Joanne James19. April 2022 12:00

It's Tuesday and time for a new challenge over at CAS Colours & Sketches. Bhavya is hosting for the month of April and it's time for our second colour challenge of the month: 


I thought these colours would be perfect for a bowl of cherries for a sweet friend - so I grabbed the retiring 'Measure of Love' stamp set and set to work - take a look:


Here's the low-down on today's card:

 A simple bowl of cherries, backed with some Pattern Party black and white gingham and with an added Cherry Cobbler scalloped border detail to finish:


A super clean and simple card!

Here is the visual summary of the key products used on today's project for you to pin for easy reference:


You can see all of my 'How To' summaries on my 'How To - Tips and Techniques' Pinterest board in case you've missed any. 

As a reminder, for our colour challenges, you must use all of the stated challenge colours. You may also use neutral colours; however, the challenge colours should be the most noticeable ones featured on your card. We use Stampin' Up! color names for reference, but you are welcome to use any other companies' products as long as you match the challenge colours as closely as possible.

Enjoy your day and I'll be back tomorrow with another project. Until then, happy stampin'!


Stampin' Up! Supplies Used:

Table built using Product Table Builder by The Crafty Owl - Independent Stampin' Up! Demonstrator.

More Clean and Simple Stencilled Flowers

by Joanne James13. April 2022 09:50

Today I'm sharing a card for the current challenge over at CAS on Friday where the challenge is to use a stencil. I chose a favourite colour combination of yellow and navy blue and came up with this sunny creation to contrast with the grey clouds that seem ever present here in the UK at the moment:


Here's the low-down on today's card:

Instead of stencilling the whole of the floral image across the centre, I added a partial stencil along two edges of my main panel, in order to preserve the all important 'white space'. I layered a selection of yellows for depth, then inked a sentiment from 'Create With Friends' and overstamped the edge of one of my floral clusters:

A couple of thin borders completes my card.

Here is the visual summary of the key products used on today's project for you to pin for easy reference:


You can see all of my 'How To' summaries on my 'How To - Tips and Techniques' Pinterest board in case you've missed any. 

If I was making this card again, I'd probably move the florals in the bottom left corner out even further, showing less florals and more white - next time! I really love these stencils; I do have to be careful to not get either too enthusiastic with my blending brushes or put my inky fingers across the clean white areas on my card. If this happens to you too, all is not lost; with a 'ruined' card that was the pre-cursor to today's creation, I simply chopped around the offending smudge and converted the remains into gift tags for my in-person customer orders:


Waste not, want not and all that! Enjoy your day and I'll be back tomorrow with another project. Until then, happy stampin'!


Stampin' Up! Supplies Used:

Table built using Product Table Builder by The Crafty Owl - Independent Stampin' Up! Demonstrator.

What's Cookin? CCS 465

by Joanne James12. April 2022 12:00

It's Tuesday and time for a new challenge over at CAS Colours & Sketches. Bhavya is hosting for the month of April and it's time for her first sketch challenge of the month: 


Feel free to flip or rotate the sketch when making your card. For my card today I decided to grab my retiring 'What's Cookin'' stamp set and Cookin' Dies and create a simple card for the baker or would-be chef in your life - take a look:


Here's the low-down on today's card:

I almost passed over the colours at Just Add Ink this week, when it occurred to me that they really reminded me of Cornishware pottery, with its distinctive blue or red and vanilla stripes, so I decided that a Cornishware-inspired mixing bowl, along with a little texture from my neutral chopping board and mixing spoon and a pop of red from a Cherry Cobbler sentiment and twine bow were just what I needed for today's clean and simple card. Check out the texture that the die gives the chopping board on the closeup below:


I also added a little additional decoration to the inside of my card - aren't those miniature chef hats just the cutest?!


I can't believe this set is on the retiring list this year; I had so many more plans for it and am really sad to see it leave the annual catalogue. I will definitely be holding on to mine - I love to spend time in the kitchen and I know I'll find many more uses for it. If you would like to be the proud owner of the What's Cookin' stamp set and co-ordinating Cookin' Dies, they will only be around for another couple of weeks, and even then only whilst stocks last, so do get your order in sooner rather than later! I'm also sharing today's card over at Less Is More where the theme this week is 'occupations'  - this set is perfect for chefs, bakers and kitchen enthusiasts! 

Here is the visual summary of the key products used on today's project for you to pin for easy reference:


You can see all of my 'How To' summaries on my 'How To - Tips and Techniques' Pinterest board in case you've missed any. 

I love to cook and my family suggest I'm quite good at it. Whilst out for lunch at the weekend, my son was tucking into his lasagne and when asked if everything was ok with his meal, he announced "It's good - but not as good as my Mum's!" I'm not sure there's anything you can reply to that; if only all problems could be solved with a homemade lasagne!

Enjoy your day and I'll be back tomorrow with another project. Until then, happy stampin'!


Stampin' Up! Supplies Used:

Table built using Product Table Builder by The Crafty Owl - Independent Stampin' Up! Demonstrator.

Embossed Dandelions Notecard

by Joanne James11. April 2022 11:15

Today I'm sharing a card I made at the weekend that uses Jen M's great layout over at Freshly Made Sketches this week and also uses the current Color Hues combination of pink and green:


Jen's sketch has a lovely open panel that can be used in so many different ways. I decided it would be a great place to have one last hurrah with my Dandelions 3D embossing folder - take a look:


Here's the low-down on today's card:

I simply embossed my dandelions on a panel of white cardstock and added Polished Pink to the seed heads and Pear Pizazz to the stems lightly with a blender brush for just a hint of colour to the raised elements. I added them to a base covered with a piece of Polished Pink In-Colour designer paper and added a simple heat embossed sentiment from 'Flowing Flowers' and a trio of iridescent rhinestones for some subtle sparkle:


I think this embossing folder is so pretty and a great way to make texture a feature on an otherwise clean and layered card. 

Here is the visual summary of the key products used on today's project for you to pin for easy reference:


You can see all of my 'How To' summaries on my 'How To - Tips and Techniques' Pinterest board in case you've missed any. 

Just a quick post from me today - I have a long 'to do' list that I'm trying to rattle through and a new annual catalogue pre-order that has just arrived that I want to get the opportunity to play with!

Enjoy your day and I'll be back tomorrow with another project. Until then, happy stampin'!


Stampin' Up! Supplies Used:

Table built using Product Table Builder by The Crafty Owl - Independent Stampin' Up! Demonstrator.

Good Luck From All Of Us

by Joanne James10. April 2022 20:10

I have an extra card today to share a card a special card I made for Rebecca and her hockey team mates to say goodbye to one of their members who is leaving at the end of the season to go to university. I thought the motley crew of animals in the retiring 'From All of Us' stamp set would be perfect for a team farewell - take a look:


I used a bright and fun unconventional colour scheme to colour my group of animals and fussy cut them and placed on the centre of a larger A5 card, over a simple scored panel of Coastal Cabana - I needed room for lots of messages inside! I added a 'good luck' message using a retired alphabet set either side of my colourful gang:


I added one other stamp to the inside to finish:


Cute, right?! This is a great stamp if you need a collective card from a group.

Here is the visual summary of the key products used on today's project for you to pin for easy reference:


You can see all of my 'How To' summaries on my 'How To - Tips and Techniques' Pinterest board in case you've missed any. 

I'm sharing this card over at SUO Challenges with the theme is 'animals and critters' and The Alphabet Challenge where their theme is 'A for Animal Antics' - I think my collective definitely look they could get up to some mischief!

I'll be back tomorrow with another project. Until then, happy stampin'!


Stampin' Up! Supplies Used:

Table built using Product Table Builder by The Crafty Owl - Independent Stampin' Up! Demonstrator.

2025-26 Annual Catalogue

BROWSE THE CATALOGUE

Click on the image to download your copy of the 2025-26 annual catalogue. For a full list of current SU! supplies, go to my online store. If you would like any help or advice, please drop me a line at joanne@thecraftyowl.co.uk or give me a call on 07773 421446 - I'd be happy to help.

Shop Online

Access my online shop 24 x 7, 365 days of the year:

Shop Online

Join My Team

It's always a great time to join Stampin’ Up! Between 6-31 May, new team members can get £170 worth of products for only £99 + free business supplies + free shipping + all the fun being a part of Stampin’ Up! That's an extra £40 of product - FREE! Stampin' Up! has something for everyone: join my growing team and benefit from my support to enjoy Stampin' Up! however you choose.

If you're interested, call me for a chat to understand how I can help you realise your goals. Alternatively, if you have already decided to sign up and you just can't wait, please click here for the link to the online form where you can sign up and order your starter kit right away! 

Latest Kits!

Stampin Cut and Emboss

The Sending A Smile Kit and The Beautiful Blues Kit are the latest kit additions to the online store - get yours here!

New Online Exclusives

There are new products available exclusively in the online store from 6 May - check them out here.

About Me

Hi I'm Joanne and live in Northampton and when I'm not looking after my husband and two beautiful children, am an avid crafter with a passion for all things Stampin' Up!

I must confess that I have never been a big rubber stamper - until I discovered Stampin' Up! that is. I love the fact that I can get such great results with co-ordinating stamps, inks, papers and punches - the possibilities are endless! Join me on my stamping journey as I share the things I love and be inspired to create amazing things yourself!

Follow Me

Monthly Newsletter

Box Builder

Click the button above to use Box Buster to create your custom box design using the Envelope Punch Board!

Kits Collection Now Available!

Stampin Cut and Emboss

The new Kits Collection from Stampin' Up! is now available!

Click here to see the current kits available and order yours online today.

I Design For


Stampin' Up Stuff

This is my personal blog and is not endorsed by Stampin’ Up! Stampin' Up! is a registered trademark of Stampin' up! Inc. I hope you find my blog a plentiful source of ideas and personal inspiration but please don't copy my designs for contest submission or use for classes, publication or sale without express permission.