Snowman Season Embossed Snowflakes and A Bright Pine Tree Plaid Tidings Christmas

by Joanne James16. November 2020 16:20

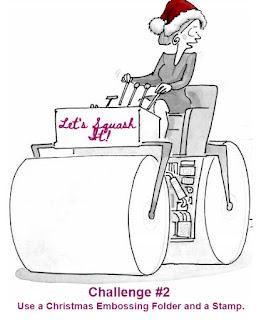
Happy Monday everyone! Today I have a couple of cards for you - hence my somewhat random blog title! The first for the current colour challenge over at Color Throwdown, using the sketch over at TGIF Challenges and with a stamp and embossed background that also fits the bill over at Christmas Kickstart who are partnering with a new-to-me challenge Squash It this time around:


That is a fairly hefty set of linkups, but when you look at my card it's super easy to see how each and every one inspired my project - take a look:
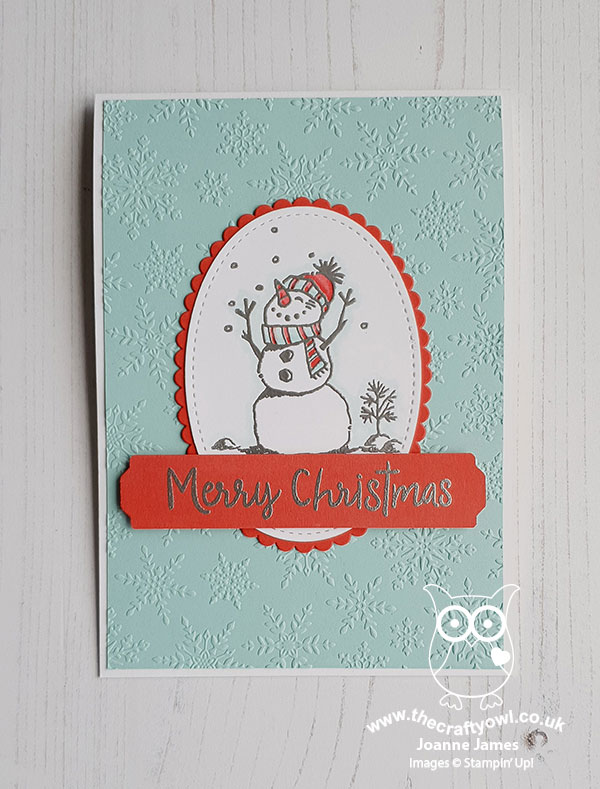
 

Here's the low-down on today's card:

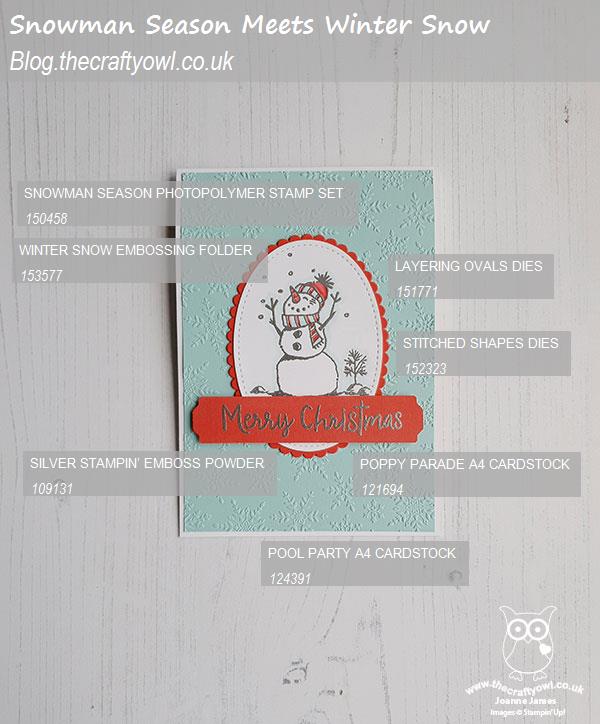
Snowman Season - When I saw those Color Throwdown colours, I immediately thought 'snowman' and was delighted that they gave me an excuse to break out one of my much-loved stamp sets from last year, 'Snowman Season'. This set was carried over into the annual catalogue, but hasn't seen any love from me yet this season, with so many new stamp sets taking precedence! Today's card rectifies that though - how adorable is this chap, heat embossed in silver and carefully coloured with Pool Party and Poppy Parade Blends? 

Oval Centrepiece - The sketch over at #TGIFC290 was just perfect to showcase my snowman and it also encouraged me to use another shape I don't naturally gravitate towards - ovals! I went with a stitched oval to frame my snowman and added a Poppy Parade scallop-edged oval background mat, to allow it to pop against the Pool Party embossed background. 

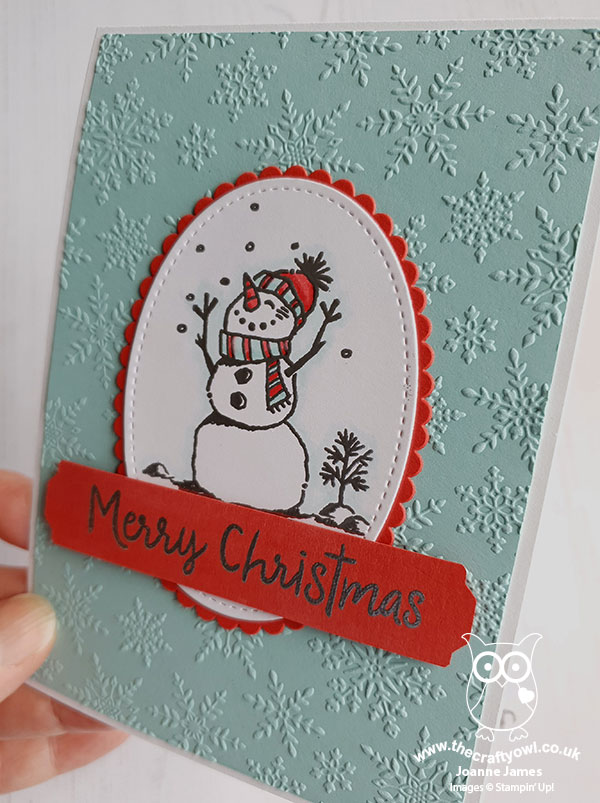
Winter Snow - Lastly, to the embossed background! I ran my Pool Party layer through Stampin' Up!'s Winter Snow embossing folder to create a pretty background of delicately embossed snowflakes, which I felt complimented my snowman perfectly. Check out the detail on the angled shot below:
 

I love that something old can pair so well with something new - it's almost as if they were meant for each other!

Here is the visual summary of the key products used on today's project for you to pin for easy reference:
 

You can see all of my 'How To' summaries on my 'How To - Tips and Techniques' Pinterest board in case you've missed any. 

And for my second card today I am playing along with this week's Freshly Made Sketches challenge and the photo inspiration over at Just Add Ink:


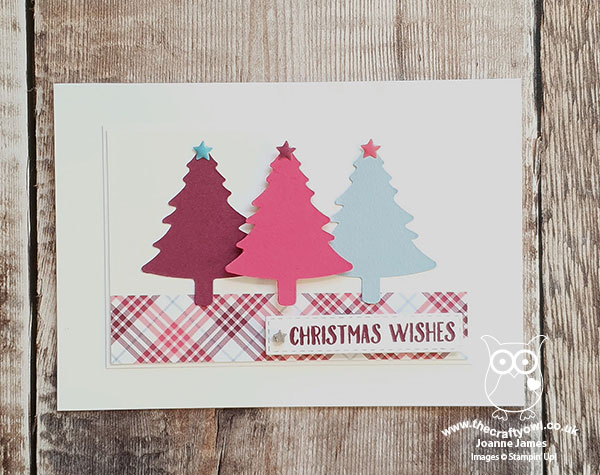
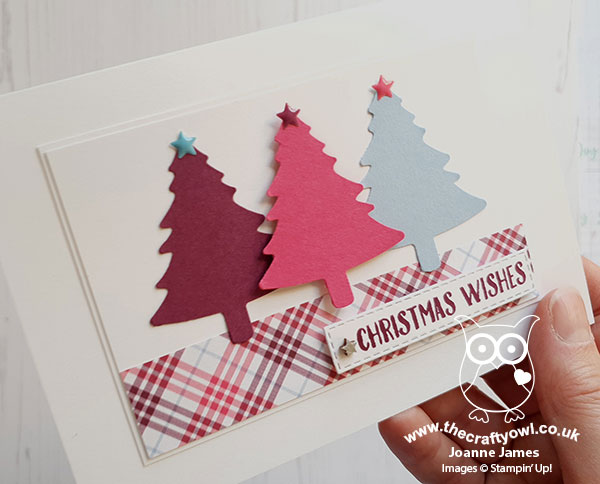
Karren's FMS sketch is a real go-to for me (if you search my blog you'll see lots of cards with this layout) so I thought I would challenge myself to rotate the sketch and work with it in the horizontal orientation and, inspired by those brightly coloured trees in the JAI photo, I created an unconventionally coloured Christmas card, again pairing something old with something new - take a look:
 

Here's the lowdown on this card:

Pine Tree Punch - I decided to use my Pine Tree Punch to create some bold block-colour Christmas trees, and went with a layered white background to allow the colours to really pop. I used a single (retired) enamel star in an alternating colour to top each one.

Plaid Tidings - In the absence of any dotty paper like the background trees in the inspiration photo, I decided to take inspiration for my bright colour combination from the trio of colours featured in my chosen design of Plaid Tidings designer series paper: Rich Razzleberry, Melon Mambo and Seaside Spray. I love that this paper pack contains some unusual plaid colours and whilst unconventional, I like the effect of these colourful trees.

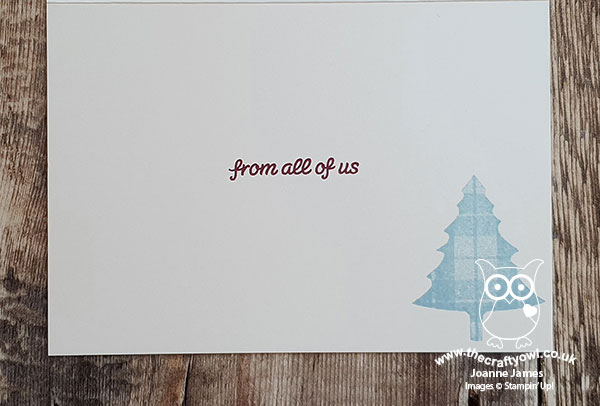
Banner Year Sentiments - The sentiment on my card is from the 'Banner Year' sentiment set, embellished with a silver-painted (retired) wooden star from my stash, and finishes inside my card as follows:
 

I really like the way this card turned out - unconventional colours on Christmas cards really change things up and I'm pleased I managed to stretch my use of this great layout too.

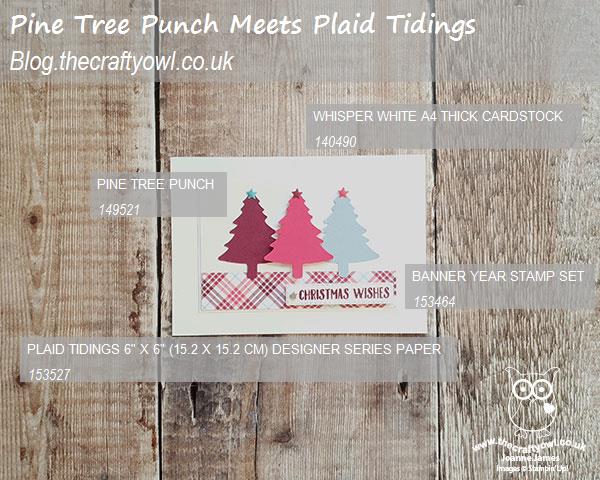
Here is the visual summary of the key products used on today's project for you to pin for easy reference:
 

You can see all of my 'How To' summaries on my 'How To - Tips and Techniques' Pinterest board in case you've missed any. 

That's me done for today! Enjoy your evening and I'll be back tomorrow with another project. Until then, happy stampin'!
 

Stampin' Up! Supplies Used - Card 1:

Table built using Product Table Builder by The Crafty Owl - Independent Stampin' Up! Demonstrator.


Stampin' Up! Supplies Used - Card 2:

Table built using Product Table Builder by The Crafty Owl - Independent Stampin' Up! Demonstrator.

Plush Poinsettia Specialty Paper Banner Christmas Card

by Joanne James9. November 2020 19:25

Happy Monday everyone! I had a fun card class this morning and encouraged by the ladies on my call (thank you Deborah!), instead of getting on with my household chores this afternoon, whilst the edited recording of my class video was rendering I decided to make a 'quick' card which has resulted in an extra post for today because I used the current Freshly Made Sketches layout so I'm squeezing in a link up:

I'd been mulling over what to feature on Judy's banner element and finally settled on some of the gorgeous Plush Poinsettia specialty paper - take a look:


Here's the low-down on today's card:

This card wouldn't take long at all if I was to make it again from scratch, but I spent ages procrastinating over colours and backgrounds so it ended up taking way longer than it should have! It really is pretty straightforward: a banner of the lovely textured flocked white vellum, popped up on a panel of Real Red and a Whisper White card base, with a white-on-red heat-embossed sentiment from the Poinsettia Petals stamp set on some stitched rectangles, with a final embellishment of some sheer ribbon tied with two tiny (retired) jingle bells from my stash because I felt without it my card, whilst beautifully 'clean', was lacking a little something. 

Here's another view of that gorgeous paper, even though I'm not sure the camera really does it justice:


Here is the visual summary of the key products used on today's project for you to pin for easy reference:


You can see all of my 'How To' summaries on my 'How To - Tips and Techniques' Pinterest board in case you've missed any. 

I'll be back shortly with the post that I actually intended for today! Until then, happy stampin'!


Stampin' Up! Supplies Used:

Table built using Product Table Builder by The Crafty Owl - Independent Stampin' Up! Demonstrator.

Rustic Country Home Thanks TTT88

by Joanne James29. October 2020 18:00

It's Thursday and time for a new challenge over at TicTacToe! It's the turn of Team X to host this week and the lovely Felicita is our featured designer this week. This is the fun board that we are playing along with: 


So much seasonal goodness to choose from on Felicita's board this week! I got so excited with all the elements and the lovely Julee's fab Mojo Monday sketch that I covered pretty much every square on this week's board except wreath and Thanksgiving! I paired the beautiful Gilded Autumn papers with lots of rust and one of my most favourite stamp sets to use at this time of year - take a look:


Here's the low-down on today's card:

Country Home - My milk churn and autumn florals come from the 'Country Home' stamp set that has been around for a while, but I have to say is one of those sets that is a real keeper. I've made many, many cards with this set (and never featured it in a class, interestingly); I've coloured those florals many times and each of them different - search my blog for lots more inspiration using this set. I love the sentiment font and sizes too and they are great for thankful cards, whatever the time of year. My milk churn features a tiny 'thanks' and I saved one of my favourites for the inside of my card:


Rusty Colour - I decided to look at ways to incorporate the 'rust' element into my card and whilst I wasn't in a mood to get messy, I decided that the brushed brass foil (as opposed to copper) would add a nice metallic element and I embossed it using the Tin Tile Embossing Folder for some texture. I also majored on browns in my colour scheme and added some loops of coppery ribbon to my florals too.

A Little Bit Country - Having spent more time than anticipated deciding how best to layer those papers (I alternated each pattern for each layer before deciding), I wanted to keep with my country feel and added some wooden leaf embellishments and some green and white gingham ribbon to finish. A lot going on with this card, but sometimes it's really nice to move away from 'clean and simple' and see how far the layering can take you!


I'm also linking today's card up over at SUO Challenges too where the current theme is Autumn/Fall and my leafy, rusty creation definitely evokes the season for me! Here is the visual summary of the key products used on today's project for you to pin for easy reference:


You can see all of my Product and 'How To' summaries on my 'How To - Tips and Techniques' Pinterest board in case you've missed any. 

A tictactoe board offers so many creative possibilities - how does this week's board inspire you? Why not have a go? We would love to see you in the gallery and who knows - you might be selected for Designer's Choice and be eligible to be a guest designer on a future challenge. 

Enjoy your day; half term continues in the James household with nothing much of interst to report! I'll be back tomorrow with another project. Until then, happy stampin'!


Stampin' Up! Supplies Used: 

Table built using Product Table Builder by The Crafty Owl - Independent Stampin' Up! Demonstrator.

Sweetest Time Christmas Candles PP514

by Joanne James25. October 2020 09:00

Today it's Sunday and time for this week's new challenge over at The Paper Players! It's the turn of the amazing Jaydee to host this week and she has my favourite, a sketch challenge for you to work with:


Jaydee's sketch has three vertical images; it's a great sketch that is wide open to interpretation. I considered something that incorporated three panels but in the end decided on a much more liberal interpretation and decided on three candles - take a look:


Here's the low-down on today's card:

Sweetest Time - I've used the 'Sweetest Time' stamp and co-ordinating borders dies before (here if you missed it), but had yet to combine with the candles. I went all-out on today's card, layering a piece of Feels Like Frost foiled designer paper (it has a pines pattern but that is obscured by the main panels), followed by the panel with the stamped candles, followed by the integrated holly border.

Borders in Blue - Whilst this border looks great in traditional reds and greens, I thought I would ring the changes and make a blue card today. I know that you don't get blue holly and berries but it's the cardmaker's prerogative to get creative with colour, right? That's my story anyway and I'm sticking to it! 

Foil, Frost and Sparkle - The challenge over at Just Add Ink this week is to add two of foil, ribbon and sequins to your card. I did use some foil-embossed designer paper for my background layer to compliment my silver heat-embossed flames and sentiment, but I also added some loops of Seaside Spray/Silver metallic ribbon behind my paper-pieced holly border and since the diecut berries are obscured by my sentiment banner, I added a selection of clear epoxy droplets and a few Seaside Spray sequins for some added sparkle; you can see them better on the photo below:

So I inadvertently ended up incorporating all three - and I love the finished effect!

Here is the visual summary of the key products used on today's project for you to pin for easy reference:


You can see all of my Product and 'How To' summaries on my 'How To - Tips and Techniques' Pinterest board in case you've missed any. 

Before you reach for your ink and papers, check out what our amazing team has created to inspire you this week:

Here's a quick recap of our challenge rules:
 
1.  Create a new paper project
2.  Upload your creation to your blog with a link back to us and provide a direct link to the post featuring your challenge submission.
3.  Please link your card to no more than four challenges, TOTAL.
4.  Have FUN!

You can see all of my 'How To' summaries on my 'How To - Tips and Techniques' Pinterest board in case you've missed any. 

Enjoy your day. We have no specific plans; if the weather is as poor as it has been these last few days, we may hunker down for a movie afternoon. We watched Disney's live remake of 'Mulan' last week; have you seen it? We thoroughly enjoyed it. I'll be back tomorrow with another project. Until then, happy stampin'!


Stampin' Up! Supplies Used: 

Table built using Product Table Builder by The Crafty Owl - Independent Stampin' Up! Demonstrator.

Plaid Tidings Leaf Thankful Card

by Joanne James24. October 2020 21:00

Today I've a quick post with a card inspired by the following challenges:


There is a great sketch at The Paper Craft Crew this week and my card is also perfect for the seasonal thanks challenge over at Global Design Project #GDP263. I made a feature of a Cajun Craze autumn leaf, diecut with one of the large Stitched Leaf Dies and paired with a sentiment from the bundled 'Lots of Leaves' stamp set - take a look:


 My CAS card also features one of my favourite Plaid Tidings papers so I will be linking up over at CAS on Fridays where the theme is PLAID and I added a yellow bow accented with one of the gorgeous acorn trinket embellishments to finish:


Here is the visual summary of the key products used on today's project for you to pin for easy reference:


You can see all of my 'How To' summaries on my 'How To - Tips and Techniques' Pinterest board in case you've missed any. 

Enjoy your evening and I'll be back tomorrow with my card for our new challenge over at The Paper Players. Remember if you're reading this and you're in the UK, the clocks go back this evening so you get an extra hour in bed in the morning - yay! Until then, happy stampin'!


Stampin' Up! Supplies Used:

Table built using Product Table Builder by The Crafty Owl - Independent Stampin' Up! Demonstrator.

Strong & Beautiful Starry Congratulations Card

by Joanne James20. October 2020 19:25

Today I'm sharing a card that is based on the current Fab Friday Challenge sketch, which I love:


I decided it would be the perfect layout for a card I needed to make for the newest member of my Stampin' Up! team who recently achieved a 'rising star' milestone for consistent sales during her first quarter; an achievement to be celebrated! Here's my card:


Here's the low-down on today's card:

Shoot For The Stars - I thought the starry flourish from the Stitched Stars Dies was perfect for the flourish in the sketch and totally fitting with my congratulatory theme, so I cut it out of copper foil for a swirl of shiny stars.

Brightly Gleaming - I picked up on the starry theme with a piece of Brightly Gleaming designer paper and used the Night of Navy/copper colour combo as the basis for the rest of my card. I also added a narrow copper scalloped border and a trio of copper star embellishments to my card. I love this paper - great for all kinds of occasions, not just Christmas.

Strong & Beautiful - The 'Strong and Beautiful' stamp set has some wonderful empowering sentiments and I chose to feature two on today's card; one on the front of this card and another on the inside:


Here is the visual summary of the key products used on today's project for you to pin for easy reference:


You can see all of my 'How To' summaries on my 'How To - Tips and Techniques' Pinterest board in case you've missed any. 

Enjoy your evening and I'll be back tomorrow with another project. Until then, happy stampin'!


Stampin' Up! Supplies Used:

Table built using Product Table Builder by The Crafty Owl - Independent Stampin' Up! Demonstrator.

Life is Beautiful Autumn Leaves PP512

by Joanne James11. October 2020 09:00

It's Sunday and time for this week's new challenge over at The Paper Players! I'm back following a break last week as I was running my first virtual Creative Escapes Weekend Craft Retreat. More news on that later this week; today it's the turn of the amazing Ann to host this week and she has a seasonal colour challenge for you to work with:


These colours are just perfect for autumn; as I've been driving through the countryside on the school run this week, I have marvelled at just how wonderful the trees are looking with their blends of colour, so armed with my ink pads, some sponge daubers and the current Fusion sketch, I grabbed my 'Life is Beautiful' stamp set and set about recreating the look. This is what I came up with:


Super simple, with a couple of punched banners and stapled ribbon decoration, but oh so pretty with those variegated autumn leaves.

Here is the visual summary of the key products used on today's project for you to pin for easy reference:


You can see all of my Product and 'How To' summaries on my 'How To - Tips and Techniques' Pinterest board in case you've missed any. 

Before you reach for your ink and papers, check out what our amazing team has created to inspire you this week:

Here's a quick recap of our challenge rules:
 
1.  Create a new paper project
2.  Upload your creation to your blog with a link back to us and provide a direct link to the post featuring your challenge submission.
3.  Please link your card to no more than four challenges, TOTAL.
4.  Have FUN!

You can see all of my 'How To' summaries on my 'How To - Tips and Techniques' Pinterest board in case you've missed any. 

Enjoy your day; I will be busy finishing up some bits and pieces before going in to hospital tomorrow for surgery on my shoulder. This will be my fourth visit in 14 months and I'm hoping this will be the last! I will still be sharing here though and will be back tomorrow with another project. Until then, happy stampin'!


Stampin' Up! Supplies Used: 

Table built using Product Table Builder by The Crafty Owl - Independent Stampin' Up! Demonstrator.

Always Grateful With Celebration Tidings TTT84

by Joanne James1. October 2020 18:00

It's Thursday and time for a new challenge over at TicTacToe! It's the turn of Team X to host and I am the featured designer this week. I chose lots of autumnal elements for my board: 


I used the same layout on today's card as the one I used for Monday's Christmas card (you can see that card here if you missed it). I went across the first row of the tictactoe board, with Plaid-Pumpkin-Thankful and I embraced those fresh Color Dare colours to make a bright autumnal thank you card - take a look:


Here's the low-down on today's card:

I stamped the pumpkin image from the 'Celebration Tidings' stamp set in Memento Tuxedo Black onto a stitched rectangle and coloured this image with my Stampin' Blends, using a panel of bright Plaid Tidings designer paper for my background and some retired Old Olive ribbon from my box to add in a little more green. I used Mango Melody cardstock for my cardbase and Pumpkin Pie for my mat layer - I love how bright this card looks, compared to if I'd used darker, richer colours. Good news on that Plaid Tidings paper too - it, along with many other designs, is on sale for the whole of the month of October as part of Stampin' Up!'s Designer Series Paper sale - more details to follow on that in another post later!

Here is the visual summary of the key products used on today's project for you to pin for easy reference:


You can see all of my Product and 'How To' summaries on my 'How To - Tips and Techniques' Pinterest board in case you've missed any. 

A tictactoe board offers so many creative possibilities - how does this week's board inspire you? Why not have a go? We would love to see you in the gallery and who knows - you might be selected for Designer's Choice and be eligible to be a guest designer on a future challenge. 

Enjoy your day; I'll be back tomorrow with another project. Until then, happy stampin'!


Stampin' Up! Supplies Used: 

Table built using Product Table Builder by The Crafty Owl - Independent Stampin' Up! Demonstrator.

Merry and Bright Trimming The Town Christmas Card

by Joanne James28. September 2020 11:47

Happy Monday everyone! Today I'm earlier with my blog post as I was determined to be in time to share my card using Jacquie's sketch over at Freshly Made Sketches this week:

Such a great sketch; so simple yet so many ways you could interpret it! I have actually used this sketch twice this week - you will see it again on Thursday in my TicTacToe Design Team challenge card - but for today's card I couldn't resist creating layers and having some fun with one of my favourite Christmas Designer Series Papers - take a look:


Here's the low-down on today's card:

It's All About Trimming The Town - Today's card is very much all about the designer series paper. And as papers go, the Trimming The Town Designer Series Paper really has it all: cosy villages and winter scenes, whimsical homes and co-ordinating images, many of which can be cut out using the Home Together Dies, and two sheets of festive sentiments in a range of European languages. I used the paper for my snowy background, then used my Home Together Dies to cut out two houses, a wreath and a tree to decorate my card. I even fussy cut a sentiment and added this to my snowdrift. 

Layered Landscape - I decided to focus on creating my scene across the horizontal strip that features on Jacquie's FMS sketch, using two separate Whisper White 'snowdrifts' to add structure and form to my landscape, also cut using the Home Together Dies, then tucked my house in between and added my tree and sentiment to the front. This creates lots of interest and dimension, but in a small horizontal space, which keeps the clean feel of my card. You can see the layers better below:


What No Stamping? - Today's card is essentially a 'no stamping' card; I did stamp a sentiment on the inside and wanted to share it with you since the Coming Home stamp set is an image-only set. I have been trawling my other stamp sets for sentiments for house- and home-related greetings, especially because I am using the Trimming The Town Suite for my Creative Escapes Craft Retreat this weekend and I want to be able to share my suggestions with the ladies attending. The greeting I used inside today's card comes from the Poinsettia Place stamp set:

I'll share others as I use them on my cards in the coming weeks. So what do you think of this paper-based card? Does it tick your box? Do let me know in the comments below - I'd love to hear your thoughts. 

Here is the visual summary of the key products used on today's project for you to pin for easy reference:


You can see all of my 'How To' summaries on my 'How To - Tips and Techniques' Pinterest board in case you've missed any. 

Enjoy your day: I'm doing one of my favourite things, making treats to go out in the boxes with my virtual retreat boxes this weekend. I'll be back tomorrow with another project. Until then, happy stampin'!


Stampin' Up! Supplies Used:

Table built using Product Table Builder by The Crafty Owl - Independent Stampin' Up! Demonstrator.

Evergreen Forest Embossed Trees Christmas Card TTT82

by Joanne James17. September 2020 18:00

It's Thursday and time for a new challenge over at TicTacToe! It's the turn of Team X to host this week and this week's board was designed by Amy. This is the fun board that we are playing along with: 


We are rapidly approaching autumn and this week's board has lots of elements that would suit a fall card, but I combined it with the current Fab Friday sketch and went straight to Christmas as I continue to build my card stash! The Fab Friday sketch has a lovely open panel that is open to all kinds of interpretation and after some deliberation I knew exactly what I wanted to use it for - take a look:


Here's the low-down on today's card:

Centre Stage Embossing - I'm not generally a big user of embossing folders, although I do have my favourites: any that create a lightly textured background (bring on Subtle or Tasteful Textile 3D!) or embossing folders that make a statement in their own right (past favourites include Seasonal Wreath or Winter Wonder). The current Autumn Winter catalogue includes an embossing folder that can be used either as a background or a centrepiece - love a double-duty solution! The Evergreen Forest 3D Embossing Folder has a ton of texture and whilst it doesn't need to be confined to Christmas projects, I wanted to showcase it today as a forest of potential Christmas trees - just look at the depth of the embossed detailing:

It's In The Detail - I went down the first column of the TicTacToe board for today's card - Trees, Embossing, Diecut - and whilst it's easy to see where the first two elements are on my card, blink and you could miss the last one! I used a Rectangle Stitched Die to cut out my heat embossed sentiment (tick!) and backed this with a simple punch banner. The colours on today's card were inspired by this retired piece of Wrapped in Plaid designer series paper that I chose so that I could highlight my lovely green embossed trees and tie in the gold sentiment and brushed gold foil matting too.

Perfectly Plaid Inside Too - I continued the plaid theme onto the inside of my card too with a stamped plaid Christmas tree and sentiment from the annual catalogue set, 'Perfectly Plaid':


I like this card so much I think I'll make a few more - a great excuse to use up some of that retired plaid paper too!

Here is the visual summary of the key products used on today's project for you to pin for easy reference:


You can see all of my Product and 'How To' summaries on my 'How To - Tips and Techniques' Pinterest board in case you've missed any. 

A tictactoe board offers so many creative possibilities - how does this week's board inspire you? Why not have a go? We would love to see you in the gallery and who knows - you might be selected for Designer's Choice and be eligible to be a guest designer on a future challenge. 

Enjoy your evening; I'll be back tomorrow with another project. Until then, happy stampin'!


Stampin' Up! Supplies Used: 

Table built using Product Table Builder by The Crafty Owl - Independent Stampin' Up! Demonstrator.

Mini Catalogue

BROWSE THE CATALOGUE

The mini catalogue is now live! Read and download your copy here.

Shop Online

Access my online shop 24 x 7, 365 days of the year:

Current April hostess code:

VDKNV7BH

Shop Online

Join My Team

It's always a great time to join Stampin’ Up! New team members can get £130 worth of products for only £99 + free business supplies + free shipping + all the fun being a part of Stampin’ Up! Stampin' Up! has something for everyone: join my growing team and benefit from my support to enjoy Stampin' Up! however you choose.

If you're interested, call me for a chat to understand how I can help you realise your goals. Alternatively, if you have already decided to sign up and you just can't wait, please click here for the link to the online form where you can sign up and order your starter kit right away! 

Latest Kit!

Stampin Cut and Emboss

The Rock Legend Kit has all you need to make 8 cards with coordinating envelopes. Along with the new Panda Friends Kit, both are available from January 4th for just £14 each - get yours here!

2023-24 Annual Catalogue

BROWSE THE CATALOGUE

Click on the catalogue for a full list of current SU! supplies - if you would like to order any of the items featured, please drop me a line at [email protected] or give me a call on 07773 421446 - I'd be happy to help.

New Online Exclusives

There are new products available exclusively in the online store from 5 March - check them out here.

About Me

Hi I'm Joanne and live in Northampton and when I'm not looking after my husband and two beautiful children, am an avid crafter with a passion for all things Stampin' Up!

I must confess that I have never been a big rubber stamper - until I discovered Stampin' Up! that is. I love the fact that I can get such great results with co-ordinating stamps, inks, papers and punches - the possibilities are endless! Join me on my stamping journey as I share the things I love and be inspired to create amazing things yourself!

Follow Me

Monthly Newsletter

Box Builder

Click the button above to use Box Buster to create your custom box design using the Envelope Punch Board!

Kits Collection Now Available!

Stampin Cut and Emboss

The new Kits Collection from Stampin' Up! is now available!

Click here to see the current kits available and order yours online today.

I Design For


Stampin' Up Stuff

This is my personal blog and is not endorsed by Stampin’ Up! I hope you find it a plentiful source of ideas and personal inspiration but please don't copy my designs for contest submission or use for classes, publication or sale without express permission.