HB2U Hey Birthday Chicks Card

by Joanne James3. March 2021 22:16

Today was one of those days that did not go to plan - do you ever have days like that?! So I'm late squeezing in a quick post for this week's Inspired By Challenge and another entry for the birthday celebrations over at Time Out:


I used both the sketch layout and number inspiration over at Inspired By for my fun birthday card today - take a look:


Here's the low-down on today's card:

I created a custom sentiment using my Playful Alphabet Dies, flanked by some happy-go-lucky party chicks from the Hey Birthday Chicks bundle. I used some of the Ice Cream Corner designer paper for my background base and carried through the colours of the stripes for the other elements of my card:


Some quick stamping to the inside completes my card:


Here is the visual summary of the key products used on today's project for you to pin for easy reference:


You can see all of my 'How To' summaries on my 'How To - Tips and Techniques' Pinterest board in case you've missed any. 

Enjoy your evening and I'll be back tomorrow with another project. Until then, happy stampin'!


Stampin' Up! Supplies Used:

Table built using Product Table Builder by The Crafty Owl - Independent Stampin' Up! Demonstrator.

Who Is A Foxy Lady?

by Joanne James28. February 2021 21:32

Today I'm here with an extra card that I made yesterday just for fun for a few challenges:


The challenge over at CASology closes tomorrow but I had been musing over an idea that I wanted to try for a few days, so paired it with the Color Throwdown colours which had a lovely rust colour included, perfect for a fox, and made the following card:


I used a whole host of retired product on this one, most notably my Foxy Friends stamp set and Fox Builder Punch, to create a Foxy face in lieu of the 'o' in my 'FOXY' word created using the Playful Alphabet Dies and paired it with the word 'Lady' from part of a sentiment in the retired 'Little LadyBug' stamp set to create my custom wording. I used the Color Throwdown colours in a quartet of stripes for my diecut letters and carried them across my card base to unify my layers. I added an additional stamped fox to the inside of my card:


Lastly, no foxy lady is complete without a sassy magenta flower in her fur, right?! So I added a punched flower for an added touch of femininity: 


I love this clean and simple card - it turned out just as I imagined. The big question is, who would you send a card like this to? I'd be really interested in your thoughts!

I'm also linking today's card up over at Addicted to CAS where the code word for the next fortnight is 'animal'.

Here is the visual summary of the key products used on today's project for you to pin for easy reference:


You can see all of my 'How To' summaries on my 'How To - Tips and Techniques' Pinterest board in case you've missed any. 

Enjoy your evening and I'll be back tomorrow with another project and news of an early prrelease from teh forthcoming annual catalogue. Until then, happy stampin'!


Stampin' Up! Supplies Used (current supplies only):

Table built using Product Table Builder by The Crafty Owl - Independent Stampin' Up! Demonstrator.

Hey Rainbow Birthday Chick CCS 408

by Joanne James23. February 2021 13:00

It's Tuesday and time for a new challenge over at CAS Colours & Sketches. This week's challenge is a sketch challenge and Julie has asked that we use the following layout:


Feel free to flip or rotate the sketch when making your card. For my card today I am excited to use a new stamp set that I've been waiting for an age to arrive - take a look:


Here's the low-down on today's card:

Hey Birthday Chick - Remember the 'Hey Chick' stamp set that was a Sale-A-Bration stamp set in 2017? Well, you may have noticed a set in the current mini catalogue called 'Hey Birthday Chick' featuring the same group of feathered friends, this time all ready to celebrate a birthday, complete with cake, balloon and party hat! I used that crazy chicken with the mad hair on my card today, featuring both the old one from the 'Hey Chick' set and the one with the birthday cake from the 'Hey Birthday Chick' set. 

Chick and Birthday Chick Dies Exclusive - Not only are there the two chick stamps available, they are also available as part of exclusive bundles that will be available until 30 June. In addition to some great standalone dies, such as a fence, hen house, eggs, corn and a trellis, to name but a few, there are also dies to make cutting out any of the chicken shapes with ease. I used them to cut out one of my chickens to add a little dimension to my pair:


I am doing very well at meeting the CAS brief this week even if I say so myself, although I did take a small liberty with the sketch since my shapes are not identical. They would have been, but the temptation of the cupcake proved too much for chicken number one!!

Playing With Patterns - The colours for the rainbow colouring on my card today comes from the Playing With Patterns designer paper (Blends colours detailed below). Those subtle stripes were just enough to add interest to the base of my card. 

My rainbow stripes and funky rainbow-feathered chicks are perfect for the colour theme of 'rainbow colours' over at Just Us Girls this week and I'm also playing along with my gal pals over at TicTacToe where Team O are in charge this week and I went down the first column of Jeanne's board with Cute Critter/Celebrate/Coloured. 

Here is the visual summary of the key products used on today's project for you to pin for easy reference:


You can see all of my 'How To' summaries on my 'How To - Tips and Techniques' Pinterest board in case you've missed any. 

Enjoy your day; the sun is shining here so since one of the James Juniors is officially on a Games lesson this afternoon, it looks like I am going to have company for a nice long walk. Following yesterday's announcement, we are officially on a two-week countdown to a return to school, so I think I need to make the most of it! I'll be back tomorrow with another project. Until then, happy stampin'!


Stampin' Up! Supplies Used:

Table built using Product Table Builder by The Crafty Owl - Independent Stampin' Up! Demonstrator.

If In Doubt Be A Rainbow Unicorn

by Joanne James22. February 2021 13:30

Happy Monday everyone! Today I'm sharing a card inspired by that fabulous photo over at Fusion and using this week's Freshly Made Sketches sketch by Amy:


I adore that rainbow unicorn outfit in the inspiration photo - what would be princess wouldn't like to dress up in that?! I had been contemplating Amy's panelled sketch and decided that I could combine the two to create the sparkly card of my dreams. If you're not a fan of the the glimmer and glitter, then you should look away now, as this card has it in spades! Ok, you have been warned!! This is what I came up with - take a look:


Here's the low-down on today's card:

When Is A Hippo Not A Hippo? - When is a hippo not a hippo? Well, when it's a unicorn of course! My unicorn comes from the Hippo Happiness bundle, which in addition to the hippo, a butterfly, a sheep and a horse, there is of course a unicorn! I stamped mine in Smoky Slate with the second step stamp heat embosssed in silver, and gave her a gold sparkly unicorn horn. I think one of the things I love most about this stamp set is the sentiment I used on today's card - words to live by, right?! You can see the detail on my unicorn a little better below: 

Rainbow Glimmer - Having decided on a silver unicorn, I went all out to create my background panel from a complete piece of rainbow glimmer paper, spreading in colour from deep purple, through to pink, orange and yellow. I haven't used this for a while and was having definite withdrawal symptoms! I decided to leave my central clouds as one piece across the centre of my card; I tried it split with the rectangle, but preferred it as one piece. This also worked better for my sentiment, which sits nicely on the cloud.

Stitched Stars - Not satisfied with my rainbow glimmer alone, I decided to add a swirl of (retired) silver glimmer stars from the Stitched Stars die to the edge of my cloud to back my unicorn. I love this die and it's probably my most used in this set.

So what do you think - too much glimmer? I have to say I love it and I know a certain Miss James Junior who will love it too, teenager or not!! I spent the morning with a lovely bunch of my customers having our first proper online class of the year featuring florals and the Art Gallery bundle - a world away from all of this sparkle, although we did have a little play with gilded leafing - an altogether messier affair, albeit with very pretty results!

Here is the visual summary of the key products used on today's project for you to pin for easy reference:


You can see all of my 'How To' summaries on my 'How To - Tips and Techniques' Pinterest board in case you've missed any. 

Enjoy the rest of your day and I'll be back tomorrow with another project for this week's new sketch challenge over at CAS Colours & Sketches. Until then, happy stampin'!


Stampin' Up! Supplies Used:

Table built using Product Table Builder by The Crafty Owl - Independent Stampin' Up! Demonstrator.

A Walk In The Woods For AYSI 243

by Joanne James5. February 2021 13:00

Happy Friday everyone! Today I'm sharing my design team card for our new challenge over at As you See It where we have a colour challenge for you this week:


I don't mind admitting these colours threw me for a loop initially - all I could see were elephants, donkeys and apples! Anyway, having seen the card that my teamie Jane made this week, I decided I just needed to have a trawl through my stamp collection and see what I could come up with. I found my 'Walk In The Woods' stamp set and decided the palette would work perfectly for some toadstools - take a look at what I came up with:


Here's the low-down on today's card:

This week's card is definitely 'less is more': I stamped the cluster of toadstools initially in Sahara Sand and coloured the image with my water painters for a little no-line watercolouring. Once dry, I decided that the simple image looked a little flat, so overstamped the outline again in Basic Grey, which added in some much needed detail:


A heat-embossed sentiment in white on Basic Grey and some (retired) Poppy Parade chunky twine bow ties the image in with my mat and card base and completes my card.

Here is the visual summary of the key products used on today's project for you to pin for easy reference:


You can see all of my 'How To' summaries on my 'How To - Tips and Techniques' Pinterest board in case you've missed any. 

Here's a summary of our challenge rules:

  • Create any card, scrapbooking page, 3D project or packaging project that fits the challenge.
  • Please include the challenge graphic and link back to the challenge in your blog post. Turn off word verification so we can leave you lots of lovely comments. Make sure you link the post not the whole blog to the Linky. Use #AYSIXXX when uploading to a public gallery.
  • If you’re unsure about ‘the rules’, check the details under the Challenge Guidelines tab on the As You See It Challenge homepage.
  • In a colour challenge, black or other neutral can be used in outlines and sentiments but no other colours should be included. Stampin’ Up colours are used for reference but colours that are a close match are welcome.

Enjoy your day and I'll be back tomorrow with another project. Until then, happy stampin'!


Stampin' Up! Supplies Used:

Table built using Product Table Builder by The Crafty Owl - Independent Stampin' Up! Demonstrator.

Berry Blessings For You PP526

by Joanne James31. January 2021 09:00

Today it's Sunday and time for this week's new challenge over at The Paper Players! It's the fifth Sunday of the month so the lovely Laurie is hosting this week and she has a fun tic-tac-toe challenge board for us to work with:


I used Julee's current Mojo Monday sketch as the basis for my card and went top left to bottom right on the diagonal across the board with die cut-embossing-blue for another fruity card for you this week - take a look:


Here's the low-down on today's card:

Berry Blessings - Today's card is all about the free - free product that is! Both the stamp set and the designer series papers on today's card are part of the Berry Blessings bundle that is one of the free products available with a Stampin' Up! order of £90 or more during Sale-A-Bration. I love the designer papers that feature both the blueberries and raspberries in the bundled stamp set and also the strawberries from the Sweet Strawberry bundle - fruity patterns and also some fabulous checks and plaid. This card is all about the blues and greens, so I chose two plaids that would co-ordinate with my blueberry focal point. They just so happen to also be perfect for Stesha's takeover at TGIF Challenges this week where they are all about the plaid too. I also used the stamp set for the sentiment and a little extra stamping on the inside of my card too:


Stitched Shapes - The layers of Julee's sketch allowed me to fully indulge of my love of stitched shapes: rectangles for the background and then a circle as the base for my fussy cut berries. These are my most used of all my dies and the circles are for sure a staple - I just love the way they elevate a humble shape into something just a little bit more.

It's In The Details - I did a lot of fussy cutting on my berries and leaves, so wanted to add only a few extra small details. The embossing that completes my tic-tac-toe line is both dry embossing using my favourite Subtles folder on the white layer, and a white heat-embossed sentiment on my blue sentiment banner. I also added a simple white twine bow (with my banner that makes my two things from the Just Add Ink list this week) and a single pearl to the centre of my blue flower. You can see those finishing touches better below:


I really love how this card came together. Pacific Point was one of the first ink pads I ever bought when I started stamping, yet it isn't a colour I use often now so it was great to get it out for this card. I love that most of the rest of the product that I used was free - links to the store below if you'd like to snap up this bundle too!

Here is the visual summary of the key products used on today's project for you to pin for easy reference:


You can see all of my Product and 'How To' summaries on my 'How To - Tips and Techniques' Pinterest board in case you've missed any. 

Before you reach for your ink and papers, check out what our amazing team has created to inspire you this week:

Here's a quick recap of our challenge rules:
 
1.  Create a new paper project
2.  Upload your creation to your blog with a link back to us and provide a direct link to the post featuring your challenge submission.
3.  Please link your card to no more than four challenges, TOTAL.
4.  Have FUN!

You can see all of my 'How To' summaries on my 'How To - Tips and Techniques' Pinterest board in case you've missed any. 

Enjoy your day; we were forecast more snow here in the UK this weekend, but yesterday both James Juniors were disappointed to find temperatures had plummeted but it was more like freezing rain than snow. Today they will be hoping for the proper white stuff so that we can build another snowman! If not, we have some cooking to do and we might even get cracking on a knitting project that we've been promising to start for a while. I'll be back tomorrow with another project. Until then, happy stampin'!


Stampin' Up! Supplies Used: 

Table built using Product Table Builder by The Crafty Owl - Independent Stampin' Up! Demonstrator.

Walk In The Woods Get Well Soon Card

by Joanne James11. January 2021 15:14

Today I'm sharing a card that I made yesterday using the current colours over at Color Throwdown and this week's Freshly Made Sketches sketch:


I love the palette of browns and rust over at Color Throwdown and though they would be the perfect colours to try out a stamp set that I've had on the shelf for a while but not yet inked up. Using the long and skinny layout of Jen M's sketch (albeit with a few liberties in terms of layering my images) this is what I came up with:


Here's the low-down on today's card:

Walk In The Woods - I love the woodland images in the 'Walk In The Woods' set and I was tempted to try some no-line watercolouring with them, but decided instead to colour them with my Stampin' Blends markers. I fussy cut my hedgehog and popped him up on dimensionals in front of the toadstools. 

Tasteful Textile - Once I'd coloured my images, I added some texture to my stamped layer by running it through my Tasteful Textile embossing folder, which adds a lovely look and feel. Because I was making a longer slimline card, this required two passes through my diecuttting machine, one from each end of the cardstock, but the random embossing pattern meant this was easy enough to do as I didn't need the embossing to line up in any way. Hopefully you can see the subtle texture a little better below:

Everything Will Be Okay - I used this sentiment from the same stamp set as I needed a 'get well soon' card, but it would be useful for other occasions too - even just to cheer someone up on a dreary winter day - and we have plenty of those at the moment, right?!

Here is the visual summary of the key products used on today's project for you to pin for easy reference:


You can see all of my 'How To' summaries on my 'How To - Tips and Techniques' Pinterest board in case you've missed any. 

School's out for the day so we are going for a quick walk to blow off the cobwebs before it get's too dark. Enjoy your evening and I'll be back tomorrow with another project. Until then, happy stampin'!


Stampin' Up! Supplies Used:

Table built using Product Table Builder by The Crafty Owl - Independent Stampin' Up! Demonstrator.

Heartwarming Hugs With Peace and Joy For Christmas

by Joanne James5. December 2020 22:16

Today I have a quick post with the a card for the current colour challenge over at Just Add Ink:

These colours have featured in a few of my projects as they are all in the Heartwarming Hugs designer series paper (and you all know how much I love designer series paper!) this card is one I designed for a class featuring the Peace and Joy bundle - take a look:


 Here's the low-down on today's card:

I layered a trio of banners of DSP onto a stitched rectangle, then added some Real Red sheer ribbon and sprig punch greenery behind my focal point sentiment, with a little stamping on the inside to finish:


Here is the visual summary of the key products used on today's project for you to pin for easy reference:


You can see all of my 'How To' summaries on my 'How To - Tips and Techniques' Pinterest board in case you've missed any. 

Enjoy your day and I'll be back tomorrow with another project (or two!) and a video for my weekly Paper Players post. Make sure to pop by - you won't want to miss it! Until then, happy stampin'!


Stampin' Up! Supplies Used:

Table built using Product Table Builder by The Crafty Owl - Independent Stampin' Up! Demonstrator.

Copper and Navy Merry and Bright Christmas Card FMS463

by Joanne James30. November 2020 13:48

Today I'm sharing a card that uses Amy's sketch over at Freshly Made Sketches as its starting point:

I absolutely loved Amy's sketch this week (it's a keeper - thanks Amy!) and could have made a ton of cards with it! Alas time was my enemy so I chose my favourite idea and ran with it! It uses one of my favourite festive combinations inspired by the patterns of the Brightly Gleaming designer paper I used for my rectangle background - take a look:


Here's the low-down on today's card:

I made the paper the star of the show and paired it with a stamped and diecut sentiment from the 'Peace and Joy' bundle, using vellum for the base layer to soften the panel but allow the pattern to shine through. I used a bunch of retired diecuts for the trio of background 'sticks' (they are actually cut using the candle die from the 'Doily Wishes' set!) and added a copper star in place of the dot on the 'i' in 'bright' for a little something extra - check it out below:


I added a copper bow from some leftover twine from a retired card kit to complete my card.

Here is the visual summary of the key products used on today's project for you to pin for easy reference:


You can see all of my 'How To' summaries on my 'How To - Tips and Techniques' Pinterest board in case you've missed any. 

I made another card using the 'Peace and Joy' dies for another card over the weekend which I will hopefully be back to share with you later; right now I'm against the clock so have to dash!! Enjoy the rest of your day and I'll hopefully be back later with another project. Until then, happy stampin'!


Stampin' Up! Supplies Used:

Table built using Product Table Builder by The Crafty Owl - Independent Stampin' Up! Demonstrator.

Feels Like Frost Split Panel Christmas Card PP518

by Joanne James22. November 2020 09:00

Today it's Sunday and time for this week's new challenge over at The Paper Players! It's the turn of the amazing LeAnne to host this week and she has my favourite, a sketch challenge for you to work with:
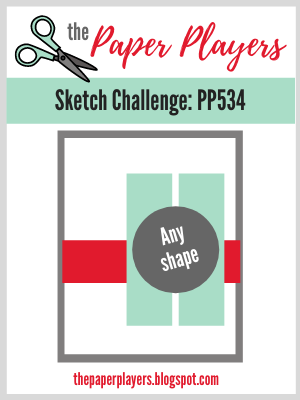
    

My card is all about the winter blues today - perfect for the Double D challenge (thanks for the heads up on this one LeAnne!) I really liked LeAnne's sketch layout this week and decided to use those panels to highlight one of the photographic images in the Feels Like Frost designer series paper pack - take a look:

Here's the low-down on today's card:

I chose a lovely image of frosty seed heads against a blue background and cut out the panels using my Rectangle Stitched Dies before piecing back together to create the finished layout:

I brushed the frosty elements with my clear Wink of Stella brush which is difficult to see in the photo but give it a lovely subtle sparkle in real life. I added a sentiment from 'Snowflake Wishes' and a mat border of silver glimmer paper and finished off the inside with a sentiment from the same set:


The most tricky part of today's card was cutting the stitched rectangles and aligning them to the image. Otherwise, a pretty straightforward card!

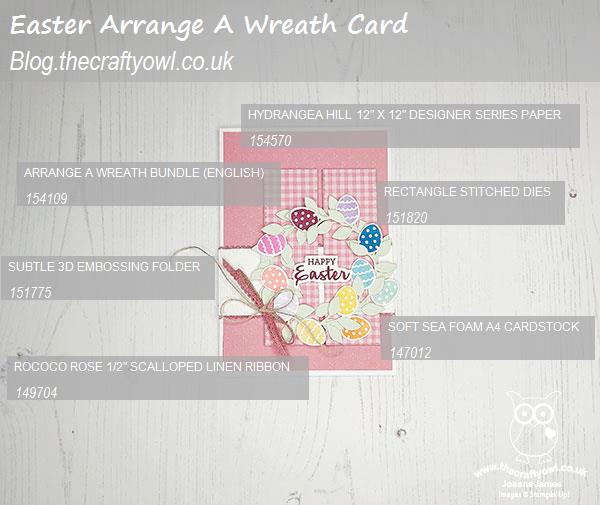
Here is the visual summary of the key products used on today's project for you to pin for easy reference:
 I 

You can see all of my Product and 'How To' summaries on my 'How To - Tips and Techniques' Pinterest board in case you've missed any. 

Before you reach for your ink and papers, check out what our amazing team has created to inspire you this week:

Here's a quick recap of our challenge rules:
 
1.  Create a new paper project
2.  Upload your creation to your blog with a link back to us and provide a direct link to the post featuring your challenge submission.
3.  Please link your card to no more than four challenges, TOTAL.
4.  Have FUN!

You can see all of my 'How To' summaries on my 'How To - Tips and Techniques' Pinterest board in case you've missed any. 

Enjoy your day; today is officially 'Stir up Sunday', an old tradition when home cooks spend the last Sunday before advent 'stirring up' their Christmas pudding and in modern times their Christmas cake and homemade mincemeat too.  The day gets its name from the beginning of the collect for the day in the Book of Common Prayer, which begins with the words, "Stir up, we beseech thee, O Lord, the wills of thy faithful people". We had a day of preparation yesterday and made a batch of mincemeat and some mince pies; today we are making Christmas puddings and cake - yum! I'll be back tomorrow with another project. Until then, happy stampin'!


Stampin' Up! Supplies Used: 

Table built using Product Table Builder by The Crafty Owl - Independent Stampin' Up! Demonstrator.

Mini Catalogue

BROWSE THE CATALOGUE

The mini catalogue is now live! Read and download your copy here.

Shop Online

Access my online shop 24 x 7, 365 days of the year:

Current April hostess code:

VDKNV7BH

Shop Online

Join My Team

It's always a great time to join Stampin’ Up! New team members can get £130 worth of products for only £99 + free business supplies + free shipping + all the fun being a part of Stampin’ Up! Stampin' Up! has something for everyone: join my growing team and benefit from my support to enjoy Stampin' Up! however you choose.

If you're interested, call me for a chat to understand how I can help you realise your goals. Alternatively, if you have already decided to sign up and you just can't wait, please click here for the link to the online form where you can sign up and order your starter kit right away! 

Latest Kit!

Stampin Cut and Emboss

The Rock Legend Kit has all you need to make 8 cards with coordinating envelopes. Along with the new Panda Friends Kit, both are available from January 4th for just £14 each - get yours here!

2023-24 Annual Catalogue

BROWSE THE CATALOGUE

Click on the catalogue for a full list of current SU! supplies - if you would like to order any of the items featured, please drop me a line at [email protected] or give me a call on 07773 421446 - I'd be happy to help.

New Online Exclusives

There are new products available exclusively in the online store from 5 March - check them out here.

About Me

Hi I'm Joanne and live in Northampton and when I'm not looking after my husband and two beautiful children, am an avid crafter with a passion for all things Stampin' Up!

I must confess that I have never been a big rubber stamper - until I discovered Stampin' Up! that is. I love the fact that I can get such great results with co-ordinating stamps, inks, papers and punches - the possibilities are endless! Join me on my stamping journey as I share the things I love and be inspired to create amazing things yourself!

Follow Me

Monthly Newsletter

Box Builder

Click the button above to use Box Buster to create your custom box design using the Envelope Punch Board!

Kits Collection Now Available!

Stampin Cut and Emboss

The new Kits Collection from Stampin' Up! is now available!

Click here to see the current kits available and order yours online today.

I Design For


Stampin' Up Stuff

This is my personal blog and is not endorsed by Stampin’ Up! I hope you find it a plentiful source of ideas and personal inspiration but please don't copy my designs for contest submission or use for classes, publication or sale without express permission.