All Wrapped Up - Simple Christmas Gift Wrapping Ideas

by Joanne James22. December 2013 21:17

Well it's been another busy few days here in the James household with a trip to the movies on Friday, a fun trip iceskating yesterday and swimming, grocery shopping and a pre-Christmas festive family get-together this evening. The big day is almost upon us, but I finally managed to get some photographs taken today in between all my last minute Christmas preparations and today would like to share some of my quick but attractive festive packaging ideas for stocking-fillers and small gifts. Here's the first one - a simple pouch made using the envelope punch board:


I made lots of these in various colours to tie in with the Winter Frost DSP stack to package some little gifts for the lovely ladies who have attended my classes over the past year (I can't tell you what's inside though - it's not Christmas Day yet ;-)! )

The second of my projects is a little stocking filler I made for my daughter - a pair of hairclips decorated with Frosted Finishes Embellishments and packaged in a cute little triangular carton that I made using a sheet of the Winter Frost DSP stack:

I embossed the 'warm wishes' sentiment from the 'Snow Day' stamp set using silver embossing powder and it added a real feel of luxury to the finished packaging. For the clips, I simply adhered a Frosted Finishes Embellishments using Crystal Effects to a couple of standard hair clips.

My last packaging idea that I'm going to share today is one of the lovely little muslin bags, which I stamped with the 'Love and Joy' single stamp and decorated with another Frosted Finishes embellishment, a ribbon tie and a little Dazzling Diamonds for some extra sparkle:

These bags are a great size and perfect for a little sweet treat or a small gift such as nail polish or some candles, or maybe a miniature bottle of a favourite tipple, a pack of playing cards or a micro torch for a more masculine gift.

So some easy ideas to make those little gifts extra special.

I have a date with a very large ironing basket tomorrow evening (the exciting life I lead!), but all being well will be back with another post as I've a few more Christmas-themed things to share and am running out of time in which to do it.

Until then, happy stampin'!


Stampin' Up! Supplies Used:

Table built using Stampin' Up! Product Table Builder from The Crafty Owl.


Envelope Card using the Envelope Punch Board and 'How to' Video Tutorial

by Joanne James19. November 2013 20:29

Evening blog readers! I had to do some Christmas shopping today, but managed to squeeze in a quick hour of crafting - still so much to do before I'm ready for my very first Stampin' Up! European Convention in Manchester in 2 days time! I'm very excited (can you tell?!) and am looking forward to spending some quality crafting and partying time with Barbara and Samantha, the two of my team that are accompanying me.

More news of that later in the week, but today I have another video tutorial of you to show you how to make a very simple envelope card using your Envelope Punch Board:

I made a whole bunch of these as thank you cards to pop in with my most recent batch of customer orders; lots of my customers have already bought envelope punch boards, so I'm keen to show them lots of simple and straightforward ways that they can use it for things as well as straightforward envelopes.

Here's a picture of the cards I made, both open and closed:

And here's the link to my YouTube channel to watch the video tutorial if you would like to make your own:


I used Sycamore Street designer series paper for my cards, which is a retired paper but one that is still available currently on the clearance rack for only £3.59 - pop over to my online store by clicking on the image below if you would like to snap some up at this bargain price before its all gone!

Back tomorrow with another project; until then, happy stampin'!


Stampin' Up! Supplies Used:


Easiest Ever Crackers with the Stampin' Up! Envelope Punch Board - Video Tutorial

by Joanne James16. November 2013 21:42

Yay - it's the weekend! I've been busy doing homework and more convention swaps today, along with other lovely items for my convention friends, all of which I will share with you another time ... because today I'm going to show you the easiest ever way to make Christmas Crackers using the new Stampin' Up! Envelope Punch Board! Not just pictures, but a video too. The new envelope punch board from Stampin' Up! has been hugely popular as lots of my customers will testify and it really is a versatile piece of kit. As I mentioned in a previous post, the board can be used not only to make envelopes, but also boxes in a variety of shapes and sizes and other 3D items such as crackers.

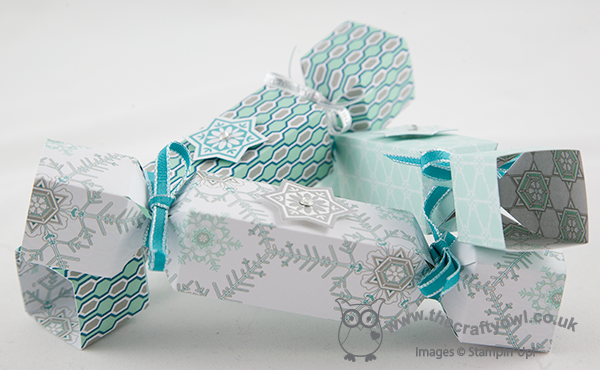
As we are fast approaching the start of the festive season, what better than to make some lovely Christmas crackers to decorate your Christmas tree, as table favours for the festive table or even to house a couple of chocolates as a little gift for someone special? Here are the ones I make in my video, along with a picture of some other ones that I've made:

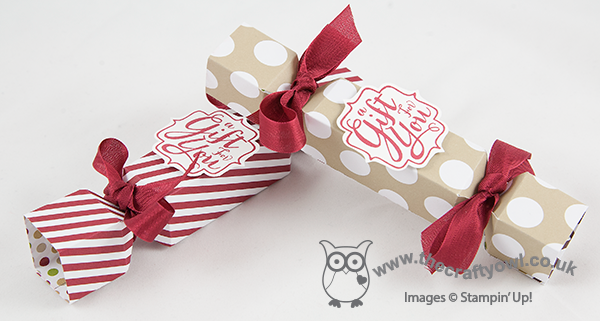
I've seen lots of videos and tutorials on how to make them in a variety of sizes and styles, but if you want to make lots I think by far the easiest way is to use the current Designer Series Paper Stacks in the seasonal catalogue as your starting point: each sheet measures 4.5"x6.5" so it makes the score measurements really easy: 1", 2", 3" and 4" on the short side, and 1", 1.5", 2", 4.5", 5" and 5"5 on the long side. Simply score, punch stick and done - you can make a cracker in just a couple of minutes. Add a minute or two more to add some decoration and you could be mass producing these in no time. If you don't use the paper stacks, any designer paper cut to the basic measurement will do; I would avoid using solid colour standard cardstock as this is much thicker and whilst your envelope punch board will punch through a double thickness of cardstock, it is quite hard work and you risk damaging your punch and board as it isn't really designed with this in mind.

In my video, I also show a boxed set of crackers that I made using the Winter Frost Designer Series Paper Stack - here is the photo again:

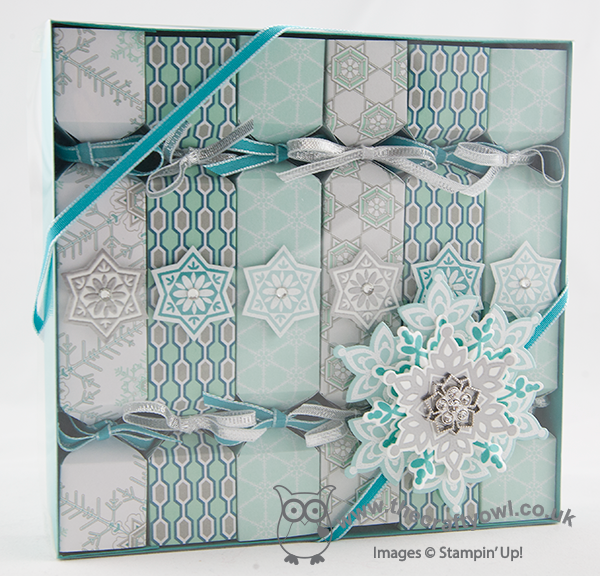
This box set would make a lovely gift for someone - if you would like to make a box for your crackers, the dimensions you will need are as follows:

Box Base: Sheet of cardstock (I used Bermuda Bay) 8 1/4" x 8 1/2". Score at 1 1/8" and 7 1/8" across the short side, then rotate through 90 degrees and score at 1 1/8" and 7 3/8" on the long side.

Box lid: Acetate window sheet size 8 1/4" x 8 1/2". Create a shim for your score board using an offcut of window sheet, then with your shim in place, score the lid to the same dimensions as the base above (1 1/8" and 7 1/8" across the short side, 1 1/8" and 7 3/8" on the long side). This will ensure your box lid fits snugly.

I then decorated my box with some embossed die cut snowflakes using the Festive Flurry Stamp Set and Framelits, Bermuda Bay ribbon and a Frosted Finishes embellishment.

So without further ado, grab your paper stack and watch my video tutorial and start making your Christmas crackers today!


Stampin' Up Supplies Used:


Merry Mini Card and Custom Envelope using the NEW Envelope Punch Board

by Joanne James4. November 2013 21:26

Today's post features one of the cards that I'm making in my classes this week: it's a 3" x 4" notelet card, with co-ordinating DSP bespoke envelope made with the new Envelope Punch Board. This really is a great piece of kit and can be used for so much besides envelopes, but before we get ahead of ourselves I thought I would shoot a short video to show you just how easy it is to make a simple envelope to fit a card that isn't a 'standard' size.

So here is the card I made:

The card itself is very simple, with some festive washi tape and a small punched square, that has been embossed with the Stylish stripes TIEF and had a little Christmas tree punched out using one of the Merry Minis punch trio. Then a tiny button and twine bow to finish and a simple sentiment and done. The great thing is that with the new envelope punch board a co-ordinating envelope really can be created in minutes - just watch the video below to see how easy it is:


Isn't that great? The ladies at my class today couldn't believe just how easy it was to create a perfect envelope. It was a good job this was our last card of the class, otherwise I think they would have spent the whole afternoon making envelopes and not cards! The envelope board can be used for so much more though; watch out for more videos showing you how to get the most out of this great new tool.

I'm also linking today's card up with the colour challenge over at Create with Connie and Mary, where this week's challenge is to make a card using my featured colours: 

If you would like to be inspired, pop over to their blog and see how other designers have used this colour combination in a variety of different ways. Back tomorrow with another project; until then, happy stampin'!


Stampin' Up! Supplies Used:


Shop Online

Access my online shop 24 x 7, 365 days of the year:

Current May hostess code:

VDKNV7BH

Shop Online

2024-25 Annual Catalogue

BROWSE THE CATALOGUE

Click on the image to download your copy of the 2024-25 annual catalogue. For a full list of current SU! supplies, go to my online store. If you would like any help or advice, please drop me a line at [email protected] or give me a call on 07773 421446 - I'd be happy to help.

Join My Team

It's always a great time to join Stampin’ Up but during May it's even better! New team members can get £78.25 of new In Color products for FREE! That's in addition to another £130 worth of products of your choice for only £99 + free business supplies + free shipping + all the fun being a part of Stampin’ Up! Stampin' Up! has something for everyone: join my growing team and benefit from my support to enjoy Stampin' Up! however you choose.

If you're interested, call me for a chat to understand how I can help you realise your goals. Alternatively, if you have already decided to sign up and you just can't wait, please click here for the link to the online form where you can sign up and order your starter kit right away! 

Latest Kits!

Stampin Cut and Emboss

The City Sights Kit has all you need to make 8 cards with coordinating envelopes for £20. Along with the new Happy Hollyhocks Kit, a no stamping kit including 9 cards for just £14, both are available from May 1st - get yours here!

New Online Exclusives

There are new products available exclusively in the online store from 5 March - check them out here.

About Me

Hi I'm Joanne and live in Northampton and when I'm not looking after my husband and two beautiful children, am an avid crafter with a passion for all things Stampin' Up!

I must confess that I have never been a big rubber stamper - until I discovered Stampin' Up! that is. I love the fact that I can get such great results with co-ordinating stamps, inks, papers and punches - the possibilities are endless! Join me on my stamping journey as I share the things I love and be inspired to create amazing things yourself!

Follow Me

Monthly Newsletter

Box Builder

Click the button above to use Box Buster to create your custom box design using the Envelope Punch Board!

Kits Collection Now Available!

Stampin Cut and Emboss

The new Kits Collection from Stampin' Up! is now available!

Click here to see the current kits available and order yours online today.

I Design For


Mini Catalogue


The next mini catalogue will be live in September! 

Stampin' Up Stuff

This is my personal blog and is not endorsed by Stampin’ Up! I hope you find it a plentiful source of ideas and personal inspiration but please don't copy my designs for contest submission or use for classes, publication or sale without express permission.