Butterflies - for Mums everywhere

by Joanne James12. May 2013 21:58

Well, it's been a busy weekend: Stampin' Up! regional training in Telford yesterday, preparing for this week's classes today, so am rather behind with my posts. Yesterday was a great day, with lots to share in the coming weeks, however I returned home with the most dreadful headache, so couldn't focus long enough to finish yesterday's post. I will share my swaps tomorrow instead, as today's post is a timely one as it's International Mother's Day; we in the UK had our Mother's Day a while ago now, but for my American and Canadian friends celebrating today, I thought I would share the Mother's Day card I made for my Mother-In-Law, which I couldn't share at the time as she reads my blog and so I couldn't spoil the surprise! This was her card:


Very pink just about sums it up! Can you see the lovely shimmer on the butterflies? This is courtesy of the liberal spray of Vanilla Smooch Spritz - they really sparkle when they catch the light. This card would of course also make a lovely birthday card for a Mum.

One of my favourite books is 'Good Mother, Bad Mother' by Gina Ford (a modern day heroine in my view) and there is a line at the beginning that says "the hand that rocks the cradle is the hand that rules the world" - I so love that line, so to Mothers everywhere, this one's for you - hope you've had a lovely day.

Back tomorrow with my Telford swaps; until them, happy stampin'!


Stampin' Up Supplies:

Stamps: En Francais

Cardstock: Whisper White, Melon Mambo, Pretty in Pink

Ink/Stampin' Write Markers: Pretty in Pink

Tools: Elegant Butterfly Punch, Bitty Butterfly Punch, Typeset Alphabet

Finishing Touches: Vanilla Smooch Spritz, Basics Rhinestones


Blossom Punch Layered Card

by Joanne James25. April 2013 20:52

Today I thought I'd share another card with you from my recent 'Mixed Bunch' class. I created it after seeing something similar on Pinterest and it made it into the class because I think it's a good example of how you can use a punched shape to create the illusion of a flower without having used the co-ordinating stamp:

I cut a layer of Sycamore Street DSP and scalloped the edge and adhered it to the Island Indigo card base, then cut a further smaller layer out of Pool Party, embossed with the Perfect Polka Dots Embossing Folder and punched out a flower shape from the edge of the cardstock and adhered with dimensionals to reveal the patterned paper underneath. I then used a 7/8" scallop circle with a co-ordinating brad to create the flower centre. A banner sentiment and a bright orange butterfly completed the card.

Back with another card tomorrow - until then, happy stampin'!


Stampin' Up Supplies:

Stamps: Happiest Birthday Wishes (hostess - retired)

Cardstock: Island Indigo, Pool Party, Tangerine Tango, Sycamore Street DSP

Tools: Blossom Punch, Bitty Butterfly Punch, Perfect Polka Dots Embossing Folder, 7/8" Scallop Circle Punch

Finishing Touches: Basics Rhinestones, Designer Printed Brad

Wishing You a Day as Perfect as You Are - Masking Technique

by Joanne James24. April 2013 17:58

I was having a sort out in my craft box and found this card that I actually made in our January demonstrator training session, but haven't yet shared with you. It was designed by Monica Gale and is a great example of how you can use shapes and dies to make your own mask and create some lovely effects. So here is the card:


This card is quite different in design to the kind of thing that comes naturally to me - in particular, I had to be almost held down before I could bring myself to crumple the cardstock that has the stamped image on! - yet this, along with the torn edges, give the card a real 'vintage' feel. This card also showcases a great technique - by creating your own mask, you can create an outline image that can give your card a different perspective.

For this card, I made a mask using vellum cardstock and one of the Delicate Doilies Sizzlits. By adding a thin layer of Tombow glue to the back of the shape and allowing it to dry (wait until the glue turns from white to clear in colour), you can create a repositionable mask. This was then placed onto the Early Espresso card and sprayed with Vanilla Shimmer Smooch Spritz. When you then remove the mask, you are left with the mask shape and detail. Another tip to achieve a uniform ripped edge: hold all three sheets of card together and tear, holding one hand steady and tearing the card with the other by pulling towards you. The hints of Rich Razzleberry card and ribbon, along with the sparing use of silver glimmer paper, add a much needed edge to an otherwise quite muted card. The stamp used here is one of this year's Sale-A-Bration stamps from the set Vintage Verses, but this layout would work with lots of other stamps - the ones in the 'From My Heart' set would work particularly well I think.

So not my usual style, but lots of creative food for thought. That's one of the great things about being a Stampin' Up! demonstrator; regular training sessions are great for pushing you out of your stamping comfort zone and encouraging you to try new techniques and ideas. If you would like to benefit from the development resources that Stampin' Up! has to offer, then there's never been a better time to sign up; you can find the full details of the current promotion that runs until May 30th here.

Back tomorrow with another project - until then, happy stampin'!


Stampin' Up Supplies:

Stamps: Vintage Verses (Sale-A-Bration - retired)

Cardstock: Sahara Sand, Rich Razzleberry, Early Espresso, First Edition Specialty Paper, Silver Glimmer Paper

Ink/Stampin' Write Markers: Rich Razzleberry

Tools: Bitty Butterfly Punch, 7/8" Scallop Circle Punch, Itty Bitty Punches

Finishing Touches: Basics Pearls, 1/4"Rich Razzleberry Stitched Grosgrain Ribbon, Vanilla Shimmer Smooch Spritz

Feel Goods - The Best of Friends

by Joanne James20. April 2013 21:10

The sun is shining here in the UK - oh, happy days at last! Back to cards today and I thought I'd share a card I made a little while ago using one of the stamps in the 'Feel Goods' stamp set. I loved this stamp set the first time I set eyes on it - 5 great sayings that can be suitable for so many occasions. This is the first card I made with this set, although I will have many more to share in days to come I'm sure:

My favourite bright colours again for this card, with a ribbon of Summer Smooches designer series paper along with a couple of butterflies for interest. Centre stage absolutely goes to the 'feel good' though. I made this card for a good friend of mine for whom the sentiment absolutely fits. In the words of a Fergal Sharkey pop song from the 80s (I know, it shows my age when I start reminiscing like this!) 'A good heart these days is hard to find'. I think the same can be said of good friends - but the recipient of this card is one of the best!

Back tomorrow with another project - until then, enjoy the sunshine and happy stampin'!

Stampin' Up Supplies:

Stamps: Feel Goods

Cardstock: Real Red, Daffodil Delight, Rich Razzleberry, Whisper White, Brights DSP, Summer Smooches DSP

Ink/Stampin' Write Markers: Rich Razzleberry

Tools: Elegant Butterfly punch, Bitty Butterfly punch, Labels Framelits

Finishing Touches: Basics Rhinestones


Sunshine and Sprinkles Scrapbook Page

by Joanne James19. April 2013 21:09

Today I thought I would share something a little different: as many of my followers will know, I love to design and make cards. I'm not a scrapbooker - it's just not my 'thing'. In many ways this may surprise those close to me, as we are a household of keen photographers and have a collection of literally thousands of memories captured on slide, film and digitally. I love to have photographs on display - for me though, I struggle to design a page without a specific photograph in mind.

All that being said, I made a scrapbook page at training last Sunday and I thought I would share it with you, as even though I haven't yet chosen the photos to put on it, the layout could be used and adapted in so many ways I'm sure it will inspire some of you reading this, who I know are keen scrapbookers. Here is my finished page: 
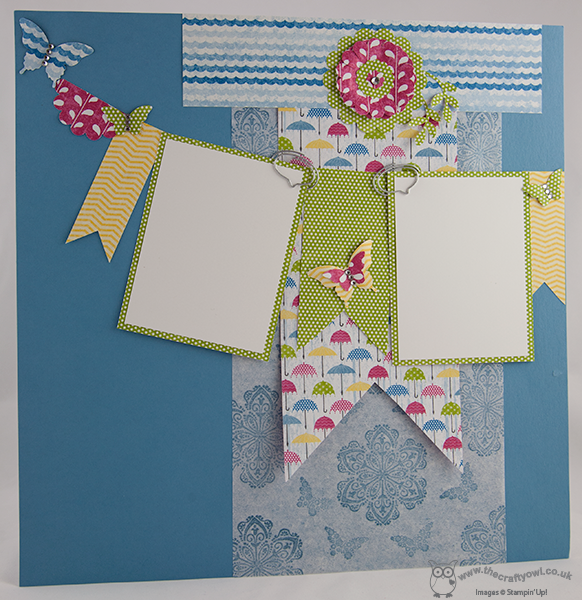
This page was designed by the lovely Bekka Prideaux and features one of my favourite current designer papers in the Spring Summer catalogue, Sunshine and Sprinkles. I also like the background stamped sheet - this is Marina Mist ink stamped straight on to filter paper.

Here's a close-up of the top section - there's so much going on here: 
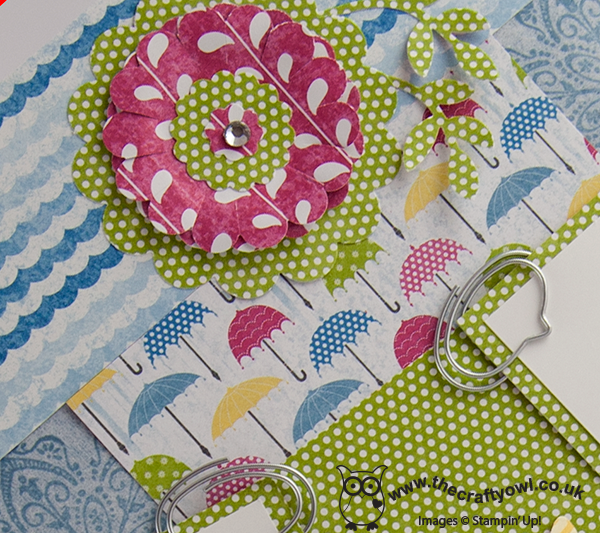
Did you notice the lovely speech bubble paper clips too - aren't they cute? You may have overlooked them in the catalogue (p.28, Spring Summer Cat.): there are 2 different packs - each with 8 of 3 different designs (there is an arrow and a coat hanger in this set too) and at £4.50 per pack they represent great value. One or two on a scrapbook page or card is enough to add just the right amount of detail. One more photo - a close-up of one of the butterflies:
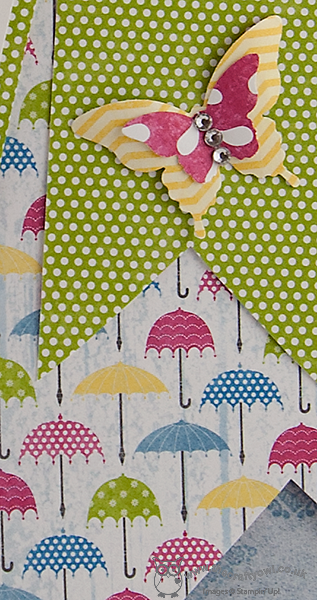
As Bekka herself would say, you can never have too many butterflies! I love the way the Bitty Butterfly punch is layered with the Elegant Butterfly punch to create a double one and the rhinestones add just enough 'bling' without overpowering the page. I really like this layout and there's even some space on the base page if you wanted to add some journalling or commentary. For those of you that enjoy journalling, I will have more great Stampin' Up! news coming soon - all 'top secret' currently, but watch this space - that's all I'm saying for now!

I hope you enjoyed the change in direction today; back with another card tomorrow. Unti then, happy stampin'!


Stampin' Up Supplies:

Stamps: Mixed Bunch, Papillon Potpourri

Cardstock: Marina Mist, Whisper White, Sunshine and Sprinkles DSP

Ink/Stampin' Write Markers: Marina Mist

Tools: Elegant Butterfly punch, Bitty Butterfly punch, 2-Step Bird punch, 1 3/4" Scallop Circle punch, 2 3/8" Scallop Circle punch, 7/8" Scallop Circle punch, Itty Bitty Shapes punch

Finishing Touches: Cute Clips, Basics Rhinestones

Waterfall Album

by Joanne James7. March 2013 22:11

Well, not doing so well with the blogging this week - I've no shortage of things to share as I've been a very busy bee - just short on time!

Yesterday I held a class attended by a lovely group of ladies to make this waterfall album designed by Becca Prideaux:

The album opens up to reveal a waterfall of pockets that can be used for all kinds of things: photos, recipes, journalling, a birthday calendar ... the possibilities are endless! It also makes a nice Mother's Day gift and there will certainly be some lucky recipients following yesterday's class.

There was lots of cutting, punching, stamping and gluing, and enough of that lovely silver glimmer paper to add some real sparkle. Thank you to everyone who attended - it was a very fun evening. If anyone following my blog would be interested in attending any of my classes, do drop me a line for more information. There will eventually be a full schedule available on my website which is still currently under construction, but if you'd like to know more in the meantime, do give me a call or drop me a line and I can share with you my schedule of both card and project classes.

Back tomorrow with a Mother's Day card for you; until then, happy stampin'!


Stampin' Up Supplies:

Stamps: Bloomin' Marvelous

Cardstock: Crumb Cake, Sycamore Street DSP

Ink: Crumb Cake

Tools: Bitty Butterfly Punch, Elegant Butterfly Punch, 1 3/4" circle punch, 1 3/8" circle punch,  1 3/4"scallop circle punch, 2 3/8" scallop circle punch, scallop edge border punch, Stampin' Trimmer

Finishing Touches: Silver Glimmer Paper


Tags: , , , , ,

3D Projects | Classes

Bloomin' Marvelous Thank You Cards

by Joanne James3. March 2013 21:59

I've been out a wedding fair all day today but as I haven't blogged for a few days, thought I'd do a quick post to share with you some thank you cards I made for the lovely ladies who placed orders at the last party I ran. I wanted something simple as I had several to make and decided to use the Sale-A-Bration Bloomin' Marvelous stamp set as many of them had chosen it as their free gift with a £45 order and I wanted to give them a little inspiration. So this is what I came up with:

I love the effect you can get by using a frame within your picture to add focus, and by stamping the third butterfly and punching out it looks like the butterflies are almost flying off the page. A little sparkle adds a finishing touch. I also used the precut notelet and envelope sets to make these (card measures 12.7 x 8.9cm), so I didn't even need to cut and score the basic cardstock - super quick. If you would like this stamp set, Sale-A-Bration is running for another 19 days so drop me a line if you would like to place an order. That's it for today - I'm off to soak my aching feet!

Until next time, happy stampin'!


Stampin' Up Supplies:

Stamps: Bloomin' Marvelous

Cardstock: Pool Party, Whisper White

Ink: Pool Party, Primrose Petals, Raspberry Ripple, Island Indigo

Tools: Bitty Butterfly Punch

Finishing Touches: Dazzling Details, Whisper White Notelets and Envelopes

Forever and Always - Preparation for the Wedding Season has Begun!

by Joanne James7. February 2013 20:59

Before I share more of my 'Feeling Sentimental' notelets with you, today I thought I'd let you know about the wedding fair I'm attending at the weekend and give you a sneak peak of the 'make and take' wedding invitation you could try your hand at if you come along.

I've been busy all week preparing samples for the Budget Bride Live Wedding Fair at Diana's Health Club in Wellingborough this Sunday (click here for more information). If you're a bride-to-be and would like to know how to make your own wedding stationery, then do come along and discover how easy it can be with a little help from me and some Stampin' Up! supplies. You can enjoy making everything from invititations to place settings, guest favours to room decorations - all colour-coordinated to tie in to your chosen theme.

If you are attending on Sunday, you will also have the opportunity to have a go and discover just how easy making your own stationery can be - just take a look:


This invitation in classic white allows you to have a go at a number of basic techniques: embossing the raised flower design with the Big Shot, a simple sentiment stamped in black, along with two punched butterflies to add interest. I'm sure you'll agree it looks great as it is, but with the addition of some pearls or colour, can be easily tied in to your theme or given even more of a 'wow' factor.

You may also be surprised at how easy on the purse-strings making such beautiful wedding stationery can be: you could make 40 invitations like the one above for just £67.90 including envelopes and still have ink, stamps, punch and an embossing folder to make co-ordinating items too. When you consider that the average UK bride and groom spend £465 on wedding stationery alone*, then this is nothing short of a bargain and definitely something to think about if you're getting married on a budget.

If you would like to discuss your wedding stationery needs, do come along on Sunday or contact me for further information on how I can help make your day as special and individual as you are.


Stampin' Up Supplies:

Paper: Whisper White

Inks: Black Stazon

Stamps: Loving Thoughts

Tools: Elegant Bouquet Embossing Folder, Bitty Butterfly Punch, Big Shot

*Source: Weddingsday.co.uk


Tags: , , , , , ,

Cards | Host a Party | Stamping | Wedding Fairs

Mini Catalogue

BROWSE THE CATALOGUE

The mini catalogue is now live! Read and download your copy here.

Shop Online

Access my online shop 24 x 7, 365 days of the year:

Current April hostess code:

VDKNV7BH

Shop Online

Join My Team

It's always a great time to join Stampin’ Up! New team members can get £130 worth of products for only £99 + free business supplies + free shipping + all the fun being a part of Stampin’ Up! Stampin' Up! has something for everyone: join my growing team and benefit from my support to enjoy Stampin' Up! however you choose.

If you're interested, call me for a chat to understand how I can help you realise your goals. Alternatively, if you have already decided to sign up and you just can't wait, please click here for the link to the online form where you can sign up and order your starter kit right away! 

Latest Kit!

Stampin Cut and Emboss

The Rock Legend Kit has all you need to make 8 cards with coordinating envelopes. Along with the new Panda Friends Kit, both are available from January 4th for just £14 each - get yours here!

2023-24 Annual Catalogue

BROWSE THE CATALOGUE

Click on the catalogue for a full list of current SU! supplies - if you would like to order any of the items featured, please drop me a line at [email protected] or give me a call on 07773 421446 - I'd be happy to help.

New Online Exclusives

There are new products available exclusively in the online store from 5 March - check them out here.

About Me

Hi I'm Joanne and live in Northampton and when I'm not looking after my husband and two beautiful children, am an avid crafter with a passion for all things Stampin' Up!

I must confess that I have never been a big rubber stamper - until I discovered Stampin' Up! that is. I love the fact that I can get such great results with co-ordinating stamps, inks, papers and punches - the possibilities are endless! Join me on my stamping journey as I share the things I love and be inspired to create amazing things yourself!

Follow Me

Monthly Newsletter

Box Builder

Click the button above to use Box Buster to create your custom box design using the Envelope Punch Board!

Kits Collection Now Available!

Stampin Cut and Emboss

The new Kits Collection from Stampin' Up! is now available!

Click here to see the current kits available and order yours online today.

I Design For


Stampin' Up Stuff

This is my personal blog and is not endorsed by Stampin’ Up! I hope you find it a plentiful source of ideas and personal inspiration but please don't copy my designs for contest submission or use for classes, publication or sale without express permission.