Season of Chic Speedy Seashells AYSI 301

by Joanne James16. June 2023 12:00

Today I'm sharing my design team card for our new challenge over at As you See It where it's time for the 'dreaded' speed challenge:


I know some of you dread the idea of creating a card in under 10 minutes, but with a little preparation it doesn't have to be tricky - take a look:


Here's the low-down on today's card:

I knew that I would be using the shell stamps and dies from the Seasons of Chic stamp set and Chic Dies for my card today as they are my only current seashells, so I grabbed each of the dies and laid up each of the stamps and found a piece of the co-ordinating (retired) Texture Chic designer series paper to use for my background. This is the easiest way to get big design impact in the shortest possible time. Having found my sheet of paper, I pulled out the co-ordinating ink pads and cardstock (Petal Pink, Pebbled Path and an offcut of distressed gold), started my timer and set to work!

I cut a piece of designer paper to cover my entire cardbase, stamped a shell and diecut it along with three more in solid cardstock colours all in one go to save time, the stamped my sentiment onto a banner of Basic White and attached it to my cardfront, anchored with my shells. I added some clear Wink of Stella to my stamped shell and a sprinkling of basic pearls to complete my cardfront:


I did a quick timecheck and was doing so well, I even managed a quick stamped detail on the inside of my card within the allotted time:


And - stop the clock! I used a total of 7 minutes 59 seconds to create today's card - I managed to surprise myself at just how much time I had left over! My desk was a mess and I hadn't cleaned a single stamp, but it just goes to show if you need a card in a hurry, it can be done! The designer paper definitely does the heavy lifting on this card - the same background could be created using the stamps in the set, but it would take sooo much longer! I am also sharing today's beach-inspired card with thoughts of summer with the team over at Inkspirational where they are looking for seasonal cards.

Here is the visual summary of the key products used on today's project for you to pin for easy reference:


You can see all of my 'How To' summaries on my 'How To - Tips and Techniques' Pinterest board in case you've missed any. 

Here's a summary of our challenge rules:

  • Create any card, scrapbooking page, 3D project or packaging project that fits the challenge.
  • Please include the challenge graphic and link back to the challenge in your blog post. Turn off word verification so we can leave you lots of lovely comments. Make sure you link the post not the whole blog to the Linky. Use #AYSIXXX when uploading to a public gallery.
  • If you’re unsure about ‘the rules’, check the details under the Challenge Guidelines tab on the As You See It Challenge homepage.
  • In a speed stamping challenge, please time yourself and say in your post how long your card took to complete. 
We look forward to seeing your creations in the AYSI gallery.

Enjoy your day and I'll be back tomorrow with another project. Until then, happy stampin'!


Stampin' Up! Supplies Used:

Table built using Product Table Builder by The Crafty Owl - Independent Stampin' Up! Demonstrator.

Watercolour World Adventure Awaits AYSI300

by Joanne James2. June 2023 12:00

Today I'm sharing my design team card for our new challenge over at As you See It where we have a special challenge for you - we are celebrating our 300th challenge! It's theme week and our wonderful leader Heather C has chosen the theme of 'adventure' for our milestone challenge:


I was inspired by the patriotic red, white and blue colours of the Card Concept and the sketch over at Try Stamping on Tuesday to create my clean and layered card - take a look:


Here's the low-down on today's card:

Today's card uses a combination of 'something old (retired), something carried over and something new': my something new is those Nested Essentials Dies again, where I used one to create the aperture in my vellum layer to 'frame' my map, courtesy of the background stamp 'Watercolour World'. I  bordered it with a thin strip of red and white stripes and finding nothing in my current stash that has an adventure theme or wording, I finished my card with a sentiment made from a retired Sweet Silhouettes die and the 'Let's Set Sail' stamp set:

I really like the effect of the vellum frame - a great way to focus on the map, without the frame obscuring the detail. A great tip when you use vellum in a frame in this way is to cut your piece wider than you need and wrap it around the layers below and adhere firmly on the reverse. This way your vellum layer stays in place, without there being any unsightly visible glue on the front of your card.

A simple layered card that I will keep ready for when one of the many teenagers I know announces they are heading to foreign parts for a gap year adventure.

Here is the visual summary of the key products used on today's project for you to pin for easy reference:


You can see all of my 'How To' summaries on my 'How To - Tips and Techniques' Pinterest board in case you've missed any. 

What does the theme of adventure mean to you? Why not make a project and share it with us for our current challenge. Since we are celebrating, there will be 6 winners this week, one chosen by each member of the Design Team and each will be eligible to receive a prize from Stampin' Up! or Clarity.

Here's a summary of our challenge rules:

  • Create any card, scrapbooking page, 3D project or packaging project that fits the challenge.
  • Please include the challenge graphic and link back to the challenge in your blog post. Turn off word verification so we can leave you lots of lovely comments. Make sure you link the post not the whole blog to the Linky. Use #AYSIXXX when uploading to a public gallery.
  • If you’re unsure about ‘the rules’, check the details under the Challenge Guidelines tab on the As You See It Challenge homepage.
We look forward to seeing your creations in the AYSI gallery.

Enjoy your day and I'll be back tomorrow with another project. Until then, happy stampin'!


Stampin' Up! Supplies Used:

Table built using Product Table Builder by The Crafty Owl - Independent Stampin' Up! Demonstrator.

Crafting With You Embroidered Flowers In Blue AYSI 299

by Joanne James19. May 2023 12:00


Today I'm sharing my design team card for our new challenge over at As you See It where it's time for a recipe challenge chosen by Deborah who is back from her travels this week:


I sometimes struggle with recipe challenges, but I just received some new goodies so grabbed them along with the sketch over at Try Stamping on Tuesday and set to work - take a look:


 Here's the low-down on today's card:

Shades of Blue - I decided for today's card that I wanted to play with the new blue that is part of the Brights colour family, Azure Afternoon, so that's what I chose for my card base (I added some tone-on-tone stamping using a stamped-off flower to create a subtle pattern detail) and the piece of watercolour-effect designer paper from the Bright & Beautiful paper pack that runs across the centre of my card. This is such a lovely shade of blue: not as turquoise as Tahitian Tide, not as dark as the old Pacific Point. I also used this colour to stamp my flowers, adding in a second blue, the returning Blueberry Bushel, to highlight the flower leaves. I also added a strip of this darker blue behind my horizontal panel and added some ribbon and a bow in some retired Blueberry Bushel ribbon that I rescued from my retired box - yay! I love the way these two blue go together.

Diecuts and Frames - There are two sets of diecuts on today's card: the horizontal border and the scallop-edged square are both adapted from the Scalloped Contours Dies, but the dies that ultimately inspired today's card are those that contain this sweet embroidery hoop and centre - the Crafting With You Dies. I thought the embroidery hoop would be a clever 'frame' and perfect way to highlight the emboidered flowers that are part of the co-ordinating stamp set:


A Handmade Hug - I decided to leave the front of my card sentiment-free because it's always useful to have some more general cards to hand, but I couldn't resist adding one of the sweetest sentiments from the 'Crafting With You' stamp set to the inside of my card:


Isn't that just lovely?! I actually managed to tick off the recipe ingredients with relative ease for once. If you are a fan of blues, you should definitely check out the Design Team cards - they really are fabulous!

Here is the visual summary of the key products used on today's project for you to pin for easy reference:


You can see all of my 'How To' summaries on my 'How To - Tips and Techniques' Pinterest board in case you've missed any. 

Here's a summary of our challenge rules:

  • Create any card, scrapbooking page, 3D project or packaging project that fits the challenge.
  • Please include the challenge graphic and link back to the challenge in your blog post. Turn off word verification so we can leave you lots of lovely comments. Make sure you link the post not the whole blog to the Linky. Use #AYSIXXX when uploading to a public gallery.
  • If you’re unsure about ‘the rules’, check the details under the Challenge Guidelines tab on the As You See It Challenge homepage. 
We look forward to seeing your creations in the AYSI gallery.

I am rushing about today, running errands and feeling unusually tired - I definitely have that Friday feeling! Enjoy your day and I'll hopefully be back tomorrow with another project. Until then, happy stampin'!


Stampin' Up! Supplies Used:

Table built using Product Table Builder by The Crafty Owl - Independent Stampin' Up! Demonstrator.

In Colour Oops A Daisy Cards AYSI298

by Joanne James5. May 2023 12:00

Today I'm sharing my design team card for our new challenge over at As you See It where it's time for a timely 'fill in the blank' challenge chosen by me:


It's always fun to be able to play with new craft goodies so this week's challenge gives everyone the chance to do just that! With the launch of the Stampin' up! 2023 Annual Catalogue this week, I have lots of new goodies; I chose to play with my Cheerful Daisies bundle and the new 2023-25 In Colours for my card today - take a look:


Here's the low-down on today's card:

I still had my Alphabet A La Mode Dies out on my desk still from the cards I made last week so I decided to play with one of my favourite sentiments in the Cheerful Daisies bundle and combine the two. I added a panel of in colour designer paper and diecut the letters to the word 'daisy' and fussy cut 'Oops-a-' from the stamped one and mashed them together, decorating with a stamped and diecut daisy, some foliage and a trio of in colour gems to finish:

I finished the inside with one of the other stamps in the set and another masked sentiment:


The card above features the new in colour Wild Wheat, but I also made one in each of the other in colours too - Pecan Pie, Boho Blue, Moody Mauve and Pebbled Path:


What do you think? Do you have a favourite of the in colours yet? Do leave me a comment below - I'd love to hear your thoughts!

I'm linking today's card collection up with the team over at The Paper Craft Crew who are featuring the new 2023-25 in colours this week.

Here is the visual summary of the key products used on today's project for you to pin for easy reference:


You can see all of my 'How To' summaries on my 'How To - Tips and Techniques' Pinterest board in case you've missed any. 

Here's a summary of our challenge rules:

  • Create any card, scrapbooking page, 3D project or packaging project that fits the challenge.
  • Please include the challenge graphic and link back to the challenge in your blog post. Turn off word verification so we can leave you lots of lovely comments. Make sure you link the post not the whole blog to the Linky. Use #AYSIXXX when uploading to a public gallery.
  • If you’re unsure about ‘the rules’, check the details under the Challenge Guidelines tab on the As You See It Challenge homepage.
  • In a Fill in the Blank challenge, complete the sentence in the Challenge Banner with the phrase that is true for you and create your project using the words you used. Tell us what you said in your blog or on your site.

Enjoy your day and I'll be back tomorrow with another project. Until then, happy stampin'!


Stampin' Up! Supplies Used:

Table built using Product Table Builder by The Crafty Owl - Independent Stampin' Up! Demonstrator.


By My Side Follow Your Own Star AYSI 297

by Joanne James21. April 2023 12:00

Today I'm sharing my design team card for our new challenge over at As you See It where it's time for a vibrant colour challenge chosen by Jane:


I love this colour combo, but I wasn't sure I was going to be able to make it work on a card. I need not have worried though; once I'd pulled out a couple of retiring stamp sets and the sketch layout over at Atlantic Hearts I knew exactly where I was headed. Take a look at what I came up with:


Here's the low-down on today's card:

I knew I wanted to make a few more cards featuring the cuties in the 'By My Side' stamp set before it retires, so I decided to go with this young lady following her butterfly friend for my focal point. I coloured her with my Stampin' Blends in the challenge colours and instead of pairing her with the sentiments in the set, I chose a larger one from the retiring 'Stepping Stones' set. A great set including a selection of famous motivational quotes, I chose 'Follow Your Own Star' and stamped it in Gorgeous Grape ink. I decided to go with a bold background of stripes in each of the challenge colours (doubling up with Coastal Cabana) and used a retired  butterfly embossing folder across the whole panel to add interest and create a unifying design:


It also picked up the stamped butterfly on the focal image. It's almost a shame the sentiment doesn't say 'Follow your own butterfly', as the young lady featured seems to be dreamily following her winged friend!

Here is the visual summary of the key products used on today's project for you to pin for easy reference:


You can see all of my 'How To' summaries on my 'How To - Tips and Techniques' Pinterest board in case you've missed any. 


Here's a summary of our challenge rules:

  • Create any card, scrapbooking page, 3D project or packaging project that fits the challenge.
  • Please include the challenge graphic and link back to the challenge in your blog post. Turn off word verification so we can leave you lots of lovely comments. Make sure you link the post not the whole blog to the Linky. Use #AYSIXXX when uploading to a public gallery.
  • If you’re unsure about ‘the rules’, check the details under the Challenge Guidelines tab on the As You See It Challenge homepage.
  • In a colour challenge, black or other neutral can be used in outlines and sentiments but no other colours should be included. Stampin’ Up colours are used for reference but colours that are a close match are welcome.
We look forward to seeing your creations in the AYSI gallery.

Enjoy your day and I'll be back tomorrow with another project. Until then, happy stampin'!


Stampin' Up! Supplies Used:

Table built using Product Table Builder by The Crafty Owl - Independent Stampin' Up! Demonstrator.

Happy Forest Friends Thank You Card for AYSI296

by Joanne James7. April 2023 12:00

Today I'm sharing my design team card for our new challenge over at As you See It where it's time for my favourite, a sketch challenge, chosen by Jan:


I considered how I was going to use that large central circle as my focal point and since I'm in 'use it up' mode with my retiring product right now, I decided to create a little scene using some woodland creatures from the Happy Forest Friends designer series paper in the annual catalogue. After much fussy cutting and arranging and re-arranging, this is what I came up with:


Here's the low-down on today's card:

Several of the sheets in the Happy Forest Friends pack have printed scenes on them, so having considered how I was going to make the most of each sheet I actually fussy cut some animals, then used my largest circle Stylish Shapes Die to partially cut a circle, having firstly fussy cut the edge of the tree to sit outside of the circle border. I then added an owl, bear, bird and half a fox (good job he was peeking from behind the tree!) and layered them to create my scene. You can see the detailing a little better on the close up below:

I added a couple of panels using another of the patterns in this pack to the background, and a simple bow of Old Olive twine and a stamped and fussy cut sentiment from the 'Lovely You' stamp set that seemed to fit with my scene. The 'Lovely You' stamp set has lots of useful sentiments and is currently available at 60% off - just £9.20. What a bargain - snap one up here in my online store whilst it's still available!

Here is the visual summary of the key products used on today's project for you to pin for easy reference:


You can see all of my 'How To' summaries on my 'How To - Tips and Techniques' Pinterest board in case you've missed any. 

Here's a summary of our challenge rules:

  • Create any card, scrapbooking page, 3D project or packaging project that fits the challenge.
  • Please include the challenge graphic and link back to the challenge in your blog post. Turn off word verification so we can leave you lots of lovely comments. Make sure you link the post not the whole blog to the Linky. Use #AYSIXXX when uploading to a public gallery.
  • If you’re unsure about ‘the rules’, check the details under the Challenge Guidelines tab on the As You See It Challenge homepage.
  • In a sketch challenge, you are welcome to rotate or flip a sketch. You can replace shapes used such as substituting a circle panel for a square panel. However, we must be able to still see the basis of the original sketch in your finished product.
We look forward to seeing your creations in the AYSI gallery.

Enjoy your day and I'll be back tomorrow with another project. Until then, happy stampin'!


Stampin' Up! Supplies Used:

Table built using Product Table Builder by The Crafty Owl - Independent Stampin' Up! Demonstrator.

Beside Me Quick Father's Day Card AYSI295

by Joanne James24. March 2023 12:00

Today I'm sharing my design team card for our new challenge over at As you See It where it's time for our monthly speed challenge, this time with a theme chosen by Jan - I also used one of the current Try Stamping On Tuesday sketches for my layout and the fresh colour palette over at Sunday Stamps ( I used dark blue, light blue and red):


The great outdoors! I decided I didn't want to go with anything floral or scenic for my card, so my mind wandered to sport and outdoor pursuits and I decided to ink up a new and as yet unused stamp set called 'Beside Me' and make a Father's Day card; I know Father's Day is still some time away here in the UK (it falls on 18th June) but the 'Beside Me' stamp set has such great images and if not carried over will be retired by then, so I'm getting in on the action now. Here's the card I came up with:


Here's the low-down on today's card:

It's All In The Preparation - As we always say when we have a speed challenge, the key is to be prepared. Gather all your supplies up front and plan what you are going to do - this can all be done before the stopwatch starts. I decided on my design and colour scheme and got everything ready, including my cardstock, paper, twine, embellishments, Stampin' Blends, ink pads and tools such as mu Stamparatus. My cardbase was already cut as I keep a stack of white ones ready as these are the ones I use most and the large piece of DSP was already cut to size as I had this cut for a previous project but didn't use it. I worked out the sizes needed for my other two layers, mounted my stamps on my platform, then started my stopwatch!

A False Start - The first thing I planned to do was stamp and colour my image. I thought my design would allow me time to roughly colour this small image, but alas - my timer went off just as I finished colouring. Here's the first image I coloured - this alone took me 10 minutes:


I know colouring can be time-consuming, but I clearly under-estimated this one! So I set that image aside, thought about how I could use way less time, got a new piece of black white cardstock and reset the timer. Take two!

Back To The Drawing - or Colouring - Board - I decided that the key to speedy colouring would rely on focusing on the outline of the image along, rather than colouring it, so I changed up the colours and stamped it in Starry Sky instead of black and stamped the sentiment in Sweet Sorbet. This was so quick, I decided to then just add some rough highlighting to the image and scribbled my lightest Balmy Blue Blend around the image to highlight it. No blending, just a rough colour - I think it works though, what do you think?


I then quickly rounded the corners and put the whole thing together, adding my baker's twine and two trios of heart embellishments to finish. I quickly stopped my timer - 9 minutes and 58 seconds, get in! Most of the time was spent trying to get the hearts straight!! This is such a simple way to use a line image designed for colouring and it's perfect for a quick card or if you're just not a fan of colouring with markers or pencils. 

I so love the images in this set - this one reminds me of when my husband was teaching Ben to ride his bike, so I just had to have it!

Here is the visual summary of the key products used on today's project for you to pin for easy reference:


You can see all of my 'How To' summaries on my 'How To - Tips and Techniques' Pinterest board in case you've missed any. 

Here's a summary of our challenge rules:

  • Create any card, scrapbooking page, 3D project or packaging project that fits the challenge.
  • Please include the challenge graphic and link back to the challenge in your blog post. Turn off word verification so we can leave you lots of lovely comments. Make sure you link the post not the whole blog to the Linky. Use #AYSIXXX when uploading to a public gallery.
  • If you’re unsure about ‘the rules’, check the details under the Challenge Guidelines tab on the As You See It Challenge homepage.
  • In a speed stamping challenge, please time yourself and say in your post how long your card took to complete
We look forward to seeing your creations in the AYSI gallery.

Enjoy your day and I'll be back tomorrow with another super clean and simple project. Until then, happy stampin'!


Stampin' Up! Supplies Used:

Table built using Product Table Builder by The Crafty Owl - Independent Stampin' Up! Demonstrator.

Bouquet of Hope Thank You Card AYSI294

by Joanne James10. March 2023 12:00

Today I'm sharing my design team card for our new challenge over at As you See It where it's time for a fun theme challenge from the lovely Heather Heroldt:

       +   

Our challenge is a little craft room spring cleaning this week as Heather would like us to use up our scraps - this is always so fun! I had a rummage through my scraps box and pulled out a few bits and pieces and put them into co-ordinating groups to see what I could make. There was lots to choose from - here are some of my favourite bits and pieces that I shortlisted:


I remembered the Inspired By inspiration photo this week so decided I would take the stamped bouquet, a leftover stamped image from an old Bouquet of Hope Paper Pumpkin kit, and the thank you sentiments, leftover from an old thank you card kit, grabbed my Stampin' Blends in the Color Dare colours (I went with my closest matches for periwinkle, sage and melon) and set to work - this is what I came up with:


Here's the low-down on today's card:

I coloured my bouquet with my Stampin' Blends and broadly following the Inspired By sketch too (although not quite fitting in a third focal point along my diagonal), adding a piece of (retired) Highland Heather designer paper to a base of the same colour and a piece of white border edging that I also found in my scrap box. I decided to use 'merci' for my sentiment - I often keep these leftover diecuts in all languages because I figure everyone understands these basic words, right? A few added coloured pearls complete my scrap box card.


Who would have thought something so pretty could have been created with leftovers from other projects, consigned to the scrap box?

Here is the visual summary of the key products used on today's project for you to pin for easy reference:


You can see all of my 'How To' summaries on my 'How To - Tips and Techniques' Pinterest board in case you've missed any. 

Here's a summary of our challenge rules:

  • Create any card, scrapbooking page, 3D project or packaging project that fits the challenge.
  • Please include the challenge graphic and link back to the challenge in your blog post. Turn off word verification so we can leave you lots of lovely comments. Make sure you link the post not the whole blog to the Linky. Use #AYSIXXX when uploading to a public gallery.
  • If you’re unsure about ‘the rules’, check the details under the Challenge Guidelines tab on the As You See It Challenge homepage.
We look forward to seeing your creations in the AYSI gallery.

Enjoy your day; I am having lunch today with one of my best friends - a reward for a long week! I'll be back tomorrow with another project. Until then, happy stampin'!


Stampin' Up! Supplies Used:

Table built using Product Table Builder by The Crafty Owl - Independent Stampin' Up! Demonstrator.

Beautifully Happy Mother's Day Fancy Fold Card AYSI293

by Joanne James24. February 2023 12:00

Today I'm sharing my design team card for our new challenge over at As you See It where our leader and chief organiser, the lovely Heather C, has a recipe challenge for us with a distinctly feminine feel:
    

Recipe challenges usually send me into a bit of a spin, but this one actually worked out surprisingly well for me! I was inspired to have a go at a fancy fold card layout that was recently shared by Stampin' Up's CEO, Sara Douglas and decided to take the opportunity to make my Mother's Day card and use a new floral stamp set that will be available for just a few more days - take a look:
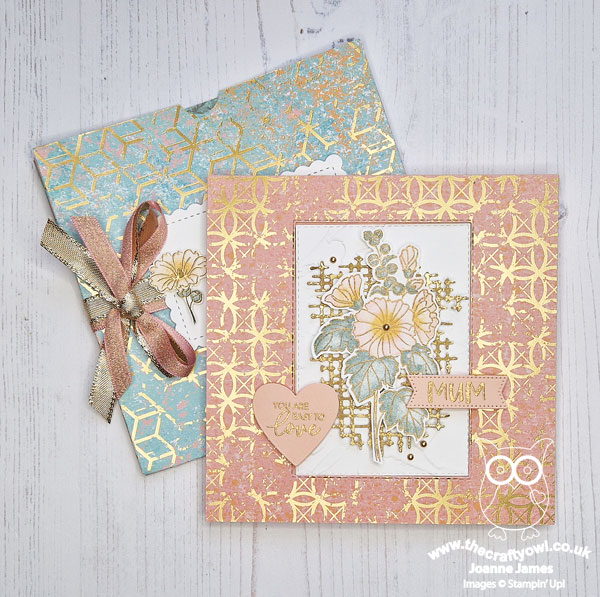
 

This is a photo-heavy post, so time to get comfy! Here's the low-down on today's card:

Beautifully Happy - The flower at the centrepiece of today's card is from the 'Beautifully Happy' stamp set - one of the items that can be yours FREE with a £90 purchase during the current Sale-A-Bration promotion. Can you believe I've had this set for almost 2 months and this is the first time I've used it?! So many stamp sets, so little time! Anyway, I digress - this is a two-step stamp set, with an outline that can be used along and coloured freehand, or alternatively used with the infill stamps. I wanted to heat-emboss my flower, so my Stamparatus was key here: I stamped the flower outline in Sahara Sand, then added the infills without removing from my Stamparatus, then stamped the outline again in Versamark and heat-embossed in gold. I fussy cut the main stem and added a gold pearl for the stamen and used this flower  as the centrepiece of my card:
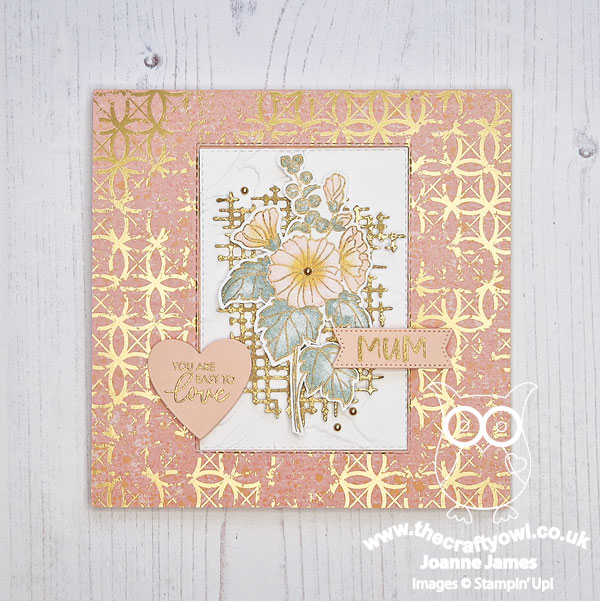
 

I also added a stemless version inside and a single bloom to my envelope label, and I used the outline for some tone-on-tone stamping on the first inside layer of my card - you can see below how the card opens:
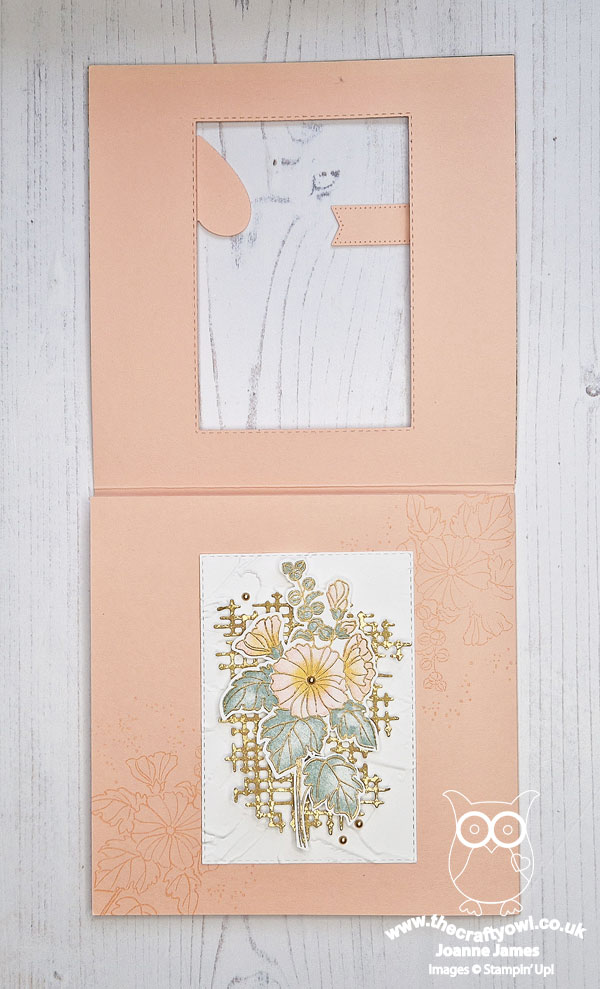
 

The sentiment in the heart on the front of my card is also from this stamp set. If 'Beautifully Happy' is on your Sale-A-Bration wishlist, you have just 4 days to place your £90 order and receive this stamp set for free. Time to get shopping!
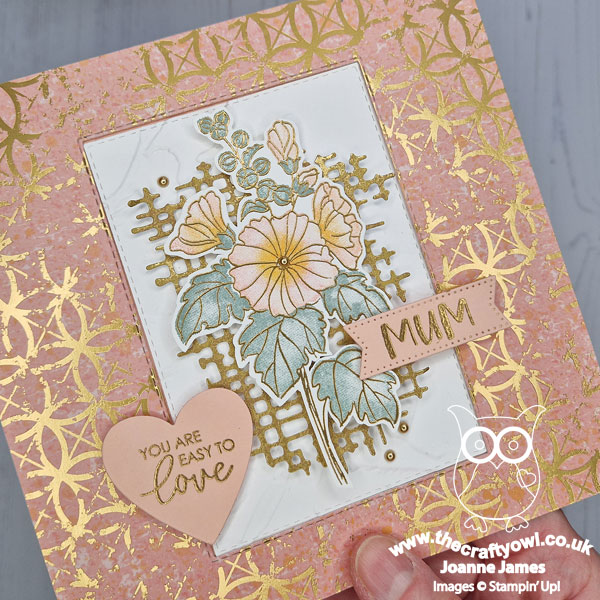
Texture Chic - The recipe ingredient of 'distressed paper' sent me immediately reaching for my Distressed Gold Specialty Paper and Texture Chic Specialty Designer Series Papers - both add a distressed look without any tearing or self-made grunge, neither of which are my style! The Texture Chic papers also include various shades of pink to compliment my Petal Pink stamped flower and lots of faux-texture. I also added actual texture with my Painted Texture Embossing Folder on the panel behind my fussy cut flower stem. 

The Distressed Gold paper is just beautiful; I used it to add some hatched diecut details on both the front and left inside panels:
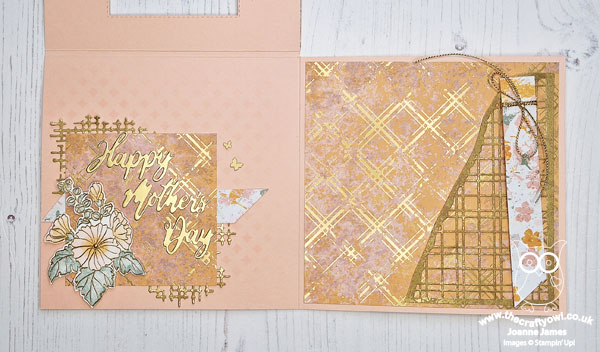
 

Here's a close-up of that detail on the left (the diecut sentiment uses the now retired Word Wishes Dies):
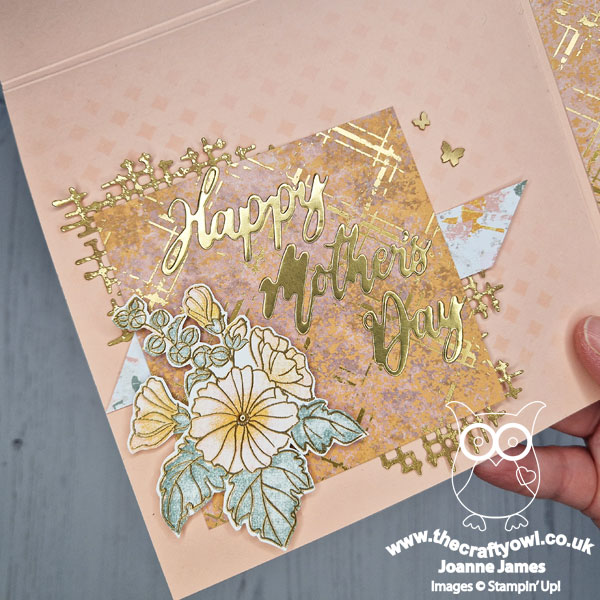
 

I also used the Distressed Gold Paper to create a pocket using the Split Textures Dies:
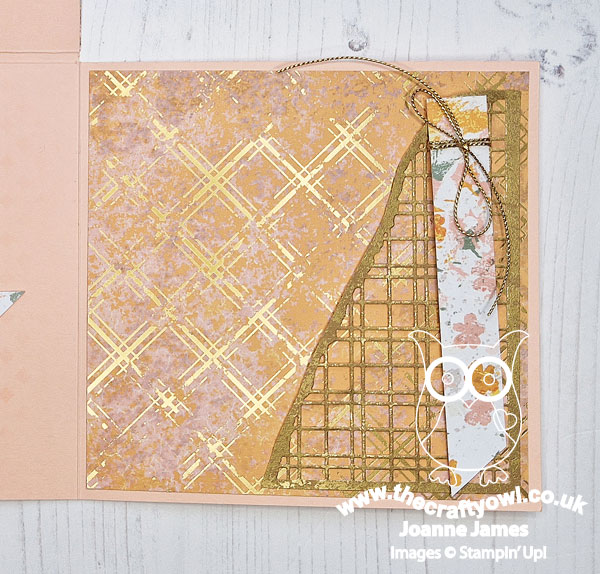
 

I handwrote my Mother's Day message, along with a poem, on a separate card that I tucked in here after photographing.

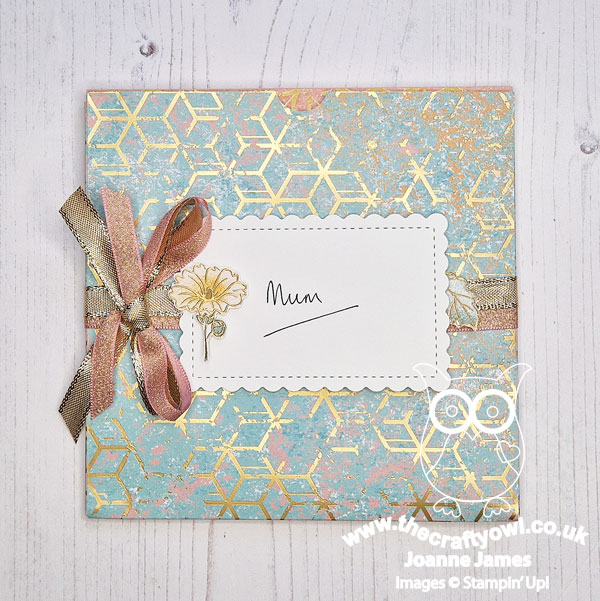
Fancy Inside and Out - A fancy card with a little bulk requires a fancy envelope too, so I created a simple file folder style, adding some retired ribbon and a scalloped address label. You can see in properly below:
 

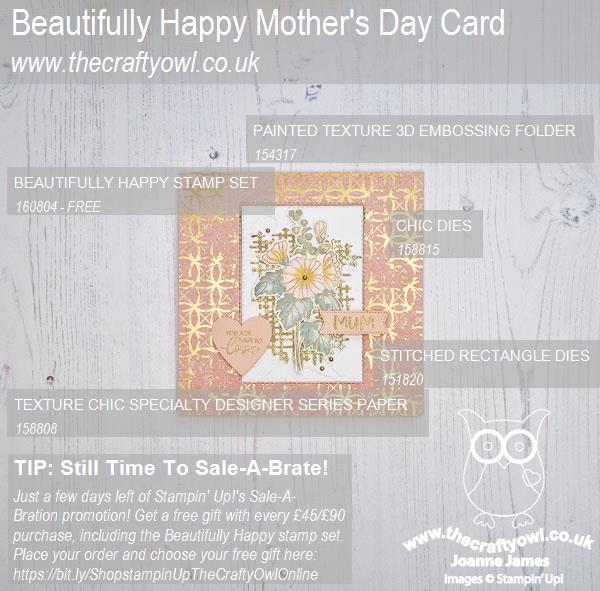
Here is the visual summary of the key products used on today's project for you to pin for easy reference:
 

You can see all of my 'How To' summaries on my 'How To - Tips and Techniques' Pinterest board in case you've missed any. 

It's not Mother's Day here in the UK until next month (March 19th) but it pays to be organised! Equally, if you don't make or send Mother's Day cards, this could be easily adapted and used as a fancy birthday card for someone special. These kinds of card do take a long time to make, however for someone special it's totally worth it. I'm linking up today's card over at The Flower Challenge where they are asking us to use our newest flower stamps and dies - it looks like I'm getting there just in time!

Here's a summary of our challenge rules:

  • Create any card, scrapbooking page, 3D project or packaging project that fits the challenge.
  • Please include the challenge graphic and link back to the challenge in your blog post. Turn off word verification so we can leave you lots of lovely comments. Make sure you link the post not the whole blog to the Linky. Use #AYSIXXX when uploading to a public gallery.
  • If you’re unsure about ‘the rules’, check the details under the Challenge Guidelines tab on the As You See It Challenge homepage.
We look forward to seeing your creations in the AYSI gallery.

Enjoy your day. I'm off to the hairdressers first thing then am collecting the eldest of the James Juniors and a friend for a trip up north to Newcastle for a university offer day tomorrow, so that should be fun. I'll be back Sunday with my project for this week's Paper Players challenge so do join me then. Until then, happy stampin'!


Stampin' Up! Supplies Used:
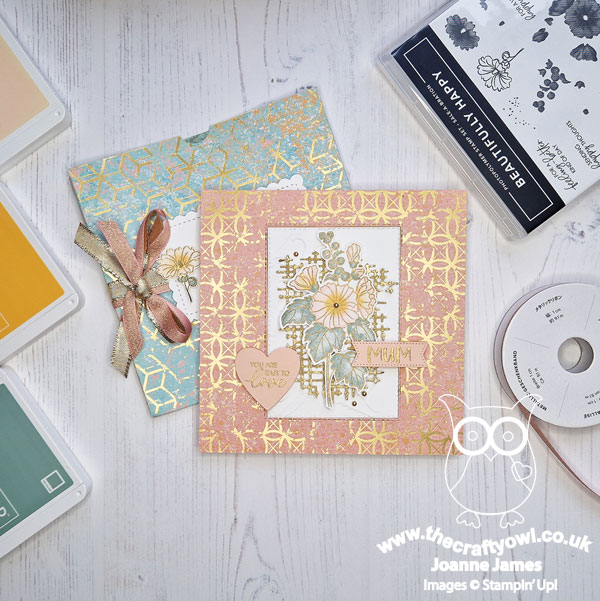
Table built using Product Table Builder by The Crafty Owl - Independent Stampin' Up! Demonstrator.

Daffodil Daydream Vellum Daffodils Easter Card AYSI 292

by Joanne James10. February 2023 12:00

Today I'm sharing my design team card for our new challenge over at As you See It where it's time for a seasonal 'fill in the blank' challenge:


My favourite thing about Spring - this was an easy one! I always know that spring is on its way when I see daffodils poking their heads through the soil and there is something so cheery about their trumpets nodding in the wind, in their various shades of yellow. I love a tulip too, but as a Welsh person my national flower will always win out. So I grabbed my 'Daffodil Daydream' stamp set and set to work. I have made many cards with this set, and I'm sure that flowers will be a popular choice for Deborah's fill in the blank challenge this week, so I set out to create with mine in a different way. Inspired by a number of cards I'd seen on Pinterest using other kinds of flowers, this is what I came up with - take a look:


Here's the low-down on today's card:

Ring The Changes With Vellum - I decided that instead of stamping and colouring my daffodils, I would heat emboss them in white onto vellum. For those of you that are not big fans of colouring, this is a great alternative way to use those line-drawn stamps. I wanted them to stand away from my background, so used a white frame made using my stitched rectangle dies and carefully adhered the points of my vellum flower to the frame, adding a small foam pad beneath the leaf that sits directly on the background as it can't be seen beneath the embossing.

Use Up Those Scraps - I used a selection of stripes measuring 1cm in width in a repeating pattern to add colour to my card, using the five colours I would have used if I was colouring the image. This is a great way to use up scraps that are leftover from other projects - we all have these random strips, don't we? My top tip for creating this kind of background is to cut a piece of white cardstock slightly smaller than your desired finished size and glue your strips to this before trimming the edges to size to create a neat finish. I added a sentiment combined from the two in the set, along with a scattering of clear sequins to complete my card:

A Daffodil Pair - I loved this card so much, I created a second one using the other daffodil in the set too. This time I rotated it from portrait to landscape, as the single daffodil is smaller:


I paired this with a layered diecut sentiment from my favourite Love For You Dies, for a card that could work for any occasion - I will probably send it to one of my dearest old school friends for St David's Day on March 1st - I know she will appreciate it! Check out the detail below:


Here's a photo of both cards together - which one do you prefer?


I love them both and had so much fun experimenting with this technique. This was such a fun way to bring new life to this much-loved stamp set. 

Here is the visual summary of the key products used on today's project for you to pin for easy reference:


You can see all of my 'How To' summaries on my 'How To - Tips and Techniques' Pinterest board in case you've missed any. 

Here's a summary of our challenge rules:

  • Create any card, scrapbooking page, 3D project or packaging project that fits the challenge.
  • Please include the challenge graphic and link back to the challenge in your blog post. Turn off word verification so we can leave you lots of lovely comments. Make sure you link the post not the whole blog to the Linky. Use #AYSIXXX when uploading to a public gallery.
  • If you’re unsure about ‘the rules’, check the details under the Challenge Guidelines tab on the As You See It Challenge homepage.
  • In a Fill in the Blank challenge, complete the sentence in the Challenge Banner with the phrase that is true for you and create your project using the words you used. Tell us what you said in your blog or on your site.
We look forward to seeing your creations in the AYSI gallery.

Enjoy your day and I'll be back tomorrow with another project. Until then, happy stampin'!


Stampin' Up! Supplies Used:


Table built using Product Table Builder by The Crafty Owl - Independent Stampin' Up! Demonstrator.

Mini Catalogue

BROWSE THE CATALOGUE

The mini catalogue is now live! Read and download your copy here.

Shop Online

Access my online shop 24 x 7, 365 days of the year:

Current April hostess code:

VDKNV7BH

Shop Online

Join My Team

It's always a great time to join Stampin’ Up! New team members can get £130 worth of products for only £99 + free business supplies + free shipping + all the fun being a part of Stampin’ Up! Stampin' Up! has something for everyone: join my growing team and benefit from my support to enjoy Stampin' Up! however you choose.

If you're interested, call me for a chat to understand how I can help you realise your goals. Alternatively, if you have already decided to sign up and you just can't wait, please click here for the link to the online form where you can sign up and order your starter kit right away! 

Latest Kit!

Stampin Cut and Emboss

The Rock Legend Kit has all you need to make 8 cards with coordinating envelopes. Along with the new Panda Friends Kit, both are available from January 4th for just £14 each - get yours here!

2023-24 Annual Catalogue

BROWSE THE CATALOGUE

Click on the catalogue for a full list of current SU! supplies - if you would like to order any of the items featured, please drop me a line at [email protected] or give me a call on 07773 421446 - I'd be happy to help.

New Online Exclusives

There are new products available exclusively in the online store from 5 March - check them out here.

About Me

Hi I'm Joanne and live in Northampton and when I'm not looking after my husband and two beautiful children, am an avid crafter with a passion for all things Stampin' Up!

I must confess that I have never been a big rubber stamper - until I discovered Stampin' Up! that is. I love the fact that I can get such great results with co-ordinating stamps, inks, papers and punches - the possibilities are endless! Join me on my stamping journey as I share the things I love and be inspired to create amazing things yourself!

Follow Me

Monthly Newsletter

Box Builder

Click the button above to use Box Buster to create your custom box design using the Envelope Punch Board!

Kits Collection Now Available!

Stampin Cut and Emboss

The new Kits Collection from Stampin' Up! is now available!

Click here to see the current kits available and order yours online today.

I Design For


Stampin' Up Stuff

This is my personal blog and is not endorsed by Stampin’ Up! I hope you find it a plentiful source of ideas and personal inspiration but please don't copy my designs for contest submission or use for classes, publication or sale without express permission.