by Joanne James15. August 2014 21:00No blog post yesterday as I took the James juniors to the zoo for the day and had a team get-together in the evening and didn't manage to squeeze one in! We had a great day at the zoo and managed to dodge the worst of the rain showers, so all good. Today I'm sharing a quick shaker card designed by Monica Gale that we made at our last quarterly team training day:
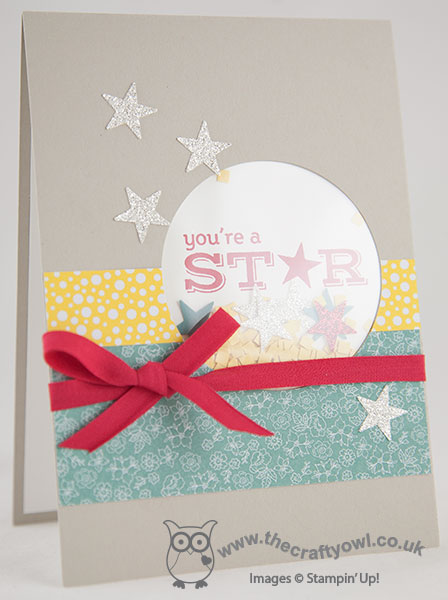
Not the best of photos I'm afraid as I struggled to beat the refection and glare on the window sheet, but hopefully good enough to get the idea. Shaker cards are all the rage at the moment and whilst you can build a window with depth for a card with real 'shake-ability (I'm sure it's a word!), you can also get the effect simply and easily by creating a pocket behind a punched opening and adding just a few elements - I added some glitter stars and square confetti created with my fringe scissors. The front of the card is simply decorated with a few strips of All Abloom DSP, some stars punched from the new Dazzling Diamonds Glimmer paper and a tied bow made with 1/4" Real Red cotton ribbon.
Short and sweet today! Back tomorrow with another project. until then, happy stampin'!
Stampin' Up Supplies Used:
97147742-8c49-4452-a304-7de7cc3e4ecb|0|.0|96d5b379-7e1d-4dac-a6ba-1e50db561b04
Tags: All Abloom, Pictogram Punches, Fringe Scissors, Itty Bitty Accents Punch Pack, Shop online, Shaker cards, Stampin' Up, Stampin' Up Card, Stampin' Up Card ideas, Stampin' Up Supplies, circle punch
Cards | Stamping
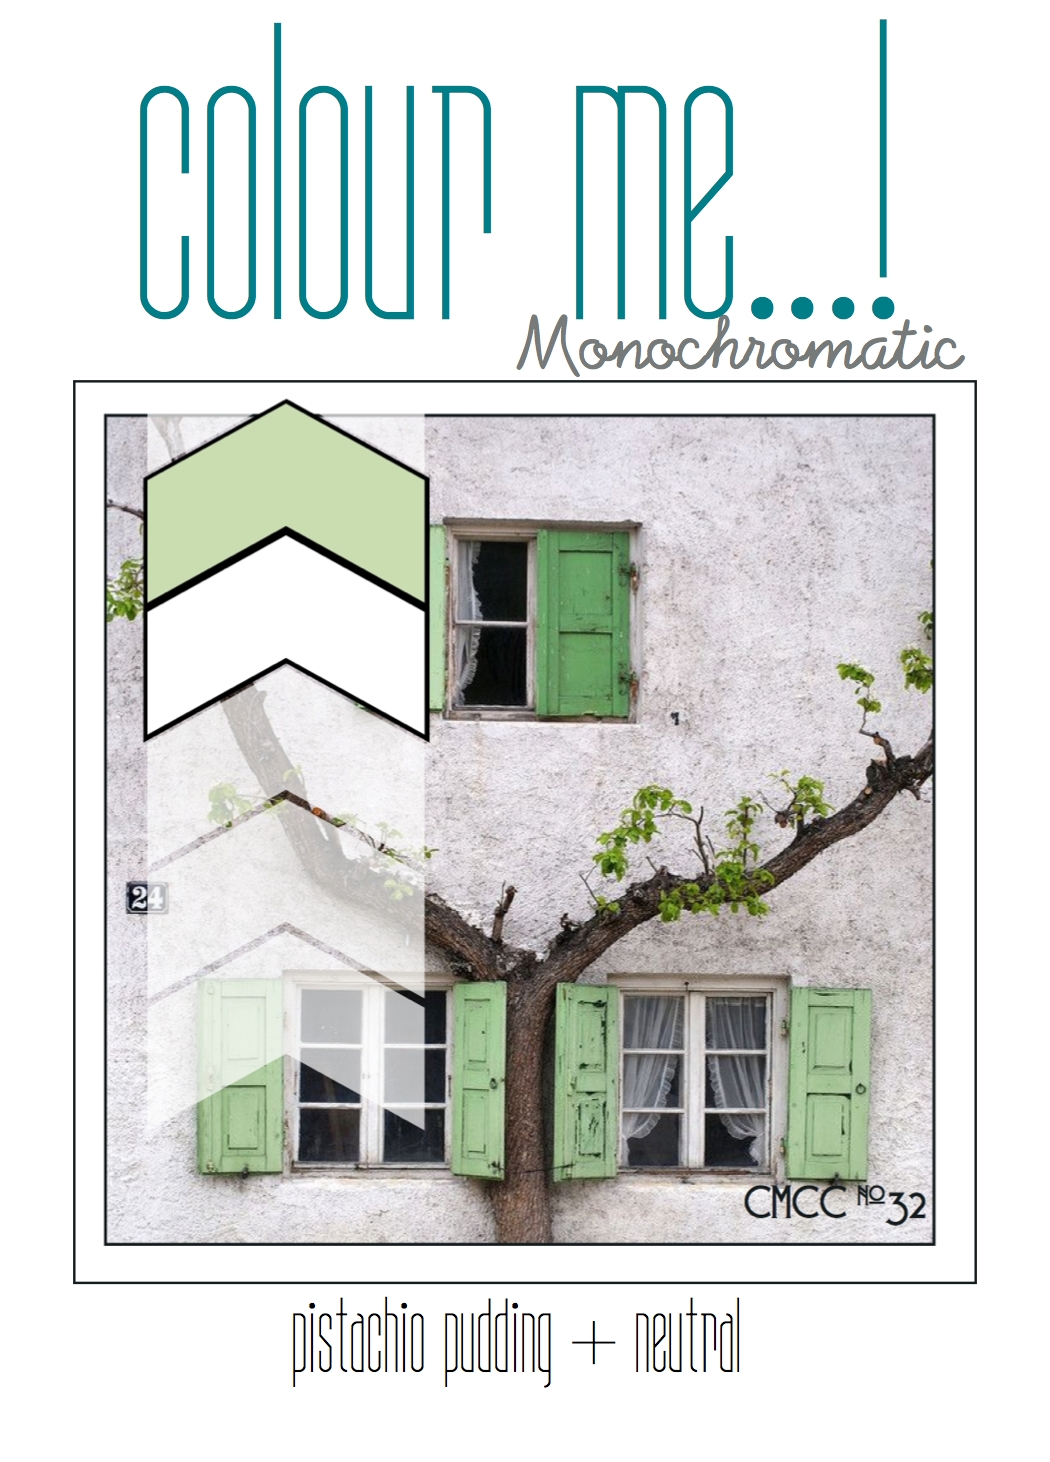
by Joanne James6. August 2014 11:00Happy Wednesday everybody! Today is a good day - the sun is shining again, my Autumn-Winter pre-order has arrived so I have lots of Halloween and Christmas goodies to play with, there's a new bunch of weekly deals (see earlier post here) and it's time for this week's Colour Me...! Challenge, where we have a monochromatic colour challenge this week using Pistachio Pudding and a neutral:
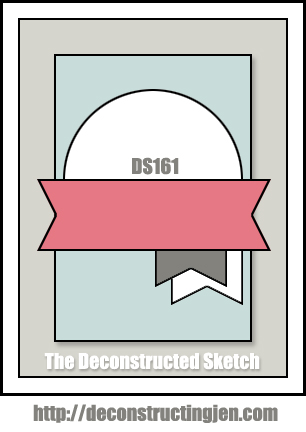
I thought this challenge would be trickier than it actually was. I used the latest sketch from the Deconstructed Sketch for my layout and inked up my new Kinda Eclectic stamp set which I have been keen to get working with - here's my card:
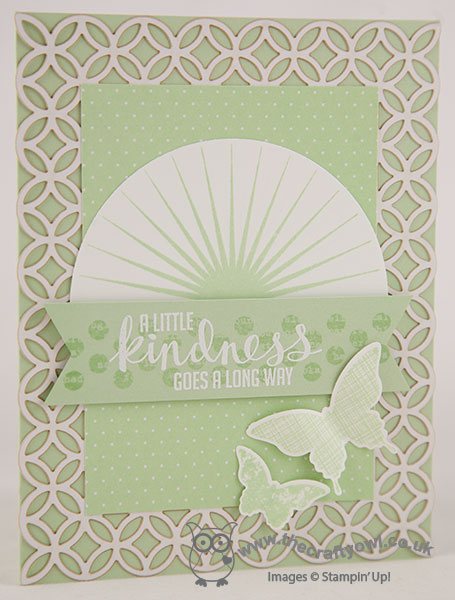
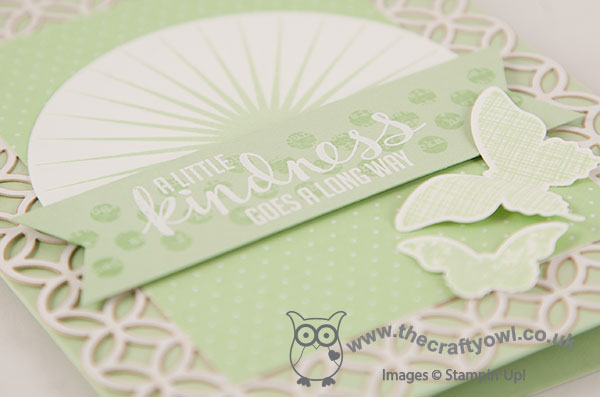
For my card I used a base of Pistachio Pudding, then layered one of the die-cut pieces from the now retired Simply Sent card kit in last year's annual catalogue. I added some Pistachio Pudding polka dot paper from the All Abloom DSP stack, then stamped the sunburst from Kinda Eclectic in Pistachio Pudding onto Whisper White and cut out using my Big Shot and Circles Framelits and cut the bottom third off the circle. For the central banner, I stamped the spots in Pistachio Pudding on the cardstock of the same colour, then stamped my sentiment in Versamark and heat embossed in White embossing powder over the top to add additional dimension. Lastly, I replaced the flags in the sketch with the butterflies from Kinda Eclectic, stamped in Pistachio Pudding onto Whisper White cardstock and punched out using the co-ordinating punches. I think the key to a single colour card where you are using one single colour plus a neutral, and don't have then benefit of tonal shades of the same colour, is to add layers, patterns and shapes for extra interest. If you're based in the UK and Europe, the Pistachio Pudding ink pad is on this week's Wednesday Weekly Deals List too and can be yours for just £3.71 instead of the usual £4.95 this week, so if you needed an incentive to have a go at this week's challenge, this is it!
I look forward to seeing what you come up with in the gallery this week - meanwhile, check out what the other designers have in store for you over at Colour Me and our new featured guest designer for the month of August.
Back tomorrow with another project for you; until then, happy stampin'!
Stampin' Up! Supplies Used:
1354179a-167f-4bc5-8a25-c568f87aa6cb|0|.0|96d5b379-7e1d-4dac-a6ba-1e50db561b04
Tags: Colour Me...!, Kinda Eclectic, Simply Fabulous Simply Sent, Butterflies, Big Shot, Circles Framelits, All Abloom, Shop online, Stampin' Up Card, Stampin' Up, Stampin' Up Card ideas, Stampin' Up Supplies
Cards | Stamping
by Joanne James5. August 2014 19:54Well, it's been a little colder here in the UK today and we've had a fair amount of rain, which has kept us largely indoors for most of the day, but we made the most of it with some early morning baking (chocolate chip muffins - yum!), an indoor picnic and a pleasant few hours catching up with friends so all in all not a bad Tuesday.
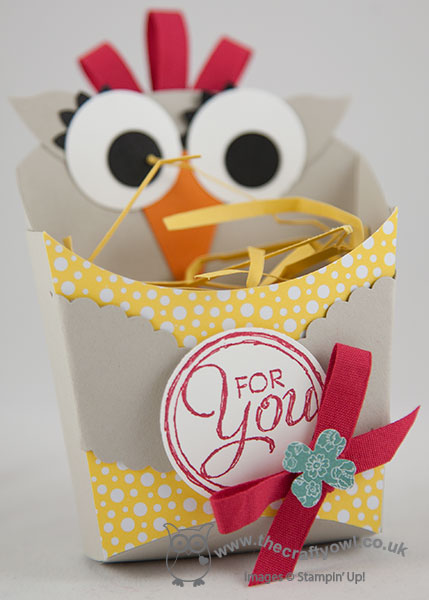
Today I thought I would share another 3D project with you - a cute little owl gift box made using the Fry Box Bigz L Die that we made at our last team training session. Check out this cute little fella:
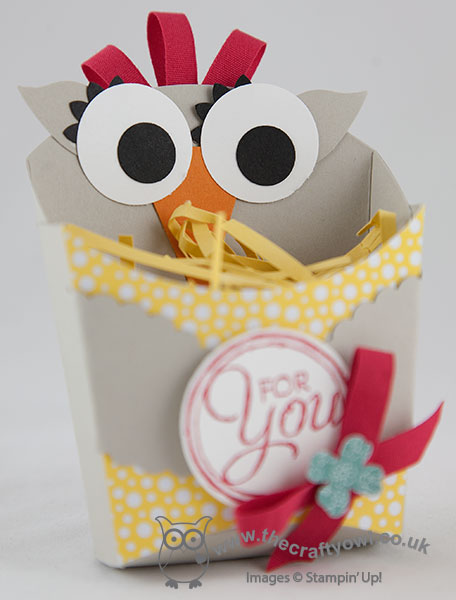
As 'The Crafty Owl', I was always going to like this cheeky chap, but the die itself has so many dress-up possibilities! The owl was so easy to make: the front of the box was covered with a piece of All Abloom DSP, then some black and white circles punched with the 1/2" and 1" circle punches, black eyelashes using the largest flower from the Boho Blossoms punch, ears from the Bird Builder punch and a Pumpkin Pie triangle nose from the Petite Pennants Builder punch then some Sahara Sand Scallop Ovals for wings. Some 1/4" red cotton ribbon was used to create a little plume of feathers and to tie a bow to adorn the 'For You' stamped greeting from the Chalk Talk stamp set, which was finally finished with a punched flower. Some filling was cut from yellow cardstock using the fringe scissors to support the box contents.
These fry boxes are the perfect size for a little gift or a few chocolates - look out for lots more variations on this in future posts.
Back tomorrow with the new weekly deals and my Design Team card for this week's challenge over at Colour Me...!
Until then, happy stampin'!
Stampin' Up! Supplies Used:
20e4e93b-5cc9-4ed2-824e-6c82962164c9|0|.0|96d5b379-7e1d-4dac-a6ba-1e50db561b04
Tags: 3D Projects, boxes, Fry Box Bigz L Die, Chalk Talk, circle punch, Itty Bitty Accents Punch Pack, Scallop Oval Punch, Boho Blossoms, bird builder punch, Petite Pennants Builder, All Abloom, Fringe Scissors, Shop online, Stampin' Up, Stampin' Up Supplies
3D Projects | Boxes
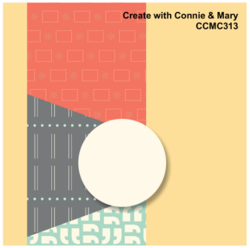
by Joanne James31. July 2014 08:00Hello there - this card is for you all! I used the latest sketch at Create With Connie and Mary this week, as I liked the unusual layout:
I'm too late to link up with the challenge, but wanted to share the card with you as it is a little different for me - here's my card:
I'm not sure I've ever used so much Strawberry Slush on one card! I thought the All Abloom papers would be perfect for this kind of paper-piecing and I loved the way that Mary Brown used thick bakers twine across the joins on her design team card here so I decided to do the same on my card. I also added some of the retired ruffle trim in the same colour to edge the patterned panel. Lastly I finished with one of the sentiments from the 'Hello There' hostess set, having first inked the outline with Strawberry Slush and Mossy Meadow markers to frame it and added a simple twine bow.
I really like the combination of Strawberry Slush and Mossy Meadow on this card; the green seems to really balance the vibrancy of the pink, and along with the vanilla and Blushing Bride cardstock makes for a very feminine card, without being too 'pink'.
I hope you like today's card - I'm off to prepare a picnic for an afternoon at the park, do enjoy your day, however you choose to spend it.
Back tomorrow with another card; until then, happy stampin'!
Stampin' Up! Supplies Used:
by Joanne James29. July 2014 15:11The sun is shining here in the UK today and I have a similarly bright and beautiful card for you - no snowflakes today, I promise! Today's card uses the sketch over at Pals Paper Arts as its starting point:
I love a good sketch and there are lots of them out there in blog land this week; I liked the squares on this one, so many possibilities! I took the opportunity to use mine to showcase another of the gorgeous patterns in the All Abloom Designer Series Paper stack - here's my card:

My base card is Daffodil Delight with a mat of Island Indigo, followed by a sheet of yellow polka dots from the Brights DSP collection - these colours echo those of my chosen feature DSP. I matted my patterned squares on Island Indigo too and did the same for my central square, which I chose to include my sentiment. Lastly, I finished with a layered flower made with my 'vintage' Floral Fusion Sizzlits centred with a candy dot. I know this is now retired, but it made the perfect flower to echo the pattern in my chosen paper.
That's all from me today - I have a few more jobs to do before rewarding myself with a bike ride, so must get on! Back tomorrow with my card for this week's Colour Me...! design team card and the Wednesday Weekly Deals.
Until then, happy stampin'!
Stampin' Up! Supplies Used:
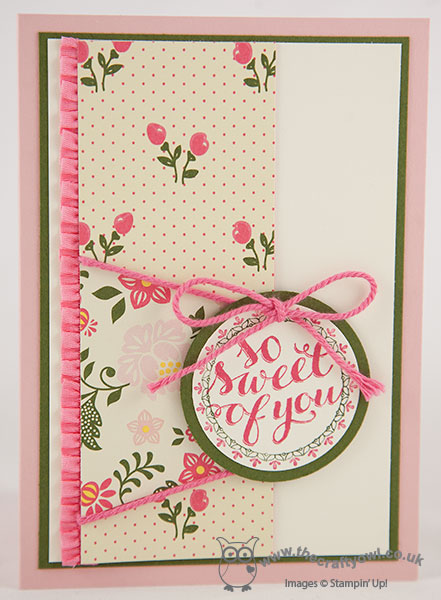
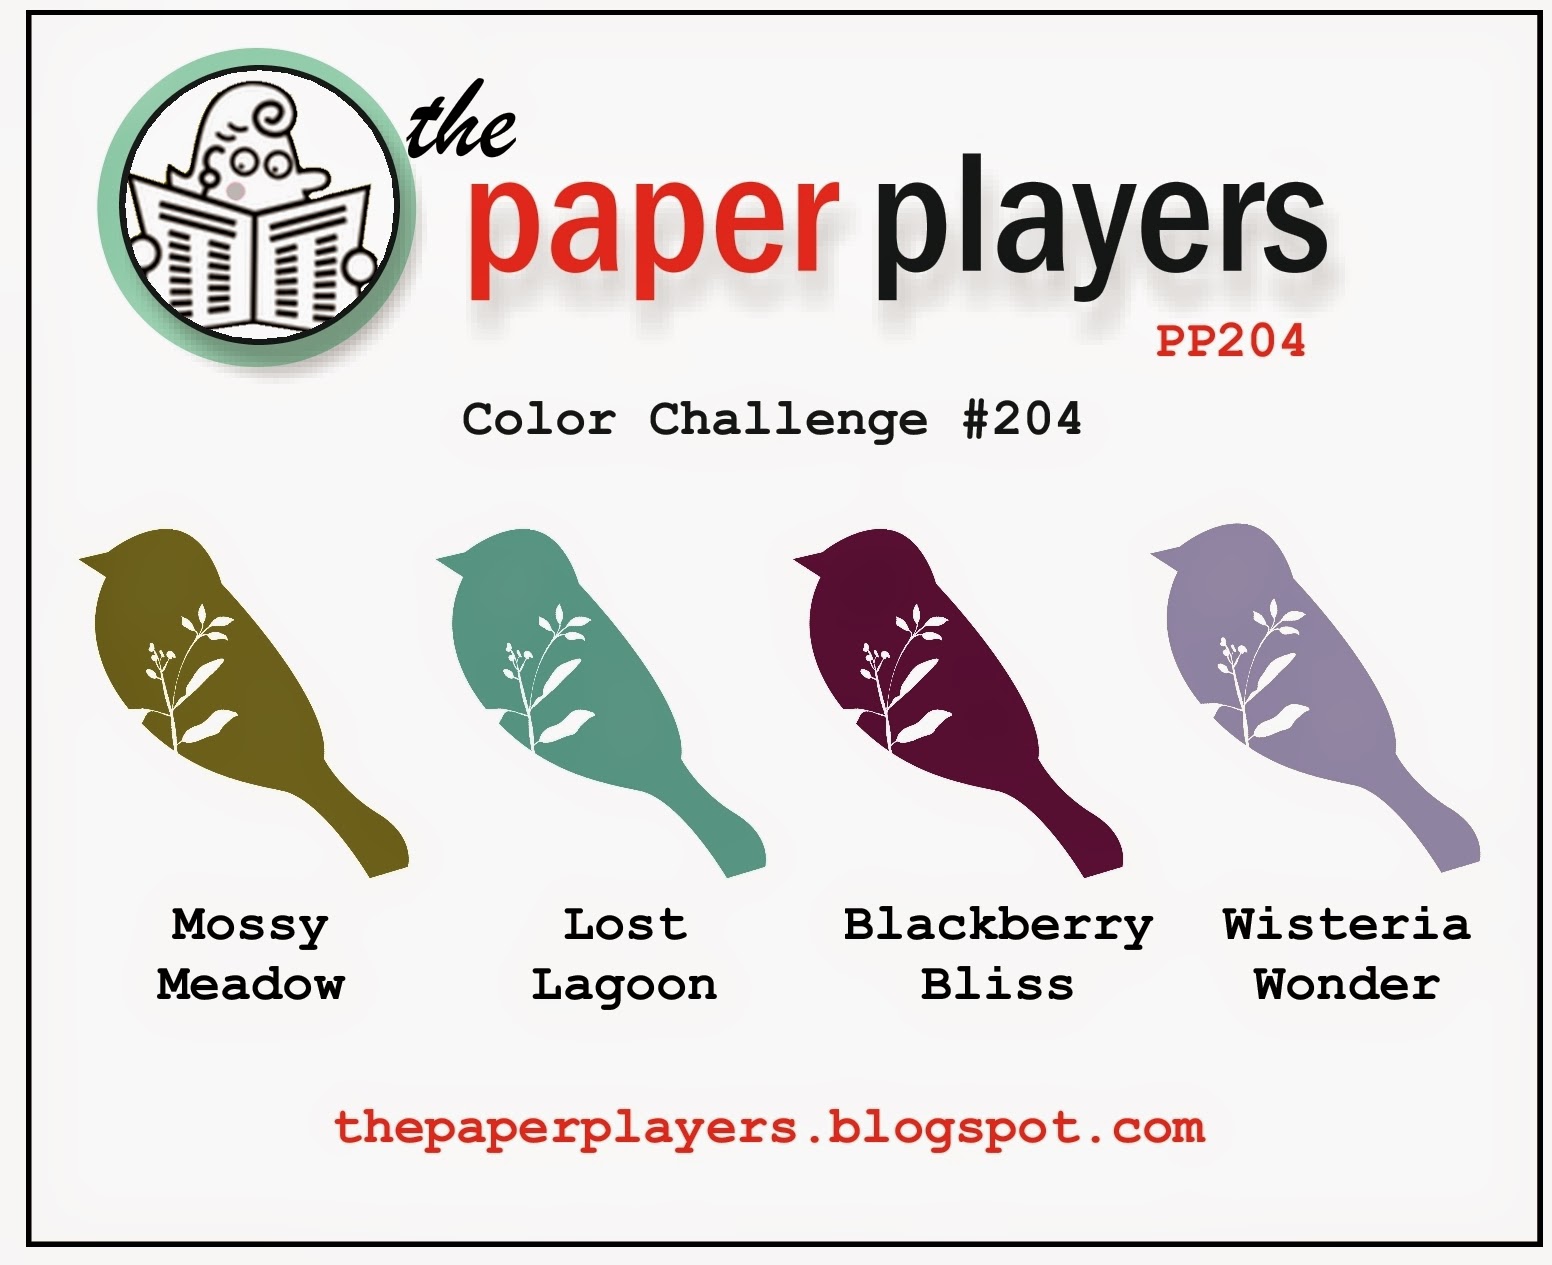
by Joanne James13. July 2014 08:00It's Sunday and today I'm sharing my weekly card designed for this week's challenge over at The Paper Players, where I'm a Guest Designer for the next few months. This week we LeAnne is hosting and she has a colour challenge for us using the following colour palette:
I also used the sketch over at The Paper Craft Crew this week for the layout of my card. I chose to make the new In-Colours of Blackberry Bliss and Lost Lagoon the focus of my card, but the other two colours also feature - take a look:
I used two pieces of DSP for the background of my card - the honeycomb from the Midnight DSP stack and the tiny blue flowers from the All Abloom DSP stack and I used a piece of the lovely Lost Lagoon satin ribbon to cover the join and create a statement bow. As these papers both have quite busy patterns, I decided to go with a fairly simple stamped focal point, with a sentiment from the 'Perfect Pennants' alongside a simple floral circle using Summer Silhouettes in Mossy Meadow, Blackberry Bliss and Wisteria Wonder. Lastly, I fussy cut one of the Wisteria Wonder flowers and mounted it onto a dimensional for extra interest.
I hope you like my card today and that it inspires you to hop on over to the Paper Players challenge blog to join in and upload your challenge creations. The Paper Player challenge takes place weekly, opening on a Sunday at 8am (PST) and closes at noon on Friday (PST). Here's a quick recap of our challenge rules:
1. Create a new paper project
2. Upload your creation to your blog with a link back to us and provide a direct link to the post featuring your challenge submission.
3. Please link your card to no more than three challenges, TOTAL.
4. Have FUN!
We look forward to seeing your colourful creations! Right I'm off to a ballet exam today (chauffeur not dancer, of course!). Back tomorrow with another project; until then, happy stampin'!
Stampin' Up! Supplies Used:
by Joanne James11. July 2014 21:54I've had another busy week and whilst it's great that it's Friday, boy do I have a busy weekend ahead of me! But before I get into my weekend, check out this card I made today for this week's Mojo Monday challenge; I haven't participated in this challenge for a while, but I really liked this week's sketch so thought I would use it for today's card. Here is the sketch:
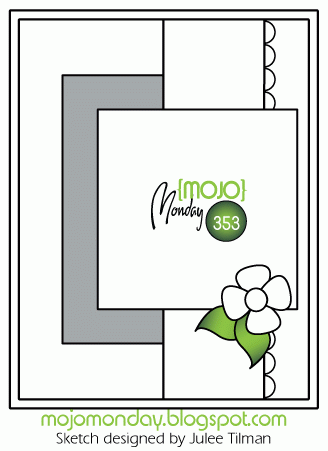
And here's my card, featuring some of the scrummy new paper in the All Abloom Designer Series Paper Stack:
I followed the sketch but I have been a little liberal with the relative dimensions of the various elements, as I wanted to use this particular sentiment from the 'Feel Goods' set and show off as much of the bold paper pattern as possible. Taking the inspiration for my colour scheme from the DSP, I matted a piece of Mossy Meadow onto a Daffodil Delight card base, then positioned the DSP on the left and bordered the right hand side with a strip of Strawberry Slush edged in Pistachio Pudding, cut with the large scallop edgelit. I stamped my sentiment in Mossy Meadow and matted it on a piece of the same colour cardstock, with a small partial mat of Pistachio Pudding as I didn't want to obscure too much of the pattern. I finished with a simple circular flower, to echo those in the paper design, punched out with a couple of circle punches and finished with a candy dot.
I made this card with a friend of mine in mind and I'm really pleased with how it turned out. Above all, I'm loving this new paper stack - the patterns in it are lovely and I can guarantee you'll be seeing lots more of this!
So that's me for today. And so to the weekend: tomorrow Rebecca has an extra ballet lesson before her exam on Sunday, we are holding Ben's birthday party for his school classmates tomorrow afternoon (more on that tomorrow!) and we are also hoping to squeeze in a visit to our local fire station open day and drop in on a church fete that a friend of mine has been working very hard to prepare for to show our support. That is all in addition to the usual homework and swim squad sessions - wish me luck!
Back tomorrow with another project; until then, happy stampin'!
Stampin' Up! Supplies Used: