Feels Like Frost Split Panel Christmas Card PP518

by Joanne James22. November 2020 09:00

Today it's Sunday and time for this week's new challenge over at The Paper Players! It's the turn of the amazing LeAnne to host this week and she has my favourite, a sketch challenge for you to work with:


My card is all about the winter blues today - perfect for the Double D challenge (thanks for the heads up on this one LeAnne!) I really liked LeAnne's sketch layout this week and decided to use those panels to highlight one of the photographic images in the Feels Like Frost designer series paper pack - take a look:

Here's the low-down on today's card:

I chose a lovely image of frosty seed heads against a blue background and cut out the panels using my Rectangle Stitched Dies before piecing back together to create the finished layout:

I brushed the frosty elements with my clear Wink of Stella brush which is difficult to see in the photo but give it a lovely subtle sparkle in real life. I added a sentiment from 'Snowflake Wishes' and a mat border of silver glimmer paper and finished off the inside with a sentiment from the same set:


The most tricky part of today's card was cutting the stitched rectangles and aligning them to the image. Otherwise, a pretty straightforward card!

Here is the visual summary of the key products used on today's project for you to pin for easy reference:

 I 

You can see all of my Product and 'How To' summaries on my 'How To - Tips and Techniques' Pinterest board in case you've missed any. 

Before you reach for your ink and papers, check out what our amazing team has created to inspire you this week:

Here's a quick recap of our challenge rules:
 
1.  Create a new paper project
2.  Upload your creation to your blog with a link back to us and provide a direct link to the post featuring your challenge submission.
3.  Please link your card to no more than four challenges, TOTAL.
4.  Have FUN!

You can see all of my 'How To' summaries on my 'How To - Tips and Techniques' Pinterest board in case you've missed any. 

Enjoy your day; today is officially 'Stir up Sunday', an old tradition when home cooks spend the last Sunday before advent 'stirring up' their Christmas pudding and in modern times their Christmas cake and homemade mincemeat too.  The day gets its name from the beginning of the collect for the day in the Book of Common Prayer, which begins with the words, "Stir up, we beseech thee, O Lord, the wills of thy faithful people". We had a day of preparation yesterday and made a batch of mincemeat and some mince pies; today we are making Christmas puddings and cake - yum! I'll be back tomorrow with another project. Until then, happy stampin'!


Stampin' Up! Supplies Used: 

Table built using Product Table Builder by The Crafty Owl - Independent Stampin' Up! Demonstrator.

Bees and Honeycomb To A Wonderful Friend

by Joanne James11. March 2017 14:12

I've a busy day today - out for a netball match this morning, then school Spring fair and a swimming gala for both James Juniors this evening, so I'm squeezing in my blog post whilst everyone else is doing homework before heading out the front door again for the next activity of the day!

Today I'm sharing a card that I made whilst preparing for this month's technique class featuring the Dragonfly Dreams bundle. In addition to featuring a particular technique in these classes, I also try and use each of the stamps in the set. My technique classes are product-based and always feature one particular stamp set or product bundle and I like to give my class attendees as many ideas as possible for how they can continue to create with their sets long after the class has finished. The techniques in this month's class are all around sponging in various forms and as this card doesn't have any sponging, it didn't make the class cut. I still love it though and since I'm always encouraging my ladies to check out my blog for additional ideas, it's right and proper that I share it with you today - take a look:


 Here's the low-down on today's card:

Dragonfly Dreams of Bees - I chose to use the bee stamp from the Dragonfly Dreams stamp set for my card today, stamping and fussy cutting two of them to frame my circle of honeycomb. I could have just as easily cut these bees out with their coordinating thinlit, however I didn't want to loose the detail on the wings for my card. I left the bee bodies matt black with just a little yellow coloured in, but their wings in real life are so pretty: I brushed each liberally with clear Wink of Stella then when dry covered that with a further layer of fine tip glue and left it to dry. The result is some beautifully glossy, shimmery wings - just like the real thing.

Hexagonal Honeycomb - I placed my bees either side of a 1 3/4" punched circle, with a layer of Daffodil Delight behind that I had embossed with my Hexagons Dynamic Textured Impressions Embossing Folder (TIEF). This is one of the new embossing folders that gives a deep, dimensional embossed impression - just like real honeycomb!

Pollen Border - To finish, I added a border of dots using the border stamp in the Dragonfly Dreams stamp set, along the bottom of my card. This is one of those really useful stamps that will work both with the stamps in the same set and others; here it reminded me of pollen, given that my bees were not too far away! It's also perfect for the new challenge over at As You See It - check out their 'seeing spots' sketch inspiration this week:

Here is the visual summary of the key products used on today's project for you to pin for easy reference:


You can see all of my 'How To' summaries on my 'How To - Tips and Techniques' Pinterest board in case you've missed any. 

If you like this card and would be interested in my Technique Class featuring the Dragonfly Dreams Bundle, do get in touch. I will be offering this as a 'Class to Go' free with a purchase of the Dragonfly Dreams Bundle from my online store and will be featuring further cards from this set later this week, so stay tuned.

Enjoy the rest of your day and I'll be back tomorrow with another project for this week's new colour challenge over at The Paper Players. Until then, happy stampin'!


Stampin' Up! Supplies Used:

Table built using Product Table Builder by The Crafty Owl - Independent Stampin' Up! Demonstrator.

Cozy Critters Pastel Owl Christmas Card - Last Day of 25% Off Stamp Sets

by Joanne James30. November 2016 08:00

Wednesday already?! Where does the time go! Firstly today I have a reminder for you: today is the last day you can take advantage of 25% off selected stamp sets as part of the Stitched From the Heart promotion - you can read full details, including the sets that are on offer, in my previous post here. For today I have another card that uses Sandy's sketch over at The Paper Players this week, but one that is quite different to my Design Team card from Sunday and that includes one of the stamps from the current offer sets:


Here's the low-down on today's card:

Book A Party, Earn An Owl -  One of the hostess sets in the current seasonal catalogue is 'Cozy Critters', which includes a sweet fox along with this adorable owl, which co-ordinates with the Owl Builder Punch for easy assembly. This stamp set is exclusively available to customers who either host their own party or place a single order of £150 or more and has been incredibly popular. This set will only be available until the 3rd January and will not be available on the retired list or clearance rack; I don't have any slots left for pre-Christmas parties now, but if this set is on your wishlist you still have time to place a qualifying order and grab yours with your Stampin' Rewards. 

Woodland Trees - I used that panel for an embossed piece again - this time the Woodland Textured Impressions Embossing Folder. Difficult to see in the photograph, but I brushed the debossed areas in between the trees with my clear Wink of Stella, along with the owl's oversized hat and co-ordinating scarf - this card is so, so sparkly!

Not Just For Tags - The sentiment and background snowflake are from the versatile Tin Of Tags stamp set. This stamp set co-ordinates with the Tin of Tags kit in the seasonal catalogue, however can be used for so much more besides and are perfect in a layered stitched circle on a card. This set is available for today only at a discounted 25% - £14.25 instead of £19. Why not buy one with a Tin of Tags kit (£20) and give someone a pre-Christmas gift that will not only provide some creative respite in the run up to the big day, but result in a set of beautiful handcrafted tags to add the finishing touch to their gift packaging:


I know I would appreciate a gift like this at this time of year!

Here is the visual summary of the key products used on today's project for you to pin for easy reference:


You can see all of my 'How To' summaries on my 'How To - Tips and Techniques' Pinterest board in case you've missed any. 

I'm also linking my card up with one of the other teams that the lovely Sandy designs for - Stamps, Ink, Paper - where the challenge is embossing, dry or heat. 

sip-any-challenge-76-800

I'll be back tomorrow with news of another great set of pre-Christmas offers from Stampin' Up! which you won't want to miss; until then, happy stampin'!


Stampin' Up! Supplies Used:

Table built using Product Table Builder by The Crafty Owl - Independent Stampin' Up! Demonstrator.

Detailed Santa Thinlits Banner Card

by Joanne James29. October 2016 19:37

I hope you're all enjoying a lovely weekend. Today I have a card using this week's sketch over at Freshly Made Sketches:

I've finally managed to break the seal on Detailed Santa Thinlits Dies and been putting them through their paces. Today's card also features a new background stamp - take a look:


Here's the low-down on today's card:

Detailed Santa Thinlits Die - Although I haven't used it before, this Santa die was one of my first purchases from the seasonal catalogue. I adore the detail of his face and beard and there are so many ways in which he can be used. Here I've cut a section of the image in Whisper White and mounted it on a banner of Real Red. You can't see in the photograph, but the whole of the white layer has been brushed with clear Wink of Stella and has a lovely subtle shimmer to it.

Put A Label On It - I stamped my sentiment from the co-ordinating 'Greetings From Santa' stamp set and cut it out with one of my Project Life Cards and Labels Framelits, great for memory keeping but perfect for card making too.

A Merry Medley - For my base, I chose to use the 'Merry Medley' background stamp, stamped in Soft Suede onto neutral kraft cardstock. I like that it adds interest without fuss and too much detail, yet is in keeping with the festive theme of my card.

Here is the visual summary of the key products used on today's project for you to pin for easy reference:


You can see all of my 'How To' summaries on my 'How To - Tips and Techniques' Pinterest board in case you've missed any. 

I'll be back tomorrow with another santa project, this time for this week's new challenge over at The Paper Players; until then, happy stampin'!


Stampin' Up! Supplies Used:

Table built using Product Table Builder by The Crafty Owl - Independent Stampin' Up! Demonstrator.

Santa's Train Watercolour Christmas Card

by Joanne James24. September 2016 20:11

It's the weekend and I managed to squeeze in a little crafting time this afternoon to make a card for this week's challenge over at Freshly Made Sketches where Amy has given us a great sketch to work with:

So many possibilities! I decided on a little watercolouring and another Christmas card - here's my card:


Here's the low-down on today's card:

Santa's Train - I stamped the train from 'Christmas Magic' in archival black onto watercolour paper and got to work with my inks and an aquapainter to colour it in with a traditional predominantly red and green colour scheme. I also created a mask for the train and added in some trees behind to add some perspective to my winter scene.

A Wink And A Sparkle -  Difficult to see on my photograph, I added a touch of gold Wink of Stella to the bell and brass elements on my train, some clear Wink of Stella on the trees and snowy ground and some retired red Dazzling Details to my holly wreath for a little sparkle. It's very subtle but it looks very pretty in real life, I assure you!

Greetings From Santa - The 'Christmas Magic' stamp set has some lovely greetings, but none of them worked for the sentiment strip as per the sketch. Instead I chose to use this one from the 'Greetings From Santa' set which has a better fit.

Here is the visual summary of the key products used on today's project for you to pin for easy reference:


 You can see all of my 'How To' summaries on my 'How To - Tips and Techniques' Pinterest board in case you've missed any. 

I'll be back tomorrow with a card for our new challenge over at The Paper Players and I'm the hostess, so you won't want to miss it. Until then, happy stampin'!


Stampin' Up! Supplies Used:

Table built using Product Table Builder by The Crafty Owl - Independent Stampin' Up! Demonstrator.

Flourish Thinlits Notecard

by Joanne James4. August 2016 08:05

Today it's time for a new challenge over at Create With Connie and Mary and this week we have a colour combination for you:


I decided it was time to break out my Flourish Thinlits for my card today - take a look:


Here's the low-down on today's card:

Frame With a Flourish - The Flourish Thinlits were on my 'must have' list when I saw the new catalogue - I think they are just lovely and you can create so many leaf and flower combinations with them, with or without the co-ordinating Flourishing Phrases stamp set. What's more, their detail can provide a great centrepiece, with not a lot else required. Here I cut mine in Mint Macaron and paper-pieced the flower heads in Rich Razzleberry, adding some clear Wink of Stella for shimmer.

Just a Note - I stamped my sentiment, from the Flourishing Phrases stamp set, in Rich Razzleberry in a 2" punched circle. There isn't much of this bright purple on my card, but where it appears it plays an important role: the sentiment, to highlight the flower petals and to create a border for my base. With two strong purple colours, less is definitely more in my book!

Pearls A Plenty - I added some doily behind my sentiment and a piece of Sweet Sugarplum ribbon, with an abundance of large pearls as 'berries' on my flourish. For some reason I rarely use this size of pearl and have an excess of them; luckily for me, they fit the circular berry spots perfectly.

A simple card where the sentiment could be switched out for lots of different occasions. 

Here is the visual summary of the key products used on today's project for you to pin for easy reference:


You can see all of my 'How To' summaries on my 'How To - Tips and Techniques' Pinterest board in case you've missed any. 

Do visit the other Design Team members to see what they did with this week's colours; there's lots of inspiration over on their blogs too!

Enjoy your day; I'm going swimming and then to the park for some outdoor fun! I'll be back tomorrow with another project; until then, happy stampin'!


Stampin' Up! Supplies Used:

Table built using Product Table Builder by The Crafty Owl - Independent Stampin' Up! Demonstrator.

You're Sublime In Subtles!

by Joanne James8. May 2016 09:00

Apologies for a lack of blog posts these last couple of days. I've plenty of projects made, I've just been away for a couple of days and then had my Crafternoon Tea Home Decor class yesterday at Bell of Northampton in Kingsthorpe. Along with everything else that makes up day-to-day life I've just not managed to find the time to write!

Anyway, today it's Sunday and time for a new challenge over at The Paper Players so I'm back to it! It's the turn of the lovely Jaydee to host our challenge this week and she has a four colour combination for you to play along with:


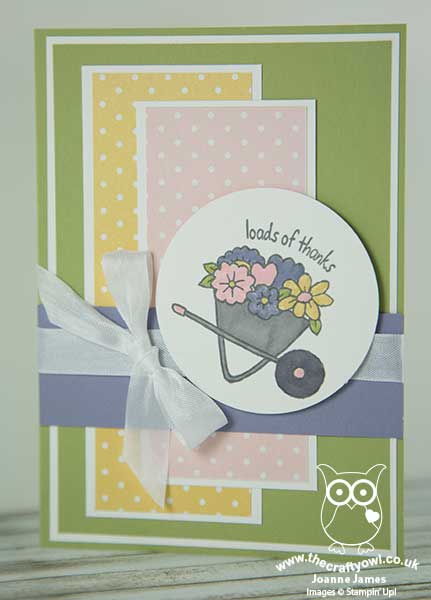
For my card this week I was inspired to use the flower-filled wheelbarrow from the 'You're Sublime' stamp set as the focal point (hence my rather compliment-filled blog post title today!), incorporating lots of layers as per the current sketch over at The Challenge:
Here's the low-down on today's card:

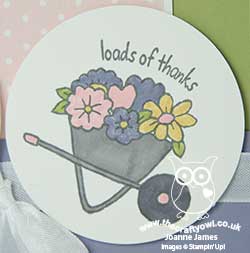
A Barrow of Flowers - This sweet little wheelbarrow stamp is one of the images in the 'You're Sublime' set that I haven't yet used and I these Spring pastels were perfect to fill my grey barrow. I coloured them using my Stampin' Write markers and added a liberal dose of clear Wink of Stella to my blooms, which adds a lovely sparkle in real life although is, alas, difficult to see in the photo. I then punched out my circle with my 2 1/2" circle punch - I'll miss this one when it retires!

A Subtle Collection of Pastels - I don't use Subtles that often, less so exclusively on a card, unless it's a baby card. These lovely ice-cream colours (there's an idea in itself!) work really well together and this card proves when mixed with a liberal dose of Whisper White they work for flowers too.

Uniformity In Layers - I focused on one each of the challenge colours per layer and kept the pattern the same on each of the DSP layers to create a uniformity to my design. Using a borderless circle for my focal image, white matting and a white seam binding ribbon and bow trim, each element ties together without overwhelming the others.

Here is the visual summary of the key products used on today's project for you to pin for easy reference:
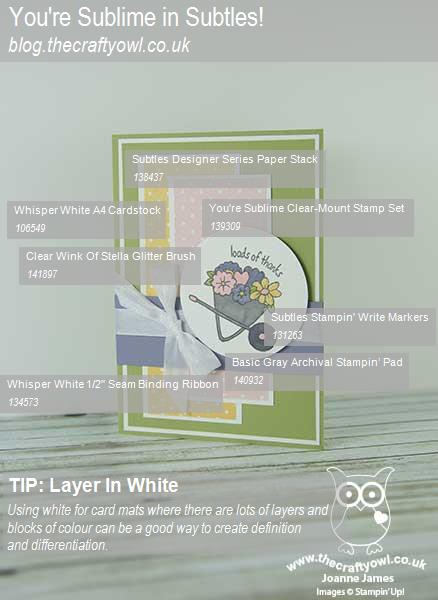
 

You can see all of my 'How To' summaries on my 'How To - Tips and Techniques' Pinterest board in case you've missed any. 

Before you reach for your ink and papers, check out what our amazing team has created to inspire you this week:

The Paper Players Design Team
 
 
Here's a quick recap of our challenge rules:
 
1.  Create a new paper project
2.  Upload your creation to your blog with a link back to us and provide a direct link to the post featuring your challenge submission.
3.  Please link your card to no more than four challenges, TOTAL.
4.  Have FUN! 


I look forward to seeing what you create with this week's colours. We are off to basketball today and then hoping for a little more of the lovely sunshine we've been having here in the UK these past few days and an afternoon in the garden.

Back tomorrow with another project; until then, happy stampin'!


Stampin' Up! Supplies Used:

Table built using Product Table Builder by The Crafty Owl - Independent Stampin' Up! Demonstrator.

Coffee and Card - Party Pop-Up Card

by Joanne James12. April 2016 10:00

I've had a busy day today with both my first Technique Class of the month and my monthly Project Life Memory Keeping Class. Today's card though is all about tomorrow; it's the card that we will be making at my Drop-in Coffee and Card morning at Bell of Northampton. This week we will be making a pop up card using the Party Pop-Up Thinlits - take a look:

I've featured a card front similar to this one on my blog previously (you can read the detail here) - for this one though the fun happens on the inside:

I used one of the fun Party Pop-Up Thinlits for a surprise inside greeting, cut out of Whisper White and coloured with my Stampin' Write markers to co-ordinate with the front of my card. Added gold Wink of Stella for the candle flames, of course!

Here is the visual summary of the key products used on today's project for you to pin for easy reference:


You can see all of my 'How To' summaries on my 'How To - Tips and Techniques' Pinterest board in case you've missed any.  

I would love you to join me at Bell's tomorrow between 10-12 (you can find a reminder of the full details here) - hope to see you there!

I will be back tomorrow with one of the cards from today's technique class featuring the Rose Wonder bundle and the new, final set of Weekly Deals; until then, happy stampin'!


Stampin' Up! Supplies Used:

Table built using Product Table Builder by The Crafty Owl - Independent Stampin' Up! Demonstrator.

Big News Awesome Clean And Simple Card

by Joanne James21. March 2016 10:45

Happy Monday everyone! I am feeling much better this week and having managed to squeeze in a little crafting time on Saturday I have lots to share with you. I was fully intending to share this quick clean and simple card on Saturday, but didn't manage to squeeze in a post due to the need to make sure I was ready in good time for yesterday's Paper Players post - oh the busy life of a blogger! I want to link up with the team over at Casology before this week's challenge closes so this is a little extra post today. Monday's scheduled post will follow shortly!

So the challenge over at Casology this week is 'Doodle'. I've been having fun playing along over there in recent weeks, seeing where the cue card takes me creatively. I also really like the way their Design Team define their cards with what makes them 'clean and simple' or CAS - very useful if you've ever wanted to understand more about what makes a great CAS card. So having pondered this week's cue, I decided on this doodled sentiment for my card for the challenge:

Such a simple card: the sentiment from 'Big News' is stamped in Black Archival ink on Whisper White, adhered to a black mat and then popped up on dimensionals on a Melon Mambo base. I infilled the spaces of my 'awesomeness' sentiment with my Melon Mambo Stampin' Write marker and added a little clear Wink of Stella for a touch of sparkle, but that's it. the restricted colour palette keeps it clean and simple and allows the doodled sentiment to shine.

Melon Mambo is one of my favourite SU! colours and chose to make this card as a card that I would love to receive. Whilst I have recently achieved a significant business goal that I had set myself, I'm not going to send myself a card (that would be weird right?!) Instead I will be sending this to one of the many young people I know who are sitting GCSEs this year when they receive great results, as I know they will. So one for the stash!

Here's the visual summary of the products needed to make today's card for easy reference:


Back shortly with today's actual post. until then, happy stampin'!


Stampin' Up! Supplies Used:

Table built using Product Table Builder by The Crafty Owl - Independent Stampin' Up! Demonstrator.


Tags: , , , , , , ,

Cards | Shop Online | Stamping

You're Just The Sweetest Apple Of My Eye Card

by Joanne James11. March 2016 22:35

A busy day so a late post from me today with a card for this week's Retrosketches challenge:

I went with brights and lemons today using my new 'Apple Of My Eye' stamp set and a sentiment with a twist:

This card is all about the lemons! Even with this relatively clean and simple design, they are three key features of today's citrus-themed card:

Apple of My Eye Stamp Set - The focal point lemon and the sentiment on today's card are from this stamp set, which also contains cherries, pears and apples of course. A fun set that will be useful, amongst other things, for teacher's thank you's too. Today's sentiment is one of three in the set and probably my favourite. I know it doesn't totally fit with lemons, but 'You're just the most sour' so doesn't have the same ring to it! This stamp can also be punched out with a 1 3/4" Circle Punch, so easy-peasy - no fussy cutting required.

Have a Cuppa Designer Series Paper Stack - This paper stack has some great cup and teapot designs, but there are also some great generic patterns too. I used three different patterns of paper on my card, all featuring lemons or leaves - great for citrus tea, but also perfect just for lemons! This sketch layout is also perfect for using up those scraps of designer paper that are left over from other projects. 

A Trio of Embellishments - There are also a number of embellishments that I added to this card to make it complete: some Crushed Curry It's My Party Enamel Dots, a small Classy Designer Button tied with a piece of Crushed Curry baker's twine (if you look up close it is ridged just like the segments of the lemon too!) and the flesh of the lemon has been liberally painted with Wink of Stella to add a subtle touch of citrus sparkle!

Here's today's visual summary of the key things needed to make today's card for easy reference:


Yellow is one of my most favourite colours and I just love this bright and lemony monochromatic card - so fresh!

I'll be back tomorrow with another project; until then, happy stampin'!


Stampin' Up! Supplies Used:

Table built using Product Table Builder by The Crafty Owl - Independent Stampin' Up! Demonstrator.
 

New Online Exclusives

There are new products available exclusively in the online store from 5 November - check them out here.

Latest Kits!

Stampin Cut and Emboss

The Layered Landscapes Kit and Nature's Paintings Kit are the latest kits in the online store - get yours here!

Shop Online

Access my online shop 24 x 7, 365 days of the year:

Current November hostess code:

9NKXDTTR

Shop Online

Mini Catalogue

BROWSE THE CATALOGUE

'Tis The Season - the new Stampin' Up! Mini Catalogue is here! For more details and to download your copy click here

Scrapbooking

Stampin' Up! has introduced a new range of 12x12" scrapbooking product and kit - the full range is now available to purchase online. To download a copy of the new digital Scrapbooking Catalogue click here.

2024-25 Annual Catalogue

BROWSE THE CATALOGUE

Click on the image to download your copy of the 2024-25 annual catalogue. For a full list of current SU! supplies, go to my online store. If you would like any help or advice, please drop me a line at joanne@thecraftyowl.co.uk or give me a call on 07773 421446 - I'd be happy to help.

Join My Team

It's always a great time to join Stampin’ Up! New team members can get £130 worth of products for only £99 + free business supplies + free shipping + all the fun being a part of Stampin’ Up! Stampin' Up! has something for everyone: join my growing team and benefit from my support to enjoy Stampin' Up! however you choose.

If you're interested, call me for a chat to understand how I can help you realise your goals. Alternatively, if you have already decided to sign up and you just can't wait, please click here for the link to the online form where you can sign up and order your starter kit right away! 

About Me

Hi I'm Joanne and live in Northampton and when I'm not looking after my husband and two beautiful children, am an avid crafter with a passion for all things Stampin' Up!

I must confess that I have never been a big rubber stamper - until I discovered Stampin' Up! that is. I love the fact that I can get such great results with co-ordinating stamps, inks, papers and punches - the possibilities are endless! Join me on my stamping journey as I share the things I love and be inspired to create amazing things yourself!

Follow Me

Monthly Newsletter

Box Builder

Click the button above to use Box Buster to create your custom box design using the Envelope Punch Board!

Kits Collection Now Available!

Stampin Cut and Emboss

The new Kits Collection from Stampin' Up! is now available!

Click here to see the current kits available and order yours online today.

I Design For


Stampin' Up Stuff

This is my personal blog and is not endorsed by Stampin’ Up! I hope you find it a plentiful source of ideas and personal inspiration but please don't copy my designs for contest submission or use for classes, publication or sale without express permission.