by Joanne James21. December 2014 20:33Sunday already?! Where are the days going??! I have been busy with my Christmas preparations and my focus has been on gift packaging these last few days, along with a few special Christmas cards. Most are going out of the door before they are even photographed though! Today I wanted to do a quick post to share a snowflake paper wreath that I made recently for a friend of mine:
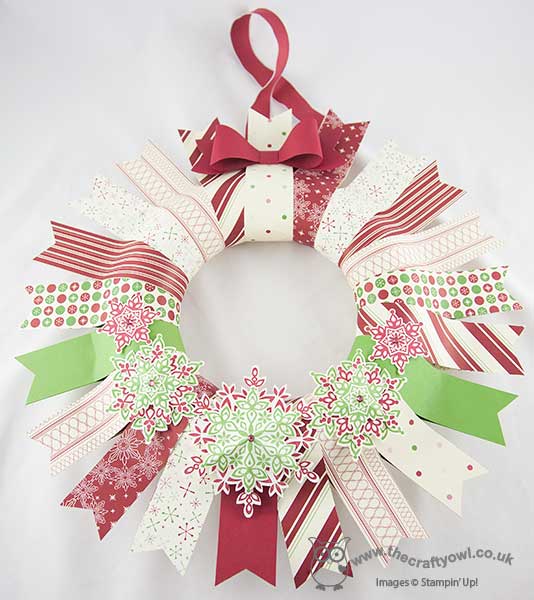
It uses a whole bunch of retired product - the paper is from a couple of years ago (I can't even remember what it was called) and is decorated with snowflakes made from stamping Cherry Cobbler and Gumball Green on Very Vanilla carstock using the Festive Flurry stamp set, that I then cut out using the Big Shot and co-ordinating framelits and finished with a paper bow made using my Gift Bow Bigz Die.
My friend specifically wanted this paper pattern as she wanted her wreath to co-ordinate with other festive pieces she had - as such I had to include a few pieces of solid colour cardstock just to enable me to get all the way around the wreath base; I am now officially out of this DSP pattern! I am going to make another of these wreath types at some point as I think it's really effective, although will probably choose a more traditional blue/silver colour scheme with my snowflakes. It was also quite easy to achieve: about 22 strips of DSP measuring 12" x 1 1/4", adhered to a styrofoam wreath and then the ends flagged.
That's all from me today - back soon with another project when time allows. Until then, happy stampin!
by Joanne James30. May 2014 12:00Yay - it's Friday again! Boy did that come around quick! This week has been half term and having James Juniors at home for the week seems to make the week fly by! Anyway, the weather is supposed to improve this weekend so that will be good. I have a busy, busy day today with retiring lists, preorders, class preparations and more besides, so let's get to it! Today I'm sharing a card that I made for this week's challenge over at 'Less is More' where it's recipe week and we're asked to include a die cut on our card. I've also combined with the vibrant colour palette over at Colour Q this week:
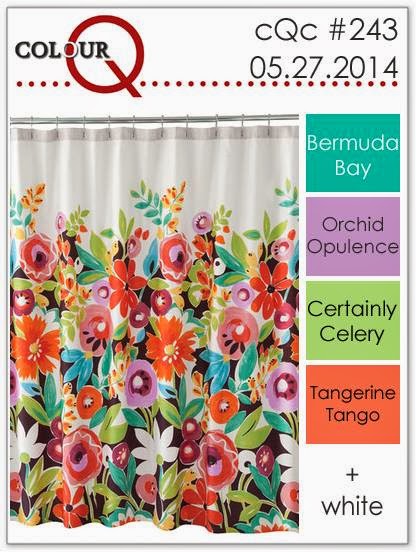
I just loved the bold flowers on that shower curtain in the inspiration photo! I had to substitute a couple of the colours, as they have retired and I don't have them; I used Rich Razzleberry and Wild Wasabi in place of Orchid Opulence and Certainly Celery, so my purple is not quite so electric but my card is just as colourful - take a look:

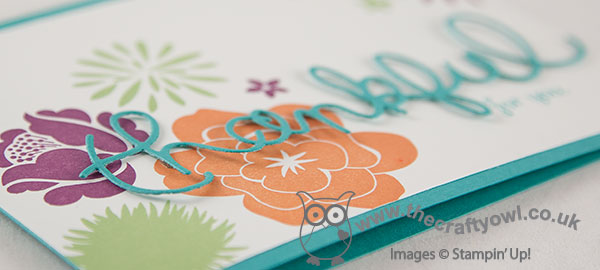
I actually used the same CAS(E) This Sketch layout, turned through 90 degrees, that I used for yesterday's butterfly card for today's background, although it looks totally different here. I used Simple Stems to stamp my flowers, along with the little flower from the Summer Silhouettes stamp set, then used Bermuda Bay for my card base, my die cut 'thankful' - the Expressions Thinlit Dies are currently available on the clearance rack, if you would like to pick up a set for the bargain price of £13.79, I love mine! - and stamped the 'for you' in Bermuda Bay using the Fabulous Phrases stamp set.
This is one of those cards that I finished and just love - the colours, layout, the diecut word, it's so me! Do you ever make a card and like it so much that you think you'll struggle to give it away? I think the recipient of this one will have to be someone special, so if it lands in your mailbox then you should consider yourself very lucky!!
Right - I'm off to peruse the retiring lists and write out my pre-order for goodies from the new catalogue too (and maybe do a little housework!). Back tomorrow with another card; until then, happy stampin'!
Stampin' Up! Supplies Used:
07beaf7b-d99f-4ad9-8388-f05a235941e8|0|.0|96d5b379-7e1d-4dac-a6ba-1e50db561b04
Tags: Simple Stems, Summer Silhouettes, Expressions Thinlits Dies, Fabulous Phrases, Shop online, Stamp-a-ma-jig, Stampin' Up, Stampin' Up Card, Stampin' Up Card ideas, Stampin' Up Supplies, Clearance Rack
Cards | Stamping
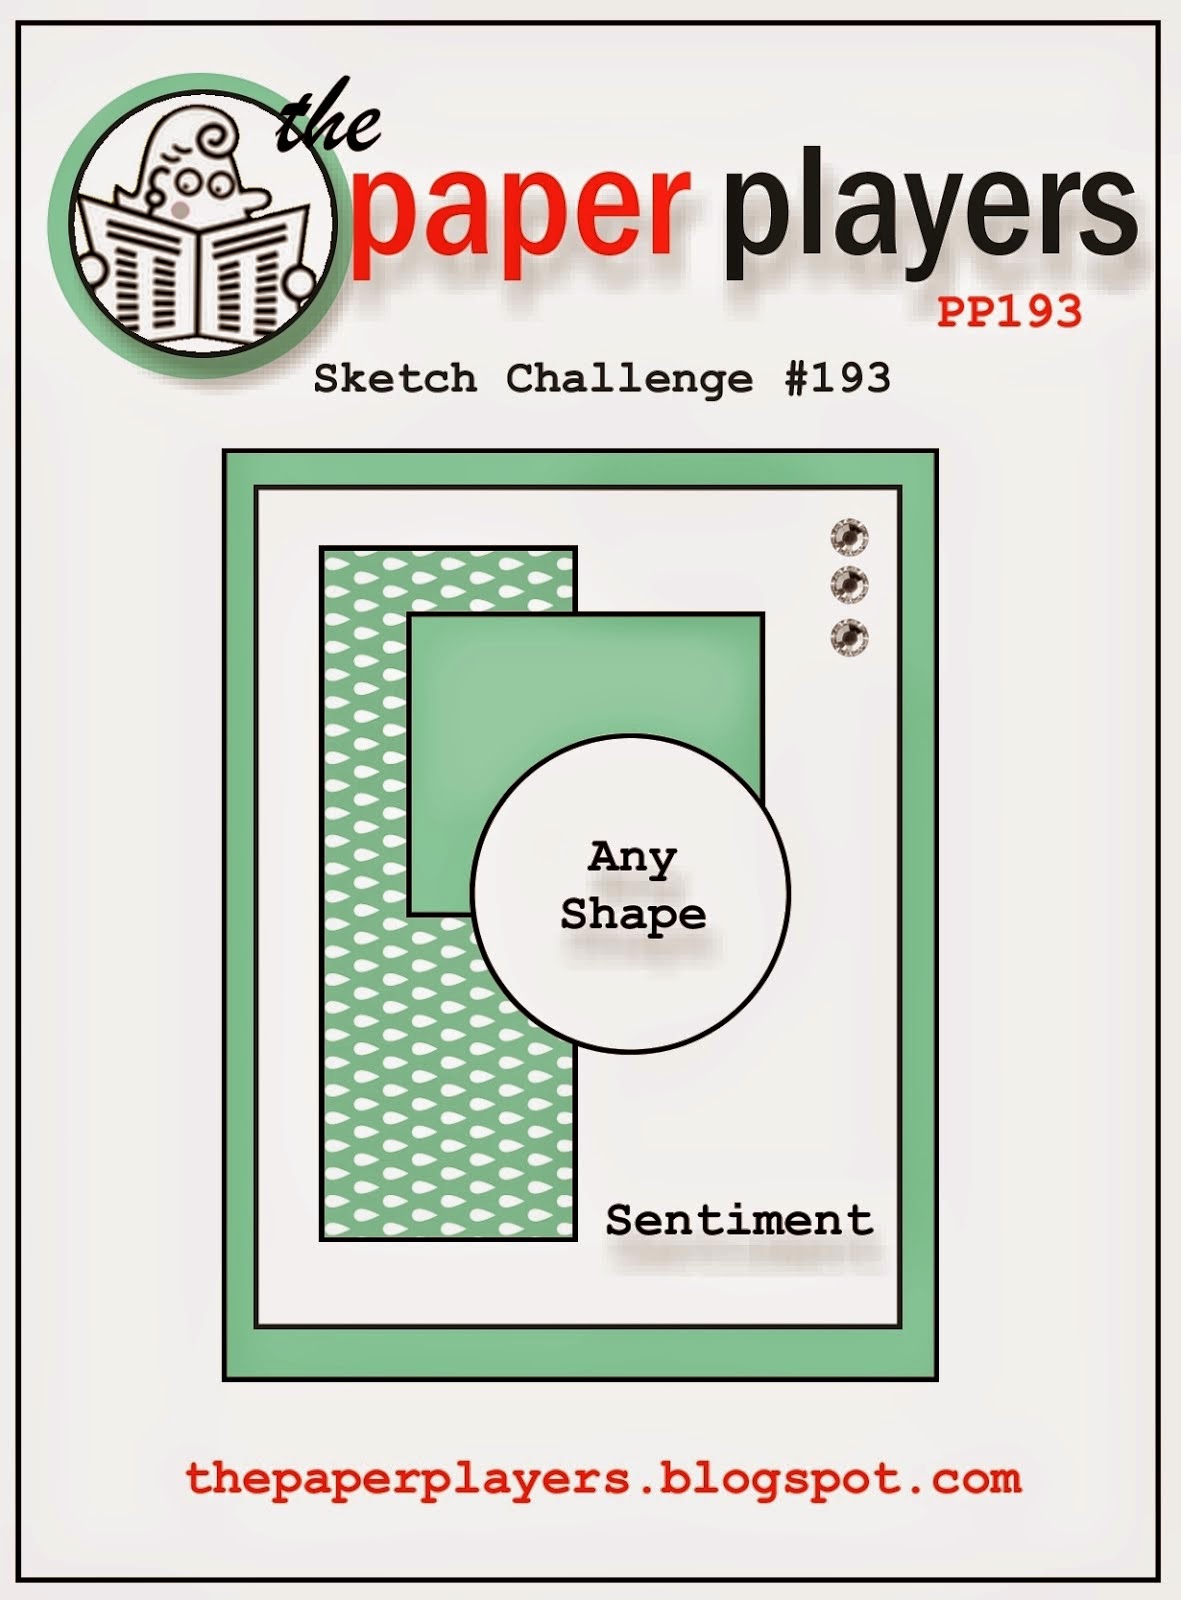
by Joanne James1. May 2014 21:48Back again with a creative post today - just in time to share my card for The Paper Players this week, where Anne Marie has this sketch challenge for us:
I decided to use a sheet of the flower patterned paper from the Fresh Prints DSP Stack as the starting point for my card; I love the pattern on this paper, but have been almost afraid to use it as it's so busy. Today I took the plunge - here's my card:
I used a Coastal Cabana base for my card, then matted a piece of Crumb Cake on Real Red and adhered to the base. I used the flower DSP for the main panel and broke slightly from the sketch to put my sentiment on the second rectangular panel, as opposed to the Crumb Cake layer. I stamped the blossom stamp from the Morning Meadow hostess set around it, having coloured it with my Crumb Cake and Coastal Cabana markers, then punched three flowers from Coastal Cabana cardstock using my Itty Bitty Flower punch and moulded them around the end of my paper piercing tool to shape them before adhering over some of the stamped blossoms. I then finished with a Real Red stamped flower from Simple Stems and three red candy dots (I really need these to be sold in packs of red only - I use more red ones than any other colour!!)
I'm quite pleased with the final result - the bold red borders really ground the busy flower pattern I think. I'm also linking this card up with SUO Challenges, where the challenge this week is to use a flower on your card.
Must go - I've grocery shopping to do before I turn in for the night (thank heavens for online grocery stores!)
Back tomorrow with another project; until then, happy stampin'!
Stampin' Up! Supplies Used:
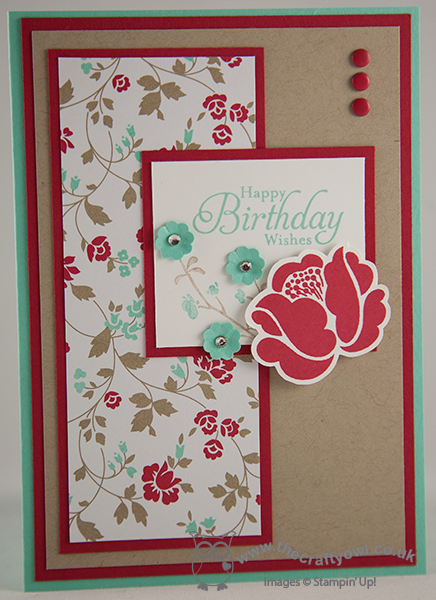
by Joanne James12. April 2014 21:39I've had a lovely day today with members of my team at our quarterly training day; it's always such fun to get together with some of the wider team and meet up with friends I don't see all that often. Today I'm sharing a birthday card that I made for one of my downline who celebrated her birthday this week. I used this week's Mojo Monday sketch and the colours and photo over at Colour Q for the inspiration for my design:

I love the bright and bold colours over at Colour Q this week and the pattern on the sundress had me reaching for my Simple Stems set again to try and capture those bright flowers. Here is my finished card:
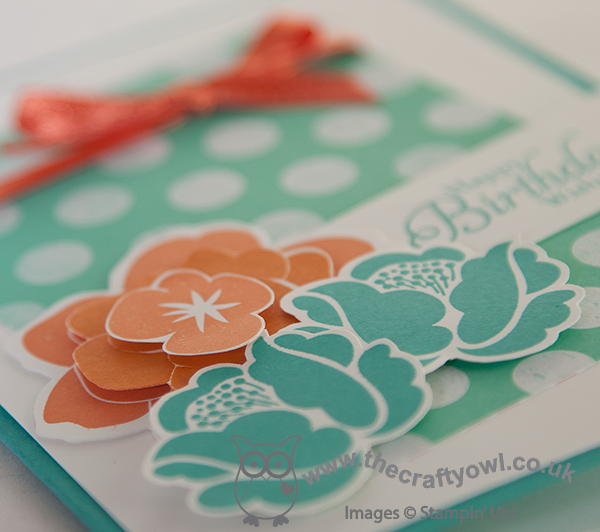
I used a piece of spotty Coastal Cabana DSP from the Fresh Prints paper stack as my angled background, then layered three flowers as the anchor for my birthday flag. I stamped the largest flower twice in Tangerine Tango and once in Pumpkin Pie, and having cut one of the flowers using my Secret Garden framlits, fussy-cut the remaining two flowers into sections, then layered them with a Tangerine Tango base, Pumpkin Pie middle layer and Tangerine Tango flower centre. I then popped them up on dimensionals to give a real 3D effect to this flower. I stamped the remaining two flowers in Bermuda Bay, then overlapped all three flowers - this photo shows the layering really well:
I used a piece of retired Tangerine Tango ribbon for my bow - I was tempted to use white, but decided my card needed another pop of orange amongst the lovely turquoise blues, so there you have it.
That's all for today; back tomorrow with another card, until then happy stampin'!
Stampin' Up! Supplies Used:
by Joanne James7. April 2014 19:53Good evening blog readers! I managed to get a little time in my craft room today (a reward to myself for finishing the housework :-) ) so thought I would make a quick card for this week's Pals Paper Arts challenge, where they are having their first colour challenge of Spring 2014 and would like us to work with the following colours:
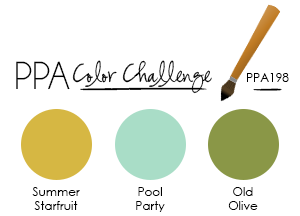
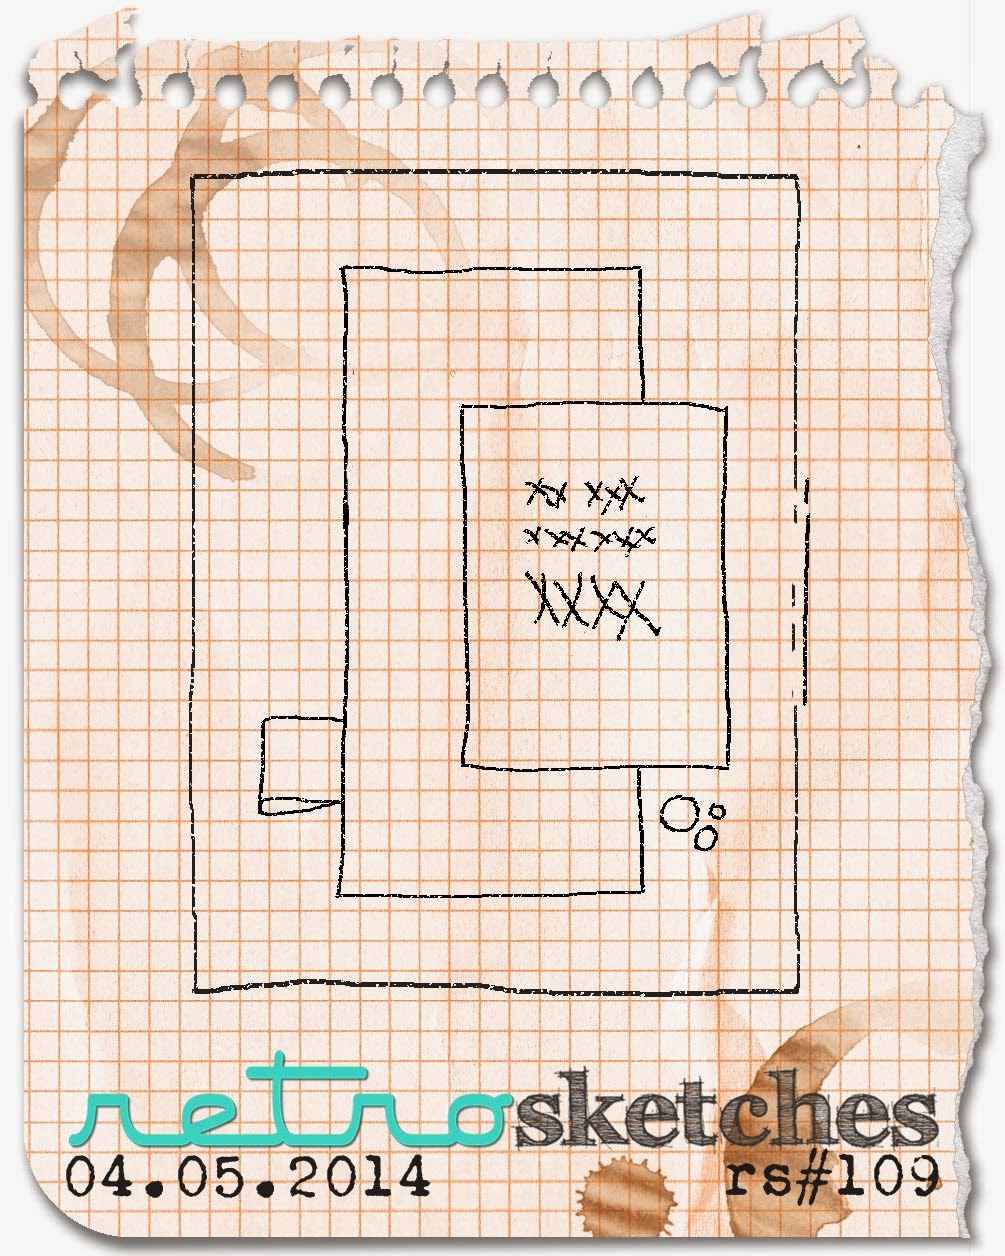
This is not a colour combination I would choose independently, but I really like it - I think the three colours work really well together. I decided to use one of the flowers from the Simple Stems stamp set and this week's sketch over at Retrosketches, and this is what I eventually came up with:
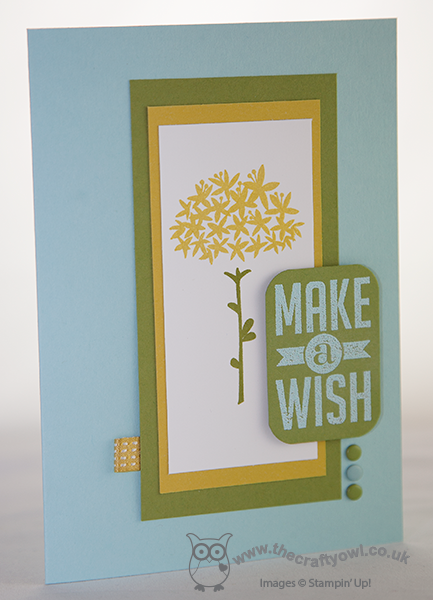
I say eventually, because this didn't turn out to be a quick card at all - it was one of those where the idea in your head doesn't fall onto the paper quite as easily as you hoped it would; I had about four aborted attempts before this one! That said, I love this flower for the Simple Stems set; it reminds me of a dandelion clock, which was the reason for pairing it with the 'Make a Wish' sentiment from the Perfect Pennants set. I stamped my sentiment in Versamark and heat embossed in Pool Party embossing powder to give it some texture and make it stand out against the Old Olive background. A small loop of ribbon and a trio of candy dots complete my card.
Back tomorrow with another project; until them, happy stampin'!
Stampin' Up! Supplies Used:
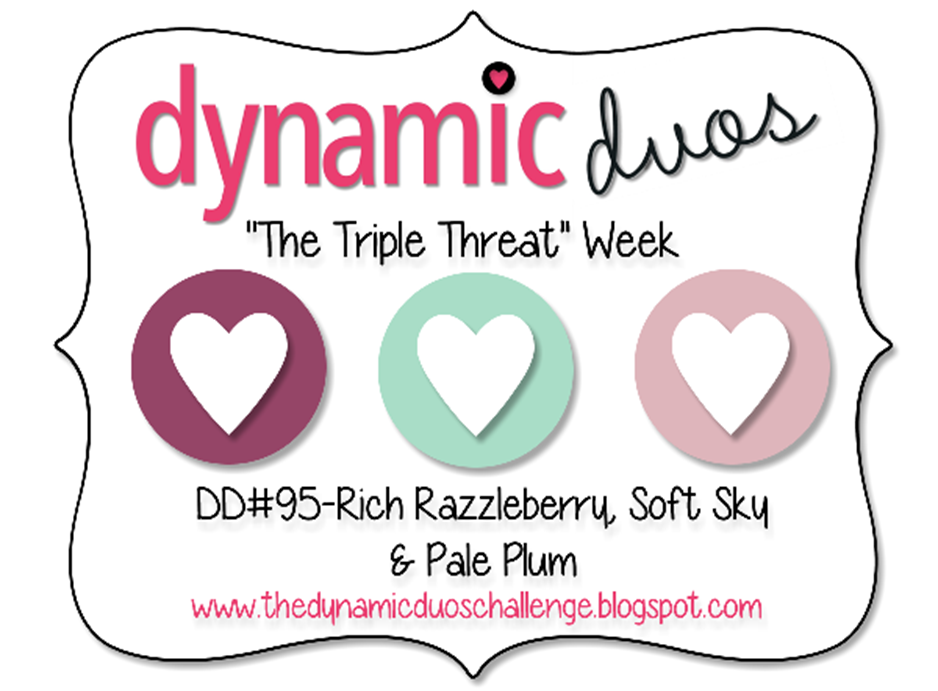
by Joanne James26. March 2014 21:28Another busy day today and my third night out in a row: today to a school concert, which was very entertaining with lots of singing and instrumentals. Now I'm back and today's card uses the colours over at Dynamic Duos this week, where it's actually 'Triple Threat' week and this week's sketch over at Retrosketches, which has an interesting decorative element:

And here is my card:
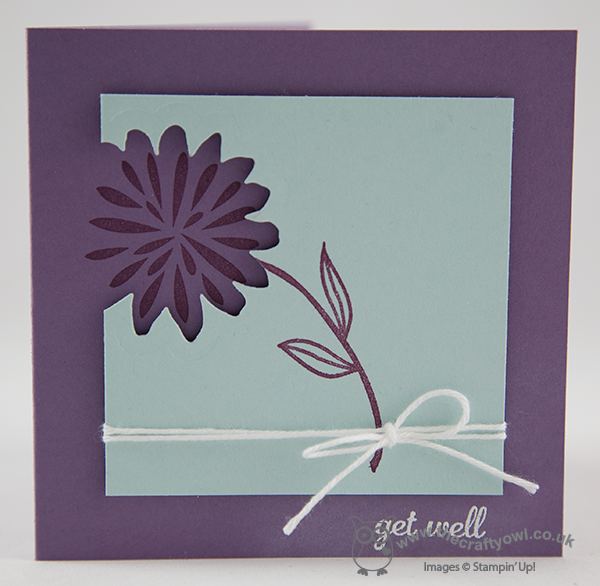
My card uses a single flower from the 'Simple Stems' stamp set and I printed the offset flower head on the base layer and the stem on a layer of Soft Sky, having cut out the area around the flower using the co-ordinating Secret Garden framelit. The Soft Sky layer was layered with dimensionals to give depth and allow a simple white baker's twine bow to be wrapped around the base.
As Pale Plum is a retired SU! colour, I substituted with Perfect Plum. I was a little concerned that it wouldn't have enough pink in it to work with the Rich Razzleberry, especially I had decided to experiment with stamping the Rich Razzleberry onto the contrasting Perfect Plum cardstock. I don't generally take two tones of the same colour and use them together in this way, but I quite like the effect - the Razzleberry 'warms' the Plum I think. I thought I would include a picture of my test card to show you how the effect differs depending on the colour ink you use:

The flowers are stamped clockwise from bottom left in Elegant Eggplant, Perfect Plum then Rich Razzleberry on Perfect Plum cardstock - it's interesting to see how different they each look, don't you think?
Anyway, back to my card! I finished it with a little 'get well' sentiment that I stamped in Versamark and heat embossed in white. This card will be sending get well wishes to one of my lovely customers who is having major surgery at the end of this week; if you're reading this Chris, I hope you're up and about again soon!
That's all from me today - I'm off to catch up on my beauty sleep! Back tomorrow with another project; until then, happy stampin'!
Stampin' Up! Supplies Used:
6ecb3bac-f56d-4451-8bd2-10848e8f6755|0|.0|96d5b379-7e1d-4dac-a6ba-1e50db561b04
Tags: Big Shot, Magnetic Platform, Stampin' Up Supplies, Stampin' Up Card ideas, Stampin' Up Card, Stampin' Up, Stamp-a-ma-jig, Shop online, Secret Garden Framelits, Simple Stems, Express Yourself
Cards | Stamping