Painted Christmas Country Wreaths TTT188

by Joanne James17. November 2022 15:00

It's Thursday and time for a new challenge over at TicTacToe! It's the turn of Team X to host this week and the lovely Felicita is our featured designer this week. This is the fun board that we are playing along with: 


I have been having a lot of fun with my Cottage Wreaths bundle so decided to take the right hand column and use any shape die, wreath and gold foil/glitter for my card today - take a look:


Here's the low-down on today's card:

I love the sketch over at TGIF Challenges this week and decided that it would be perfect for a little of 'something old, something new' - I layered a stamped and diecut wreath from the Cottage Wreaths bundle over a panel of Soft Sea Foam. embossed with the retired but gorgeous Seasonal Wreath embossing folder. This has so much detail and dimension yet makes a pretty, subtle background. I also added some stamped and diecut holly leaves, red rhinestones and an antique gold foiled bow to my Christmassy Cottage Wreath, along with a fussy cut sentiment:

All of this was against a background of the returning favourite, painted Christmas Designer Series Paper, with a couple of red glimmer borders thrown in. The prettiness doesn't stop there though - I also decorated both the inside of my card, and the envelope - no naked envelopes here:

I'll be sharing this with the lovely ladies over at Just Us Girls where it's trend week and this is the trend Lisa has chosen. I love to decorate an envelope and the inside of my card to co-ordinate with the card front; I think it's a great way to add a finishing detail and I like to think that a patterned envelope makes the recipient smile before they've even opened it. 

Here is the visual summary of the key products used on today's project for you to pin for easy reference:


You can see all of my Product and 'How To' summaries on my 'How To - Tips and Techniques' Pinterest board in case you've missed any. 

A tictactoe board offers so many creative possibilities - how does this week's board inspire you? Why not have a go? We would love to see you in the gallery and who knows - you might be selected for Designer's Choice and be eligible to be a guest designer on a future challenge. 

Enjoy your day; I am heading out to Sixth Form Options Evening with the youngest of the James Juniors at school this evening; this does at least mean dinner out, due to the logistics of trying to get everywhere on time - what a treat! I'll be back tomorrow with another project. Until then, happy stampin'!


Stampin' Up! Supplies Used: 

Table built using Product Table Builder by The Crafty Owl - Independent Stampin' Up! Demonstrator.

Pumpkin Thankful Seasonal Wreath for AYSI 213

by Joanne James8. November 2019 12:00

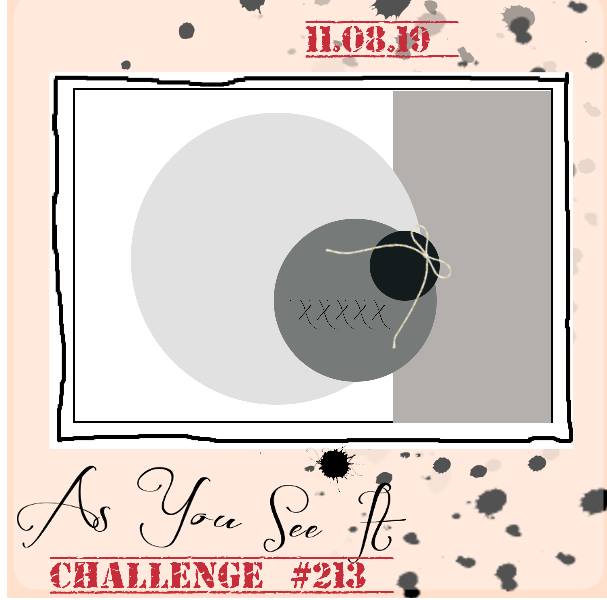
Today I'm sharing my design team card for our new challenge over at As You See It where it's time for my favourite, a sketch challenge:
       RRCB 123

 I considered a number of options before settling on using this week's muted palette over at Color Throwdown to create an autumnal thank you card - take a look:
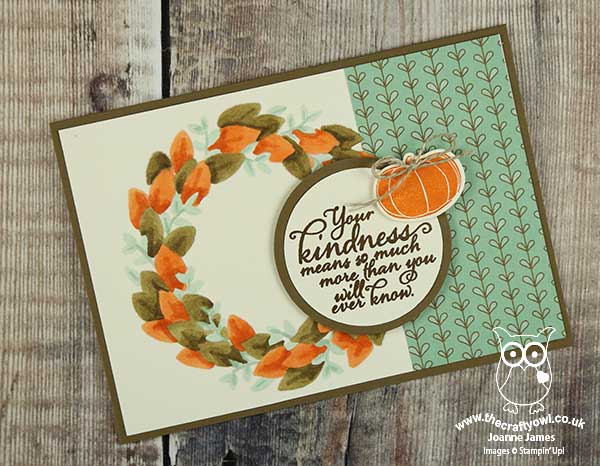
 

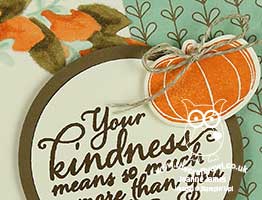
The sketch gave me the opportunity to do something that I've been wanting to try for a while with my Seasonal Wreath embossing folder. I'm also linking up with the Retro Rubber Challenge since they currently have an 'anything goes' theme. I am making a concerted effort to use up more of my retired papers and give some old favourite stamp sets some love so their theme this week is perfect: my card uses a piece of left over retired DSP and a bunch of products that are all more than a year old - read on to see just how old! Here's the low-down on today's card:

A Blended Embossed Wreath - The Seasonal Wreath is in my 'top 5' of favourite embossing folders, especially for Christmas cards. I've had mine since it was launched in 2018 and I do feel it's one of those annual catalogue 'unsung heroes' - lost in the pages at the back of the book, buried amongst the other patterns, but it's great for quick cards and works for all seasons depending on how you decorate/embellish it. I usually use it as a straight forward emboss, but I wondered what it would look like if I coloured it. I decided to try Blends in the first instance and I actually quite like the effect. It isn't as easy to see the dimension from a distance, but even in just three colours I think it gives it a new look.  

Thanks and Appreciation - The sentiment on my card comes from probably my most favourite fall stamp set ever: Painted Harvest. I've had this stamp set since it's launch in 2017 and I can't ever imagine parting with it. Such wonderful thankful sentiments and sunflower stamps that are pretty much foolproof to use and look fabulous in a wide variety of colour combinations. The best thing about it is this set features in the current Stampin' Up! annual catalogue and is still available to purchase :-) The other stamp I've used on my card today is my orange pumpkin embellishment; this stamp is from one of my old sets, 'Pick A Pumpkin', also from 2017 but now retired. I held onto this set and the co-ordinating Patterned Pumpkin Thinlits as they contain some nice pumpkin shapes that work for both fall and Halloween-themed cards alike.

Other 'Oldie but Goodies' - Other items that I've used on today's card that I've had for longer than I can remember are the circle punches I used to layer my sentiment and that piece of Paisley and Posies DSP, which is from Autumn-Winter 2016 - not that I'm a hoarder of patterned paper or anything ...!

I debated whether to add anything else to this card, but decided to leave it 'as is' and allow the wreath to take centre stage. I am enjoying experimenting a little this week and with this card it certainly felt good to use up some bits and pieces, albeit just a few - not sure I made enough of a dent to justify a shopping spree!

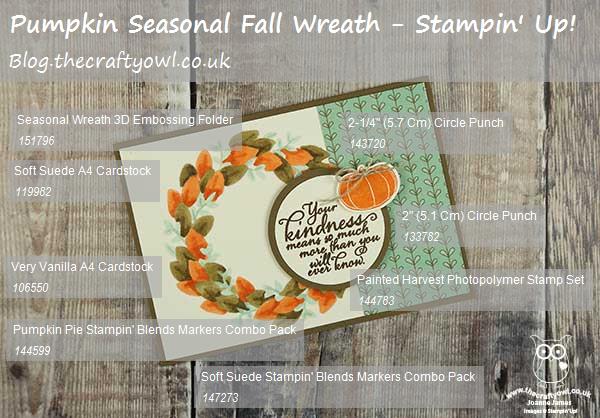
Here is the visual summary of the key products used on today's project for you to pin for easy reference:
 

You can see all of my 'How To' summaries on my 'How To - Tips and Techniques' Pinterest board in case you've missed any. 

Do check out the cards by the other members of the As you See It design team - we have all interpreted the sketch differently so there is a ton of creative inspiration!

Enjoy your day; I have a date with the ironing basket before heading out on the swim run this evening. What are your plans for the weekend? We are having a split one in the James household: the girls are at home looking forward to a weekend full of hockey, GCSE coursework and crafting, whilst the boys are on the school rugby tour to York via Nottingham. Hopefully the pitches won't be too waterlogged to play - I am looking forward to unpacking the kit bags on Sunday already!!

I'll be back tomorrow with another project. Until then, happy stampin'!


Stampin' Up! Supplies Used:

Table built using Product Table Builder by The Crafty Owl - Independent Stampin' Up! Demonstrator.

Believe in Santa with a Holly Jolly Christmas

by Joanne James7. November 2019 13:36

Today I'm sharing a card that I am hoping to squeeze in for this week's Fab Friday Challenge:


They have a great sketch and I was working on something else when I had a sudden flash of inspiration - take a look:


I decided to use my Seasonal Wreath embossing folder for that large circle as a background for my jolly Santa, which offered some theraputic colouring with my Stampin' Blends. A simple sentiment also from the 'Holly Jolly Christmas set completes my card.

Here is the visual summary of the key products used on today's project for you to pin for easy reference:


You can see all of my 'How To' summaries on my 'How To - Tips and Techniques' Pinterest board in case you've missed any. 

Enjoy your day; I have a host of things to get done today, which thankfully are indoors, unlike poor Rebecca who is outdoors taking part in a hockey tournament all day. I made sure she was dressed for the weather and I know she will be perfectly happy with her lot, but honestly it's been so cold here this last few days I would definitely rather her than me!

I'll be back tomorrow with another project for our new challenge over at As You See It. Until then, happy stampin'!


Stampin' Up! Supplies Used:

Table built using Product Table Builder by The Crafty Owl - Independent Stampin' Up! Demonstrator.

Christmas Word Wishes Seasonal Wreath Square Card

by Joanne James16. July 2019 09:00

Firstly an apology if you are here to see the masculine birthday card I promised - I mixed up my days, that one is coming tomorrow! Today I'm sharing a Christmas card for the current challenges over at As You See It and Just Add Ink:


That AYSI recipe took me a little while to work through but I got there in the end and since the JAI girls are looking for seasonal cards of any kind, it works for them too. I pulled out one of my favourite festive items in the annual catalogue that I think is rather overlooked to make today's card - the seasonal wreath embossing folder. Here's my finished card:


Here's the low-down on today's card:

A Seasonal Wreath - This Seasonal Wreath embossing folder really is in my opinion one of the unsung heroes of the Stampin' Up! catalogue; in one run through the Big Shot, you have the basis for a card. I must confess that I have only ever used it on a Christmas card, although the seasonal challenge over at Just Add Ink did get me thinking I should create another three so that I have a wreath for all seasons - so watch this space! I think the detail of the texture is difficult to capture in a photo, but in real life it's beautiful.  

A New Merry Christmas - I've used this wreath before with the Merry Christmas dies from last year's seasonal catalogue (and still available in the current annual) but thought I would use the Merry Christmas words from the new Word Wishes die set, which are smaller in size and sit rather neatly across the middle of the wreath. I heat embossed the lower part of the diecuts with silver embossing powder for a little added interest and to tie in with my decoration, but you could just as easily leave it plain - you can't go wrong with red and green for a perfectly festive colour combo.

Stars and Stripes - I decided to decorate my wreath with some silver retired metallic stars that I found in my box (I have almost run out and wish I had stockpiled a few more of these!), along with some red berries (I punched out the eye on the Elephant Builder Punch) and added a piece of (also retired) Poppy Parade mini striped ribbon tied with some silver metallic thread to finish. There was very little stamping on this card - only the inserts with one of my favourite stamps for inside a Christmas card from Merry Christmas To All:


I went with a square design because I had a 12" x 12" pack of Garden Green and Poppy Parade cardstock left over from the last seasonal catalogue and liked this card so much I decided to cut up the whole pack and mass-produce an entire set of these to make a real dent in my Christmas stash! My husband did think I'd lost to plot when he saw me cutting and embossing not one but more than 20 Christmas cards whilst watching the Wimbledon tennis finals on Sunday, but actually this was a super-easy card to make en-mass from a pack of 12" x 12" (if you would like the measurements, the card base is 6" x 6", the red matt measures 4 1/4" x 4 1/4" (the offcuts were used for the word dies) and the central green square is 4" x 4"), especially as the only stamping was on the inside. I will need to get creative with my stars for the remaining cards - I will probably punch some out of silver glimmer paper, but I am thoroughly chuffed with my efforts!

Here is the visual summary of the key products used on today's project for you to pin for easy reference:


You can see all of my 'How To' summaries on my 'How To - Tips and Techniques' Pinterest board in case you've missed any. 

Enjoy your day and I'll be back tomorrow with another project. Until then, happy stampin'!


Stampin' Up! Supplies Used:

Table built using Product Table Builder by The Crafty Owl - Independent Stampin' Up! Demonstrator.

Tags: , , , , , ,

Cards | Shop Online | Shop Stampin' Up! Online | Stamping

Two Way Embossed Square Seasonal Wreath Christmas Card

by Joanne James20. August 2018 07:00

Happy Monday everyone! It's a new week and I've a few things ready to share with you this week, including a card today for a couple of challenges that is choc-full of sneak peeks:

   Paper Craft Crew Sketch Challenge 303! Play along with the latest challenge by visiting www.papercraftcrew.com #stampinup #papercraftcrew #papercrafts #stamping #sunnygirlscraps #crafting #crafts #craft #creative #creativity #create #sketchchallenge #colorchallenge #inspirationalchallenge #tictactoechallenge

Yes, it's still summer and I'm crafting for Christmas again, but having received my pre-order of goodies from the forthcoming Stampin' Up! Autumn-Winter Seasonal catalogue, I couldn't resist getting stuck in. Take a look:


 Here's the low-down on today's card:

An Embossed Seasonal Wreath - I loved the idea of the challenge over at Just Add Ink this week, which is to choose 2 different types of embossing on your card. It gave me the perfect opportunity to use a new-to-me embossing folder that is actually to be found in the annual catalogue, so available right away! The Seasonal Wreath TIEF attracted my attention as soon as I saw it; great for non-seasonal projects too, this wreath makes a great centrepiece on a card and I can see it being a staple of my Christmas crafting stash. It results in a subtle embossed finish (a little difficult to see the detail on my photo, but I can assure you it's there and it's gorgeous!) The wreath fits on a standard A6 card, but here I decided to make a 6" x 6" square one.

A Merry Christmas - For my second type of embossing, I went with the partial heat embossing of my Merry Merlot diecuts courtesy of the new Merry Christmas Thinlits - LOVE these! I simply sponged the lower portion of the diecut letters with Versamark and heat embossed with copper embossing powder. I took my colour combo for today's project from one of the new designer series paper packs - Joyous Noel - that features in the new catalogue. Whilst it doesn't feature on my card, the combination of Tranquil Tide, Merry Merlot and copper are inspired from these beautiful papers.

The Extra Details - There are a couple of additional 'sneak peeks' on today's card: the copper glimmer paper, the gorgeous Merry Merlot and Copper Reversible Ribbon and the sentiment on the inside of my card, courtesy of the Merry Christmas To All stamp set:


Are you keen to get your hands on some of these new products too? You will have to wait until 5th September to order them, but if you aren't already a customer of mine, don't already have a Stampin' Up! demonstrator and would like a copy of the new catalogue, then just get in touch with me by email with your address details or call me to reserve your copy.

Lastly, the sketch over at Paper Craft Crew inspired the layout for today's card; definitely one I'll use again.

Here is the visual summary of the key products used on today's project for you to pin for easy reference:


You can see all of my 'How To' summaries on my 'How To - Tips and Techniques' Pinterest board in case you've missed any. 

Enjoy your day and I'll be back tomorrow with another, slightly less festive, project. Until then, happy stampin'!


Stampin' Up! Supplies Used:

Table built using Product Table Builder by The Crafty Owl - Independent Stampin' Up! Demonstrator.

New Online Exclusives

There are new products available exclusively in the online store from 5 November - check them out here.

Latest Kits!

Stampin Cut and Emboss

The Layered Landscapes Kit and Nature's Paintings Kit are the latest kits in the online store - get yours here!

Shop Online

Access my online shop 24 x 7, 365 days of the year:

Current November hostess code:

9NKXDTTR

Shop Online

Mini Catalogue

BROWSE THE CATALOGUE

'Tis The Season - the new Stampin' Up! Mini Catalogue is here! For more details and to download your copy click here

Scrapbooking

Stampin' Up! has introduced a new range of 12x12" scrapbooking product and kit - the full range is now available to purchase online. To download a copy of the new digital Scrapbooking Catalogue click here.

2024-25 Annual Catalogue

BROWSE THE CATALOGUE

Click on the image to download your copy of the 2024-25 annual catalogue. For a full list of current SU! supplies, go to my online store. If you would like any help or advice, please drop me a line at joanne@thecraftyowl.co.uk or give me a call on 07773 421446 - I'd be happy to help.

Join My Team

It's always a great time to join Stampin’ Up! New team members can get £130 worth of products for only £99 + free business supplies + free shipping + all the fun being a part of Stampin’ Up! Stampin' Up! has something for everyone: join my growing team and benefit from my support to enjoy Stampin' Up! however you choose.

If you're interested, call me for a chat to understand how I can help you realise your goals. Alternatively, if you have already decided to sign up and you just can't wait, please click here for the link to the online form where you can sign up and order your starter kit right away! 

About Me

Hi I'm Joanne and live in Northampton and when I'm not looking after my husband and two beautiful children, am an avid crafter with a passion for all things Stampin' Up!

I must confess that I have never been a big rubber stamper - until I discovered Stampin' Up! that is. I love the fact that I can get such great results with co-ordinating stamps, inks, papers and punches - the possibilities are endless! Join me on my stamping journey as I share the things I love and be inspired to create amazing things yourself!

Follow Me

Monthly Newsletter

Box Builder

Click the button above to use Box Buster to create your custom box design using the Envelope Punch Board!

Kits Collection Now Available!

Stampin Cut and Emboss

The new Kits Collection from Stampin' Up! is now available!

Click here to see the current kits available and order yours online today.

I Design For


Stampin' Up Stuff

This is my personal blog and is not endorsed by Stampin’ Up! I hope you find it a plentiful source of ideas and personal inspiration but please don't copy my designs for contest submission or use for classes, publication or sale without express permission.