Silhouette Bride And Groom Wedding Card

by Joanne James25. January 2016 22:39

The weekend is over and it's Monday again - where does the time go?! I'm finally finding the time today to share a card that I featured in part on my Facebook Page last week. This particular card was a commission for a client - a bride and groom with a romantic sunset of pinks and purples:

This card doesn't have a great deal of stamping, apart from the sentiment from the ever-popular 'Sassy Salutations' stamp set. The bride and groom were cut using my e-cutter having set them into a frame, but the real star of the show for this card I think is the beautiful brayered background. I masked the moon using a piece of post-it note punched with a 1 1/4" circle punch, then brayered the entire background using a combination of Perfect Plum, Rose Red, Melon Mambo and Rich Razzleberry. So very pretty!

I am entering today's card into this week's challenge over at Less Is More where this week the recipe is 'Silhouettes'. I was thrilled to be the LIM winner in December and so far I haven't managed an entry in January due to other commitments. This week I am going to make up for this though with not just one, but (at least!) two entries; I've been making samples for an all-day brayering technique class that I'm holding tomorrow so have lots of silhouettes to share! 

Back tomorrow with one of my basic brayer class cards that is perfect for the 'Less Is More' theme!

Until then, happy stampin!


Stampin' Up! Supplies Used:

Table built using Product Table Builder by The Crafty Owl - Independent Stampin' Up! Demonstrator.


Tags: , , , , , , ,

Cards | E-Cutter | Stamping

Flowerfull Heart Gift Card Holder

by Joanne James10. January 2014 19:45

Evening lovely blog readers! So big news of the day: my voice is (almost) back! Great news for me, not so great for my youngest when he announced he had lost his trainers following his PE lesson just 3 days into the new term - but that's a story for another time!

Today I'm going to share the last of this week's class projects: a gift card holder, once again made with the Envelope Punch Board. I've seen a few holders made in this way on the internet, but I adapted mine slightly to enable me to make it from half a sheet of A4, using metric measurements. So here is the finished gift card holder from the outside:

No apologies for once again using the Flowerfull Heart stamp (I still love it!), this time overlaid with 'love' cut from gold foil using the Expressions Thinlits die (don't forget these are only available to purchase until the 1st February). There's also another sneak peek of new product available in the Spring-Summer catalogue that launches on 28th January; did you spot it? Yes, it's the lovely gold washi tape which I paired here with Very Vanilla to make my pocket. There are lots of silver and gold items in the new catalogue, so if this is your thing, stay tuned - there will be more to come. The flap closure for the gift card holder is the bit you need the Envelope Punch Board for - it makes the two notches that enable the holder to stay closed and keep the gift card firmly in place.

When you unclasp the flap, this is what you see inside:

The insert is attached to the opening flap so that it slides out of the pocket as you open it and presents the gift card. I designed my gift card holder with a wedding or engagement gift in mind - vouchers or money seem very popular gifts these days, but you could easily adapt it for a birthday or other occasion. One thing is for sure - when it's as easy to make as this, there's really no excuse for a simply sticking a voucher in an envelope or worse still a carrier bag (believe me, it happens!!)

That's all the projects from my classes this week - I hope they've inspired you to go and be adventurous with your Envelope Punch Board. If you live local to me in Northampton and would like to attend any of my Stampin' Up! papercraft and card classes, you can find the current schedule of my card and project classes on my website here; please contact me for further information regarding location and any equipment you will need to bring. Classes must be booked at least 2 weeks in advance of the class date.

Back tomorrow with a Sale-A-Bration sneak peek; until then, happy stampin'!


Stampin' Up! Supplies Used:

Table built using Stampin' Up! Product Table Builder from The Crafty Owl.


Really Good Greetings - 25% off this month!

by Joanne James3. July 2013 15:08

Just a quick interim post from me today to bring to your attention yet another great Stampin' Up! offer this month. As if the launch of the new annual catalogue wasn't enough, Stampin' Up! are offering a selection of greeting stamp sets at 25% off when purchased before the 31st July.

The sets on offer are:

Sale Price

Catalogue Price

Description

Item

21,71 €/£15.71

28,95 €/£20.95

Sassy Salutations Wood-Mount Stamp Set

132070

17,21 €/£12.71

22,95 €/£16.95

Sassy Salutations Clear-Mount Stamp Set

126707

17,96 €/£13.46

23,95 €/£17.95

Sweet Essentials Wood-Mount Stamp Set

132085

14,21 €/£10.46

18,95 €/£13.95

Sweet Essentials Clear-Mount Stamp Set

126457

26,21 €/£19.46

34,95 €/£25.95

Petite Pairs Wood-Mount Stamp Set

128706

20,96 €/£15.71

27,95 €/£20.95

Petite Pairs Clear-Mount Stamp Set

122497

These are three very popular stamp sets each of which offer a variety of greetings that are useful for a wide range of cards and projects. Here's a picture of each of the sets:

If you would like to see samples of projects I've made using these sets, then simply do a search on the name of the stamp set in the box on the right and you will find lots of examples. If you would like to purchase any of these sets this month, then do drop me a line or give me a call and I can arrange that for you.

Back shortly with today's creative post!

Tags: , , , , ,

Promotions | Stamping

Graduation Mortar Board Card

by Joanne James27. June 2013 21:34

Another day with a poorly boy at home from school, so I am somewhat behind with my 'makes' to share with you. So today I'm going to share I card I made this week, but without the recipient having yet received it - let's hope she doesn't see the link to my blog post from my Facebook page before the postman arrives in the morning!

So the card I'm sharing is my first ever graduation card - a 'fancy folds' type card where you create a mortar board simply by scoring and folding in the right places:

I adapted a template I found on Pinterest to fit an A5 card and left the design quite simple. It was quite tricky to photograph, but hopefully you can see from the picture how the folds work and it folds completely flat for postage. I made this card for an alumni graduating from the University of Durham, so wanted to stamp the sentiment and create a tassel in Durham colours. A quick Google search tells me that Durham's key colour is 'palatinate purple' - doesn't that sound regal? A quick search through my ink pads resulted in Elegant Eggplant being the closest ink colour match. I raided my embroidery threads for the cotton for the co-ordinating tassle thread and attached the tassle to the top of the mortar board with a silver brad.

This card is well deserved - the recipient worked hard to gain a 2:1 and is intending to progress to law school; I'd say the tassle was most certainly worth the hassle!

Back tomorrow with another project; until then, happy stampin'!


Stampin' Up Supplies:

Stamps: Sassy Salutations

Cardstock: Whisper White, Basic Black

Ink/Stampin' Write Markers: Elegant Eggplant

Tools: Paper Piercing Tool

Finishing Touches: 1/8" Mini Brads

Tags: , , , , ,

Cards | Stamping

Secret Garden One Sheet Wonder - Part Two

by Joanne James20. June 2013 22:00

Today I'm sharing another of the cards from last week's Secret Garden One Sheet Wonder class with you. This card also uses single stamped images of three of the flowers in the set which are then cut out using the co-ordinating framelits and layered onto a smaller piece of patterned cardstock as a background:

This card has more detailed to it with lots of layering and looks very crisp on a white background. We had a lot of fun creating our cards using the One Sheet Wonder and the nice thing is that even though we all followed the same basic layout, everyone's cards looked different.

I really enjoyed the One Sheet Wonder - look at how many cards you can make with just one sheet of patterned stamped paper:


Come back tomorrow to see another project. Until then, happy stampin'!


Stampin' Up Supplies:

Stamps: Secret Garden, Sassy Salutations

Cardstock: Whisper White, Pink Pirouette, Old Olive

Ink/Stampin' Write Markers:  Raspberry Ripple, Pink Pirouette, Old Olive

Tools: Secret Garden Framelits

Finishing Touches: Basics Pearls


Secret Garden One Sheet Wonder - Part One

by Joanne James19. June 2013 21:00

Today I'm going to share a couple of the cards that I made with the ladies in my card classes last week. This month we decided to make a One Sheet Wonder using the Secret Garden stamp set and co-ordinating framelits. For those of you reading this who've never tried it, a One Sheet Wonder is where you create your own sheet of patterned paper using a variety of stamps and colours, then cut this into sections and use these as the basis to decorate your cards. You can cut your patterned sheet into lots of different shapes and sizes and depending on the dimensions you choose, you can make between 2 and 10 cards. I used a template based on a layout by LeAnn Greff, although modified slightly to suit my purposes. Our template made 10 cards in total. Here are the 4 cards we made in class:

And here's a close up of one of the cards in our set:

This is quite a simple card and quick to pull together - by carefully choosing the colours and adding some luxurious ribbon it turns it from something ordinary into something classic.

Come back tomorrow to see the other cards in the set. Until then, happy stampin'!


Stampin' Up Supplies:

Stamps: Secret Garden, Sassy Salutations

Cardstock: Whisper White, Raspberry Ripple, Pink Pirouette, Old Olive

Ink/Stampin' Write Markers:  Raspberry Ripple, Pink Pirouette, Old Olive

Tools: Secret Garden Framelits, Scallop Edge Border Punch

Finishing Touches: Raspberry Ripple 3/8" Stitched Satin Ribbon


Patio Party Butterflies and Half-Term Homework!

by Joanne James29. May 2013 20:06

As promised, I'm back with the last of the current run of my patio Party birthday cards today, but first I thought I would share with you another somewhat unexpected challenge that found it's way into my craft room this week - half term homework! Both James juniors have had holiday homework this week - the youngest was tasked with making a sculpture (this is still 'work in progress' - I'll share a picture when complete!) whilst the eldest has this week to complete this term's geography project - an analysis of an African country of her choice.

With the bulk of the content complete, the important task of 'making it look pretty' came to the fore. Whilst working out the best way to draw/write 'South Africa' in big letters for the cover, I (possibly with too much haste!) suggested we could make light work of this by using Mummy's Alphabet typeset die and the Big Shot to knock these out in a jiffy. A few turns of the handle later and the cover was complete: 
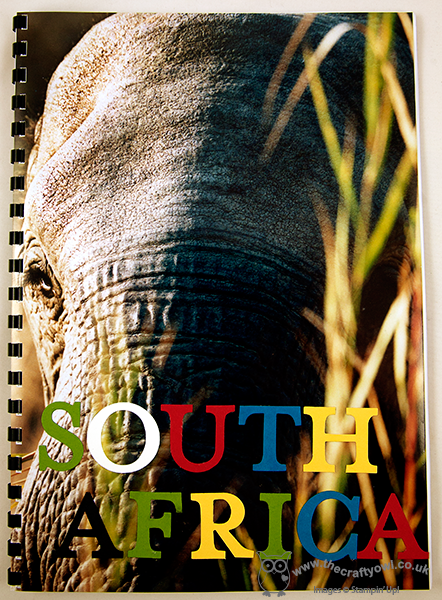
I wish I could take the credit for the photograph here, but this is all Daddy's work, captured the last time we went on safari to Sabi Sands in South Africa. Thinking we were now done, Rebecca promptly announced that she wanted me to teach her how to make a giraffe like the ones I'd made in my last card class; oh and by the way, as she had written a piece about going on safari and the hunt for 'the big 5', if I could come up with an elephant, lion, rhino and buffalo too that would be great! I wasn't phased by the lion or elephant, having seen lots of examples of these on Pinterest, but a rhino ... and a buffalo?! Never one to shy away from a challenge, I set to it and by the time Rebecca had made her giraffe the other animals were complete. Here is my version of a punch art 'big 5': 
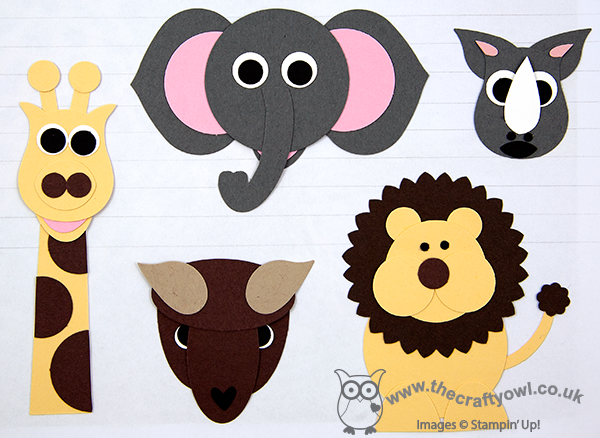
What do you think? Easy enough to work out which is which, but I'm not sure if you saw the buffalo out of context you would immediately recognise him as one!! Main thing is Rebecca loves them - and her project is finally complete. Who would have thought that Stampin' Up! punches would be so versatile?! I should just point out that I know technically these are not the safari 'big 5' rather Rebecca's personal interpretation - she substituted the leopard with the giraffe, because this was the animal she really wanted to make (that's 7 year olds for you!)

Lastly, for those of you who did check in today wanting to see the last Patio Party birthday card, here it is:
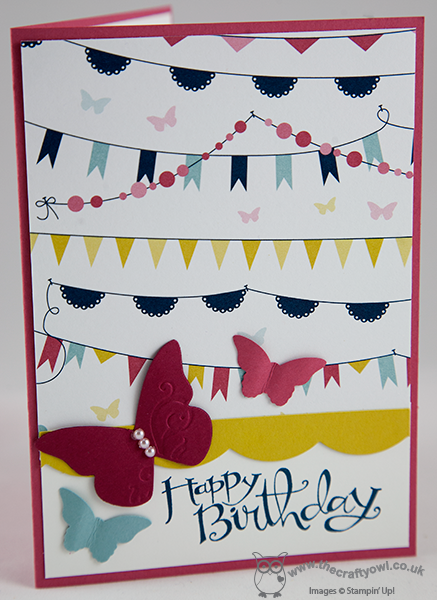
Same layout as yesterday's post-friendly card, but in the opposite orientation and picking up the butterflies in the paper pattern with a trio of co-ordinating ones flying around the sentiment.

Back tomorrow with another (non Patio Party!) project; until then, happy stampin'!


Stampin' Up Supplies (for the card):

Stamps: Sassy Salutations

Cardstock: Primrose Petals, Whisper White, Raspberry Ripple, Baja Breeze, Summer Starfruit

Ink/Stampin' Write Markers: Midnight Muse

Tools: Large Scallop Edgelit, Beautiful Wings Embosslits

Finishing Touches: Basics Pearls


The Big 40 Mark Two - Post Friendly Version

by Joanne James28. May 2013 20:26

This evening I'm sat wrapped up against the elements, having taken my little ones to buy summer sandals today on another thoroughly wet day - I must be mad! Never mind, time to party on - as promised yesterday, I'm back today to share the second of my big 40 birthday cards this week, this time a post-friendly version:


I stayed with the same Patio Party background, but as I needed a design without buttons, I decided to make more of a feature of the number forty and cut it out of silver glimmer paper. I layered this with a circle and scallop circle and an alternative 'Happy Birthday' sentiment. So another take on the '40' theme.

Back tomorrow with another patio party card, but no numbers this time - until then, happy stampin'!


Stampin' Up Supplies:

Stamps: Sassy Salutations

Cardstock: Primrose Petals, Whisper White, Raspberry Ripple, Midnight Muse

Ink/Stampin' Write Markers: Midnight Muse

Tools: 1 3/4" Circle Punch, 2 3/8" Scallop Circle Punch, Large Scallop Edgelit, Typeset Alphabet Die

Finishing Touches: Silver Glimmer Paper

Four Legged Friends

by Joanne James14. May 2013 21:32

Today I thought I'd share a couple of projects that I made for my good neighbour and friend and fill you in on the story that goes with them. My neighbour is MAD about dogs! Not just a dog-lover - I mean, head-over-heels, mad about her canine friends (and other animals too, but that's a whole other story!) Anyway, anyone reading this who knows me, knows that I am SO not like this; it's not that I don't like animals, it's just that I've never really had a pet and I don't really understand the pet-owner bond; combined with my OCD cleaning obsession this means that I can't imagine having a four legged friend running round the house, as much as my children plague me to get one. As a consequence, I have been known to say the wrong thing on occasion as far as pets are concerned; I would like to think I've learned from some of my previous faux-pas though, so when my neighbour's beloved great dane, Chelsea, passed away recently I decided to do something special to remember her. I decorated a box frame to house a favourite picture of her and this is the finished result: 

You might think it a bit pink, but for all her size and stature, she was a real girly dog if there is such a thing, with a bright pink collar and always to be seen wearing a bright pink necktie. The sentiment, 'You're in my thoughts, you're in my heart" seemed so appropriate in the circumstances. Whilst Chelsea will never be forgotten, her passing has been followed by the arrival of a new neighbour; a beautiful grey baby great dane puppy called Storm. To welcome her, I made a card, similar to one I'd seen designed by Mary Fish. You can see her card here; and this is my version:

I did add some grey stitched grosgrain ribbon across the front too, but I can't find the photo with ribbon so you'll just have to use your imagination! I stayed with the pink theme toned in with grey - I love the punch art paw print, don't you? Lastly, for all you other many dog lovers reading this, I thought you might like to see a picture of the new puppy - so here she is, Storm in all her glory:

Isn't she just the cutest?! That's all for today - back tomorrow with another project. Until then, happy stampin'!


Stampin' Up Supplies:

Stamps: Word Play, Sassy Salutations

Cardstock: Regal Rose, Melon Mambo, Basic Grey, Whisper White, Pretty in Pink, Rose Red

Ink/Stampin' Write Markers:  Melon Mambo, Basic Grey

Tools: Full Heart Punch, Owl Punch, 3/4" Circle Punch, Large Scallop Edgelits

Finishing Touches: Basics Rhinestones

Happy Bird-day Wishes

by Joanne James26. April 2013 20:57

Apologies for my sense of humour, but I just couldn't resist! Today's card is a birthday card that I made for a male friend of mine, but would work equally well as as a female card and features one of the birdies from the Aviary stamp set:

This card was inspired by a Paula Dobson card I saw on Pinterest; I love the two colour design but I felt that the muted Crumb Cake layer needed a solid Island Indigo base card to really bring out the flashes of colour of the owl, sentiment and ribbon trim. Top tip if you fancy recreating this card - use a stamp-a-ma-jig to line up the bird cages; they're not as random as they look!

That's all for today. Back tomorrow with something special - until then, happy stampin'!


Stampin' Up Supplies:

Stamps: Aviary, Sassy Salutations

Cardstock: Island Indigo, Crumb Cake

Tools: Stamp-a-ma-jig

Finishing Touches: Sycamore Street Ribbon (Sale-A-Bration - retired)


Tags: , , , , , ,

Cards | Stamping

New Online Exclusives

There are new products available exclusively in the online store from 5 November - check them out here.

Latest Kits!

Stampin Cut and Emboss

The Perpetual Beauty Calendar Kit and Cherry Blossoms Treat Boxes Kit are the latest kits in the online store - get yours here!

Shop Online

Access my online shop 24 x 7, 365 days of the year:

Current December hostess code:

9NKXDTTR

Shop Online

Mini Catalogue

BROWSE THE CATALOGUE

'Tis The Season - the new Stampin' Up! Mini Catalogue is here! For more details and to download your copy click here

Scrapbooking

Stampin' Up! has introduced a new range of 12x12" scrapbooking product and kit - the full range is now available to purchase online. To download a copy of the new digital Scrapbooking Catalogue click here.

2024-25 Annual Catalogue

BROWSE THE CATALOGUE

Click on the image to download your copy of the 2024-25 annual catalogue. For a full list of current SU! supplies, go to my online store. If you would like any help or advice, please drop me a line at joanne@thecraftyowl.co.uk or give me a call on 07773 421446 - I'd be happy to help.

Join My Team

It's always a great time to join Stampin’ Up! New team members can get £130 worth of products for only £99 + free business supplies + free shipping + all the fun being a part of Stampin’ Up! Stampin' Up! has something for everyone: join my growing team and benefit from my support to enjoy Stampin' Up! however you choose.

If you're interested, call me for a chat to understand how I can help you realise your goals. Alternatively, if you have already decided to sign up and you just can't wait, please click here for the link to the online form where you can sign up and order your starter kit right away! 

About Me

Hi I'm Joanne and live in Northampton and when I'm not looking after my husband and two beautiful children, am an avid crafter with a passion for all things Stampin' Up!

I must confess that I have never been a big rubber stamper - until I discovered Stampin' Up! that is. I love the fact that I can get such great results with co-ordinating stamps, inks, papers and punches - the possibilities are endless! Join me on my stamping journey as I share the things I love and be inspired to create amazing things yourself!

Follow Me

Monthly Newsletter

Box Builder

Click the button above to use Box Buster to create your custom box design using the Envelope Punch Board!

Kits Collection Now Available!

Stampin Cut and Emboss

The new Kits Collection from Stampin' Up! is now available!

Click here to see the current kits available and order yours online today.

I Design For


Stampin' Up Stuff

This is my personal blog and is not endorsed by Stampin’ Up! I hope you find it a plentiful source of ideas and personal inspiration but please don't copy my designs for contest submission or use for classes, publication or sale without express permission.

DSP Special Release

Check out 3 popular designer series paper designs in fresh new colourways! Available exclusively in the online store from 3 December - check them out here