Foiled Autumn Leaves TTT86

by Joanne James15. October 2020 18:00

It's Thursday and time for a new challenge over at TicTacToe! It's the turn of Team X to host this week and the lovely LeAnne is our featured designer this week. This is the fun board that we are playing along with: 


My card works for either of the diagonals: stitching, circle, diecut or gold foil, circle, designer paper today! I decided to CASe Sharon's card over at Less Is More with a trio of punched autumn leaves for a card for someone special today - take a look:


Here's the low-down on today's card:

I featured a small area of the vanilla foiled Gilded Autumn designer paper between some curvy stitched borders (courtesy of the snowdrifts in the Freezin' Friends Dies!) and then punched a trio of leaves and mounted these on a selection of gold and copper foil and glimmer paper stitched circles at the meeting point. A gold heat-embossed fussy cut sentiment from 'Rooted In Nature' on the front was paired with this sentiment on the inside of my card:


Foil is always difficult to photograph, so I hope you can see how pretty this card is! I must say having seen some of the other cards from the design team this week, I now have a desire to go and make this card in burgundy too!

Here is the visual summary of the key products used on today's project for you to pin for easy reference:

You can see all of my Product and 'How To' summaries on my 'How To - Tips and Techniques' Pinterest board in case you've missed any. 

One more look at that pretty glittery leaf trio:


A tictactoe board offers so many creative possibilities - how does this week's board inspire you? Why not have a go? We would love to see you in the gallery and who knows - you might be selected for Designer's Choice and be eligible to be a guest designer on a future challenge. 

Enjoy your evening; I am still resting up and will be spending my evening attending a 6th Form Virtual Open Evening with Rebecca from the comfort of the sofa whilst recovering from today's physiotherapy session. I'll be back tomorrow with another project. Until then, happy stampin'!


Stampin' Up! Supplies Used: 

Table built using Product Table Builder by The Crafty Owl - Independent Stampin' Up! Demonstrator.

Rooted in Nature Winter Wonderland CAS Christmas Card

by Joanne James30. January 2020 12:30


The week is running away with me again - I can't believe it's Thursday already and I'm finally managing a blog post! Today I'm sharing a card that I made for a few challenges in an attempt to keep my 2020 Christmas cardmaking on track:


Armed with the codeword of 'Frosty' from the current challenge over at Addicted to CAS, along with the snowflakes, trees and pink sky in the inspiration photo at Hand Stamped Sentiments, I set to work and this is what I came up with:


Here's the low-down on today's card:

This was another relatively quick and easy card to make: I used a 2 1/4" circle punch to make a mask and then sponged a combination of Melon Mambo and Blueberry Bushel inks on a Whisper White base to create my sky. I stamped a collection of trees from Rooted in Nature in Memento Black onto Whisper White and cut them out with my co-ordinating Nature's Roots Dies and popped them up on dimensionals in front of the sky. I added snow to the branches of my trees with a chalk marker then added a liberal application of glitter to the snowy branches and a few sequins to complete my frosty look:


How pretty is this? Given the crystalline appearance of all that glittery and frosty snow, I am also linking up with CASology for my take on the word 'Crystal'. I then stamped my sentiment (from the retired SU! stamp set 'Wonderland') in black onto vellum and wrapped this around the front of my card to finish. I do find it difficult to think about Christmas amongst all of the hearts and flowers that are prevalent at this time of year, so was grateful to the above challenges for some festive inspiration!

Here is the visual summary of the key products used on today's project for you to pin for easy reference:


You can see all of my 'How To' summaries on my 'How To - Tips and Techniques' Pinterest board in case you've missed any. 

Enjoy your day; I am without electricity today, which since it was planned is no bad thing; I've enough laptop battery to write this post and access to a wifi hotspot, and no means to do any washing, ironing, cooking or vacuuming  - an afternoon of crafting it is then!! I'll be back tomorrow with another project. Until then, happy stampin'!


Stampin' Up! Supplies Used:

Table built using Product Table Builder by The Crafty Owl - Independent Stampin' Up! Demonstrator.

Beautiful Boughs Meets Rooted in Nature for a Woodland Christmas PP466

by Joanne James3. November 2019 09:00

Today it's Sunday and time for this week's new challenge over at The Paper Players! It's the turn of the fabulous Anne Marie to host this week and she has a fun theme challenge for you to work with:
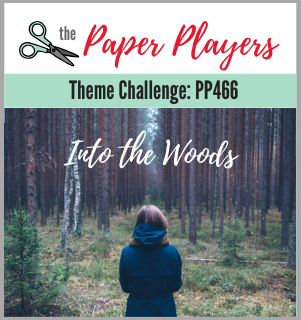
       

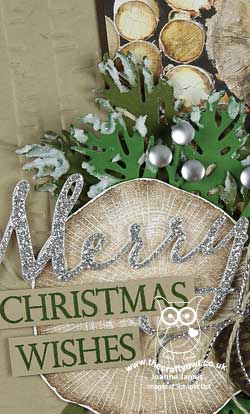
I had a few ideas for Ann Marie's 'woodsy' theme today and decided to really go all-out to incorporate as many wood-themed elements into my card as possible. I decided to continue with another Christmas card to add to my collection and ended up creating something a little different (for me!) - take a look:
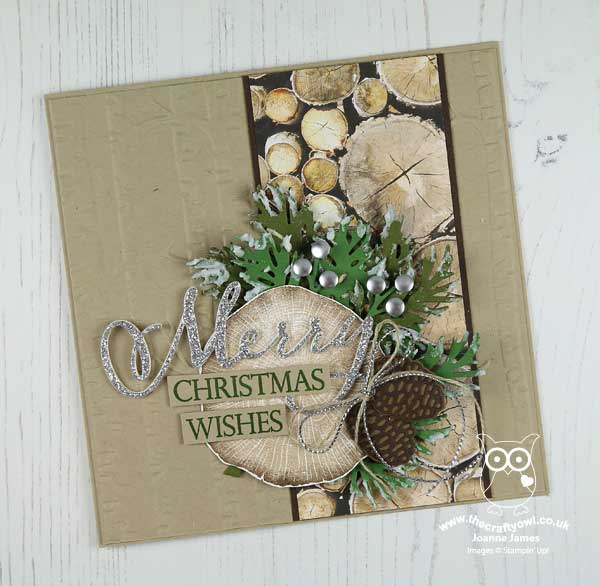
 

Here's the low-down on today's card:

Knock on Wood - My card has lots of elements that tie in to the wood theme: some woodland background dry embossing, a panel of retired Wood Textures DSP, the tree trunk stamp from Rooted in Nature (stamped in Crumb Cake and then sponged with Early Espresso around the edge), as well as some greenery and a couple of pine cones that could easily be spotted on a walk through the woods.

Texture, Texture - There are lots of layers and textural elements on today's card too: in addition to the dry embossing, I added shimmery white embossing paste to my greenery for  textured snow and the glimmer paper and twine bow also adds contrast. I originally started out using Jen's sketch over at Freshly Made Sketches (you can see that sketch here), but ended up adding so many layers and bits and pieces I rather lost my usual 'clean' look. Whilst I love the finished result, I will need to go back to the drawing board if I'm to put in an FMS entry this week!

Woodland Sparkle - All that wood made for a rather neutral card, with only the greens adding colour to the mix of browns. I decided to add a silver glimmer 'merry' diecut for some festive sparkle, along with some frosted epoxy droplet 'berries' and a silver and linen twine bow. I really like the finished effect.

Here is the visual summary of the key products used on today's project for you to pin for easy reference:
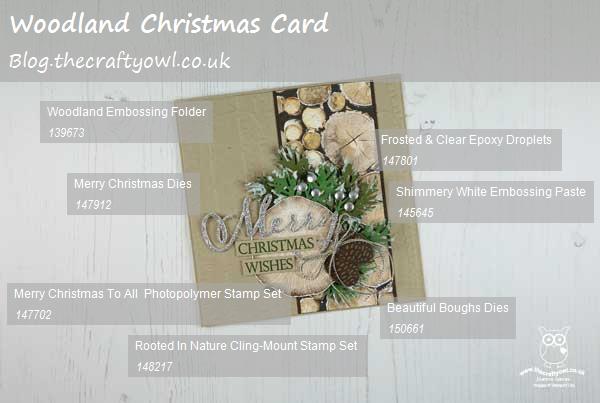
 

You can see all of my Product and 'How To' summaries on my 'How To - Tips and Techniques' Pinterest board in case you've missed any. 

I'm also linking up today's card to the Festive Friday Challenge (my card features silver, wood, texture, circles and green from the inspo list) and the challenge over at Paper Craft Crew where I went across the middle of the board: embossing paste/rustic/gone wild and the top left-bottom right diagonal: found in the forest/rustic/sponging)

Before you reach for your ink and papers, check out what our amazing team has created to inspire you this week:

Here's a quick recap of our challenge rules:
 
1.  Create a new paper project
2.  Upload your creation to your blog with a link back to us and provide a direct link to the post featuring your challenge submission.
3.  Please link your card to no more than four challenges, TOTAL.
4.  Have FUN!

Enjoy your day; we are enjoying the last day of the half-term holiday before returning the school tomorrow. We have some hockey planned and a trip to the farm shop, along with preparations for my classes this week. I'll be back tomorrow with another project. Until then, happy stampin'!


Stampin' Up! Supplies Used: 

Table built using Product Table Builder by The Crafty Owl - Independent Stampin' Up! Demonstrator.

Rooted in Nature Sympathy Cards Part 2 - For The Avid Crafter

by Joanne James3. July 2019 08:00


Today it's lesson time! I'm sharing a couple of cards that I promised you a while ago that are stepped up versions of an earlier clean and simple sympathy card that I made and since this week's challenge over at TGIF Challenges is to make a sympathy card, this seemed an appropriate time to share with you:


It's never nice to have to create sympathy cards especially on the spur of the moment, so it's always handy to have one or two on hand for when they are needed. There are lots of great sets in the Stampin' Up! catalogue with just the right words for these sometimes difficult cards and Rooted In Nature is definitely on my 'go to' list. Here's my original card that I featured in this blog post here:


This is a great card for a beginner stamper - stamps, ink and white cardstock are all you need to create this card.

I decided that this was a good card to show how easily a card can be 'stepped up' with a few extra supplies. Here's my intermediate version - instead of a one layer white base, I used a coloured card base (retired Lemon Lime Twist, but you could use Granny Apple Green for a similar colour combo), a piece of designer series paper (retired 'Under The Mistletoe' pattern) along with a strip of Night of Navy cardstock, then popped my leaf stamped panel up on dimensionals and heat embossed my sentiment in silver on a strip of vellum and wrapped it around this layer:


A few additional cardstock and paper supplies and the addition of the heat embossing as another technique creates a slightly more stepped up card for the more casual crafter who wants something a little more. Finally I created a card for the avid crafter that features an even wider variety of products and techniques:


For this version, I retained the layout of my stepped up card, but this time stamped the leaves tone-on-tone onto the same coloured cardstock and cut them out using the co-ordinating Nature's Roots framelits, overlapping slightly on my white panel. I then added a double length of navy baker's twine across the middle before overlaying my heat-embossed vellum sentiment. I finished my card with one of the silver metallic leaf trinket embellishments tied with a navy twine bow. 

So what do you think? Which of these do you prefer? I think on balance I am somewhere between the first two cards - I love the simplicity of the outlined leaves on the white, but maybe with the addition of the heat embossed sentiment on the vellum. Decisions, decisions - the joy and freedom of creativity!

Here is the visual summary of the key products used on today's project for you to pin for easy reference:


You can see all of my 'How To' summaries on my 'How To - Tips and Techniques' Pinterest board in case you've missed any. 

Enjoy your day; the sun is still shining here in the UK and I am off to sports day this afternoon, so looking forward to a fun afternoon. I'll be back tomorrow with another project. Until then, happy stampin'!


Stampin' Up! Supplies Used:

Table built using Product Table Builder by The Crafty Owl - Independent Stampin' Up! Demonstrator.

Rooted In Nature - Simply Stamps, Ink And Paper

by Joanne James27. August 2018 20:00

Well, the last of the summer Bank Holiday Mondays here in the UK today and as is often the way, it has been wet, grey and gloomy here and decidedly chilly too! So lots of cooking, board games and even a little crafting here in the James household today as a result.

I have a quick card for you this evening that uses this week's colours over at The Color Throwdown:

I was inspired not only by the colours, but by the duvet cover in the inspiration photo too - take a look:


I used the largest veined leaf in the Rooted In Nature set to stamp a leaf in each of the challenge colours onto an extra thick Whisper White card base, slightly overlapping each other, and added a simple sentiment beneath it. That's it - nothing more than stamps, ink and paper - an absolute 'back to basics' card, easy to execute with minimal supplies needed. 

I actually created two additional cards at the same time, a stepped-up version and a 'bells and whistles' version for the avid crafter and will share both of these with you in another post - of all three though, I think the simplicity of this one makes it my favourite.

Here is the visual summary of the key products used on today's project for you to pin for easy reference:


You can see all of my 'How To' summaries on my 'How To - Tips and Techniques' Pinterest board in case you've missed any. 

That's all from me today; I'll be back tomorrow with another project. Until then, happy stampin'!


Stampin' Up! Supplies Used:

Table built using Product Table Builder by The Crafty Owl - Independent Stampin' Up! Demonstrator.

New Online Exclusives

There are new products available exclusively in the online store from 5 November - check them out here.

Latest Kits!

Stampin Cut and Emboss

The Layered Landscapes Kit and Nature's Paintings Kit are the latest kits in the online store - get yours here!

Shop Online

Access my online shop 24 x 7, 365 days of the year:

Current November hostess code:

9NKXDTTR

Shop Online

Mini Catalogue

BROWSE THE CATALOGUE

'Tis The Season - the new Stampin' Up! Mini Catalogue is here! For more details and to download your copy click here

Scrapbooking

Stampin' Up! has introduced a new range of 12x12" scrapbooking product and kit - the full range is now available to purchase online. To download a copy of the new digital Scrapbooking Catalogue click here.

2024-25 Annual Catalogue

BROWSE THE CATALOGUE

Click on the image to download your copy of the 2024-25 annual catalogue. For a full list of current SU! supplies, go to my online store. If you would like any help or advice, please drop me a line at joanne@thecraftyowl.co.uk or give me a call on 07773 421446 - I'd be happy to help.

Join My Team

It's always a great time to join Stampin’ Up! New team members can get £130 worth of products for only £99 + free business supplies + free shipping + all the fun being a part of Stampin’ Up! Stampin' Up! has something for everyone: join my growing team and benefit from my support to enjoy Stampin' Up! however you choose.

If you're interested, call me for a chat to understand how I can help you realise your goals. Alternatively, if you have already decided to sign up and you just can't wait, please click here for the link to the online form where you can sign up and order your starter kit right away! 

About Me

Hi I'm Joanne and live in Northampton and when I'm not looking after my husband and two beautiful children, am an avid crafter with a passion for all things Stampin' Up!

I must confess that I have never been a big rubber stamper - until I discovered Stampin' Up! that is. I love the fact that I can get such great results with co-ordinating stamps, inks, papers and punches - the possibilities are endless! Join me on my stamping journey as I share the things I love and be inspired to create amazing things yourself!

Follow Me

Monthly Newsletter

Box Builder

Click the button above to use Box Buster to create your custom box design using the Envelope Punch Board!

Kits Collection Now Available!

Stampin Cut and Emboss

The new Kits Collection from Stampin' Up! is now available!

Click here to see the current kits available and order yours online today.

I Design For


Stampin' Up Stuff

This is my personal blog and is not endorsed by Stampin’ Up! I hope you find it a plentiful source of ideas and personal inspiration but please don't copy my designs for contest submission or use for classes, publication or sale without express permission.