And The Fox says "Thanks a Million!"

by Joanne James11. May 2014 20:42

Today I have a special blog post for you - a guest blogger, none other than my 8 year old daughter! As I was eating my breakfast and minding my own business one day, she was reading over my shoulder and fell in love with the card featured - this fabulous card featuring the fox from the Life in The Forest set, by the talented Erica Cerwin.  She promptly announced she just HAD to copy the card and as Rebecca has always fancied the idea of writing her own blog, I asked if she would like to write the blog post for it and she jumped at the chance! So here is her CASE of Erica's card and a few words about how and why she made it:

"I really liked this card when I saw it and decided it would make a perfect card for my singing teacher, to say thank you for her help in enabling me to get a distinction in my recent grade one singing exam. I stamped lots of foxes on the card base, and coloured in the white bits with a chalk marker. I love how you can see them through the vellum. I then stamped another fox and cut him out and stuck him on the front behind the grass, which I cut with fringe scissors. I made the banner with 'You're one in a million' but added a row of gold sequins to mine too, for extra sparkle. I also stamped a fox on the card envelope and coloured him in with a Cajun Craze marker pen. my singing teacher loved her card!"

I hope you like Rebecca's card - normal blog service resumes tomorrow! until then, happy stampin'!


Stampin' Up! Supplies Used:

Table built using Product Table Builder by The Crafty Owl - Independent Stampin' Up! Demonstrator.


A Challenging Thank You Card!

by Joanne James18. April 2014 10:00

Yay, it's Friday - where did that week go?! Today I'm sharing my entry for this week's challenge over at The Paper Players, where Ann has laid down the following colour challenge: 

I really wanted to enter this week's challenge as I missed last week's, however this colour combination filled me with some dread: I use Coastal Cabana a lot, I use Calypso Coral less so; as for Always Artichoke - I've only used this colour ONCE before - EVER!! The design team provided such great and varied inspiration this week though that I thought I should endeavour to rise to the challenge and have a go. It took a long while, but eventually this is what I came up with - that I'm prepared to share with the world, anyway :-):

After much (unsuccessful) experimentation with a variety of designer series paper, I decided that simple was the way to go and I reached for my 'Oh, Hello' stamp set which I haven't used in a while. I stamped the oval chevron background in Coastal Cabana on the same colour base and paper pierced the outline for added interest. Then I split the sentiment, stamping part of it directly onto the card base and part of it onto a layered vellum banner that I popped up on some dimensionals. I then decorated this with a flower that I stamped twice, once on Calypso Coral Cardstock and once onto Always Artichoke, then carefully cut both out with my paper snips and paper-pieced them together.

Not an overly complicated card, but one of those that took way longer to execute than anticipated! Always nice to move outside of one's comfort zone though, and I like the result even though this is a colour combination I would never ordinarily choose.

Right - I'm off for some serious painting today - the preparation has been done, so today the nursery walls of Ben's bedroom will be officially transformed into a Lego-lovers paradise!

Back tomorrow with another project; until then, happy stampin'!


Stampin' Up! Supplies Used:

Table built using Product Table Builder by The Crafty Owl - Independent Stampin' Up! Demonstrator.


Tags: , , , , , , ,

Cards | Stamping

Afternoon Picnic Birthday Card PP169

by Joanne James31. October 2013 23:15

A late post from me today and it was supposed to be all about Halloween, but as I'm behind this week and the current Paper Players challenge ends tomorrow, I need to have a switch around so that I can link up today's card. This week's challenge over at The Paper Players is a sketch by the lovely Ann Marie - here it is:

I love sketch challenges as you know and I've actually used this layout for several card designs this week (still in the making and not blogged yet, in case you're thinking you haven't seen them!) The card that I'm going to link up though is the one that is most 'true to sketch' and is actually the birthday card I designed for my Mum - here it is:

Now it's not my Mum's birthday until Saturday, so I'm taking a chance here, but as she rarely looks at my blog I think I'm safe! I took the inspiration for my colour scheme from some of the papers in the Afternoon Picnic DSP stack and it was an opportunity to use a colour that I rarely do: Wisteria Wonder. I actually had some out on my desk as I've been using it for another project recently, but must confess it's a colour I don't find myself drawn to. I love the idea of lilac, but I find too much Wisteria Wonder rather overpowering. Here I've tried to temper that by using a Very Vanilla background and making good use of Pear Pizzazz, the other main colour in the patterned paper. I used my Stampin' Write markers to colour the flower from the 'Oh Hello' stamp set, which so looks like the flowers that you see in this paper stack and I used an embossed strip across the centre of my card because whilst I think it would have looked nice with a strip of chevron ribbon, I wanted it to be post-friendly and I like the way the embossed dots again echo the pattern of the paper.

So that's my card. I may well share some of today's Halloween makes with you tomorrow (call it early planning for next year!) Whilst I don't tend to go in for Halloween cards and as my regular readers will know, I haven't featured a single Halloween project, one of the things that is really big in the James household is pumpkin carving. Each year we try to grow our own pumpkins in the garden and this year we managed to grow four, two of which were the biggest ever! Our record breaking pumpkin was 1.38m in circumference and weighed 17.9kg - only 2kg lighter than my 6 year old son!!! The children and I spent the happiest of days today carving all four of our pumpkins, so I thought I should share some pictures with you:

 This is Rebecca's pumpkin, that she carved herself:

This is Ben's pumpkin, that he too managed himself for the first time this year:


And lastly here are both Ben and Rebecca, with our two 'monster' pumpkins, the largest of which was big enough for a double Monsters University-inspired carving:


Not a piece of cardstock in sight, but very creative, nonetheless! I'll be back tomorrow with another project, meanwhile why not pop over to The Paper Players and see what the designers and other participants have done with the above sketch? Until tomorrow, happy stampin'!


Stampin' Up Supplies Used:

Giraffe Punch Art

by Joanne James24. May 2013 21:19

As promised, I'm back today with the last of the owl punch cards from this month's class. Our last card was another alternative use for this versatile punch; this time, to make a cute giraffe punch art card:


To make this card, the owl's body (minus his feet!) becomes the giraffe's head - clever, right?! We then used a variety of circle punches and the large oval punch to create the rest of him. The edges of the finished giraffe were sponged in So Saffron ink to add dimension and I placed him inside the card looking out, for added interest. The oval aperture was easy to make using an oval framelit and a few branches from the Bird Builder punch were added to give the giraffe something to munch on. I finished this card with embossed clouds and an 'Oh Hello' sentiment highlighted with a Cute Clip (love these!), but you could just as easily use a happy birthday greeting - I think this would make a lovely card for a little person.

I hope you like the finished card - there were a few interesting adaptations to this card by the ladies at my class: everything from hearts added to the sentiment banner to eyelashes on the giraffe. That's one of the things I love about teaching classes - whilst I scope out the original design, it can still be adapted or customised to make it individual to you. If you would like to attend my stamping classes, please do get in touch via joanne@thecraftyowl.co.uk for more details. Next month's class is a One Sheet Wonder class using the Secret Garden stamp set and framelits. 

Back tomorrow with another project - until then, happy stampin'!


Stampin' Up Supplies:

Stamps: Oh Hello

Cardstock: Whisper White, Marina Mist, Pink Pirouette, So Saffron, Chocolate Chip, Basic Black, Certainly Celery

Ink/Stampin' Write Markers: Early Espresso

Tools: Owl Punch, Cloudy Day Textured Impressions Embossing Folder, 1" Circle Punch, 3/4" Circle Punch, Bird Builder Punch, Oval Framelits, Itty Bitty Shapes Punch (circle), Large Oval Punch

Finishing Touches: Cute Clip


Oh Hello Mr Owl

by Joanne James21. May 2013 20:54

I've been busy card making today, but I thought it was about time I shared some of the cards that we made in this month's card class, featuring the owl punch. The class centred around the versatility of this punch and with the exception of the card I'm sharing today, the other cards we made were about using the punch to make things other than a straight forward owl. So on to today's card! This is the somewhat unassuming front of the card:


A nice woodgrained stamped tree trunk with a someone peeping out to say 'Oh Hello'. Open up the card and this is what you find:

A cute pair of owls keeping each other company, balancing on a branch. I chose to use bright colours for the owls so that they would stand out against the neutral Crumb Cake background. This would make a great card for a good friend, or even an anniversary card for your 's'owl' mate' (apologies - couldn't resist the pun!)

Back tomorrow with another owl card - until then, happy stampin'!


Stampin' Up Supplies:

Stamps: Oh Hello, Bloomin' Marvelous (Sale-A-Bration - retired), Woodgrain

Cardstock: Whisper White, Basic Black, Crumb Cake, Chocolate Chip, Island Indigo, Raspberry Ripple, More Mustard, Old Olive

Ink/Stampin' Write Markers: Island Indigo, Raspberry Ripple

Tools: Owl Punch, 1 3/4" Scallop Circle Punch, 1 1/4" Circle Punch, Bird Builder Punch


Brights Thank You Card with hand-dyed Filter Paper Flower

by Joanne James30. April 2013 19:56

As promised, today I have a card to match yesterday's lovely Melon Mambo treat holder, made with the Pop 'n' Cuts base. No dresses today, but another of those gorgeous filter paper flowers, this time hand-dyed yellow to really make it 'pop': 

This flower was made using the slightly smaller Floral Frames Framelit; the flowers can be coloured in a number of different ways - to achieve this effect, the edges were sponged with Daffodil Delight ink then the layers sprayed with a homemade mix of alcohol and shimmer spray to encourage the colour to 'bleed' and shimmer slightly. So easy and each time you make one, you get a slightly different look so all your flowers are unique.

The flower definitely takes centre stage here, however the background stamping, rhinestones and cute clip attaching the flag at the top all contribute to making this a great card, and one that perfectly co-ordinates with yesterday's treat holder. Here's a picture of both items together:

Rather lovely! Back tomorrow with another project and exciting news about a special promotion valid for the month of May only. To find out more, make sure you check back tomorrow for the full low-down. Until then, happy stampin'!


Stampin' Up Supplies:

Stamps: Oh, Hello

Cardstock: Melon Mambo, Whisper White, Sunshine and Sprinkles DSP

Ink: Basic Grey, Melon Mambo, Daffodil Delight

Tools: Floral Frames Framelits, Big Shot

Finishing Touches: Basics Rhinestones, 1/4" Stitched Grosgrain Ribbon Basic Grey, Creped Filter Paper, Cute Clips

Oh Hello - Welcome to my Team!

by Joanne James16. April 2013 22:19

Lots to share today: new Stampin' Up! offers, some lovely makes and a 'sneak peek' of tomorrow's post - but you'll have to read everything else first!

Stampin' Up! has announced two great offers that will run from April 15th-May 30th: If you host a £250 party, you will earn an additional £25 in hostess credits to spend on any items you like from the current annual and Spring-Summer catalogues - that's a whopping £65 worth of product absolutely free, just for hosting a party. All you need to do is contact me to arrange a date, invite your friends round and pop the kettle on - I'll take care of the rest.

If you've ever thought about becoming a Stampin' Up! demonstrator, there's another great offer that will be of interest to you: if you sign up before 30th May, you will receive an extra £25 worth of product of your choice in your starter kit - that's a total of £155 worth of product for £99 cost - bargain! You will also receive a business supplies pack worth £45, which brings the total value of the starter pack to £200 - a great deal at half the price. Whether you want to be a hobby demonstrator and simply take advantage of the opportunity to purchase your craft supplies at a discount, supplement your existing income or work with a specific financial goal in mind, or build a business out of your love of crafting that has endless opportunities and the flexibility to work the hours of your choice and do a much or as little as you like, Stampin' Up! has something for everyone. In addition to the extensive resources that Stampin' Up! offers, I like to give my team members something 'extra'. In addition to my personal support in helping you make the most of everything that Stampin' Up! has to offer, I like to share my enthusiasm and passion and inspire them to create great things. Here's the welcome card and gift I made for new members of my team during Sale-A-Bration earlier this year, inspired by something similar I had seen on the SU corporate blog:
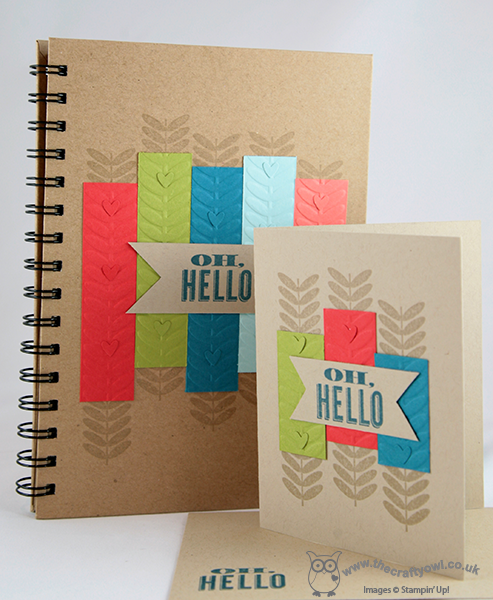
 

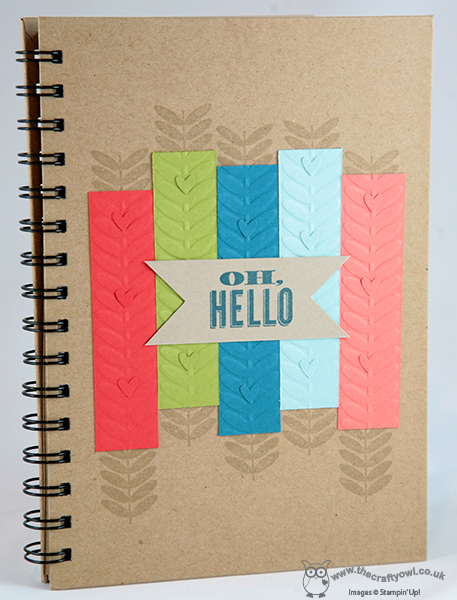
A lovely decorated notebook for those all important moments when inspiration strikes and a co-ordinating welcome card. I used the Vine Embossing Folder and co-ordinating stamp from the Madison Avenue stamp set, highlighting with some hearts from my Owl Punch and the 'Oh Hello' stamp set from the stamp set of the same name. Here's a close-up of the notebook:
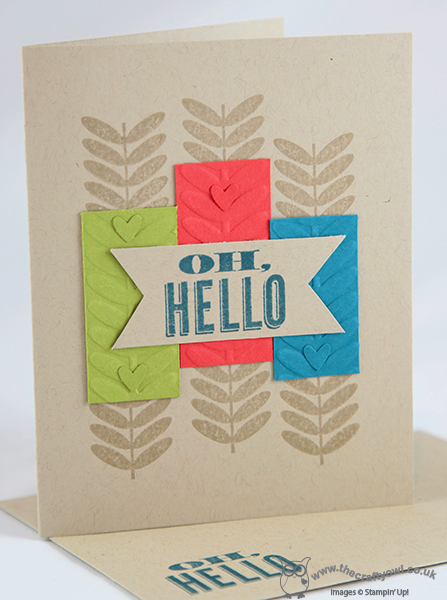
And here's a close-up of the co-ordinating welcome card: 
So if you would like to say 'Oh Hello' and join my team of Crafty Owls, do get in touch with me here if you'd like more information. Alternatively, if you've already decided and are ready to order your starter pack, just click here to complete the form online - it's really straightforward.

Lastly, I promised a 'sneak peek' of tomorrow's post, which will feature one of the cards from my class tomorrow evening - so here it is:

You'll have to come back tomorrow to see the whole thing though - until then, happy stampin'!


Stampin' Up Supplies:

Stamps: Oh Hello, Madison Avenue (Sale-A-Bration - retired)

Cardstock: Island Indigo, Pool Party, Lucky Limeade, Calypso Coral, Poppy Parade (retired)

Inks: Crumb Cake, Island Indigo

Tools: Vine Embossing Folder (Sale-A-Bration - retired), Stamp-a-ma-jig, Owl Punch


New Online Exclusives

There are new products available exclusively in the online store from 5 November - check them out here.

Latest Kits!

Stampin Cut and Emboss

The Layered Landscapes Kit and Nature's Paintings Kit are the latest kits in the online store - get yours here!

Shop Online

Access my online shop 24 x 7, 365 days of the year:

Current November hostess code:

9NKXDTTR

Shop Online

Mini Catalogue

BROWSE THE CATALOGUE

'Tis The Season - the new Stampin' Up! Mini Catalogue is here! For more details and to download your copy click here

Scrapbooking

Stampin' Up! has introduced a new range of 12x12" scrapbooking product and kit - the full range is now available to purchase online. To download a copy of the new digital Scrapbooking Catalogue click here.

2024-25 Annual Catalogue

BROWSE THE CATALOGUE

Click on the image to download your copy of the 2024-25 annual catalogue. For a full list of current SU! supplies, go to my online store. If you would like any help or advice, please drop me a line at joanne@thecraftyowl.co.uk or give me a call on 07773 421446 - I'd be happy to help.

Join My Team

It's always a great time to join Stampin’ Up! New team members can get £130 worth of products for only £99 + free business supplies + free shipping + all the fun being a part of Stampin’ Up! Stampin' Up! has something for everyone: join my growing team and benefit from my support to enjoy Stampin' Up! however you choose.

If you're interested, call me for a chat to understand how I can help you realise your goals. Alternatively, if you have already decided to sign up and you just can't wait, please click here for the link to the online form where you can sign up and order your starter kit right away! 

About Me

Hi I'm Joanne and live in Northampton and when I'm not looking after my husband and two beautiful children, am an avid crafter with a passion for all things Stampin' Up!

I must confess that I have never been a big rubber stamper - until I discovered Stampin' Up! that is. I love the fact that I can get such great results with co-ordinating stamps, inks, papers and punches - the possibilities are endless! Join me on my stamping journey as I share the things I love and be inspired to create amazing things yourself!

Follow Me

Monthly Newsletter

Box Builder

Click the button above to use Box Buster to create your custom box design using the Envelope Punch Board!

Kits Collection Now Available!

Stampin Cut and Emboss

The new Kits Collection from Stampin' Up! is now available!

Click here to see the current kits available and order yours online today.

I Design For


Stampin' Up Stuff

This is my personal blog and is not endorsed by Stampin’ Up! I hope you find it a plentiful source of ideas and personal inspiration but please don't copy my designs for contest submission or use for classes, publication or sale without express permission.