Teenager Cards Made Easy with My Digital Studio

by Joanne James3. March 2015 15:00

Today I have something a little different for you! The current challenge over at SUO Challenges is 'Cards For Teens', sometimes a tricky group to create for. Most of the children's cards I create are for the under-10s so I wouldn't consider my self experienced in this field at all although having purchased an e-cutter recently and looking through My Digital Studio for inspiration, I discovered a stamp that is perfect for a birthday card for male teens that ultimately led me to make a few cards. Here's the first one:


Using Pacific Point as my base colour, I used the 'Extreme Skateboard' stamp image and converted it to a cut file which I then cut out of Basic Black cardstock using my e-cutter. Before adhering to my cardbase, I added some spatter and stripes in Memento Black ink and Encore Silver Metallic to create a grungy background. I also added a retired 'Awesome' stamp from the 'Cool Kid' set to this card.

For my second card, I used the negative space of the skateboarder to create a black card with a graduated rainbow sponged skateboarder behind and added some letters cut with my Little Letters thinlits to spell 'Cool' - something all teens think applies to them I think:

Finally, I used the cut skateboarder and adhered him to a sponged rainbow starburst background - I also stamped some black stars on top of this to add to the effect:

I love all of these cards, bit I think the bottom one is my favourite. It has an almost psychodelic feel. This is one of the projects that I submitted for the Convention Design Challenge in Brussels last November, although haven't shared until now. I gave the first card to my skateboard-mad 13 year old neighbour for his birthday and he pronounced it 'sick' - as I looked puzzled and slightly disappointed, he rushed to explain this was a good thing - apparently in teen-speak this is high praise! Clearly, what do I know!!!

If you struggle with teenage cards too, do check out the DT samples and the SUO gallery, where there's lots of teen inspiration.

Back tomorrow with a new set of Wednesday Weekly Deals and another project. Until then, happy stampin!


Stampin' Up! Supplies Used:

Table built using Product Table Builder by The Crafty Owl - Independent Stampin' Up! Demonstrator.


Today's Wednesday Weekly Deals

by Joanne James4. June 2014 10:01

It's Wednesday and that can only mean one thing - a new collection of Wednesday Weekly Deals! This week's deals are included below - they will be available for one week only, before a new collection of deals is announced.

As always, if you want to take advantage of any of the deals on offer, you can support my business by placing your order online by clicking here or using the link to my store on the right hand side of my blog page where it says 'Shop Online' or with me in person. Don't forget to add the Hostess Code for June (you can find this under the 'Shop Online' section on the right). 

Here's a summary of this week's one-week only Wednesday deals - click on each item to go to the online store to purchase:

Table built using Product Table Builder by The Crafty Owl - Independent Stampin' Up! Demonstrator.

This week there are lots of dies on special, so if you're a Big Shot owner this is a great time to make some savings whilst adding to your collection. Also some lovely pink ribbon and the Twitterpated DSP MDS download - this is such a pretty floral paper!

Back shortly with today's creative post; meanwhile, happy shopping!

Tags: , , , , , , , ,

Promotions | Shop Online

St Patrick's Day MDS Lucky Frameable

by Joanne James9. March 2014 22:18

Good evening blog readers! Well, what a lovely day - today it was so mild and warm it almost felt like summer! I used my washing line for the first time this year and had a lovely couple of hours out riding my bicycle with the rest of the James family this afternoon, then came home and finished carving my first set of Undefined stamps. More on that later in the week; today I have an entry for this week's Colour Q challenge, where this is the inspiration:

When I saw the colour scheme and clover leaf-type flowers, I immediately thought of St Patrick's Day; whilst not Irish myself (I'm not even wanting to admit my Welsh heritage following the Five Nations rugby results today!) this is the month when the Irish also celebrate their patron saint day, so having made daffodils for St David's Day last week, today it's the turn of the shamrock. I turned to My Digital Studio and created this Lucky Frameable, which could be used either on a card or framed as a piece of home décor:

I love these graphic frameables (here's one I did for my New year cards this year) - you can play around with them until you get the look you're after. The other bonus with using MDS for today's project is that I could use all of the suggested colours, including the retired Glorious Green.

Back tomorrow with another project; until then, happy stampin'!


Stampin' Up! Supplies Used:

Table built using Product Table Builder by The Crafty Owl - Independent Stampin' Up! Demonstrator.


Sale-A-Bration My Digital Studio Party Invitations

by Joanne James15. February 2014 21:50

I've had the busiest of days today, dominated by last minute preparations for the wedding fair I am exhibiting at tomorrow, so today I've just got time for a quick post to share with you something I made with another of the items you can receive free with a £45 spend during Sale-A-Bration.

There are two My Digital Studio digital ensembles available as part of this year's Sale-A-bration free gift offering - one of them is the 'Hooray for Parties' set, which includes some great designer templates for invitations, thank yous, treat holders and much more. Here's a party invitation I made with it using the basic layout:

This is a great package if you need to make lots of invitations or party bits and pieces and have limited time - you only need to design once, then can just print out as few or as many as you need. And it can be yours free with a spend of £45 or more during Sale-A-Bration before 31st March.

Another busy day ahead tomorrow; if you're local to me and a bride-to-be, do pop in to the Budget Bride Live Wedding Fair at Diana's in Wellingborough - I'll be there talking to brides about how they can make the wedding stationery of their dreams using Stampin' Up! products and I would love to see you too.

Back tomorrow with another project; until then, happy stampin'!


Stampin' Up! Supplies Used:

Table built using Product Table Builder by The Crafty Owl - Independent Stampin' Up! Demonstrator.


DIY Wedding Stationery - It's Easier Than You Think!

by Joanne James12. January 2014 19:56

Good evening lovely blog readers - I hope you have all enjoyed a lovely weekend. Mine seems to have revolved around cooking for a change, with more time in the kitchen trying out new things. I blame Gordon Ramsey - I caught the last few episodes of his recent home cooking series on Channel 4 and just had to buy the accompanying book. The whole family pored over it yesterday morning and are now in a race to work our way through the delicious recipes within! Coupled with the fact that I seem to have passed my recent ailments to my daughter, such that she couldn't manage her swim squad training today as usual, it has felt like a less frantic weekend than is usually the case in the James household.

Anyway, today I thought I would share something different with you: wedding stationery. I recently wrote an article for the Winter Edition of a local wedding magazine called 'Local Wedding Connections' on just how easy it is to create the wedding stationery of your dreams, at a fraction of the cost of purchasing ready-made. You can read my article in full here, but I wanted to share more of the samples I created for this shoot in my post today. So here is the entire collection: 
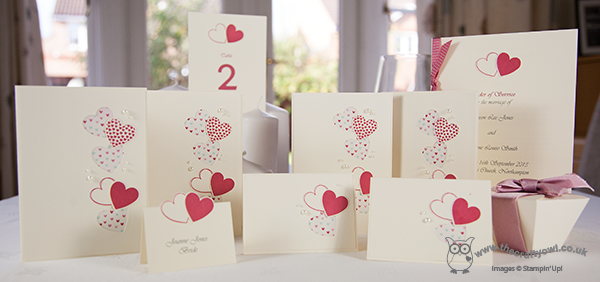
Creating your own wedding stationery can be not only cost-effective, but also means you can produce something that is unique and personal to you. I created the above range using the 'Hearts-A-Flutter' stamp set and matching framelits - here are some additional images that show some of the close-up design detail:

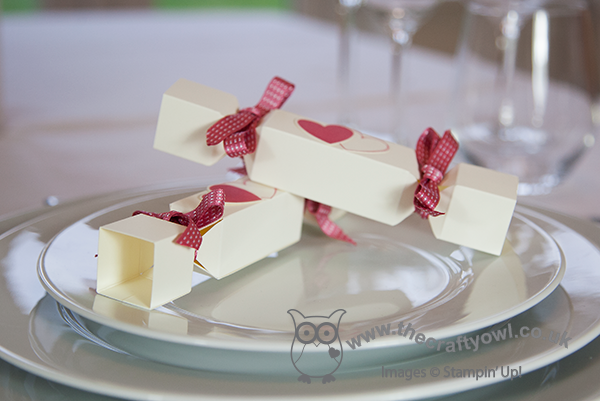
Wedding favour 'crackers' made using the Envelope Punch Board:
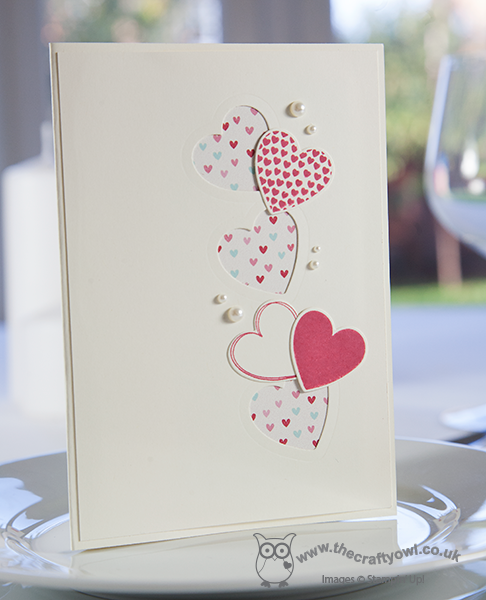
A dinner menu for the Reception dinner, where you can see the subtle layering of the design:
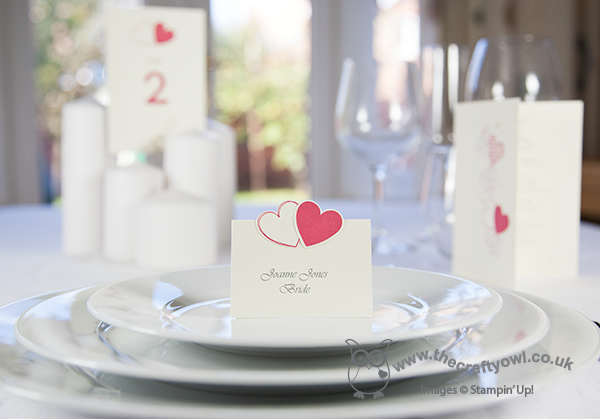
A place card, to denote the bride's place setting:
The inside of one of the 'Save The Date' cards:
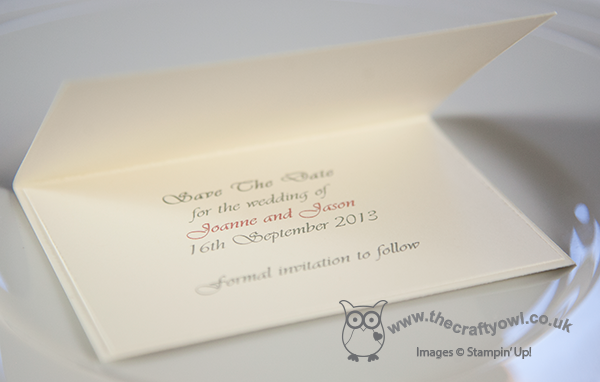
You can go to my own website, www.thecraftyowl.co.uk for more information on the services I provide. As customers of mine that have made their own stationery will attest, if you choose a simple yet elegant design it is easier to produce large volumes of perfectly co-ordinating stationery than you might think. Best of all, Stampin' Up!'s extensive range of co-ordinating inks, papers, ribbons, embellishments and cardstock, alongside an extensive range of stamp designs, mean that pretty much anything is possible. That said, if making your own wedding stationery really isn't for you, I also offer a bespoke 'make to order' service - just contact me to discuss your requirements.

Christmas time is popular for engagements and many people will be making wedding plans at this time of year, so if you know someone who fits the bill do share my details with them - I can make a huge chunk of their wedding preparations easier! In addition, point them in the direction of the Local Wedding Connections website at www.localweddingconnections.co.uk; it contains lots of useful information, supplier details and general useful bits and pieces for anyone in the market for a wedding.

Back tomorrow with another project; until then, happy stampin'!


Stampin' Up! Supplies Used:

Table built using Stampin' Up! Product Table Builder from The Crafty Owl.


Tags: , , , , , , , ,

Cards | Stamping | Weddings

My Digital Studio: This Week's Downloads

by Joanne James8. January 2014 11:10

A quick blog post just to share this week's My Digital Studio downloads; I have inadvertently not been bringing these to your attention in recent weeks, so thought today was a good day to put that right, not least as it gives a 'sneak peek' of one of the DSP designs and embellishment sets that will be featuring in the new Spring-Summer seasonal catalogue that is out on the 28th January.

I've included the links to each of the items in an enlarged table below - just click on the links to go to my online store to purchase. Or if you prefer to wait for the pre-printed versions, just another 20 days to go!

Table built using Stampin' Up! Product Table Builder from The Crafty Owl.


Back later with today's creative post; until then, happy stampin'!

Tags: , , , , ,

My Digital Studio | Shop Online

Happy New Year - Welcome 2014 MDS Hybrid Card

by Joanne James2. January 2014 22:01

As promised, I managed to get some photographs taken today and wanted to share with you a variation on yesterday's MDS card that you can see here. This is a larger card, A5 size, and something of an MDS hybrid: I printed the same panel for the central section, but also created a larger panel using another of the stamps in the set which I repeated and inverted to create an outer border panel, then mounted both layers on Midnight Muse cardstock:

I really like the addition of the layering and the border image - it reminded me of fireworks! - and gives a different look to the card I think. The interior panel was the same as the one I created for yesterday's card.

Hope you like today's variation. Back tomorrow with a card using one of my absolute favourite new stamps - the Flowerfull Heart that's available this month as part of the 'Whole lot of Love' promotion (details on the right hand side of my blog). Until then, happy stampin'!


Stampin' Up! Supplies Used:

Table built using Stampin' Up! Product Table Builder from The Crafty Owl.


Tags: , , , , , , , ,

Cards | My Digital Studio | Shop Online

Happy New Year - Welcome 2014!

by Joanne James1. January 2014 19:55

Happy New Year to you all! I hope you've all had a lovely day recovering from the excesses of last night or simply enjoying what is traditionally the last day of the holiday season today. I've spent mine having a family day with the extended James clan, generally enjoying good food and catching up before we all start back to work tomorrow.

Today I have another My Digital Studio project to share with you; this is a Happy New Year card that I made using the Midnight Cheer download. Having hunted through my stamp sets, I didn't have anything that was really appropriate for New Year, so decided to browse through MDS and I found this download, which I love. I stuck with the suggested colours of Midnight Muse, Summer Starfruit and Sahara Sand and created the basic layout. Here's the front of the card:


I created a really simple greeting for the inside using other stamps in the set - here it is:

I also created an A5 hybrid version of this card using additional layers and mounted on Midnight Muse, but I haven't managed to photograph it yet. Hopefully I will have another round of photographing tomorrow, so I should be able to come back and update this post with the additional photograph then. I can see me using this set in future years too, ringing the changes with an alternative colourway and also using it to create party invitations and a piece of frameable home décor. I love the flexibility that MDS gives in this regard.

That's me done for today; back tomorrow with some exciting new projects to share. Until then, happy stampin'!


Stampin' Up! Supplies Used:

Table built using Stampin' Up! Product Table Builder from The Crafty Owl.


Tags: , , , , , , , ,

Cards | My Digital Studio | Shop Online

Happy New Year - A Crafty Owl Year End Review

by Joanne James30. December 2013 22:41

Good evening blog readers! I have spent a lovely day crafting today and putting together lots of lovely things using the current 'Whole Lot of Love' promotion products and items from the forthcoming Sale-A-Bration celebration, but today I wanted to share with you a New Year card that I created in MDS using the Year End Review infographic digital download. This set is great for creating a family Christmas card that shares important news and milestones over the year along with some fun festive facts however since I am approaching the first anniversary of the start of my blog I thought it would be a great way to take stock of everything I've achieved this year and record some of the Crafty Owl's milestones.

So here is the image that forms the basis of my card:

I'm still getting the hang of MDS and don't profess to be an expert, but it's a great way to create things that you could possibly stamp and this card is a good example of that. If you're a new MDS user or would just like to know more about what MDS has to offer, I am considering running small face-to-face classes to develop your use and understanding further in 2014 - if you live in Northampton or the surrounding area and this is something that interests you, please do contact me at joanne@thecraftyowl.co.uk for more details.

For the above project, I used lots of the elements within the Year End Review download, some of which I modified to suit my theme, along with one or two others in place of the seasonal embellishments that were more Christmas-themed. I hope you enjoy reading the fun facts I've included about my Stampin' Up! journey this year - thanks to all of you my blog readers, customers, Product Table Builder users and my wonderful downline and wider extended team members for all of your support and encouragement this year - here's to an equally successful 2014!

Back tomorrow with another project; in the meantime, happy stampin'!


Stampin' Up! Supplies Used:

Table built using Stampin' Up! Product Table Builder from The Crafty Owl.


Tags: , , , , , , , ,

Cards | My Digital Studio | Shop Online

My Digital Studio Keyrings and Downloads

by Joanne James3. December 2013 12:30

Today I have a quick post with the last of my Convention-related makes to share with you. One of the things we have to do for Convention is make a bag tag featuring our names. Why? Well, we are each given a Convention rucksack full of goodies and everything we will need to get us through the event. The rucksacks are great, but there's only one problem - they're all the same! So it's really important that we have a name tag that enables us to identify our bags, and each other, in the crowd. I made bag tags for each of the team members travelling with me that featured our team logo - The Crafty Owl:

Cute, eh?! I made these by printing onto shrink plastic at 250% of finished size, then cut out the shapes, punched a hole for the keyring and shrunk them in the oven. I was so pleased with the result, I made a few more for some of my good friends and members of my wider Stampin' Up! team, this time using My Digital Studio (my logo was created using alternative software when UK demos didn't have access to MDS). I used the butterfly stamp that comes as part of the Creative Elements stamp set, and coloured the sections individually using the brush tool, using various shades of greens and turquoise - here are a couple of them:

What do you think? These bag tags are really eye-catching and certainly helped my team stand out from the crowd - my friends loved theirs too, especially Michelle whose team is a called the Butterfly Belles - how appropriate! I just thought I would share to show how versatile MDS can be - it's not just for cards!

The MDS shop links are included below if you don't already have it; Creative Elements is part of the standard software version so there is no product link for this, however as today is Digital Downloads Weekly Release Day I've also included the links to all of this week's new MDS downloads - some lovely festive sets here.

Right, off to attend my son's Christingle service at school; I'm hoping for a nice photo or two for my December photo journal (another MDS project that I'll be sharing with you another day!) Back tomorrow with another project - I'm thinking we might need to get back to Christmas, it is the 3rd December after all! Until then, happy stampin'!


Stampin' Up! Supplies Used:

Table built using Stampin' Up! Product Table Builder from The Crafty Owl.


New Online Exclusives

There are new products available exclusively in the online store from 5 November - check them out here.

Latest Kits!

Stampin Cut and Emboss

The Layered Landscapes Kit and Nature's Paintings Kit are the latest kits in the online store - get yours here!

Shop Online

Access my online shop 24 x 7, 365 days of the year:

Current November hostess code:

9NKXDTTR

Shop Online

Mini Catalogue

BROWSE THE CATALOGUE

'Tis The Season - the new Stampin' Up! Mini Catalogue is here! For more details and to download your copy click here

Scrapbooking

Stampin' Up! has introduced a new range of 12x12" scrapbooking product and kit - the full range is now available to purchase online. To download a copy of the new digital Scrapbooking Catalogue click here.

2024-25 Annual Catalogue

BROWSE THE CATALOGUE

Click on the image to download your copy of the 2024-25 annual catalogue. For a full list of current SU! supplies, go to my online store. If you would like any help or advice, please drop me a line at joanne@thecraftyowl.co.uk or give me a call on 07773 421446 - I'd be happy to help.

Join My Team

It's always a great time to join Stampin’ Up! New team members can get £130 worth of products for only £99 + free business supplies + free shipping + all the fun being a part of Stampin’ Up! Stampin' Up! has something for everyone: join my growing team and benefit from my support to enjoy Stampin' Up! however you choose.

If you're interested, call me for a chat to understand how I can help you realise your goals. Alternatively, if you have already decided to sign up and you just can't wait, please click here for the link to the online form where you can sign up and order your starter kit right away! 

About Me

Hi I'm Joanne and live in Northampton and when I'm not looking after my husband and two beautiful children, am an avid crafter with a passion for all things Stampin' Up!

I must confess that I have never been a big rubber stamper - until I discovered Stampin' Up! that is. I love the fact that I can get such great results with co-ordinating stamps, inks, papers and punches - the possibilities are endless! Join me on my stamping journey as I share the things I love and be inspired to create amazing things yourself!

Follow Me

Monthly Newsletter

Box Builder

Click the button above to use Box Buster to create your custom box design using the Envelope Punch Board!

Kits Collection Now Available!

Stampin Cut and Emboss

The new Kits Collection from Stampin' Up! is now available!

Click here to see the current kits available and order yours online today.

I Design For


Stampin' Up Stuff

This is my personal blog and is not endorsed by Stampin’ Up! I hope you find it a plentiful source of ideas and personal inspiration but please don't copy my designs for contest submission or use for classes, publication or sale without express permission.