New Wreath of Blooms Home Decor Kit Now Available

by Joanne James3. February 2023 13:15

Get ready for the latest addition to the Kits Collection by Stampin’ Up! The Wreath of Blooms Kit gives you everything you need to make your own home decor piece and it's now available in the online store. Roll and shape the pre-cut pieces and put your wreath on display!


This kit includes:

  • One 8" (20.3 cm) diameter chipboard wreath.
  • Pre-cut paper pieces that can be rolled and shaped into three-dimensional blossoms.
  • Multicoloured brads to keep everything together.
  • Thick twine to hang your wreath.
  • Enough adhesive* to complete the project.
  • Coordinating colours: Cajun Craze, Calypso Coral, Crumb Cake, Garden Green, Night of Navy, Pear Pizzazz, Petal Pink, So Saffron, white.

*Please note that you will need a hot glue gun for this project, which is not included in the kit.

If you would like to see this kit in more detail, please check out the video below:

This is such a beautiful kit - and would you believe, only £13 - this is an absolute bargain for a home decor kit! No excuse to not add a touch of Spring colour to your home and enjoy a little creativity in the process! 

Get yours in my online store today - just click on the link below:

Table built using Product Table Builder by The Crafty Owl - Independent Stampin' Up! Demonstrator.
 
This kit would also be a great little project for a crafty get-together with friends too; if you would like to arrange one, do get in touch!

Tree Lot Dies Christmas Home Decor And Festive Table Favour AYSI 280

by Joanne James29. July 2022 12:00

Today I'm sharing my design team card for our new challenge over at As you See It where it's time for a festive 'fill in the blank' challenge:


Today we are all about Christmas in July. I do like to get a start on Christmas cards at this time of year, but when it come to my favourite Christmas in July creation it has to be home decor and table favours; these always take longer to make than you think they will and in the busy run up to Christmas there is rarely time to devote large chunks of time to crafting, so I like to get a good headstart on these kinds of projects - it makes me feel organised! I have two projects for you today - a piece of home decor and a co-ordinating table favour. Both use the Tree Lot Dies, available free with a £90 purchase during the current Sale-A-Bration promotion - and I took the inspiration for my festive caravan and 'trees for sale' scene from the top right photo over at Hand Stamped Sentiments - what a great inspo board! First up - here's my home decoration piece:


Here's the low-down on today's projects:

I used a dome that I had in my office that I bought last year that was just waiting to be made into something, and built my little scene onto the base, having first covered the base with snowy white velvet paper (cut with a retired layering circles die). The string of lights, embellished with the pretty Festive Pearls, the trees and the 'trees for sale' sign are all one dimensional and stand with the aid of small supports behind them. The caravan is made by diecutting two of the diecut caravan pieces and adding a base (described in more detail with the table favour below) and a second curved piece of cardstock for the roof (the roof piece measures 3 1/2" x 1 1/2", scored at 1/2" on each side and 1/4" on each side respectively). I added some red ribbon to the top of my dome and red glimmer to the base of my dome for extra festive feel. Here's a close up of my little scene, with the dome removed so that you can see the detail more easily:


My finished dome measures 11cm wide by 19cm tall and that's not all - it lights up too! 


A little tricky to see since I photographed it in daylight, but a nice feature to give a cosy night time glow. In addition to my decoration, which could be used as a table centrepiece, I also created the first of a set of table favours made from the caravan die. These are quite easy to make: just cut two caravan sides, then take a piece of cardstock measuring 4 1/8" x 1 1/2", scored at 1" on each side and 1/4/" on each side respectively, to create the open box shape. They are just big enough to hold two Lindor chocolates or similar:

How cute is that?! Both of today's projects are quite easy to make, but I won't lie - there is a time-consuming element, since all of the little pieces need to be cut and glued in place. Worth it though I think - and if you start now, you will have them finished and ready to go when Christmas rolls around!

The key products used on today's project are included in the table below - no visual today. 

Here's a summary of our challenge rules:

  • Create any card, scrapbooking page, 3D project or packaging project that fits the challenge.
  • Please include the challenge graphic and link back to the challenge in your blog post. Turn off word verification so we can leave you lots of lovely comments. Make sure you link the post not the whole blog to the Linky. Use #AYSIXXX when uploading to a public gallery.
  • If you’re unsure about ‘the rules’, check the details under the Challenge Guidelines tab on the As You See It Challenge homepage.
  • In a Fill in the Blank challenge, complete the sentence in the Challenge Banner with the phrase that is true for you and create your project using the words you used. Tell us what you said in your blog or on your site.
How will you fill in the blank? What are your favourite Christmas In July projects to create? We look forward to seeing your creations in the AYSI gallery.

Enjoy your day and I'll be back tomorrow with another project. Until then, happy stampin'!


Stampin' Up! Supplies Used:

Table built using Product Table Builder by The Crafty Owl - Independent Stampin' Up! Demonstrator.

Stampin' Up! Colour Collection Lined Alphabet Framed Home Decor Sampler

by Joanne James31. May 2018 11:00

Today is the last day for lots of things - you can read all about those in my earlier post here - but for today's creative post I'm sharing a piece of framed home decor that I made recently for a recent event and my upcoming new catalogue launch to illustrate to my customers the new Stampin' Up! colour collections following the colour revamp, whilst also highlighting both current sets of in-colours. 

I wanted something that would serve as a conversation-starter for questions and enable comparison of the new colour families so decided to take the opportunity to highlight one of my favourite bundles from the new catalogue, the Lined Alphabet bundle, to create a colour-themed piece of home decor - take a look:


This is a rather large framed piece, measuring a whopping 17 1/2" x 17 1/2" square (or 45cm x 45cm), so I've photographed it quite tightly so that you can see the detail. You might recognise the quotation - it is attributed to the Russian artist Wassily Kandinsky, famed for painting the first works of modern abstract art in the 20th century. In defining life, painting and the psychological impact of colour, he is quoted as saying:

"Colour is a power which directly influences the soul. Colour is the keyboard, the eyes are the hammer, the soul is the strings. The artist is the hand that plays, touching one key or another, to cause vibrations in the soul" (V. The psychological working of Colour: Quoted in: Hajo Düchting (2000) Wassily Kandinsky, 1866-1944: A Revolution in Painting. p. 17). 

This seemed perfectly suitable for my interpretation of the Stampin' Up! colours. All 53 colours feature: the new 2018-20 In-colours feature first (I repeated the Lovely Lipstick and Grapefruit Grove colours as I needed 6 colours for this word and a seventh panel to give me the symmetry for my overall design, but otherwise all colours feature just once). You can see each of the families in sequence, highlighted below - a little messy to label to be fair, as two of the colour families span more than one horizontal line, but hopefully you can make them all out:


This is then complimented by the three basics of Whisper White, Very Vanilla and Basic Black to make up the background.

What do you think of the new Lined Alphabet and the co-ordinating Layering Alphabet Edgelit Dies? I love them! Rest assured, these are an investment item and I will be getting my money's worth out of them so you will see lots more projects using them in the coming months for sure. They are really easy to use - I actually cut the letters first then stamped afterwards, but you could do the other way around which is the more conventional approach I guess. I like the subtle line detail that stamping the diecut letter adds for just that little bit of extra definition and the marker lines on the dies make it easy to get the words lined up. This is just one of the ways that I will be sharing the new colours with my customers - along with colour swatches, guides and the new in-color bookmarks that I sent out with my catalogues too.

I will be having a couple of new catalogue drop-in sessions next week for anyone who is local to me and would like to have a look at my new product displays including this frame in more detail, pick up their new catalogue, shop my 'buy one, get one free' stash of retired stock and more. These drop-ins will be on Wednesday 6th June 10am-12 noon and then again on Thursday evening 7th June from 6-8pm - please get in touch and let me know if you would like to attend either via email or my Facebook page.

Enjoy your day and I'll be back tomorrow with news of the new catalogue. Until then, happy stampin'!


Stampin' Up! Supplies Used: 

Table built using Product Table Builder by The Crafty Owl - Independent Stampin' Up! Demonstrator.

Petals And Paisleys 3D Home Decor Wall Art - FREE PDF Tutorlal

by Joanne James26. April 2017 20:13

Today I'm sharing a project that I made in an all-day class last November, but didn't share at the time on my blog. Do you remember the 3D home decor piece featuring the Paisleys and Posies stamp set and co-ordinating Paisleys Framelits that featured on page 46 of the Autumn-Winter seasonal catalogue? Here's a reminder:


I thought this was a lovely and unusual piece of wall art, so decided to use it as the basis for an all-day class where the ladies attending would each make their own version of this project and also stamp a stack of cards using the remaining papers in the Petals & Paisleys Specialty Designer Series Paper pack, which they each received in their kits.

Here's my finished framed piece - I originally framed it in white, but have since had it professionally framed in a beautiful copper-coloured wood frame similar to the one in the catalogue, which has much greater impact:


I like this piece so much it is now hanging on the wall in my dining room. The photo above really doesn't do it justice - just look at the lovely shine on the foil and embossed copper against the navy: 


So very pretty! The finished piece measures 12" x 12" unmounted and unframed. The Petals and Posies stamp set and co-ordinating Paisleys Framelits were carried over and are still available, however the paper was discontinued. Good news though: I decided to share this project today because those lovely Petals and Paisleys Specialty Designer Series Papers are now available again on the Clearance Rack for only £4.70 per pack - bargain!

I ALSO HAVE A SPECIAL OFFER FOR YOU - A FREE PDF TUTORIAL!

For everyone who purchases the Petals and Paisleys Specialty Designer Series Papers on the Clearance Rack along with the Petals and Posies stamp set and co-ordinating Paisleys Framelits from me through my online store before the end of this month (Sunday 30th April) using the current hostess code Y2MKPTP6, I will send you a copy of my PDF tutorial for the above home decor wall art project, containing full written and photo step-by-step instructions FOR FREE, so that you can recreate it too! Instructions will be emailed separately following purchase - please ensure you include your email address and check the box that allows you to be contacted by me as your demonstrator following your purchase to send them on to you.


The links below will take you to my online store to enable you to purchase all of the supplies you need. I'll be back tomorrow with another project and more Stampin' Up! news. Until then, happy stampin'!


Stampin' Up! Supplies Used:

Table built using Product Table Builder by The Crafty Owl - Independent Stampin' Up! Demonstrator.

Forever Evergreen Christmas Tree Home Decor Wall Art - Free Tutorial

by Joanne James26. November 2016 16:08

Another week over! Mine has been a busy one, with two full days of classes, Christmas preparations and not a minute to spare, hence the lack of blog posts. So I hope you have all been making the most of this week's Online Extravaganza; I know that Monday's flash sale was popular with my customers and I am already receiving orders for the second one, to take place next Monday.

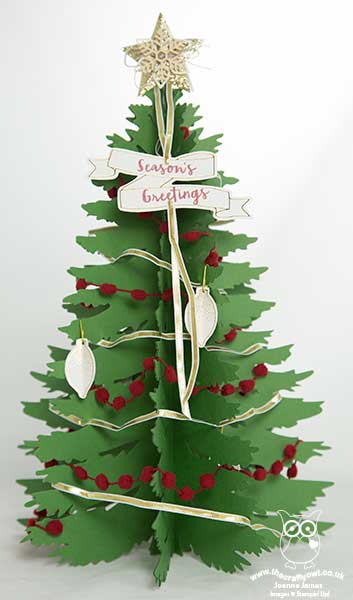
Today I have another 3D home decor project for you and it uses items from the Forever Evergreen Project Kit on page 35 of the seasonal catalogue - one of the products that is available at a 10% discount during this week's sale and the co-ordinating Forever Evergreen stamp set is also available at a 20% discount. This project is a CASE of one that was included in our Demonstrator-only quarterly magazine and it's a great way to get more mileage from the stamp set if you've invested in it to complete your trees and use up lots of leftover bits and pieces from the kit. Here's a reminder of what those fabulous Christmas trees look like (you can read my previous blog post on those here):
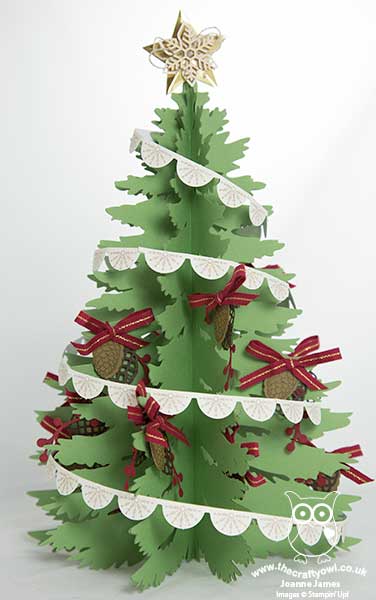
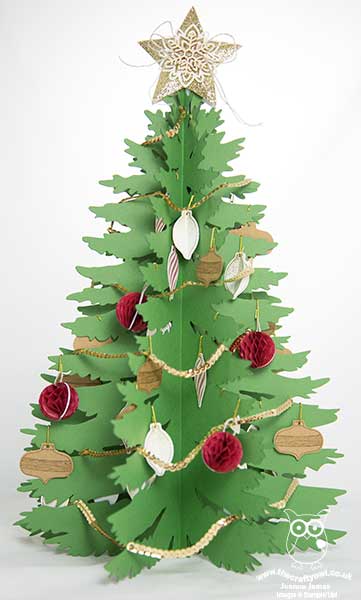
       

Using one of the tree sections, some leftover sequins, card and by adding a few other supplies, I created this lovely piece of wall art:
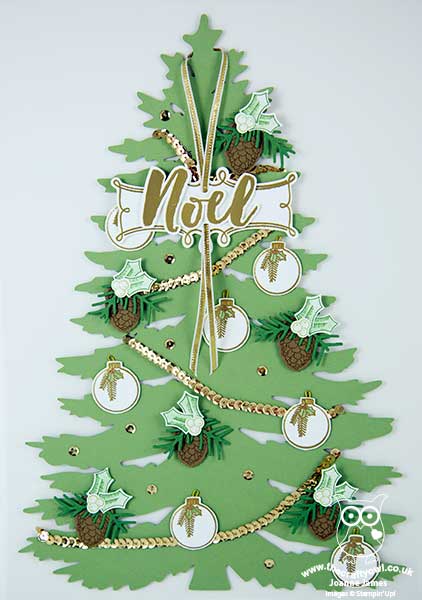
 

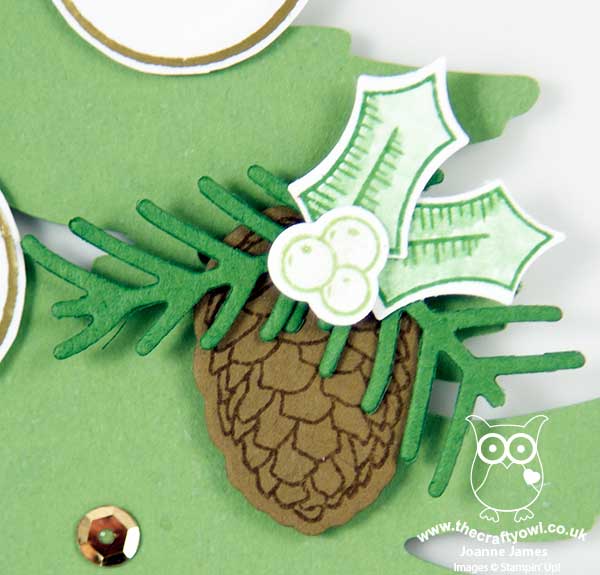
It's shown here without its frame as it was easier to photograph and has some lovely detail. Here's a close up of the white holly berries (liberally coated in clear Wink of Stella for a wonderful sparkle) with the pinecone embellishment:
 

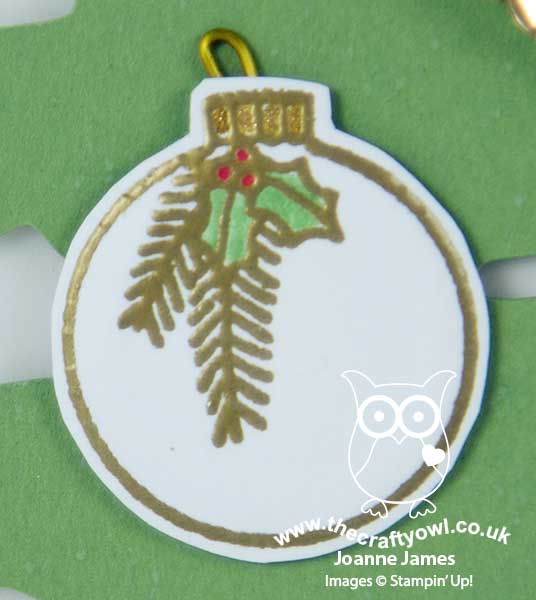
There are also a number of paper-toled gold heat embossed ornaments:
 

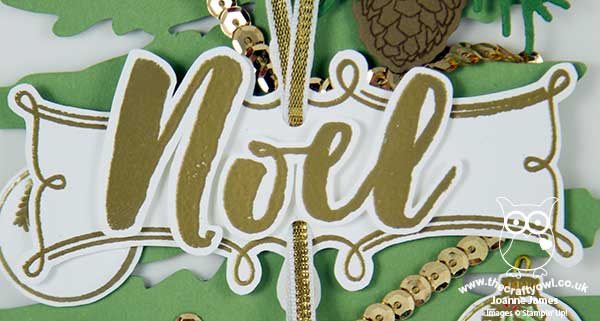
Lastly, check out the Noel sentiment from the Christmas Pines set (this could be substituted with one of those in the Forever Evergreen set) - stamped in Versamark and heat embossed in gold, then fussy cut, layered and finished with gold ribbon:
 

Making cards or additional home decor projects such as this one is a great way to extend the usefulness of both the kit and co-ordinating stamp set.

Now for the good news! Would you like to make this project? Every customer who purchases a Forever Evergreen Project Kit and a co-ordinating Forever Evergreen stamp set from me either in person or through my online store will receive a written tutorial from me FOR FREE with complete instructions on how to make the above piece of Christmas Tree Home Decor Wall Art, along with an extra piece of green tree so that you don't have to use one from your kit. Isn't that just something?!

This offer will last until the end of the current seasonal catalogue, but since both the kit and stamp set have 10% and 20% respectively off before 10.50pm GMT on Monday (28th November 2016) and are now available only while stock lasts, I wouldn't leave it too long before placing your order if this is an offer that you would like to take advantage of. Tutorials will be sent separately by me directly to you once your order has been shipped - please note if you are ordering online you will need to ensure you have not ticked the 'no contact' box in order for me to be able to access your details.

Here is the visual summary of the key products used on today's project for you to pin for easy reference:
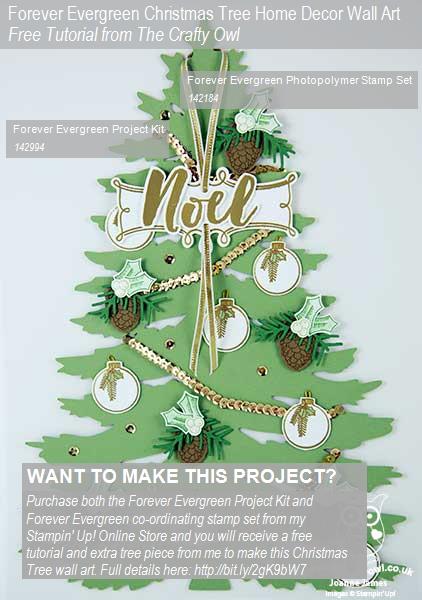
You can see all of my 'How To' summaries on my 'How To - Tips and Techniques' Pinterest board in case you've missed any. 

Right I'm off to a swimming gala (helping not participating of course!); I'll be back tomorrow with a card (or two!) for this week's new challenge from the lovely Sandy over at The Paper Players. Until then, happy stampin'!


Stampin' Up! Supplies Used:

Table built using Product Table Builder by The Crafty Owl - Independent Stampin' Up! Demonstrator.

Christmas Cheer With Project Life Seasonal Snapshot 2015

by Joanne James2. December 2015 11:46

It's Wednesday already? The week is zipping by! I'm sure that time moves quicker the nearer to Christmas we get! I have a great festive monochromatic Christmas card for you today: big on layers, easy to recreate - just what we like at this time of year! I made today's card with a couple of challenges in mind:

    CYCI#97

The sketch over at CAS(E) This Sketch this week is a classic and I just love the inspiration photo at CanYouCaseIt - so much shine! I took my inspiration from the red and white elements and the shiny foil which I incorporated into the border frame for my card:

Isn't that striped Holiday vellum just gorgeous? I matted it on a piece of Whisper White cardstock before adhering to my Real Red base so that the red foil stripes would really stand out. For the focal point of my card, I used the sentiment from the 'Cheer All Year' stamp set - so versatile - and my little hot cocoa mugs are from the 'Project Life Hello December 2015' stamp set - another one of those sets that is useful for so much more than its designed purpose.

Are any of you out there joining in with the #decemberdaily project? I love to create a Project Life mini-album each December documenting the goings on in the James household during the festive season, so the above stamp set was a must for me to decorate this year's journalling, along with the Hello December 2015 Project Life Card Collection and Accessory Kit:

I'm mindful that I don't often share my Project Life documenting here on my blog - I just tend to get on with it! - but I'm trying to consciously change that, so throughout December I will be sharing some of the inspiration for my daily journalling and occasionally some of my completed pages in the hope that they will inspire you to get involved in active memory keeping too. Yesterday's page will feature the arrival of our Christmas Elf Charlie, who often gets up to mischief in the run up to Christmas and yesterday appeared with a fun piece of home decor I made to remind the James Juniors that good behaviour is important more now than ever since the elf will be reporting back to Santa on everything he sees and hears:

Isn't that fun? Surprisingly easy to create with the help of my e-cutter and some Stampin' Up! cardstock. Here's a picture of Charlie as he made his first appearance of the year:

This morning Ben was out of bed, up and dressed in record time and off on the hunt for Charlie to see what mischief he had got up to overnight; he eventually found him hiding in the basil pot amongst the herbs on the kitchen windowsill. Here's to more mayhem as the month progresses!

If you would like to join me in documenting your December, it's not too late to order the supplies to create your own album; just click on the links below to go to the online store or give me a call and I would be happy to place an order for you. More tips and Project Life #decemberdaily inspiration to come! Equally, if you would like to share your own #decemberdaily memories, feel free to upload them to my Facebook page here - I would love to feature them.

That's all from me today; I'll be back tomorrow with a festive card for this week's new challenge over at Create With Connie and Mary. until then, happy stampin'!


Stampin' Up! Supplies Used:

Table built using Product Table Builder by The Crafty Owl - Independent Stampin' Up! Demonstrator.


Project Life #dailydecember Stampin' Up! Supplies Used:

Table built using Product Table Builder by The Crafty Owl - Independent Stampin' Up! Demonstrator.


Witching Decor Project Kit - Halloween Witches Hat

by Joanne James5. October 2015 21:39

So today I thought we would have a change from cards and I would share with you the 3D project that I made on World Card Making Day. I know, topsy turvy, but since crafting with friends is in itself something to be celebrated, it seemed a great way to spend the day. So the project in question is the Witching Decor Project Kit in the seasonal catalogue. Normally this isn't the kind of project I would make, however the female James junior of the house, Rebecca, absolutely loved it and wore me down until I promised to buy it for her to create! 

So she invited her friend and fellow crafting enthusiast Nicholas over for the afternoon and we spent a pleasant few hours putting our respective hats together. Here is Rebecca's finished hat in all its glory:

Now if you've seen the photo in the catalogue, you will see a few differences between this one and that one. the first is the shape: the one in the catalogue looks crumpled and 'worn in' (a little like the sorting hat in the Harry Potter stories!). The trouble was, once put together Rebecca decided she wanted hers to have a perfect point, so since she still managed to tie on her bell and have it tinkle, she couldn't bring herself to crumple the end! It must be a girl thing - Nicholas had no such issues and his had a wonderfully worn in appearance! 

You might also notice the rather enthusiastically sponged edging to the 'Happy Halloween' label; the kit recommends using Soft Suede for a 'worn' look, yet having made one like this the children universally agreed that this didn't work for them at all and orange was most definitely needed! So we made another label - there are enough labels for 3 each of the stamp designs, in fact the whole kit is very generous in its contents; we made interchangeable labels and still had labels, flags, rhinestones and lots of leaves left over. All for just £20 and the co-ordinating 'Witches' Night' stamp set. I have a class scheduled to make this kit on 13th October - it would also make a great project for a girls' night in. I have a few calendar slots left in October so if this is something that interests you, please get in touch.

The leaves that are threaded around the edge of the hat are all pre-punched and can be used just as they are, as the children did on their hats (they just wanted to get them threaded and had no time for extra sponging!). They could also be sponged and distressed to add more texture and colour, or even stamped with the Vintage Leaves set to add more detail. 

We were so absorbed in our task, I didn't even take a photograph of us at work to share with you. Suffice to say, the children had a great time and I am loving the addition of the hat to our Halloween home decor. 

This is a great kit and very easy to construct - you might say child's play! It would be a great kit to make with children as part of the build up to your 'trick or treat' festivities. 

That's all from me today - back tomorrow with another project and some exciting children's news too! Until then, happy stampin'!


Stampin' Up! Supplies used:

Table built using Product Table Builder by The Crafty Owl - Independent Stampin' Up! Demonstrator.


Star Framelits 3D Wall Art

by Joanne James10. July 2014 22:01

Another busy day for me today - for those who follow me on Facebook, you will have seen photographs of a class I ran a few weeks ago with a super bunch of ladies making 3D wall art using folded hearts so that they would each have a unique gift for their little girls. Well it just so happens that the same group of ladies also each have one or more sons, so in order that they wouldn't feel left out they wanted to make a similar project with boys in mind. Never one to resist a challenge, I already had an idea in mind using the new Stars Framelits - here it is:

Using a combination of the two smallest star framelits and the mini star punch from the new Itty Bitty punches pack, I cut lots of stars and then having scored them down the middle, adhered them to each other on one half in groups of three and arranged them in a star shape. This close-up shot gives a better explanation of this:

I used a combination of Pacific Point, Pumpkin Pie and Real Red patterned papers from the Brights Designer Paper Stack for my wall art as these colours will look great in Ben's Lego-inspired bedroom, however the ladies in my class used different colour combinations and even created some stunning monochrome designs. The dimensional stars really make this wall art stand out, especially in bold, bright colours. The wall art made in the class will be on my Facebook page in the morning if you would like to pop over and take a look, when I will also be updating the product links for today's post. If you live local to me in Northampton or the surrounding area and you would like to attend a class to make one of these lovely frames, then do get in touch.

This really is a quick post from me as I have a few more jobs to do before I turn in for the night, having been running a class today, sorting my school and after-school club runs and then a pleasant (if brief!) couple of hours with some of my lovely team this evening for one of our regular catch up sessions.

Back tomorrow with another project; until then, happy stampin'!


Stampin' Up Supplies Used:


Tags: , , , , , , , , ,

3D Projects | Classes

Spring Banner Class

by Joanne James23. March 2014 18:16

This morning I held one of my weekend project classes. They generally last longer than my monthly card classes and are a great opportunity to do something different and a little more involved. Following a successful class last December to make festive Christmas banners (you can read more about that and see our wonderful creations here), at the request of a few of the ladies who attended I decided to hold one to make a Spring/Easter banner with the other half of our banner kits. I chose a colour scheme that would compliment that of the Burlaps and Blooms wreaths that several of us made at my last weekend project class - you can see my finished wreath here. So here is my completed banner:

I chose to feature the word 'Spring' on my banner, as I am intending to leave it up to decorate for a while, but some of the ladies in my class made one that featured the word 'Easter'. We stencilled our backgrounds and letters using the now retired Build a Banner stencil kit in Daffodil Delight, Tangerine Tango and Pool Party with lettering in Smoky Slate.

The banner is decorated with flowers made with the Spiral Flower Originals Die and punched and die-cut butterflies. Here are some close ups of the individual banner pieces - this is the first piece, with a layered butterfly with a lightly embossed layer and some tiny ones punched out with the Itty Bitty Butterfly punch: 

Here's a close-up of one of the letters, along with a couple of the spiral flowers; a single yellow flower and a two-tone blue flower, finished with some Smoky Slate leaves cut out with the Secret Garden framelits:

This one has a So Saffron single flower and a two-tone one in Tangerine Tango and Crisp Cantaloupe, finished with an extra-large pearl, along with a bitty blue butterfly:

My banner simply served as inspiration and as is often the way with this kind of class, everyone makes theirs slightly differently and adds their own unique touch. If you hop on over to my Facebook page, you will be able to see the finished banner that Julie, one of the lovely ladies who attended the class made - different to mine, yet equally gorgeous!

If you live in Northampton and would like to join any of my card or project classes, check out my schedule of forthcoming classes here or contact me for more information.

Back tomorrow with a card to share; until then, happy stampin'!


Stampin' Up! Supplies Used:

Table built using Product Table Builder by The Crafty Owl - Independent Stampin' Up! Demonstrator.


Rainbow Butterfly Wall Art

by Joanne James29. December 2013 13:00

As you will have guessed if you read yesterday's post and saw my 'sneak peek', today's post features butterflies - quite a few, in fact! Ever since I saw this piece of wall art by Fiona Duthie on Pinterest I've wanted to have a go at creating a version of my own. Butterflies have a special meaning to one of my best and most dear friends and she is also someone who loves home décor, so I decided to create this piece as a Christmas gift for her. Here's my finished piece:

The finished piece measures 50cm x 50cm (approx. 20") so is a definite statement piece. I used a variety of colours across each of the Stampin' Up! colour families, including in-colours, along with one or two retired colours too. I wanted to give a full rainbow spectrum of colours, particularly given the size of the piece.

For the butterflies, I used the Beautiful Wings Embosslits to make the butterflies as opposed to a punch, as I wanted the texture that the embosslit provides - here's a closer look:

You could quite easily create a similar piece using one of the butterfly punches and it would be equally effective. I'm so pleased with the finished piece - it was quite tricky to photograph, but I hope you can get a sense of the movement it gives - it is so colourful and dramatic. 

This is a nice early post from me today as I'm out with friends this evening on a cookery course, in an attempt to master the art of Indian cookery; it's the second one that hubby and I have attended (I'd like to say it's because we want to expand our repertoire, but it might just be that we need the practice - I'll have to get back to you on that!)

Back tomorrow with another project; until then, happy stampin'!


Stampin' Up! Supplies Used:

Table built using Stampin' Up! Product Table Builder from The Crafty Owl.


Tags: , , , , , , , ,

3D Projects | Punch Art

New Online Exclusives

There are new products available exclusively in the online store from 5 November - check them out here.

Latest Kits!

Stampin Cut and Emboss

The Layered Landscapes Kit and Nature's Paintings Kit are the latest kits in the online store - get yours here!

Shop Online

Access my online shop 24 x 7, 365 days of the year:

Current November hostess code:

9NKXDTTR

Shop Online

Mini Catalogue

BROWSE THE CATALOGUE

'Tis The Season - the new Stampin' Up! Mini Catalogue is here! For more details and to download your copy click here

Scrapbooking

Stampin' Up! has introduced a new range of 12x12" scrapbooking product and kit - the full range is now available to purchase online. To download a copy of the new digital Scrapbooking Catalogue click here.

2024-25 Annual Catalogue

BROWSE THE CATALOGUE

Click on the image to download your copy of the 2024-25 annual catalogue. For a full list of current SU! supplies, go to my online store. If you would like any help or advice, please drop me a line at joanne@thecraftyowl.co.uk or give me a call on 07773 421446 - I'd be happy to help.

Join My Team

It's always a great time to join Stampin’ Up! New team members can get £130 worth of products for only £99 + free business supplies + free shipping + all the fun being a part of Stampin’ Up! Stampin' Up! has something for everyone: join my growing team and benefit from my support to enjoy Stampin' Up! however you choose.

If you're interested, call me for a chat to understand how I can help you realise your goals. Alternatively, if you have already decided to sign up and you just can't wait, please click here for the link to the online form where you can sign up and order your starter kit right away! 

About Me

Hi I'm Joanne and live in Northampton and when I'm not looking after my husband and two beautiful children, am an avid crafter with a passion for all things Stampin' Up!

I must confess that I have never been a big rubber stamper - until I discovered Stampin' Up! that is. I love the fact that I can get such great results with co-ordinating stamps, inks, papers and punches - the possibilities are endless! Join me on my stamping journey as I share the things I love and be inspired to create amazing things yourself!

Follow Me

Monthly Newsletter

Box Builder

Click the button above to use Box Buster to create your custom box design using the Envelope Punch Board!

Kits Collection Now Available!

Stampin Cut and Emboss

The new Kits Collection from Stampin' Up! is now available!

Click here to see the current kits available and order yours online today.

I Design For


Stampin' Up Stuff

This is my personal blog and is not endorsed by Stampin’ Up! I hope you find it a plentiful source of ideas and personal inspiration but please don't copy my designs for contest submission or use for classes, publication or sale without express permission.