Forever Fern Friendship Card TTT106

by Joanne James25. March 2021 17:00

Firstly, if you didn't see yesterday's post about the list of products that will be retiring with the current annual catalogue, please go and check it out here - the retiring lists are worth a look with big discounts to be had, long whilst supplies last! Then come back and read today's post too!

It's Thursday and time for a new challenge over at TicTacToe! It's the turn of Team X to host this week and the lovely LeAnne is our featured designer this week. This is the fun board that we are playing along with: 


I went down the last column with leaves, green and diecut for my card today with another card using those lovely Forever Greenery papers - take a look:


Here's the low-down on today's card:

Forever Greenery -  Today's card just like this one that I shared earlier this week features lots of elements from the Forever Greenery Suite. The Forever Greenery paper was once again the starting point for today's card. These papers have some beautiful patterns featuring lush greenery and today I chose a subtle background design combined with a busy foliage-filled designs, and layered them and used them as the inspiration for my foliage sprig. 

Forever Fern - I stamped similar pieces of leaf foliage from the Forever Fern stamp set in the same colours as those that feature on the papers and diecut it with the corresponding Forever Flourishing Dies. The detail on these stamps really is amazing - they are another of the Distinktive range that appear almost 3-dimensional when stamped. So pretty! 

Touches of Gold - I used some gold foil for a border and tiny foliage pieces, along with gold twine to embellish my card but the star of the show is the gold hoop embellishment that frames my sentiment - such a wow in real life:


I have really enjoyed working with this set this week and am so glad that it is carrying over to the new annual catalogue, even though the papers and gold elements in the suite aren't; it will give me lots more opportunity to play for sure.

Here is the visual summary of the key products used on today's project for you to pin for easy reference:


You can see all of my Product and 'How To' summaries on my 'How To - Tips and Techniques' Pinterest board in case you've missed any. 

A tictactoe board offers so many creative possibilities - how does this week's board inspire you? Why not have a go? We would love to see you in the gallery and who knows - you might be selected for Designer's Choice and be eligible to be a guest designer on a future challenge. 

Enjoy your evening; I'll be back tomorrow with another project. Until then, happy stampin'!


Stampin' Up! Supplies Used: 

Table built using Product Table Builder by The Crafty Owl - Independent Stampin' Up! Demonstrator.

Woodland Wonder Concertina Birthday Card TTT104

by Joanne James11. March 2021 18:00

It's Thursday and time for a new challenge over at TicTacToe! It's the turn of Team X to host this week and I have the honour of being the featured designer this week. This is the fun board that we are playing along with: 
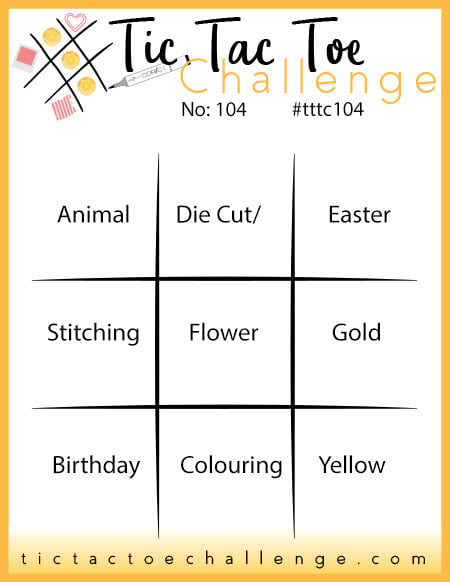
       

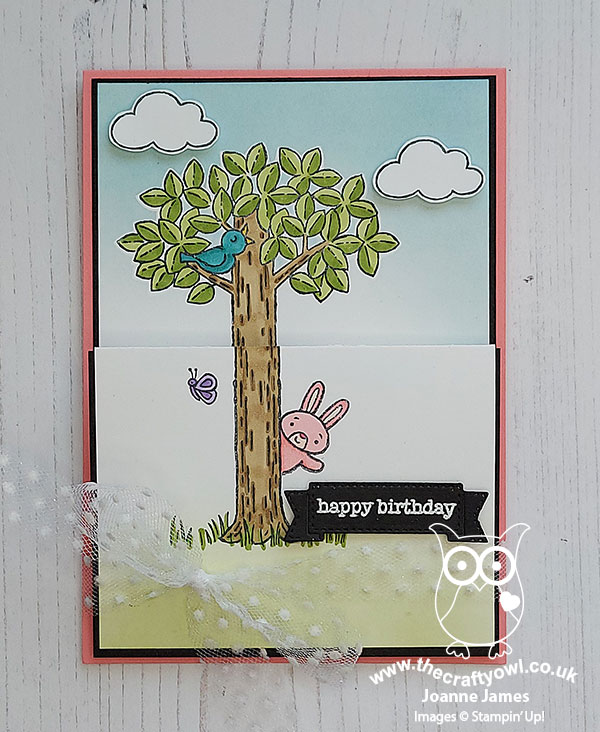
Lots of options for you to create with this one! I went down the first column with animal, stitching and birthday for a fun card with a difference today - take a look:


Here's the low-down on today's card:

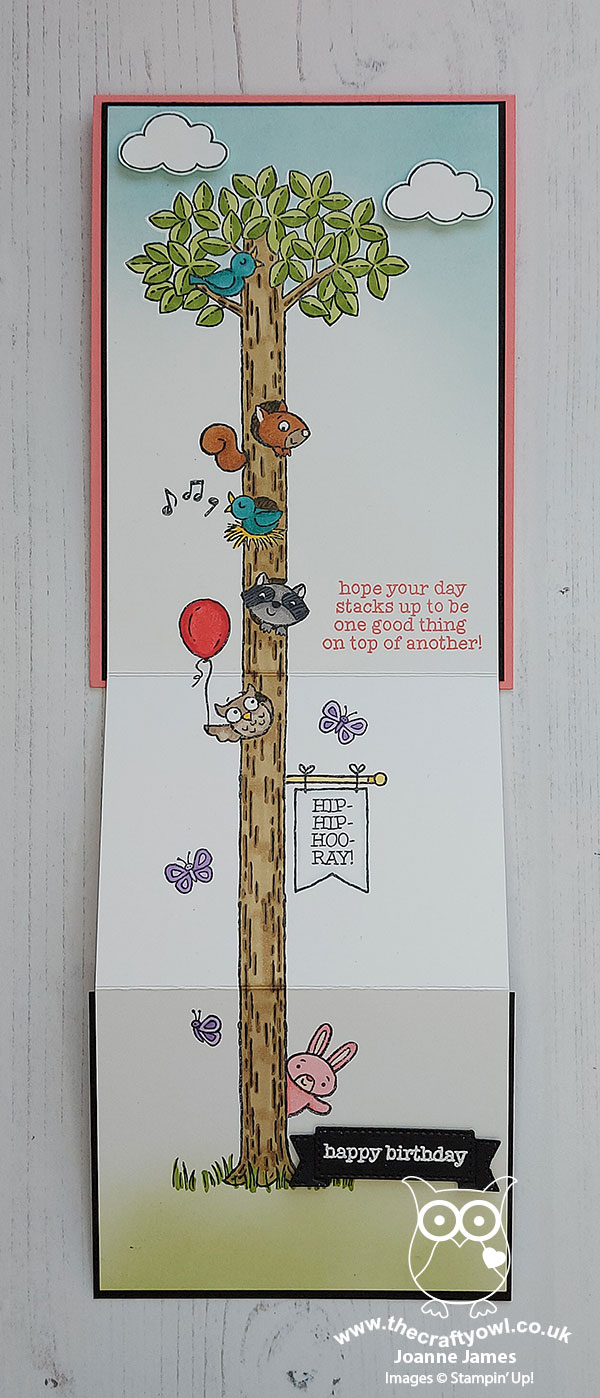
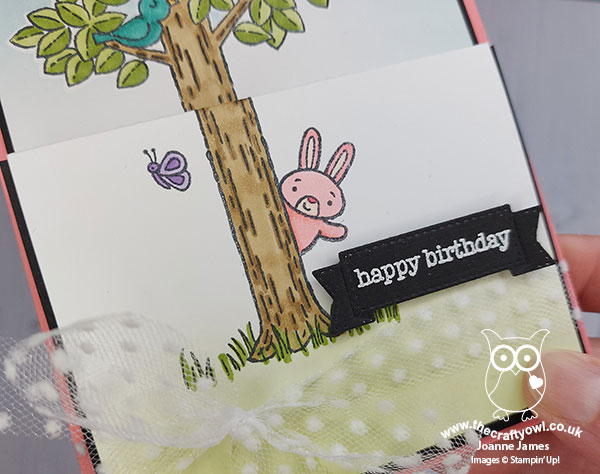
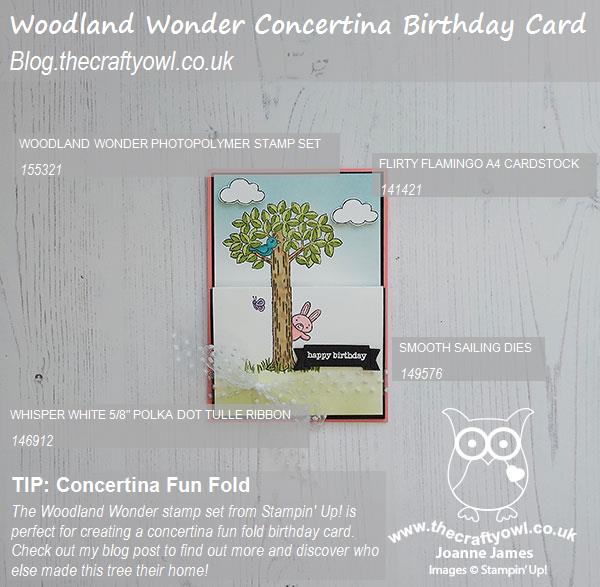
Woodland Wonder - I don't have any really little people in my life, however I couldn't resist the Woodland Wonder stamp set! In addition to birthday cards, it's also great if you need to make a card from lots of people or even if you use elements of the set for a different purpose - that pink bunny could totally be going on an Easter egg hunt, right?! 

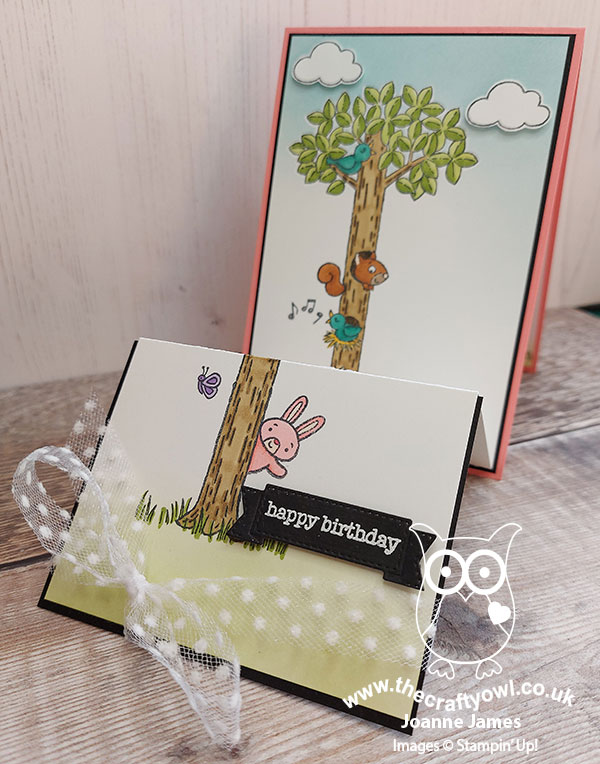
A Fun Fold - Whilst my card looks pretty standard at first glance, you may have noticed the fold across the centre - that's because it's a concertina fun fold. I loved the sample on page 53 of the January-June mini catalogue, so thought I'd have a go at making one myself. Once you slide the tulle ribbon bow off the cardfront, the card opens up to reveal the remainder of the bunny's friends:


I had a lot of fun stamping and colouring the various elements of this card, which folds up to a standard card size. The stamps are really easy to align; my one top tip for you is that you make sure you know where the front fold will sit on your back panel when closed, so that you don't have any elements that end up being partially visible when it's closed up, such as a cloud or part of an animal (ask me how I know!!)

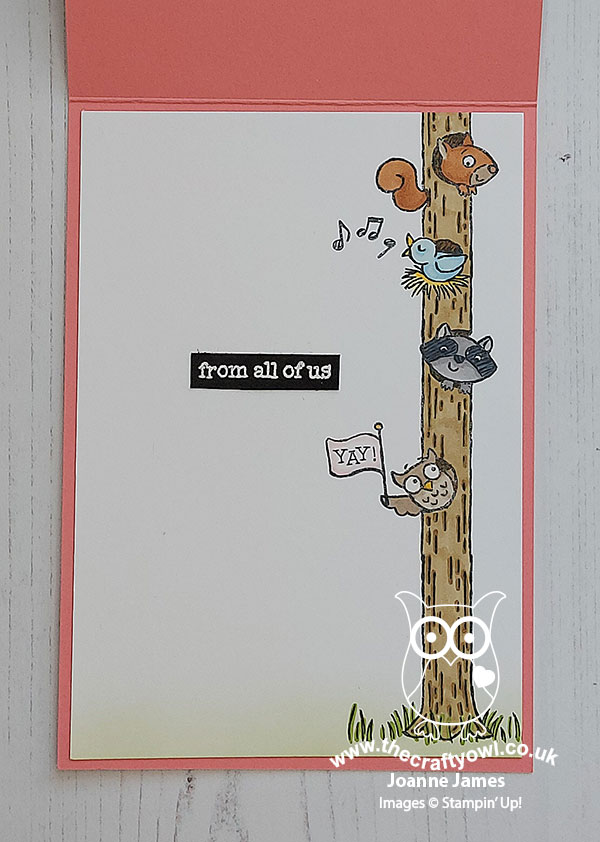
Behind the concertina fold the card also opens up in the conventional way, for you to write a message. I couldn't resist adding another trunk full of cute critters waving their respective birthday wishes:

Isn't that just the cutest?! This is what the card looks like when it stands up in its concertina design:


It's In The Details - There are only two other main elements to my card besides my fun fold and stamped design: the lovely soft polka dot tulle ribbon that holds the card closed for mailing, and the stitched banner diecut I used for my happy birthday sentiment, that is from the Smooth Sailing Die set - such a useful little die:


I think this card could be adapted for lots of other uses too, such as welcome to the team, farewell and good luck cards and more besides!  

Here is the visual summary of the key products used on today's project for you to pin for easy reference:


You can see all of my Product and 'How To' summaries on my 'How To - Tips and Techniques' Pinterest board in case you've missed any. 

I'm also linking today's card up over at Just Us Girls where the theme is 'animals' and at SUO Challenges for a second entry in the 'things that fly' - today's card has birds, butterflies an owl - and at a stretch, a balloon too!

A tictactoe board offers so many creative possibilities - how does this week's board inspire you? Why not have a go? We would love to see you in the gallery and who knows - you might be selected for Designer's Choice and be eligible to be a guest designer on a future challenge. 

Enjoy your evening; I'll be back tomorrow with another project. Until then, happy stampin'!


Stampin' Up! Supplies Used: 

Table built using Product Table Builder by The Crafty Owl - Independent Stampin' Up! Demonstrator.

Flower and Field Happy Thoughts TTT 102

by Joanne James25. February 2021 15:00

It's Thursday and time for a new challenge over at TicTacToe! It's the turn of Team X to host this week and the lovely Betty is our featured designer this week. This is the fun board that we are playing along with: 
     

I went down the first column with thinking of you/stitching/flowers for my card today, that also makes the most of one of the Sale-A-Bration freebies that can still be yours for a few more days so is perfect to play along with the team over at TGIF Challenges too - take a look:


Here's the low-down on today's card:

Flower and Field - Although I didn't eventually choose it, I was considering 'shades of green' as one of my board options and I immediately thought of this paper in the Flower and Field Sale-A-Bration DSP pack as it makes such a beautiful use of Just Jade as its background colour. I decided to use this paper anyway as it's so pretty and the green, pink and yellow combo give me three colours to play with the peeps over at Paper Craft Crew this week too! It's also a great reminder that there are just 3 days to go until the end of the current Sale-A-Bration promotion. If you are a regular Stampin' Up! customer, don't be caught out - the current promotion ends a whole month earlier than it has in previous years. That's no bad thing, as it means we will get a second Sale-A-Bration promotion later in the year, but if you still have things on your current SAB wishlist, you need to earn them whilst you still can!

Thinking of You - The sentiment I chose for my card today comes from the 'Happy Thoughts' stamp set, inspired by the Million Sales Achiever Jackie Bolhuis. This is a sentiment-only set, designed with beginner crafters in mind. It has great basic sentiments for every occasion, along with some longer ones that work perfectly as a feature or on the insdie of a card. What's more, this set was designed to co-ordinate with a number of our basic punches, so is really versatile and a great way to build on a beginner's collection of basic items. 

Pierced Blooms - I added a few Pierced Blooms to decorate my card - another long-awaited addition to my collection - although as I went to finishe my card with some black enamel dots on those itty bitty pink flowers I realised ... yes, I've run out! So use your imagination as I go off to order more of these craft room staples!

Here is the visual summary of the key products used on today's project for you to pin for easy reference:
 

You can see all of my Product and 'How To' summaries on my 'How To - Tips and Techniques' Pinterest board in case you've missed any. 

A tictactoe board offers so many creative possibilities - how does this week's board inspire you? Why not have a go? We would love to see you in the gallery and who knows - you might be selected for Designer's Choice and be eligible to be a guest designer on a future challenge. 

Enjoy your day; I'll be back tomorrow with another project. Until then, happy stampin'!


Stampin' Up! Supplies Used: 

Table built using Product Table Builder by The Crafty Owl - Independent Stampin' Up! Demonstrator.

Love In The Scrap Bin For TTT 98

by Joanne James28. January 2021 17:00

It's Thursday and time for a new challenge over at TicTacToe! It's the turn of Team X to host this week and the lovely Felicita is our featured designer this week. This is the fun board that we are playing along with: 


When I was sorting through my scrap bin the other week for our Speed Stamping Scrap Bin Challenge over at As You See It (you can see those cards in my previous post here), I had a whole bunch of black, red and gold bits and pieces, lots of which were heart shaped, so I thought I would use them for my TicTacToe card today. Here's what I came up with:


Here's the low-down on today's card:

I went both down the first column and across the third row of our TicTacToe grid with today's card, completing both 'red-free-sentiment' and 'sentiment-embellishment-diecut' I had a red tone-on-tone stamped heart, a row of black diecut hearts (Stitched Be Mine Dies), some leftover strips of foiled DSP and gold glimmer paper and a gold foil diecut from the 'Joy To The World' Paper Pumpkin kit from before Christmas; I held onto the French 'amour' pieces as I thought they would be perfect for a Valentine's card too. I layered all of my pieces together then added a trio of Real Red resin hearts to compliment my large red heart and add a little additional pop of red. You can see the dimension on my simple layered cluster better below:


No product summary or supply list for today's card as it contains lots of retired bits and pieces. It does feel good to get a few more things used up though! I'm linking today's card up over at Festive Friday as it uses red, gold and foil paper and at The Spot where they are all about getting your heart on this week. 

A tictactoe board offers so many creative possibilities - how does this week's board inspire you? Why not have a go? We would love to see you in the gallery and who knows - you might be selected for Designer's Choice and be eligible to be a guest designer on a future challenge. 

Enjoy your day; I'll be back tomorrow with another project. Until then, happy stampin'!


Red and White Heart Hello For TTT96

by Joanne James14. January 2021 17:00

It's Thursday and time for a new challenge over at TicTacToe! It's the turn of Team X to host this week and the lovely LeAnne is our featured designer this week. This is the fun board that we are playing along with: 


Lots of love-related elements on this week's board, but you are by no means restricted to creating a Valentines/wedding/anniversary card - this is your opportunity to get creative! I couldn't resist another card using my Floral Heart Dies and the sentiment that made me buy the accompanying stamp set - take a look:


Here's the low-down on today's card:

You Had Me At Hello - Any of my regular readers will know that the sentiment that features on the central heart that features on today's card is a line from one of my most favourite movies of all time - Jerry Maguire. If you'd like to read the back story to this, check out this previous post where I explained all. The Floral Hearts Dies were definitely on my wish list, but it was this stamp that sold me on the bundle. What can I say - I am an old romantic at heart!

Hearts and Flowers - Having stamped my sentiment in Real Red so that the wording would appear in white (I definitely recommend using your Stamparatus for this to give good, solid ink coverage), I decided to border it with the main die from the Floral Hearts Dies in white. This card is unashamedly made with Valentines in mind, with its red and white colour combination and showy red satin ribbon and bow detail, but sometimes it just has to be done!

And More Hearts - The background designer paper is now retired, but there is a similar design in the Snail Mail pack or you could even stamp a similar design with the tiny heart stamps in the Always in my Heart stamp set. I also added a trio of bright red resin hearts to my card to finish; these are actually from the Snail Mail Suite, but work perfectly for a Valentine's card and blend easily with other sets too.

Here is the visual summary of the key products used on today's project for you to pin for easy reference:


You can see all of my Product and 'How To' summaries on my 'How To - Tips and Techniques' Pinterest board in case you've missed any. 

I might keep this card for the DH, as he would certainly appreciate the sentiment, if not the fancy heart and showy bow. We don't generally send each other Valentine's cards since we got married, as our wedding anniversary is the following week, but it sometimes serves as a useful reminder to him to get a card for the following week - it is fair to say Mr James is not known for either remembering or celebrating memorable dates without a little help, much preferring spontaneous romantic gestures. Unexpected flowers are always lovely though, so I'm not complaining!

A tictactoe board offers so many creative possibilities - how does this week's board inspire you? Why not have a go? We would love to see you in the gallery and who knows - you might be selected for Designer's Choice and be eligible to be a guest designer on a future challenge. 

Enjoy your day; I'll be back tomorrow with another project. Until then, happy stampin'!


Stampin' Up! Supplies Used:

Table built using Product Table Builder by The Crafty Owl - Independent Stampin' Up! Demonstrator.

Trimming The Town Christmas Notelets TTT 94

by Joanne James17. December 2020 17:00


It's Thursday and time for a new challenge over at TicTacToe! It's the turn of Team X to host this week and I am our featured designer this week. This is the fun board that we are playing along with: 


I went across the middle row with house-snow-tree and created a trio of festive notecards for you today - take a look:


Here's the low-down on today's cards:

I made a set of notelets similar to these in a case as one of the projects at my Creative Escapes Craft Retreat back in October, and I still had some papers left so I thought I would make a few more. I used a combination of Trimming The Town designer paper, white cardstock, Stitched Shapes Dies and Home Together Dies to create my cards, each one with a snowy tree background, a white snowscape piece and trees and houses in various combinations diecut from the paper to create my little scenes, with each one finished with a sentiment cut from the paper too. Here's each of the cards individually:


A red and green chalet style house:


And lastly a palatial home on a landscape card, complete with porch entrance:


This last card shows lots of detail and layering - check it out:


I just love these cards - and not a stamp in sight! No supplies link today, as these items are no longer available, but I still wanted to share as I had paper to use up and for those of you in a similar position, I hope they give you some creative inspiration! I'm also linking up with the current challenge #GDP271 over at Global Design Project, where their theme is Winter/Holiday.

A tictactoe board offers so many creative possibilities - how does this week's board inspire you? Why not have a go? We would love to see you in the gallery and who knows - you might be selected for Designer's Choice and be eligible to be a guest designer on a future challenge. 

Enjoy your day; I'll be back tomorrow with another project. Until then, happy stampin'!


Snowflake Wishes Thank You Card TTT92

by Joanne James26. November 2020 17:00

It's Thursday and time for a new challenge over at TicTacToe! It's the turn of Team X to host this week and the lovely Betty is our featured designer this week. This is the fun board that we are playing along with: 


I decided to use the lovely Julee's Mojo Monday sketch along with the Paper Craft Crew inspiration photo (no red presents on this one but I did love that snowy blue sky) - take a look:


Here's the low-down on today's card:

Snowflake Splendor - The paper I used for the background on today's card is another of the Snowflake Splendor patterns. It has a really atmospheric effect that reminds me of the sky when it snows and blends from navy through to seaspray blue.

So Many Snowflakes - I decorated my card with lots of snowflakes: some diecut from (retired) white glimmer paper, a sprinkling of snowflake sequins and then a few holographic self-adhesive snowflakes for good measure. They are all so sparkly:

I added some extra sparkle with a twist of Snowflake Splendor ribbon behind the sentiment circle too.

Snowflake Wishes Thank You - I used the 'Snowflake Wishes' stamp set for my greeting, and decided to use the thank you as opposed to a Christmas one for a (brief!) change - after all, we still need thank you cards at this time of year so it's nice to have one that is seasonally themed. And I'm always up for a good pun, so this one's perfect! 

Here is the visual summary of the key products used on today's project for you to pin for easy reference:


You can see all of my Product and 'How To' summaries on my 'How To - Tips and Techniques' Pinterest board in case you've missed any. 

A tictactoe board offers so many creative possibilities - how does this week's board inspire you? Why not have a go? We would love to see you in the gallery and who knows - you might be selected for Designer's Choice and be eligible to be a guest designer on a future challenge. 

Enjoy your evening; I'll be back tomorrow with another project. Until then, happy stampin'!


Stampin' Up! Supplies Used: 

Table built using Product Table Builder by The Crafty Owl - Independent Stampin' Up! Demonstrator.

Snowflake Splendor Sparkling Snowflake Wishes TTT90

by Joanne James12. November 2020 17:00

A busy couple of days but it's Thursday and time for a new challenge over at TicTacToe! It's the turn of Team X to host this week and the lovely Ashwini is our featured designer this week. This is the fun board that we are playing along with: 


I decided to go down the centre column with blue, holiday and sparkle/shine and am sharing a clean and layered snowflake card with you today - take a look:


Here's the low-down on today's card:

True Blue - The main blue that I chose to feature on my card today is Pacific Point - one of the first three ink pads I ever purchased when I started stamping (along with Real Red and Old Olive, in case you're interested!) and whilst, like my other initial purchases, this is a colour that is still going strong, it's also one I don't use as frequently in my general crafting. So you can imagine how pleased I was when I saw it feature as one of the colours in the Snowflake Splendor patterned paper - I knew it would be the perfect opportunity to give it some love!

Snowflake Splendor - There are so many beautiful patterns in the Snowflake Splendor papers it's difficult to choose just two, but choose I did! I went with a couple of complimentary patterns, both of which feature Pacific Point, to bring out the bold blue colour. I used white mats on my project, which is something I don't often do but is a great way to showcase a stronger colour such as Pacific Point. 

Glimmer and Sparkle - Pacific Point is not the only blue that I showcase on today's card though; the Balmy Blue glimmer paper is so full of sparkle I couldn't resist adding some to my festive snowflake showcase and I think it compliments the other elements beautifully. I also added a sprinkling of sequins for a little more shimmer; along with my sparkle-filled sentiment I think this card is perfect for the current Time Out challenge too, where the challenge word is 'festivals' with the option of added shimmer/glitter - yes please!

Here is the visual summary of the key products used on today's project for you to pin for easy reference:


You can see all of my Product and 'How To' summaries on my 'How To - Tips and Techniques' Pinterest board in case you've missed any. 

A tictactoe board offers so many creative possibilities - how does this week's board inspire you? Why not have a go? We would love to see you in the gallery and who knows - you might be selected for Designer's Choice and be eligible to be a guest designer on a future challenge. 

Enjoy your day; I'll be back tomorrow with another project. Until then, happy stampin'!


Stampin' Up! Supplies Used: 

Table built using Product Table Builder by The Crafty Owl - Independent Stampin' Up! Demonstrator.

Rustic Country Home Thanks TTT88

by Joanne James29. October 2020 18:00

It's Thursday and time for a new challenge over at TicTacToe! It's the turn of Team X to host this week and the lovely Felicita is our featured designer this week. This is the fun board that we are playing along with: 


So much seasonal goodness to choose from on Felicita's board this week! I got so excited with all the elements and the lovely Julee's fab Mojo Monday sketch that I covered pretty much every square on this week's board except wreath and Thanksgiving! I paired the beautiful Gilded Autumn papers with lots of rust and one of my most favourite stamp sets to use at this time of year - take a look:


Here's the low-down on today's card:

Country Home - My milk churn and autumn florals come from the 'Country Home' stamp set that has been around for a while, but I have to say is one of those sets that is a real keeper. I've made many, many cards with this set (and never featured it in a class, interestingly); I've coloured those florals many times and each of them different - search my blog for lots more inspiration using this set. I love the sentiment font and sizes too and they are great for thankful cards, whatever the time of year. My milk churn features a tiny 'thanks' and I saved one of my favourites for the inside of my card:


Rusty Colour - I decided to look at ways to incorporate the 'rust' element into my card and whilst I wasn't in a mood to get messy, I decided that the brushed brass foil (as opposed to copper) would add a nice metallic element and I embossed it using the Tin Tile Embossing Folder for some texture. I also majored on browns in my colour scheme and added some loops of coppery ribbon to my florals too.

A Little Bit Country - Having spent more time than anticipated deciding how best to layer those papers (I alternated each pattern for each layer before deciding), I wanted to keep with my country feel and added some wooden leaf embellishments and some green and white gingham ribbon to finish. A lot going on with this card, but sometimes it's really nice to move away from 'clean and simple' and see how far the layering can take you!


I'm also linking today's card up over at SUO Challenges too where the current theme is Autumn/Fall and my leafy, rusty creation definitely evokes the season for me! Here is the visual summary of the key products used on today's project for you to pin for easy reference:


You can see all of my Product and 'How To' summaries on my 'How To - Tips and Techniques' Pinterest board in case you've missed any. 

A tictactoe board offers so many creative possibilities - how does this week's board inspire you? Why not have a go? We would love to see you in the gallery and who knows - you might be selected for Designer's Choice and be eligible to be a guest designer on a future challenge. 

Enjoy your day; half term continues in the James household with nothing much of interst to report! I'll be back tomorrow with another project. Until then, happy stampin'!


Stampin' Up! Supplies Used: 

Table built using Product Table Builder by The Crafty Owl - Independent Stampin' Up! Demonstrator.

Foiled Autumn Leaves TTT86

by Joanne James15. October 2020 18:00

It's Thursday and time for a new challenge over at TicTacToe! It's the turn of Team X to host this week and the lovely LeAnne is our featured designer this week. This is the fun board that we are playing along with: 


My card works for either of the diagonals: stitching, circle, diecut or gold foil, circle, designer paper today! I decided to CASe Sharon's card over at Less Is More with a trio of punched autumn leaves for a card for someone special today - take a look:


Here's the low-down on today's card:

I featured a small area of the vanilla foiled Gilded Autumn designer paper between some curvy stitched borders (courtesy of the snowdrifts in the Freezin' Friends Dies!) and then punched a trio of leaves and mounted these on a selection of gold and copper foil and glimmer paper stitched circles at the meeting point. A gold heat-embossed fussy cut sentiment from 'Rooted In Nature' on the front was paired with this sentiment on the inside of my card:


Foil is always difficult to photograph, so I hope you can see how pretty this card is! I must say having seen some of the other cards from the design team this week, I now have a desire to go and make this card in burgundy too!

Here is the visual summary of the key products used on today's project for you to pin for easy reference:

You can see all of my Product and 'How To' summaries on my 'How To - Tips and Techniques' Pinterest board in case you've missed any. 

One more look at that pretty glittery leaf trio:


A tictactoe board offers so many creative possibilities - how does this week's board inspire you? Why not have a go? We would love to see you in the gallery and who knows - you might be selected for Designer's Choice and be eligible to be a guest designer on a future challenge. 

Enjoy your evening; I am still resting up and will be spending my evening attending a 6th Form Virtual Open Evening with Rebecca from the comfort of the sofa whilst recovering from today's physiotherapy session. I'll be back tomorrow with another project. Until then, happy stampin'!


Stampin' Up! Supplies Used: 

Table built using Product Table Builder by The Crafty Owl - Independent Stampin' Up! Demonstrator.

Mini Catalogue

BROWSE THE CATALOGUE

The mini catalogue is now live! Read and download your copy here.

Shop Online

Access my online shop 24 x 7, 365 days of the year:

Current April hostess code:

VDKNV7BH

Shop Online

Join My Team

It's always a great time to join Stampin’ Up! New team members can get £130 worth of products for only £99 + free business supplies + free shipping + all the fun being a part of Stampin’ Up! Stampin' Up! has something for everyone: join my growing team and benefit from my support to enjoy Stampin' Up! however you choose.

If you're interested, call me for a chat to understand how I can help you realise your goals. Alternatively, if you have already decided to sign up and you just can't wait, please click here for the link to the online form where you can sign up and order your starter kit right away! 

Latest Kit!

Stampin Cut and Emboss

The Rock Legend Kit has all you need to make 8 cards with coordinating envelopes. Along with the new Panda Friends Kit, both are available from January 4th for just £14 each - get yours here!

2023-24 Annual Catalogue

BROWSE THE CATALOGUE

Click on the catalogue for a full list of current SU! supplies - if you would like to order any of the items featured, please drop me a line at [email protected] or give me a call on 07773 421446 - I'd be happy to help.

New Online Exclusives

There are new products available exclusively in the online store from 5 March - check them out here.

About Me

Hi I'm Joanne and live in Northampton and when I'm not looking after my husband and two beautiful children, am an avid crafter with a passion for all things Stampin' Up!

I must confess that I have never been a big rubber stamper - until I discovered Stampin' Up! that is. I love the fact that I can get such great results with co-ordinating stamps, inks, papers and punches - the possibilities are endless! Join me on my stamping journey as I share the things I love and be inspired to create amazing things yourself!

Follow Me

Monthly Newsletter

Box Builder

Click the button above to use Box Buster to create your custom box design using the Envelope Punch Board!

Kits Collection Now Available!

Stampin Cut and Emboss

The new Kits Collection from Stampin' Up! is now available!

Click here to see the current kits available and order yours online today.

I Design For


Stampin' Up Stuff

This is my personal blog and is not endorsed by Stampin’ Up! I hope you find it a plentiful source of ideas and personal inspiration but please don't copy my designs for contest submission or use for classes, publication or sale without express permission.