
Windmill Flowering Tulip Fields Mother's Day Card With Belly Band PP580

by Joanne James27. February 2022 09:00

Today it's Sunday and time for this week's new challenge over at The Paper Players! It's the turn of the fabulous Anne Marie to host this week and she has my favourite, a sketch challenge, for you to work with:
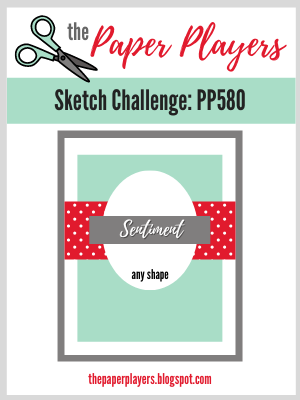
    

I do love a good sketch and this week I really went to town! I have been making lots of cards with the 'Tulip Fields' bundle as it was the feature bundle for my online class last week and I decided that the layout of Anne Marie's sketch was perfect for a diecut windmill for the central focal point and the beginnings of what turned out to be a rather special card - take a look:
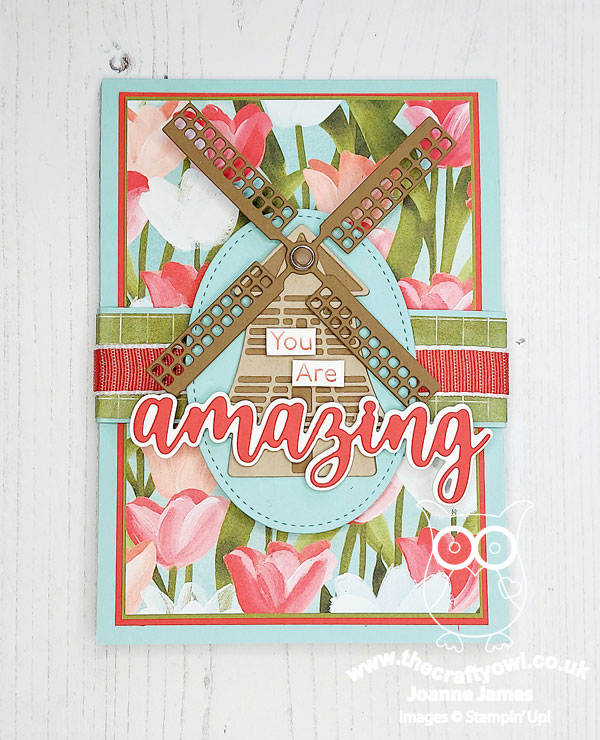
 

Here's the low-down on today's card:

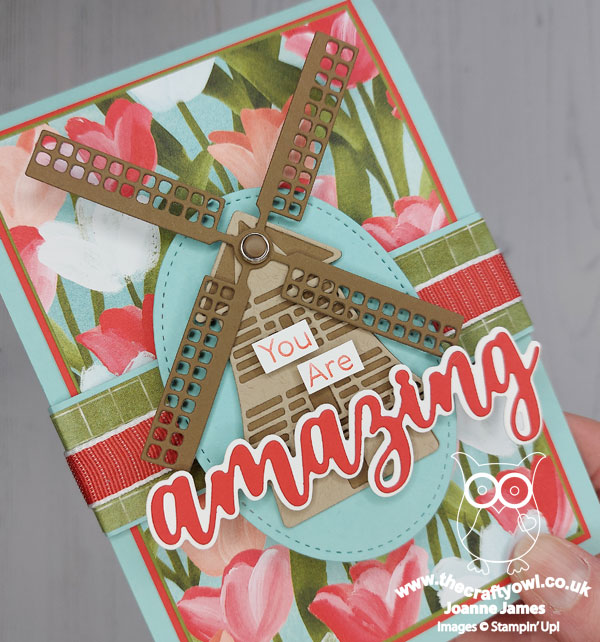
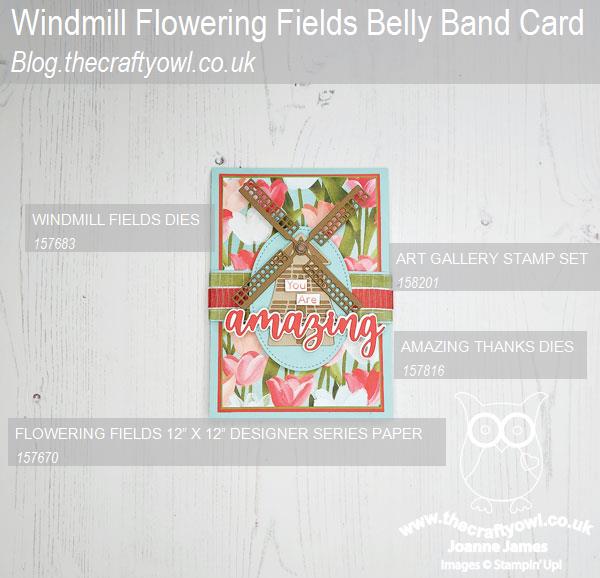
Many Layers - This is a card of many layers - which means I'm also playing along with the ladies at Just Add Ink this week where I chose 'layers' and patterned paper as my two things. More on patterned paper in a moment, but firstly those layers! I can count 13 on the front of my card alone (not including the band of ribbon!) - and there are even more inside! I used a (retired) stitched oval diecut as a base for my windmill cut using the Windmill dies and added a sentiment combining stamped words taken from 'Art Gallery' and a layered 'amazing' cut using the Amazing Thanks Dies. I attached these to a horizontal band as the focal point for the front of my card.You can see the layered loveliness in more detail below:
A Belly Band Surprise - The layered windmill is in fact attached to a belly band decorated with a strip of DSP, which when removed reveals the beautiful red, pink and white tulips of the Flowering Fields DSP in all it's glory, along with a sentiment made from a combination of some partial stamping from a stamp in the 'Flowering Tulips' stamp set and the word 'Mother's' cut using the Word Wishes Dies:
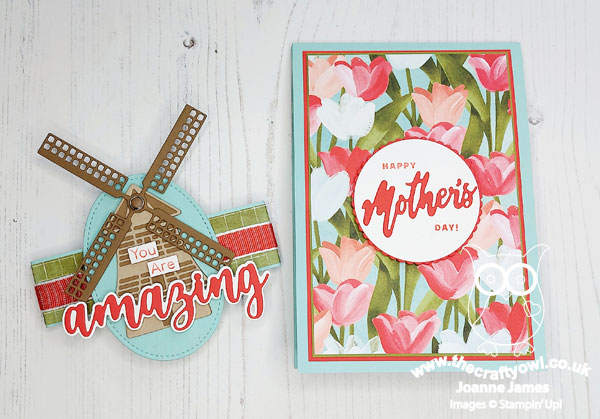
 

With Mother's Day here in the UK only a few weeks away, this was a great opportunity to get ahead and make my Mother's Day card. I love that the layered circle greeting sits below the windmill oval of the belly band and is only revealed when the belly band is removed. 

Mother's Day Details - The surprises don't end there though. My card has an additional flap, so when it's opened you see this panel, also decorated with another piece of Flowering Fields DSP and a trio of tulips cut with the Tulips Dies:
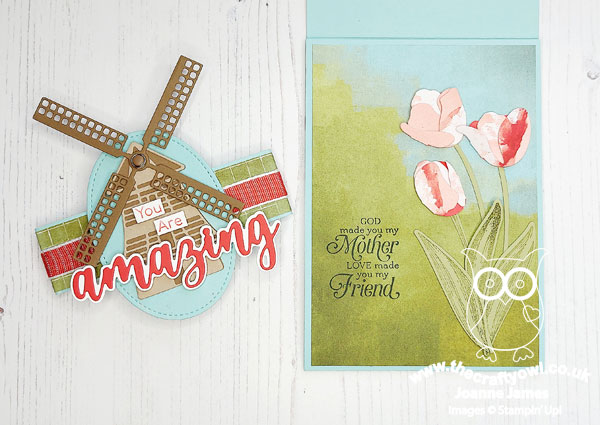
 

 These Tulips Dies are amazing - they create the most amazing dimensional tulips! I cut mine from another pattern in the Flowering Fields DSP pack; it is actually a Petal Pink sky with white and red clouds, but I like the mottled effect that it gives the tulips and they compliment the pattern on the front of the card:
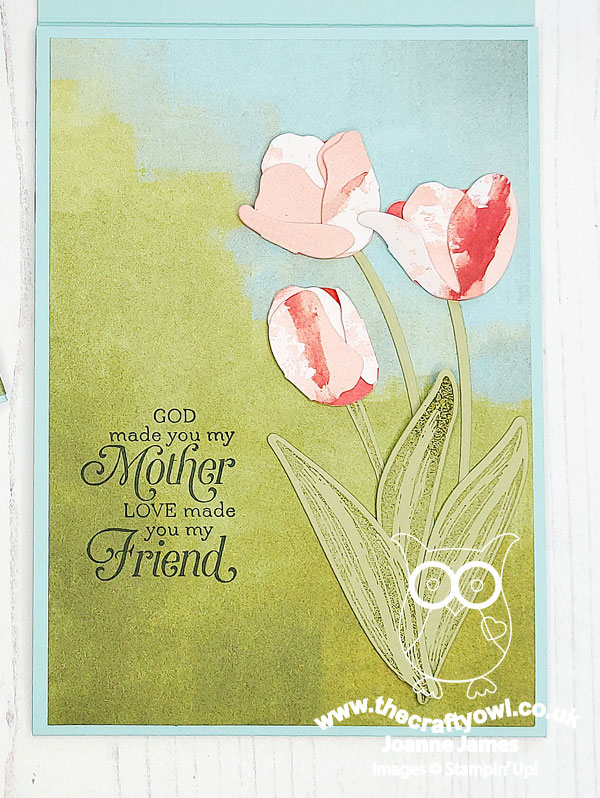
 

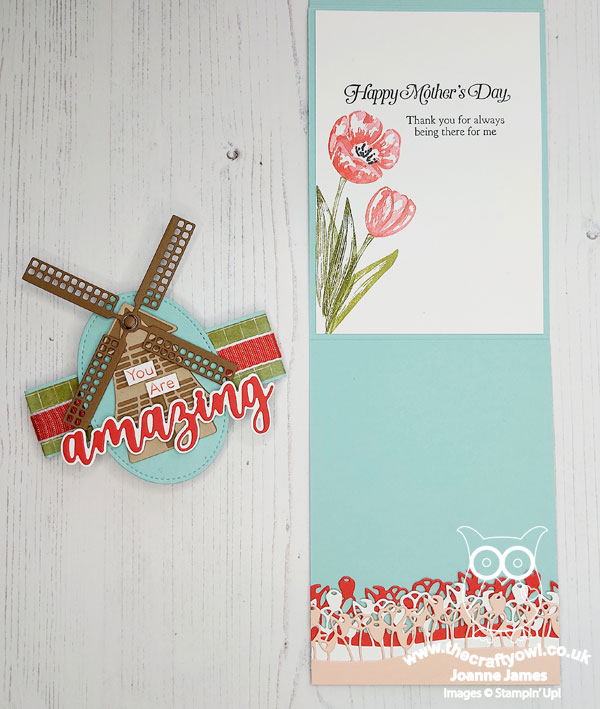
The sentiment, along with the one on the inside of the card is from the retired stamp set 'Strong and Beautiful'. This set is a keeper - the words in this set are so perfect for special female cards. when you open the next flap, the inside panel is revealed. I bordered the edge of the bottom panel with a trio of tulip border dies (I might add another diecut windmill behind these tulips - now that I am looking at it again this panel is a little light on decoration compared to the others):
 

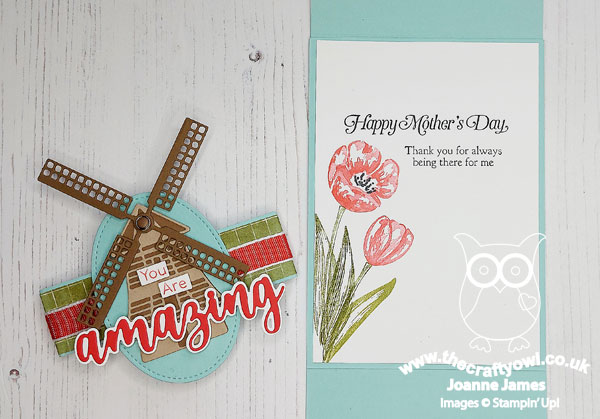
 And here's a close-up of the innermost panel, decorated with some layered tulips stamped with the 'flowering Tulips' stamp set:
 

As you can imagine, all those layers make for a bulkier than usual card, so I will be making a custom box-envelope to enclose it in. That's a job for another day though! This kind of card does take a long time to make, but it is worth it - I love the end result and know my Mum will appreciate it too.

Here is the visual summary of the key products used on today's project for you to pin for easy reference:
 

You can see all of my Product and 'How To' summaries on my 'How To - Tips and Techniques' Pinterest board in case you've missed any. 

Before you reach for your ink and papers, check out what our amazing team has created to inspire you this week:

Here's a quick recap of our challenge rules:
 
1.  Create a new paper project
2.  Upload your creation to your blog with a link back to us and provide a direct link to the post featuring your challenge submission.
3.  Please link your card to no more than four challenges, TOTAL.
4.  Have FUN!

Enjoy your day; we are hoping for another restful Sunday, mainly centred around cooking and eating - we are cooking a Turkish recipe for dinner today for the first time, so that should be fun! I'm also hoping to squeeze in another movie this afternoon - last week's 'Encanto' proved a big hit so this week we might go for 'Sing 2' - hope it's as good as the first one!

I'll be back tomorrow with another project. Until then, happy stampin'!


Stampin' Up! Supplies Used: 
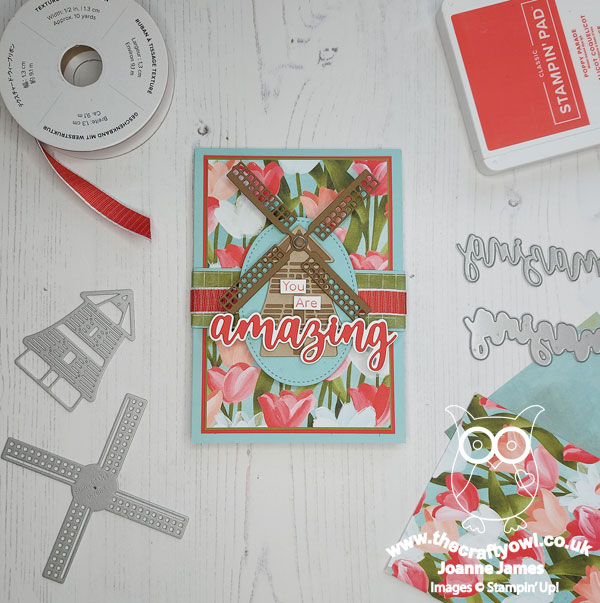
Table built using Product Table Builder by The Crafty Owl - Independent Stampin' Up! Demonstrator.

Friendly Hello Birthday Card TTT150

by Joanne James24. February 2022 16:00

It's Thursday and time for a new challenge over at TicTacToe! It's the turn of Team X to host this week and the lovely Vicky is our featured designer this week. This is the fun board that we are playing along with: 


Vicky chose some great options this week and I could have gone in any direction! In the end I went across the top of the board with pastel colours/designer paper/diecut and grabbed some of my designer paper and paper snips and set to work:


Here's the low-down on today's card:

Friendly Hello Times Two - I decided to use both the 'Friendly hello' stamp set and the co-ordinating papers on today's card. I set to work fussy cutting one of the multi-coloured sheets and created a layered image of the bird surrounded by leaves and flowers. The stamping on my card is limited to my sentiment on the front, that I stampsed twice, once onto the base and then again onto some Pool Party cardstock and fussy-cut the word 'friend' for a contrasting look. I also stamped a birthday sentiment inside and used some left over flowers to decorate my insert:


These papers are gorgeous - I even used a piece to decorate the envelope flap for a card that is pretty both inside and out!

Dots and Circles - I layered my bird, flowers and foliage onto a circle of Granny Apple Green with a black scalloped mat - you can just see it peeking through below all of that fussy-cut goodness below:


I grounded the decorative circle with a strip of dotty paper which is another design in the same Friendly Hello pack.

Still Time To Sale-A-Brate - The 'Friendly Hello' bundle is available FREE with a £90 purchase during Stampin' Up!'s current Sale-A-Bration promotion. If it's still on your wish list, you have until next Monday when the promotion ends to order yours before it's gone forever. Just click on the links below to go to my online store to get yours - remember to add the current host code for a special thank you from me.

Here is the visual summary of the key products used on today's project for you to pin for easy reference:


You can see all of my Product and 'How To' summaries on my 'How To - Tips and Techniques' Pinterest board in case you've missed any. 


Today's card uses the sketch over at Atlantic Hearts for the layout (I did move the sentiment though - and it's my first time of playing too!). There are also lots of dots and circles so I'm linking up over at Global Design Project as that's their theme this week and I'm linking up over at TGIF Challenges where they, like me, are all about Sale-A-Bration (thanks too for chooing me as your winner last week ladies!)

A tictactoe board offers so many creative possibilities - how does this week's board inspire you? Why not have a go? We would love to see you in the gallery and who knows - you might be selected for Designer's Choice and be eligible to be a guest designer on a future challenge. 

Enjoy your day; I'll be back tomorrow with another project. Until then, happy stampin'!


Stampin' Up! Supplies Used: 

Table built using Product Table Builder by The Crafty Owl - Independent Stampin' Up! Demonstrator.

Awesome Otters Otterly Awesome Card

by Joanne James14. February 2022 14:00

Happy Valentine's Day everyone! Today I'm sharing a card for the current challenge over at Fusion where I used both the sketch and the pink and red hearts in the photo for my inspiration:

No cupcakes on today's card, although I did try and incorporate a little chocolate brown colour! I I have a card that would work for Valentine's, or any other time that you'd like to let someone know how awesome they are - take a look:


Here's the low-down on today's card:

Today's card features one of the cute otters from the 'Awesome Otters' stamp set - one of the many items that can be yours free with a £45 purchase during the current Sale-A-Bration promotion. I coloured him with my new skin tone Blends markers - so great to now have so many neutral tone Blends to choose from! - and then heat embossed a sentiment from the same set onto a red diecut heart for him to hold. I love that the heart is so big it looks like the otter can barely hold it up!


I backed the whole thing with more of my favourite Sweet Talk heart patterned paper, and for the horizontal banner added a red glimmer diecut; what to use for the horizontal caused me most of the thinking time on today's card and I tried a whole range of things before settling on this!

Did you know that otters hold hands so that they don't drift away from each other as they sleep? I think that's so sweet! My other half definitely does not display any otter-like tendencies, preferring plenty of space down the middle of the bed to ensure a good night's sleep! He's thoughtful in other ways though - and will be cooking Valentine's dinner for four this evening, so no complaints from me!

Here is the visual summary of the key products used on today's project for you to pin for easy reference:


You can see all of my 'How To' summaries on my 'How To - Tips and Techniques' Pinterest board in case you've missed any. 

Enjoy your day and I'll be back tomorrow with another project. Until then, happy stampin'!


Stampin' Up! Supplies Used:

Table built using Product Table Builder by The Crafty Owl - Independent Stampin' Up! Demonstrator.

Catch You Later Best of Friends AYSI267

by Joanne James28. January 2022 12:00

Today I'm sharing my design team card for our new challenge over at As You See It where it's time for a colour challenge from the lovely Heather C:


I am using the current Fusion sketch again today for my layout (in the correct orientation this time ;-)) and another first-time outing for a new stamp set - take a look:


Here's the low-down on today's card:

Catch You Later - Today's card features the cat and goldfish combination from the 'Catch You Later' stamp set, found on page 63 of the mini catalogue. An unlikely pair of friends perhaps, but the sentiment suggests they share a definite affection between them! I like this set because it contains lots of small images that are easy to colour. 

Circles, Circles - I added my stamped image to a pair of layered circles in each of the challenge greens and also used a strip of Soft Succulent in-colour designer paper with a circle motif across my card to tie the whole thing together. 

A Pop Of Extra Colour - I actually chose to use this image for today's challenge because I thought the goldfish would be the perfect animal to showcase Calypso Coral. When my card was almost complete, I decided I wanted to add a little more coral to accentuate it; luckily I found a few retired enamel hearts in my stash that were just the job!

The funniest thing about today's card? I didn't even register that our challenge badge also featured a cat until after I had loaded up my card into my blog post! Heather must have been sending me inspirational vibes in more ways than one!

Here is the visual summary of the key products used on today's project for you to pin for easy reference:


You can see all of my 'How To' summaries on my 'How To - Tips and Techniques' Pinterest board in case you've missed any. 

Here's a summary of our challenge rules:

  • Create any card, scrapbooking page, 3D project or packaging project that fits the challenge.
  • Please include the challenge graphic and link back to the challenge in your blog post. Turn off word verification so we can leave you lots of lovely comments. Make sure you link the post not the whole blog to the Linky. Use #AYSIXXX when uploading to a public gallery.
  • If you’re unsure about ‘the rules’, check the details under the Challenge Guidelines tab on the As You See It Challenge homepage.
  • In a colour challenge, black or other neutral can be used in outlines and sentiments but no other colours should be included. Stampin’ Up colours are used for reference but colours that are a close match are welcome.
We look forward to seeing your creations in the AYSI gallery.

Enjoy your day and I'll be back soon with another project. Until then, happy stampin'!


Stampin' Up! Supplies Used:

Table built using Product Table Builder by The Crafty Owl - Independent Stampin' Up! Demonstrator.

Daffodil Daydream CAS Easter Card CCS453

by Joanne James18. January 2022 13:00

It's Tuesday and time for a new challenge over at CAS Colours & Sketches. I am hosting this month and this week it's my second colour challenge of the month and I chose some fresh, spring colours to create with: 


For my card today I used the layout over at Paper Craft Crew and created a frame using two offset layering circle dies to highlight a single daffodil stem that I coloured with Blends in each of the three challenge colours:


The daffodil is one of my favourite spring flowers (along with tulips!) and I couldn't resist the new 'Daffodil Daydream' stamp set and bundle as a result. I stamped the detailed border from the same set for my horizontal element and finished off with an Easter sentiment and a trio of Daffodil Delight sequins that I found in my embellishment stash. The flower is so easy to colour and the co-ordinating Daffodil Dies make it a cinch to cut out perfectly:


This is a great set if you are new to colouring and want to give it a try as you only need a couple of colours to start off with and the flowers themselves won't take too long to complete. I love to colour and having had so much fun colouring the stem for my cardfront, I decided to stamp another one on the front of my envelope too - no naked envelopes here today!

Whether you are new to colouring or it's your passion, I have another great tip that I'm sharing in my Crafty Owl Creatives customer Facebook group today that is all about using Blends markers - why not pop over and take a look? If you're not already a member, click here to find the group and request to join - everyone is welcome and it's the place to share projects, ask questions and where I share lots of tips and tricks. 

Here is the visual summary of the key products used on today's project for you to pin for easy reference:


You can see all of my 'How To' summaries on my 'How To - Tips and Techniques' Pinterest board in case you've missed any. 

As a reminder, for our colour challenges, you must use all of the stated challenge colours. You may also use neutral colours; however, the challenge colours should be the most noticeable ones featured on your card. We use Stampin' Up! colour names for reference, but you are welcome to use any other companies' products as long as you match the challenge colours as closely as possible.

Enjoy your day; it's super frosty here so no more excuse needed to run indoors on the treadmill and keep warm and craft until it's time for the school run! I'll be back soon with another project. Until then, happy stampin'!


Stampin' Up! Supplies Used:

Table built using Product Table Builder by The Crafty Owl - Independent Stampin' Up! Demonstrator.

Nature's Beauty In Winter Clean and Simple PP574

by Joanne James16. January 2022 09:00

Today it's Sunday and time for this week's new challenge over at The Paper Players! It's the turn of the fabulous Claire to host this week and she has a seasonal clean and simple challenge for us to work with:


Winter animals - so many options! I decided to dig out a rather neglected stamp set of late and using Judy's sketch over at Freshly Made Sketches and very much inspired by the snow and blue tones over at AAA Cards  set to work on my clean and simple card - take a look:


Here's the low-down on today's card:

 I diecut a circle from my white cardfront and added a piece of Beauty of the Earth paper with a watercoloured blue behind and stamped some bushes and twigs in Versamark across the aperture and heat embossed them in silver. I then also stamped and fussy cut a leaf branch and arctic fox, heat embossed them both in silver then added some shading with my Smoky Slate Blends, before finishing with a sentiment from 'timeless Tulips' and a sprinkling of sequins. You can see the detail on the fox and the shine of the metallic slightly better below:


A quick reminder to all of you playing along over at The Paper Players this week, in addition to the theme of winter animals, it is more importantly 'clean and simple' week. What does this mean?

  • minimal layers and embellishments
  • clean, white space

 I liked this card so much I made another one, mirroring the sketch and using the arctic rabbit as the focal point:


 I used a different sentiment on this one - this one comes from the new 'Honeybee Home' set - but I like this card just as much as the fox. Again, you can see the shine and detail slightly better below:


Since my second card also uses this week's colours over at Just Us Girls of white, silver and light blue, I'll be linking it up there.

Here is the visual summary of the key products used on today's project for you to pin for easy reference:


You can see all of my Product and 'How To' summaries on my 'How To - Tips and Techniques' Pinterest board in case you've missed any. 

And one last photo of both cards together - which one do you prefer? I like them both and it was nice to give this stamp some love again.

Before you reach for your ink and papers, check out what our amazing team has created to inspire you this week:

Here's a quick recap of our challenge rules:
 
1.  Create a new paper project
2.  Upload your creation to your blog with a link back to us and provide a direct link to the post featuring your challenge submission.
3.  Please link your card to no more than four challenges, TOTAL.
4.  Have FUN!

Enjoy your day; having spent yesterday outside in the freezing fog watching the oldest of the James Juniors play hockey whilst hubby went to watch the youngest do the same (fun games and wins all round, so that helped!), we are all looking forward to a day indoors enjoying the warmth today! I'll be back tomorrow with another project. Until then, happy stampin'!


Stampin' Up! Supplies Used: 

Table built using Product Table Builder by The Crafty Owl - Independent Stampin' Up! Demonstrator.
 
Edit: Kim chose my card for Princess of Clean for FMS518 - yay!
See the source image

Peaceful Place And A Festive Escape

by Joanne James6. December 2021 10:15

Happy Monday everyone! It's the start of a busy week here in the James household and I'm squeeking in with an early post using Cecile's fabulous sketch over at Freshly Made Sketches before I get ready for my final online card class of the year! Here is Cecile's sketch:


I still had those Peaceful Place papers out on my desk over the weekend and was cutting out log cabins with abandon, so knew that I had to use the sketch to feature another one - take a look:


Here's the low-down on today's card:

I fussy cut another house and coloured my log cabin scene with my watercolour pencils and blended them with a blender pen, adding a liberal coat of clear Wink of Stella to the trees and snowy roof. Then came my moment of indecisiveness! I added a fussy cut fir tree for one of the sketch elements and I had decided that I was going to use my Stitched Snowflake Dies to add two snowflake impressions into my card base for the other two, however when I created my background in basic white it seemed a little flat. So I cut another panel, this time in Shimmery White, which was a little better, but still seemed to lack a little sparkle. So I went all-out and used a panel of (retired) white glimmer paper. This I LOVE - but it did prove difficult to photograph so that you could see the diecut snowflakes, amidst all that sparkle! I'm hoping you can see the idea a little better below:


As tricky as it was to capture on film, I absolutely love the sparkle and shimmer that a whole panel of glimmer paper adds and the diecut cut snowflake impressions are really effective in real life. A simple sentiment was all I needed to complete my card. So what do you think - is there ever something such as too much sparkle? I think not, but if you disagree, feel free to comment below! My super sparkly snowflakes are also perfect for a second play over at Inspired By this week - the first of their inspiration photos suggests they love a bit of snowflake sparkle!

Here is the visual summary of the key products used on today's project for you to pin for easy reference:


You can see all of my 'How To' summaries on my 'How To - Tips and Techniques' Pinterest board in case you've missed any. 

It is so grey, wet and miserable here today I would definitely rather escape to my little log cabin in the snow. Alas, no such luck - my class ladies are calling and wouldn't be too impressed! Enjoy your day and I'll be back tomorrow with another project. Until then, happy stampin'!


Stampin' Up! Supplies Used:

Table built using Product Table Builder by The Crafty Owl - Independent Stampin' Up! Demonstrator.

Peaceful Place Evergreen Winter Wonderland PP570

by Joanne James5. December 2021 08:00

Today it's Sunday and time for this week's new challenge over at The Paper Players! It's the turn of the fabulous Jaydee to host this week and she has a festive theme challenge for us to work with:


We've had snow twice this week in my part of the world and the current freezing temperatures are definitely showing early signs of a winter wonderland! I decided to make another card using the current colours over at The Color Throwdown and decided to get creative with my Peaceful Place designer series papers and create my own idyllic winter wonderland - take a look:


Here's the low-down on today's card:

Peaceful Place - I decided to fussy cut one of the log cabins from the Peaceful Place designer paper, across the upper horizon including some trees, and added this to a precut white circle, that I had added Polished Pink ink to with a blending brush and stamped on some snowflakes in Encore silver. I allowed the trees to overhang the circle border and liberally brushed the snowy areas of the scene with clear Wink of Stella. It's difficult to see on the photos, but this card is so sparkly in real life!

Evergreen Forest - I used another sheet of Peaceful Place designer series paper for my background, this time the sparkly silver snowflakes on a mottled grey background. I ran this panel through the Evergreen Forest Embossing folder to add a row of embossed fir trees to the background for added interest. Again, it's easier to see in real life - the texture adds subtle additional detail. I used the pink for my sentiment banner and borders for a pop of colour against the silver and grey:


Don't Forget The Inside - I carried the winter wonderland theme over to the inside of my card, adding a strip of the sparkly snowflake paper along with a couple of fussy-cut trees and a sentiment from the 'Snowflake Wishes' stamp set:


Doesn't that cosy log cabin look inviting? I could totally hole myself up there with my craft supplies and a roaring log fire for a week or two! 

Here is the visual summary of the key products used on today's project for you to pin for easy reference:


You can see all of my Product and 'How To' summaries on my 'How To - Tips and Techniques' Pinterest board in case you've missed any. 

Before you reach for your ink and papers, check out what our amazing team has created to inspire you this week:

Here's a quick recap of our challenge rules:
 
1.  Create a new paper project
2.  Upload your creation to your blog with a link back to us and provide a direct link to the post featuring your challenge submission.
3.  Please link your card to no more than four challenges, TOTAL.
4.  Have FUN!

You can see all of my 'How To' summaries on my 'How To - Tips and Techniques' Pinterest board in case you've missed any. 

Enjoy your day; I'll be back tomorrow with another project. Until then, happy stampin'!


Stampin' Up! Supplies Used: 

Table built using Product Table Builder by The Crafty Owl - Independent Stampin' Up! Demonstrator.


Playful Pets Peek A Boo Birthday Card AYSI264

by Joanne James26. November 2021 13:00

Today I'm sharing my design team card for our new challenge over at As you See It where it's time for a theme challenge:


I decided to use the sketch over at Try Stamping on Tuesday for my layout, grabbed my retired Playful Pets Designer Series Paper and embraced TSOT'S optional theme of 'peek a boo' with today's birthday card. This is what my card looks like when closed:


I used a simple birthday greeting from the 'Peaceful Moments' set inside my circle, adding a cat fussy cut from the DSP that fitted the shape perfectly. When you open the card, the magic slider causes a second sentiment to be revealed:


This sentiment is from the 'Pampered Pets' set, which I masked and stamped in sections in order that it would fit in my circle. I also added another cat - this one looks more than a little scared of the mouse though! Here's a close up:


Here's a little video I made to show the peek-a-boo in action:

As fun folds go, these cards are so easy to make - what fun!

Here is the visual summary of the key products used on today's project for you to pin for easy reference:


You can see all of my 'How To' summaries on my 'How To - Tips and Techniques' Pinterest board in case you've missed any. 

Here's a summary of our challenge rules:

  • Create any card, scrapbooking page, 3D project or packaging project that fits the challenge.
  • Please include the challenge graphic and link back to the challenge in your blog post. Turn off word verification so we can leave you lots of lovely comments. Make sure you link the post not the whole blog to the Linky. Use #AYSIXXX when uploading to a public gallery.
  • If you’re unsure about ‘the rules’, check the details under the Challenge Guidelines tab on the As You See It Challenge homepage.
We look forward to seeing your creations in the AYSI gallery.

Enjoy your day and I'll be back tomorrow with another project. Until then, happy stampin'!


Stampin' Up! Supplies Used:

Table built using Product Table Builder by The Crafty Owl - Independent Stampin' Up! Demonstrator.

Whimsy and Wonder Holly Christmas Card CCS 446

by Joanne James16. November 2021 12:00

It's Tuesday and time for a new challenge over at CAS Colours & Sketches. I am your host for the month of November and this week I have another colour challenge for you: 


 I am also playing along with Sue's challenge over at Addicted To CAS where the code word is 'circle' as I've used circles on my card today as part of my layout and design - take a look:


Here's the low-down on today's card:

The colour scheme for my challenge this week was taken straight from the oh-so-pretty Whimsy and Wonder designer paper. Mossy Meadow and Polished Pink is not a colour combination that shouts 'festive' particularly, but I do rather like it - especially with the addition of metallic silver. I chose one of the non-foiled patterns that has a tiny holly pattern on it and diecut a bunch of circles and added them in a vertically aligned column on my cardfront. I used a solid colour card base as I wanted them to blend in more than stand out against a brighter white, then overlaid them with a contrasting pink banner with my silver heat embossed sentiment, that I anchored with a piece of holly that I stamped, heat embossed, coloured and diecut with a stamp that is rather overlooked in the Whimsical Trees bundle I think:

I also added a simple silver twine bow (maybe a bit too blingy for a CAS card but it's Christmas - that's my excuse and I'm sticking to it!), before finishing off the inside of my card with a sentiment greeting from the same set and a leftover partial circle- waste not, want not and all that!

I rather like this simple card and I think these colours work surprisingly well together. What do you think? I'd love you to leave me a comment below with your thoughts, or better still play along - I can't wait to see what you create!  

Here is the visual summary of the key products used on today's project for you to pin for easy reference:


You can see all of my 'How To' summaries on my 'How To - Tips and Techniques' Pinterest board in case you've missed any. 

As a reminder, for our colour challenges, you must use all of the stated challenge colours. You may also use neutral colours; however, the challenge colours should be the most noticeable ones featured on your card. We use Stampin' Up! color names for reference, but you are welcome to use any other companies' products as long as you match the challenge colours as closely as possible.

Enjoy your day. I have one of the James Juniors home poorly today, so am juggling jobs with nurse duty. Not sure whether I'll manae a creative post tomorrow but will be back for sure on tursday with my TicTacToe post and a reminder that it will be the last day to save in the seasonal sale. Until then, happy stampin'!


Stampin' Up! Supplies Used:

Table built using Product Table Builder by The Crafty Owl - Independent Stampin' Up! Demonstrator.

Mini Catalogue

BROWSE THE CATALOGUE

The mini catalogue is now live! Read and download your copy here.

Shop Online

Access my online shop 24 x 7, 365 days of the year:

Current April hostess code:

VDKNV7BH

Shop Online

Join My Team

It's always a great time to join Stampin’ Up! New team members can get £130 worth of products for only £99 + free business supplies + free shipping + all the fun being a part of Stampin’ Up! Stampin' Up! has something for everyone: join my growing team and benefit from my support to enjoy Stampin' Up! however you choose.

If you're interested, call me for a chat to understand how I can help you realise your goals. Alternatively, if you have already decided to sign up and you just can't wait, please click here for the link to the online form where you can sign up and order your starter kit right away! 

Latest Kit!

Stampin Cut and Emboss

The Rock Legend Kit has all you need to make 8 cards with coordinating envelopes. Along with the new Panda Friends Kit, both are available from January 4th for just £14 each - get yours here!

2023-24 Annual Catalogue

BROWSE THE CATALOGUE

Click on the catalogue for a full list of current SU! supplies - if you would like to order any of the items featured, please drop me a line at [email protected] or give me a call on 07773 421446 - I'd be happy to help.

New Online Exclusives

There are new products available exclusively in the online store from 5 March - check them out here.

About Me

Hi I'm Joanne and live in Northampton and when I'm not looking after my husband and two beautiful children, am an avid crafter with a passion for all things Stampin' Up!

I must confess that I have never been a big rubber stamper - until I discovered Stampin' Up! that is. I love the fact that I can get such great results with co-ordinating stamps, inks, papers and punches - the possibilities are endless! Join me on my stamping journey as I share the things I love and be inspired to create amazing things yourself!

Follow Me

Monthly Newsletter

Box Builder

Click the button above to use Box Buster to create your custom box design using the Envelope Punch Board!

Kits Collection Now Available!

Stampin Cut and Emboss

The new Kits Collection from Stampin' Up! is now available!

Click here to see the current kits available and order yours online today.

I Design For


Stampin' Up Stuff

This is my personal blog and is not endorsed by Stampin’ Up! I hope you find it a plentiful source of ideas and personal inspiration but please don't copy my designs for contest submission or use for classes, publication or sale without express permission.