I'm in love ... with the Flowerfull Heart!

by Joanne James3. January 2014 15:55

Good day, blog readers! I am sounding cheerier than I am feeling today; having got through Christmas without so much as a sniffle, I'm paying for it now. Since New Year's Eve I have been battling the worst cold I've had in ages - typical. Anyways, not to be deterred, today I have a special announcement - I have a new love in my life! I know you often here me say I love new products, but I an honestly say that I've never had as much fun with a single stamp as I'm having with the 'Flowerfull Heart' stamp that's available as part of the 'Whole Lot of Love' promotion. Along with the other items in this promotion, this stamp is only available until the end of January, but I can assure you I'll be sharing lots of ideas using this stamp this month.

Whilst this stamp is heart-shaped, the flower design means this stamp lends itself to a wide variety of cards, and not all valentine-related. All that said, for my first card I decided upon a classically elegant anniversary card:

I went with the classic colours of Very Vanilla and Cherry Cobbler and stamped both the image and sentiment in Versamark and heat embossed in Cherry Cobbler embossing powder. You can just see the texture in the photo, but you can't really appreciate the glossy finish which looks beautiful in real life. the other thing I love about this stamp is that it fits inside one of the Hearts Framelits perfectly, so makes cutting out a cinch.

This card is very 'me' and true to my style; I'll be back to share another card I made with this stamp tomorrow. Until then, happy stampin'!


Stampin' Up! Supplies Used:

Table built using Product Table Builder for Stampin' Up! from The Crafty Owl.


Tags: , , , , , , , , ,

Cards | Stamping

Festive Flurry Tag a Bag Gift Box

by Joanne James28. December 2013 20:33

Another quick post from me today in between continuing festivities. We had one of our two annual trips to the pantomime today: this one our family visit to one of the smaller theatres in town, which is always guaranteed to put on a good show. This year was no exception - the performance of 'Wind In The Willows' was one of the best I've seen in some time and we all had a lovely time. If you're local to Northampton you really should visit the Royal before the run finishes - you won't regret it.

Now for today's project! As my regular blog readers will know, one of my other hobbies is biscuit baking and decorating. I've made lots of them in the last few weeks, mostly as gifts for teachers, friends and neighbours. I've packaged them in lots of different ways and often use jars tied with ribbon for my bite-size cookies, but one of my favourite methods of presentation for standard size biscuits has to be the Tag a Bag Gift Boxes - you can decorate and embellish, but I love the 'sneak peek' you get of the contents inside through the acetate sleeve. These boxes are also super sturdy, which is great for transporting their reasonably fragile contents. Many of my boxes were made and gifted before I got the chance to photograph them, but I managed to get a shot of my very last box before its departure: 

I finished the box with a belly band of Pool Party layered with a strip of Winter Frost DSP through the centre and finished with a pretty triple-layered snowflake, just right for my festive snowflake iced gingerbread biscuits in a co-ordinating colourway. This particular box of biscuits was destined for Aaron, the UPS man who delivers my Stampin' Up! parcels all year round; just one of the many people I like to show my appreciation for, especially at this time of year.

Tomorrow I have a special project to share: not a Christmas themed project, but rather something I made for a dear friend of mine as a Christmas gift. Here's a little glimpse just to whet your appetite: 

Hopefully you're intrigued - pop back tomorrow to see the whole thing. Until then, happy stampin'!


Stampin' Up! Supplies Used:

Table built using Stampin' Up! Product Table Builder from The Crafty Owl.


Tags: , , , , , , , ,

3D Projects | Boxes | Stamping

Christmas Star - Gold and Silver

by Joanne James23. December 2013 21:51

Today a quick post to share the Christmas cards I made for my Mum and Dad and Mother-in-law respectively - and a little 'sneak peek' of some new product that will be available in the Spring-Summer seasonal catalogue at the end of January. I wanted to use the single stamp 'Christmas Star' for my cards; this is such a great statement stamp but feel like I haven't used it anywhere near enough this season. I was inspired by this Brian King card I saw a while ago here. For my version, I decided to use the same design for each card, but create it in two different colourways. Here's the first one in silver and Midnight Muse:

I wanted the star to take centre stage, so kept the design fairly simple and embossed the star then hand cut and scored along the point lines to create a lovely 3-dimensional effect. I adhered the star to the card with rolled glue dots at the end of each point; this is a better option where you don't want the bulk of a dimensional. To finish I added the Christmas sentiment from the 'Delightful Dozen' stamp set.

For the second version, I used gold and Cherry Cobbler:

Did you spot the 'sneak peek' of the new product? Yes, shiny gold sequins - just one of a number of new gold products that will make their appearance in the Spring-Summer seasonal catalogue in just over a month's time. I just couldn't resist using a few to finish off my Christmas projects.

So here's a picture of both cards together; the question is, which one do you prefer?

I must say, I think it's a tough call - I like them both, and I'm not sure which I would choose as my favourite. Both were well received by the recipients, so I guess that's the main thing!

Tomorrow is Christmas Eve, so will be a day of food preparations for the big day, along with a few fun things too. I'll be back to share another Christmas project too; until then, happy stampin'!


Stampin' Up! Supplies Used:

Table built using Stampin' Up! Product Table Builder from The Crafty Owl.


Tags: , , , , , , , , ,

Cards | Stamping

Festive Flurry 3D Snowflake Bottle Tag and Video Tutorial

by Joanne James26. November 2013 13:20

Well, I'm back from Stampin' Up! 2013 European Convention and what can I say - my team and I had a blast! We came home exhausted, but having had the best time swapping, learning, meeting old friends, making new ones, 'sneak peeking' at some fabulous new products. Normal blogging is now resumed and I have lots of lovely things to show you, starting with the general swap that one of my downlines, Barbara, and I made for everyone we met at convention. It was something of a 'case' on the tag that features in this year's autumn-winter seasonal catalogue, but with a few changes to make it our own. Here is a picture of one of our finished swaps:

We also made some in a Pool Party/Island Indigo/Embossed Silver colourway - I will have to edit this post to include a photograph of one of these as I can't find one at the moment (might have to retake!) The snowflakes in the Festive Flurry set are great for making ornaments or 3-D tags or box-toppers with and you can layer just three snowflakes or all four to get a really large one. I shot a short video tutorial to show you how to put these layered snowflakes together to create this added dimension; grab your glue gun and click on the link below if you would like to see how to achieve it yourself - the video also shows the snowflake in the alternative colourway:

 I hope you find the video useful and have fun creating your own snowflakes in lots of different colour combinations. Just before I leave you the supplies list for this project, I thought you might like to see a fun Convention picture of me with 2 of my downline team members - I'm the one in the middle with the stripey hat:

If you would like to join us for some fun - and chocolate! - at next year's European Convention in Brussels next October, get in touch for more information about the benefits of joining my team.

Back tomorrow with more swaps and gifts made for friends; until then, happy stampin'!


Stampin' Up! Supplies Used:


Postage Due Telford Swap

by Joanne James27. August 2013 19:30

A quick post from me today. Here is the last of my favourite Telford swaps to share: this one was by Maria (you can see her blog here):

I like it because it used a number of products and sets I don't have and showcases some beautiful clear embossing. I love the overall finished effect of this card and the unusual colour combination too.

Back tomorrow with another of my cards; until then, happy stampin'!


Stampin' Up Supplies:

Stamps: Postage Due

Cardstock: Primrose Petals, Pool Party, Whisper White, Early Expresso

Ink/Stampin' Write Markers: Primrose Petals, Pool Party, Versamark

Tools: Big Shot, Delicate Design Textured Impressions Embossing Folder, Argyle Textured Impressions Embossing Folder, Floral Fusion Sizzlit

Finishing Touches: Clear Embossing Powder, Early Expresso Stitched Grosgrain Ribbon, Basics Rhinestones


Tags: , , , ,

Cards | Stamping | Swaps

Best of Flowers - Double Embossed Vintage Class Card

by Joanne James21. July 2013 20:07

So I have a confession: I don't like all the stamps that Stampin' Up! has to offer! I like modern, clean and unfussy design and don't really go in much for the vintage, distressed look. So whilst I loved three of the four stamps in June's 'Best of Flowers' set, I struggled with the fourth one. The bouquet of roses had a real 'old fashioned' look I thought and I would probably have left it in the box uninked. I could happily spend endless hours creating things with the other three stamps in the set, each of which I love, but for the fact that I had decided to use this set for this month's card class and therefore felt I should use each of the stamps equally. After much huffing and puffing, I came up with a couple of cards and this is one, of them:

This is something of a departure from my usual style, but I quite like the way it turned out. It was also a great opportunity to teach the ladies in my class the double embossing technique, which enabled me to make the stamp the focal point, without creating an overly fussy design. Some sponging of Crumb Cake ink over the surface and some ruched seam binding ribbon were all that I needed to finish it off.

I think maybe it's the kind of card that grows on you; the more you look at it, the more appeal it has - some 'olde worlde' charm, perhaps! if you would like to own the 'Best of Flowers' set, it is still available to purchase for £13.95 until 31st March 2014. Equally, if you would like to join one of my card classes, do get in touch for more details - our September class will feature the new 'Mosaic Madness' stamp set, along with the coordinating punch and embossing folder.

Back tomorrow with another card I made using this stamp; until then, happy stampin'!


Stampin' Up Supplies:

Stamps: Best of Flowers

Cardstock: Crumb Cake, Very Vanilla

Ink/Stampin' Write Markers: Crumb Cake

Tools: Stamp-a-ma-jig, Perfect Polka Dots Embossing Folder, Designer Frames Embossing Folder, Sponge Dauber

Finishing Touches: Crumb Cake `1/2" Seam Binding Ribbon


Embossed Daisies and new Build-a-Brad

by Joanne James11. July 2013 22:06

Another mad busy day today, working on several commissions, a few household chores and preparing for the last day of the school term tomorrow. As promised, here's the other card Barbara and I made when we were busy embossing the other day - a sunny yellow base with a heat embossed white daisy pattern:

Here's a close up of the embossed detail where you can see the raised pattern:

I love the simplicity of this kind of card and Barbara and I originally left ours with the embossed panel taking centre stage, but I later decided to add a sentiment from the Sweet Essentials stamp set and two of the lovely new build-a-brads with Daffodil Delight candy dots (did you guess the new product correctly?!)

Just a reminder too that 'Sweet Essentials' is one of the greeting stamp sets available at 25% off this month - it can be yours for £10.46 (clear mount).

Back tomorrow with another project - another of my new annual catalogue favourites. Until then, happy stampin'!


Stampin' Up Supplies:

Stamps: Sweet Essentials

Cardstock: Whisper White, Daffodil Delight

Ink/Stampin' Write Markers: Daffodil Delight, Versamark

Tools: Heat Gun

Finishing Touches: White Embossing Powder, Brights Candy Dots, Candy Dots Brad Bases

Tags: , , , , , , ,

Cards | Promotions | Stamping

Vellum Embossed Best of Butterflies

by Joanne James10. July 2013 22:14

A late blog post today, but a post none the less! I've been busy putting the finishing touches to some teacher gifts that I'll share with you later in the week, but for those of you who follow me on Facebook and saw my 'sneak peek' earlier today, you will know that today's card features a butterfly - one of the stamps from this month's 'Best of' anniversary set, Best of Butterflies.

I spent some time with my downline Barbara yesterday afternoon working on different embossing techniques and this is one of the cards we produced:

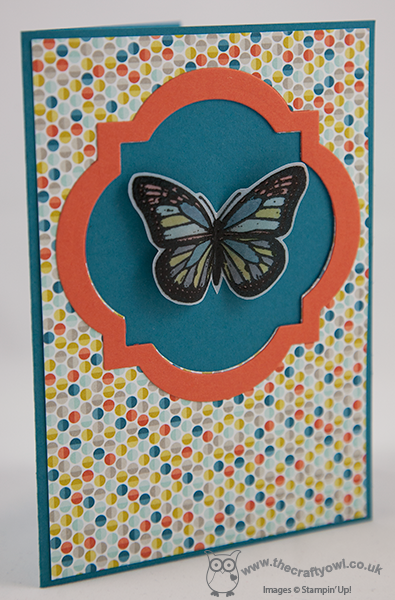
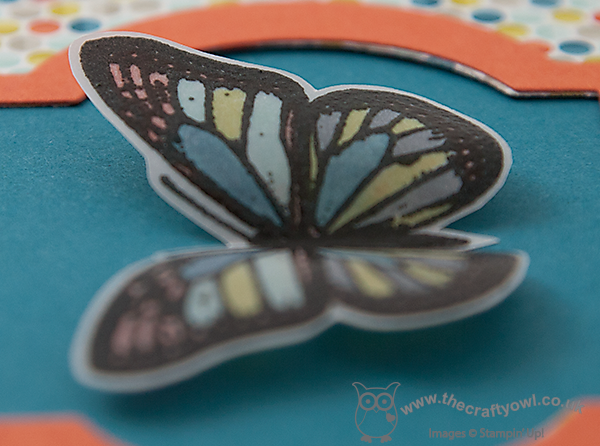
The butterfly takes centre stage on this card and is stamped in Versamark on vellum then embossed in black to give a textured outline. We then picked up the colours in the now retired Sale-A-Bration Sycamore Street paper to shade our butterfly, colouring with markers on the underside of the butterfly so that the muted colours show through. Here is a close up of the detail where you can really see the texture of the black embossing on the butterfly:

This is the first time I've tried this technique and I really like the effect that this gives. I will be sharing more cards featuring the Best of Butterflies stamp set in coming days, but if you can't wait to get started creating your own butterfly cards, contact me and I will happily order this stamp set for you.

Back tomorrow with more embossing and another new product ... any guesses? I'll give you a clue - it was one of my 'top 5' wishlist products in the video I shot to accompany the launch of the new annual catalogue this month. If you haven't yet seen it, you can find it here. Until then, happy stampin'!


Stampin' Up Supplies:

Stamps: Best of Butterflies

Cardstock: Island Indigo, Tangerine Tango, Sycamore Street DSP (Sale-A-Bration - retired), vellum

Ink/Stampin' Write Markers: Island Indigo, Pool Party, Tangerine Tango, Summer Starfruit, Basic Grey, Versamark

Tools: Window Framelits, Heat Gun

Finishing Touches: Black Embossing Powder

Tags: , , , , , ,

Cards | Promotions | Stamping

Remember When...?

by Joanne James13. June 2013 22:37

Last night's card class was fun as always but too late for a blog post and today has been another busy day making birthday cards for the young lady of the house and some Father's Day cards, ahead of the big birthday weekend. I'll share these in the next few days, but meanwhile tonight I thought I'd share the last of the Golden Anniversary cards I made recently. This one is quite different to the previous two; instead of leading with a 50th Anniversary sentiment, I used one of the stamps from the retiring Word Play set as the focus:

I've never used this stamp before, as it never seemed right for anything I was designing. I have toyed with using it as a feature stamp on a scrapbook page (a project for another time though!) then as I was thinking about what it would be like to celebrate 50 years of marriage myself (believe me, that is a LONG way off!) and it struck me how appropriate this stamp would be for a milestone anniversary card - 50 years is a lot of memories!

I decided to use white and brushed gold cardstock again and leave the layout quite simple, with Oval and Label Framelits making light work of the layered front. You can see the lovely gold embossing in this photo too - it adds a real shine. I finished the front with a fussy organza double bow then stamped the inside with my congratulatory anniversary message:

So that's all my Golden Anniversary cards for the time being - which one do you prefer? The other big news of the day is that registration for this year's Stampin' Up! European Convention opened today. Better still, this year convention is being held in Manchester in the UK. I've signed up already; if you would like to enjoy two days of stampin' fun from 22nd-23rd November, contact me for a chat about this and the other benefits being a Stampin' Up! demonstrator can offer.

Back tomorrow with another project - until then, happy stampin'!


Stampin' Up Supplies:

Stamps: Word Play, Memorable Moments

Cardstock: Whisper White, Brushed Gold

Ink/Stampin' Write Markers: Versamark

Tools: Ovals Framelits, Labels Framelits, Stamp-a-ma-jig

Finishing Touches:  Gold Embossing Powder, Whisper White 5/8" Organza Ribbon

Hearts of Gold

by Joanne James11. June 2013 22:48

Very late post from me today, but having had a day out on a geography field trip, one of the children's classmates round for tea and a Parents' Association fete planning meeting, this feels like the first time I've sat down since breakfast! I've the second of my Golden Wedding Anniversary cards to share today, this one using the Hearts A Flutter stamps and framelits:

For this card I used a white card base with a raised brushed gold and white layered panel, with two gold embossed hearts. I have used the Hearts A Flutter stamps and framelits in many ways and love the versatility of this set. I used more gold embossing for the sentiment across the bottom of the card. So, quite different to yesterday's card but this is also on it's way to another couple celebrating 50 years of marriage - some achievement, for sure.

Back tomorrow with the last of the golden anniversary cards; until then, happy stampin'!


Stampin' Up Supplies:

Stamps: Hearts A Flutter, Memorable Moments

Cardstock: Whisper White, Brushed Gold

Ink/Stampin' Write Markers: Versamark

Tools: Hearts a Flutter Framelits, Stamp-a-ma-jig

Finishing Touches:  Gold Embossing Powder, Whisper White 5/8" Organza Ribbon

Tags: , , , , , , , , ,

Cards | Stamping

Mini Catalogue

BROWSE THE CATALOGUE

The mini catalogue is now live! Read and download your copy here.

Shop Online

Access my online shop 24 x 7, 365 days of the year:

Current March hostess code:

S9F2XJJW

Shop Online

Join My Team

It's always a great time to join Stampin’ Up! New team members can get £130 worth of products for only £99 + free business supplies + free shipping + all the fun being a part of Stampin’ Up! Stampin' Up! has something for everyone: join my growing team and benefit from my support to enjoy Stampin' Up! however you choose.

If you're interested, call me for a chat to understand how I can help you realise your goals. Alternatively, if you have already decided to sign up and you just can't wait, please click here for the link to the online form where you can sign up and order your starter kit right away! 

Latest Kit!

Stampin Cut and Emboss

The Rock Legend Kit has all you need to make 8 cards with coordinating envelopes. Along with the new Panda Friends Kit, both are available from January 4th for just £14 each - get yours here!

2023-24 Annual Catalogue

BROWSE THE CATALOGUE

Click on the catalogue for a full list of current SU! supplies - if you would like to order any of the items featured, please drop me a line at [email protected] or give me a call on 07773 421446 - I'd be happy to help.

New Online Exclusives

There will be new products available exclusively in the online store from 5 March - check them out here.

About Me

Hi I'm Joanne and live in Northampton and when I'm not looking after my husband and two beautiful children, am an avid crafter with a passion for all things Stampin' Up!

I must confess that I have never been a big rubber stamper - until I discovered Stampin' Up! that is. I love the fact that I can get such great results with co-ordinating stamps, inks, papers and punches - the possibilities are endless! Join me on my stamping journey as I share the things I love and be inspired to create amazing things yourself!

Follow Me

Monthly Newsletter

Box Builder

Click the button above to use Box Buster to create your custom box design using the Envelope Punch Board!

Kits Collection Now Available!

Stampin Cut and Emboss

The new Kits Collection from Stampin' Up! is now available!

Click here to see the current kits available and order yours online today.

I Design For


Stampin' Up Stuff

This is my personal blog and is not endorsed by Stampin’ Up! I hope you find it a plentiful source of ideas and personal inspiration but please don't copy my designs for contest submission or use for classes, publication or sale without express permission.