Perfectly Wrapped Gift Packaging Made Easy

by Joanne James24. May 2017 06:00

Today I'm sharing a reminder of some of the kits that will be retiring from the current annual catalogue. You can read my previous posts about the Watercolour Wishes and Oh Happy Day all inclusive card kits here and here. The catalogue also includes some fun project kits too, including the Perfectly Wrapped product kit.

This kit contains everything you need to create 8 bags (4 each of 2 different designs) and 8 boxes (4 each of 2 different designs). Here's a picture of everything the kit contains:

 Perfectly Wrapped Project Kit

This little lot makes a whole ton of cute boxes and bags that are perfect for gifting treats:

Perfectly Wrapped Project Kit

You can use it with the co-ordinating Perfectly Wrapped stamp set or find your own creative uses for it - you choose! 

In addition to the photo of one of the bags above, here's one of the boxes that I made up:

These would be great for party favours and are also proving popular with my daughter's almost teenage friends due to the trendy packaging and are a great size for jewellery, makeup or a good supply of chocolates!

The nice people at Stampin' Up! have also produced a video that show how this kit comes together:


If you want to get your hands on some stylish packaging that's easy to put together, click on the links at the bottom of today's post to go the online store. It's a wrap!

Here is the visual summary of the key products used on today's project for you to pin for easy reference:


You can see all of my 'How To' summaries on my 'How To - Tips and Techniques' Pinterest board in case you've missed any. 

Enjoy your day and I'll be back tomorrow with another project. Until then, happy stampin'!


Stampin' Up! Supplies Used:

Table built using Product Table Builder by The Crafty Owl - Independent Stampin' Up! Demonstrator.

Label Me Pretty Homemade Jam #GDP087

by Joanne James20. May 2017 11:00

Happy Saturday everyone! A mix of old and new today and not a card but some cute packaging which is perfect for this week's Global Design Project challenge:

Many of my readers know that the James family are keen vegetable growers and we have a small kitchen garden which keeps us supplied with fresh vegetables through the summer months. We also have a collection of fruit trees and last year for the first time I started making my own jam. one of my James Juniors is an absolute jam addict - given the choice, Ben would live on jam on toast  - so much so, that his big sister once declared we should have called him 'Jam-in-Ben' rather than 'Ben-jam-in', something that sticks to this day!

Anyway, I digress - making my own jam is a great way to make the most of our fruit and meet demand. I also love to give it away as a gift occasionally too and that's where today's project comes in; whilst Ben is all about the jam itself, if I'm gifting it I like to pretty up the packaging somewhat and there is a stamp set in the new catalogue that is perfect for me  - take a look:


Here's the low-down on today's card:

Label Me Pretty - The new 'Label Me Pretty' stamp set is just perfect for me and anyone else how likes to preserve or cook and pretty-up their gifts for giving; the label I've used today works for any kind of produce. The set includes lots of other stamps too, that would work for other types of gift giving or on cards too - look out for more featuring those another day. Wondering how I got it so beautifully cut out too? That would be the co-ordinating Pretty Label Punch  - love this! I will have my jams labelled in no-time!! 

Fruit Stand - I paired my label with a band of strawberry-patterned Fruit Stand paper; a great pack with images of apples, pears lemons and peaches too. This is retiring 31 May though so if you want to add this to your jam jars you need to stock up soon!

Add A Spoon - Lastly, I wanted to add a little something to my jar and added a little wooden spoon, stamped with a strawberry from the 'Cool treats' stamp set. This is a simple way to add a 'wow' to a plain spoon - and in the words of Ben, a great way to enable someone to tuck in to their jam as soon as they receive it! I simply tied it to my jar using some of the retiring Cucumber Crush 5/8" mini-striped ribbon - here's a close up of my spoon detail: 


Here is the visual summary of the key products used on today's project for you to pin for easy reference:


You can see all of my 'How To' summaries on my 'How To - Tips and Techniques' Pinterest board in case you've missed any. 

Given the recent addition of four chickens to the James Household, my next challenge is to use some of our eggs to create homemade lemon curd, one of Rebecca's favourite treats. Watch this space for some lemon-inspired packaging at some point later in the year! Oh and if Stampin' Up! could provide some raspberry-patterned paper it would also be much appreciated!!

I'll be back tomorrow with another project for this week's new challenge over at The Paper Players. We have a busy day today - Rebecca has a big swimming meet and is racing all day (at the time of writing, she has already achieved two 100m personal bests for her breaststroke and individual medley, so that is great news) and Ben has a football-themed birthday party to attend followed by his swimming lesson. Enjoy your day and until tomorrow, happy stampin'!


Stampin' Up! Supplies Used:

Table built using Product Table Builder by The Crafty Owl - Independent Stampin' Up! Demonstrator.

Window Box Thinlit Gift Box And The Benefits Of Crafting Together

by Joanne James8. May 2017 20:00

As promised on Friday (Saturday was consumed with homework, swimming and the first cricket match of the season - goodness, doesn't that game go on FOREVER?!! - so I didn't get to post this the as planned), today I'm sharing with you another of the makes from one of last month's technique classes, featuring the Window Box Thinlits dies. In addition to using them to make the birthday card I shared on Friday and an Easter basket, we also made a box with the thinlits and one of the decorative pieces. Here is our finished box:


Here's the low-down on today's project:

Window Box Thinlits - The Window Box Thinlits make the most adorable hexagonal box that is incredibly versatile. It can be used as packaging for a small gift or would be the perfect size for a wedding favour; it also makes a beautiful table decoration if you place a battery-operated tealight inside and looks lovely if a number of them are clustered together in this way. You can build it plain, decorate with designer series paper or use the selection of cutout dies to give extra pattern to the side and top panels. The box above has the side panels cut out and backed with vellum, along with a layered vellum backed top, so that the ribbon tie sits below the vellum panel and allows the sentiment banner to sit neatly across the top of the box.

So Much More Than A Box - The Window Box Thinlits are so much more than a standard box though. This versatile thinlit die set can also be used to make other items, such as sail boats and baskets, and can be used to create alternative boxes in different shapes and sizes too. The benefit of featuring this set in a class is that you can demonstrate and show the class participants how to do the slightly more unusual things in a hands-on way and be there to answer their questions and queries as you go. It's also a good opportunity to ensure everyone understands what each thinlit piece is for, any hints and tricks and sometimes how to avoid common pitfalls when using the item in question.

Love What We Do, Share What We Love - Stampin' Up!'s Statement of the Heart is "To love what we do and share what we love, as we help others enjoy creativity and worthwhile accomplishments ... in this we make a difference". There are many ways as a demonstrator that this can be achieved and I'm someone who loves to share my projects in a variety of ways. I love the 'art' of blogging (I find it relaxing and in many ways a kind of free therapy!) and sharing my projects with you, but in the online world not everyone who reads my blog or sees my projects on Pinterest or other social media channels leaves feedback or a comment to say what they think. That's one of the things I love about face-to-face classes - the feedback is immediate and it is instantly gratifying to share my love of Stampin' Up! with those that attend my classes and see them leave at the end of a session having learned lots, made some beautiful things and be brimming with ideas of how they can use their Stampin' Up! purchases to bring them continued and lasting crafting pleasure. There's nothing quite like it! 

I would love to see you at one of my classes and share my knowledge and experience of how to get the best from your Stampin' Up! products 'up close and personal'. You can see the current list here but do check back regularly for updates as new classes are added from time to time and will be updating shortly with a new set of classes featuring new items from the new 2017-18 Annual Stampin' Up! Catalogue. 

Here is the visual summary of the key products used on today's project for you to pin for easy reference:


You can see all of my 'How To' summaries on my 'How To - Tips and Techniques' Pinterest board in case you've missed any. 

I'll be back tomorrow with another project. Until then, happy stampin'!


Stampin' Up! Supplies Used:

Table built using Product Table Builder by The Crafty Owl - Independent Stampin' Up! Demonstrator.

Petals And Paisleys 3D Home Decor Wall Art - FREE PDF Tutorlal

by Joanne James26. April 2017 20:13

Today I'm sharing a project that I made in an all-day class last November, but didn't share at the time on my blog. Do you remember the 3D home decor piece featuring the Paisleys and Posies stamp set and co-ordinating Paisleys Framelits that featured on page 46 of the Autumn-Winter seasonal catalogue? Here's a reminder:


I thought this was a lovely and unusual piece of wall art, so decided to use it as the basis for an all-day class where the ladies attending would each make their own version of this project and also stamp a stack of cards using the remaining papers in the Petals & Paisleys Specialty Designer Series Paper pack, which they each received in their kits.

Here's my finished framed piece - I originally framed it in white, but have since had it professionally framed in a beautiful copper-coloured wood frame similar to the one in the catalogue, which has much greater impact:


I like this piece so much it is now hanging on the wall in my dining room. The photo above really doesn't do it justice - just look at the lovely shine on the foil and embossed copper against the navy: 


So very pretty! The finished piece measures 12" x 12" unmounted and unframed. The Petals and Posies stamp set and co-ordinating Paisleys Framelits were carried over and are still available, however the paper was discontinued. Good news though: I decided to share this project today because those lovely Petals and Paisleys Specialty Designer Series Papers are now available again on the Clearance Rack for only £4.70 per pack - bargain!

I ALSO HAVE A SPECIAL OFFER FOR YOU - A FREE PDF TUTORIAL!

For everyone who purchases the Petals and Paisleys Specialty Designer Series Papers on the Clearance Rack along with the Petals and Posies stamp set and co-ordinating Paisleys Framelits from me through my online store before the end of this month (Sunday 30th April) using the current hostess code Y2MKPTP6, I will send you a copy of my PDF tutorial for the above home decor wall art project, containing full written and photo step-by-step instructions FOR FREE, so that you can recreate it too! Instructions will be emailed separately following purchase - please ensure you include your email address and check the box that allows you to be contacted by me as your demonstrator following your purchase to send them on to you.


The links below will take you to my online store to enable you to purchase all of the supplies you need. I'll be back tomorrow with another project and more Stampin' Up! news. Until then, happy stampin'!


Stampin' Up! Supplies Used:

Table built using Product Table Builder by The Crafty Owl - Independent Stampin' Up! Demonstrator.

Basket Builder Easter Chocolate Bunny Treats

by Joanne James13. April 2017 22:31

We are into our school Easter holidays with a vengeance here in the James household and it is leaving little time for crafting! I just wanted to pop buy and share with you a cute little Easter bunny basket treat using the Basket Bunch stamp set and Basket Builder Framelit dies - retiring, but still available at a great discount at present:


These little 3D baskets are so easy to make with a 1 1/4" wide piece of cardstock, scored twice to create a U-shape, attached between each basket piece to hold the chocolate Lindt bunny then decorated with some stamped and cut out out flowers and a bow. I made these for each of my ladies that  attended a class with me this month as a thank you Easter treat and it's fair to say they were definitely well received!

You've still time to make these if you have the product or alternatively snap up a bargain now and be super-prepared for next year!

Here is the visual summary of the key products used on today's project for you to pin for easy reference:


You can see all of my 'How To' summaries on my 'How To - Tips and Techniques' Pinterest board in case you've missed any. 

I'll be back tomorrow with another project. Until then, happy stampin'!


Stampin' Up! Supplies Used:

Table built using Product Table Builder by The Crafty Owl - Independent Stampin' Up! Demonstrator.

Sealed With Love Lidded Notelet Box Using The Envelope Punch Board

by Joanne James6. February 2017 20:00

Happy Monday everyone! I've had a busy day today with the first of this month's classes. I'll share some of those projects later in the week, but for today I wanted to share a simple little lidded box that I made with my Envelope Punch Board to hold some cute little Valentine's love notes. Now I didn't do the best job of photographing this one - the lid edges get a little lost against the background:


Here's the box with one of the little notelets inside:


Here's the low-down on today's project:

Sending Love Notes - Way back at Onstage last November we made three little notelets using the Sealed with Love Bundle. I modified mine slightly, cutting down the panels of Sending Love patterned paper and adding each one to a 3 1/2" Whisper White card base. I designed a few more using the other stamps in the set and made a bunch of co-ordinating envelopes and decided to make a little box to keep them all in. 

Love My Envelope Punch Board - Not only did I use my Envelope Punch Board to make my designer series paper envelopes (each made to fit a card of 3 1/2" square and requiring a 6" square piece of paper) but I also used my Box Buster tool to help me design a 4" square lidded box to hold them in. I love making lidded boxes usign the EPB rather than a scoreboard, as it makes them much more sturdy and rigid. It's really easy to do - you just need to make your lid 1/8" larger than your base for a snug fit.

Ribbon and Hearts - I continued the red and white theme of my project by adding a triple loop of Sending Love Ribbon with a double bow to adorn my sassy red Valentine-embossed heart to complete my box embellishment.

Here is the visual summary of the key products used on today's project for you to pin for easy reference:


You can see all of my 'How To' summaries on my 'How To - Tips and Techniques' Pinterest board in case you've missed any. 

I will be using these little notes to hide in my children's school bags and pencil cases this month; they love to find a surprise note when they least expect it; I might even slip in a little chocolate treat too. I'm also linking up with the team over at SUO Challenges again where they are also celebrating Valentine's this week.

I'll be back tomorrow with another project. Until then, happy stampin'!


Stampin' Up! Supplies Used:

Table built using Product Table Builder by The Crafty Owl - Independent Stampin' Up! Demonstrator.

Forever Evergreen Christmas Tree Home Decor Wall Art - Free Tutorial

by Joanne James26. November 2016 16:08

Another week over! Mine has been a busy one, with two full days of classes, Christmas preparations and not a minute to spare, hence the lack of blog posts. So I hope you have all been making the most of this week's Online Extravaganza; I know that Monday's flash sale was popular with my customers and I am already receiving orders for the second one, to take place next Monday.

Today I have another 3D home decor project for you and it uses items from the Forever Evergreen Project Kit on page 35 of the seasonal catalogue - one of the products that is available at a 10% discount during this week's sale and the co-ordinating Forever Evergreen stamp set is also available at a 20% discount. This project is a CASE of one that was included in our Demonstrator-only quarterly magazine and it's a great way to get more mileage from the stamp set if you've invested in it to complete your trees and use up lots of leftover bits and pieces from the kit. Here's a reminder of what those fabulous Christmas trees look like (you can read my previous blog post on those here):


Using one of the tree sections, some leftover sequins, card and by adding a few other supplies, I created this lovely piece of wall art:


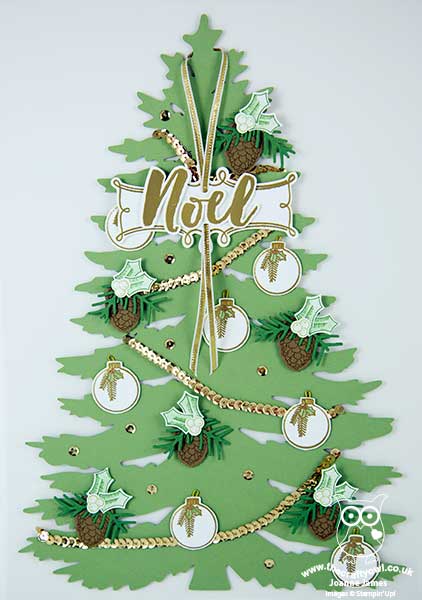
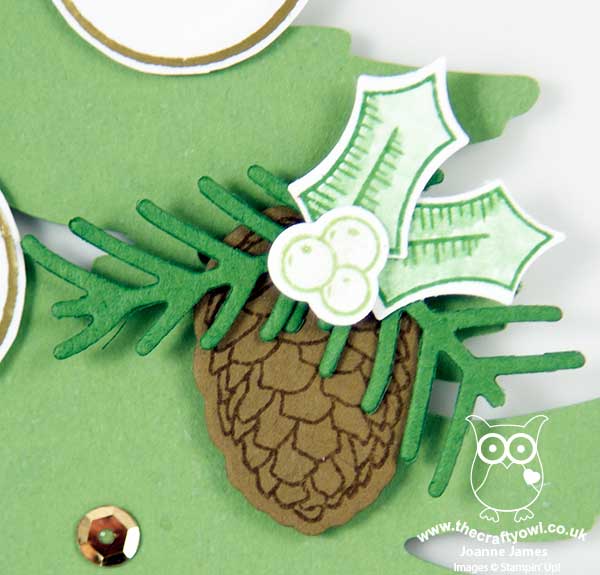
It's shown here without its frame as it was easier to photograph and has some lovely detail. Here's a close up of the white holly berries (liberally coated in clear Wink of Stella for a wonderful sparkle) with the pinecone embellishment:


There are also a number of paper-toled gold heat embossed ornaments:


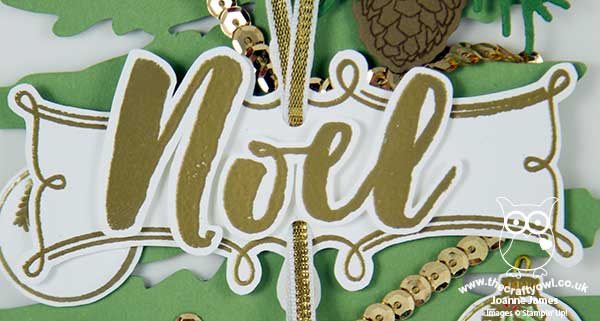
Lastly, check out the Noel sentiment from the Christmas Pines set (this could be substituted with one of those in the Forever Evergreen set) - stamped in Versamark and heat embossed in gold, then fussy cut, layered and finished with gold ribbon:


Making cards or additional home decor projects such as this one is a great way to extend the usefulness of both the kit and co-ordinating stamp set.

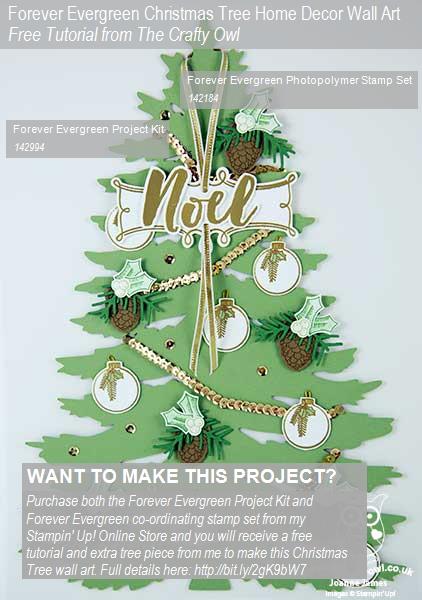
Now for the good news! Would you like to make this project? Every customer who purchases a Forever Evergreen Project Kit and a co-ordinating Forever Evergreen stamp set from me either in person or through my online store will receive a written tutorial from me FOR FREE with complete instructions on how to make the above piece of Christmas Tree Home Decor Wall Art, along with an extra piece of green tree so that you don't have to use one from your kit. Isn't that just something?!

This offer will last until the end of the current seasonal catalogue, but since both the kit and stamp set have 10% and 20% respectively off before 10.50pm GMT on Monday (28th November 2016) and are now available only while stock lasts, I wouldn't leave it too long before placing your order if this is an offer that you would like to take advantage of. Tutorials will be sent separately by me directly to you once your order has been shipped - please note if you are ordering online you will need to ensure you have not ticked the 'no contact' box in order for me to be able to access your details.

Here is the visual summary of the key products used on today's project for you to pin for easy reference:

You can see all of my 'How To' summaries on my 'How To - Tips and Techniques' Pinterest board in case you've missed any. 

Right I'm off to a swimming gala (helping not participating of course!); I'll be back tomorrow with a card (or two!) for this week's new challenge from the lovely Sandy over at The Paper Players. Until then, happy stampin'!


Stampin' Up! Supplies Used:

Table built using Product Table Builder by The Crafty Owl - Independent Stampin' Up! Demonstrator.

Forever Evergreen Project Kit Christmas Trees

by Joanne James2. November 2016 09:40

Wednesday already? Happy 'hump day' everyone! Today I have a 3D project for a change - I want to share the trio of Christmas trees I made using the Forever Evergreen Project Kit in the seasonal catalogue. My regular readers will know what a fan I am of Stampin' Up!'s kits: they are great for everyone from the complete novice to the seasoned crafter and are the perfect option for a fun afternoon or evening activity with friends.

The Forever Evergreen kit comprises three Christmas trees, one 33cm tall and two 27.9cm tall - complete with decorations. You then need some additional basic items to complete the project: the Forever Evergreen stamp set, ink pads and adhesives. Here are my trees in all their glory - first the largest one in Garden Green:


The second, smaller one also in Garden Green:


And lastly, the final smaller one, this time in Wild Wasabi:


I have to say the catalogue really doesn't do these trees justice; they are way more impressive in real life and having had them on display at the craft show I exhibited at recently they were the subject of many 'oohs' and 'aahs'. Many of my customers have passed comment on them as they've been in and out for classes too. If you would like to purchase these kits to make at home, Stampin' Up! has produced a very helpful video that is worth watching before you start putting the kit together:

If you would like to get together with me in person to make this kit, you have a couple of options: you can gather with friends and purchase a kit each and have me bring the extra supplies needed for a crafty afternoon or evening in with friends. Alternatively you could join me for my next Crafternoon Tea at Bell's in Kingsthorpe, Northampton, on Saturday 19th November from 10am-2pm, when we will be making this kit and finishing with an afternoon tea prepared by the Cafe @ Bells in store - contact me to book your place. 

I hope you've enjoyed your day today; I enjoyed a crisp autumn day kicking leaves in the country park and a hockey match (unfortunately no win today, but another match on Saturday so hopefully their luck will change!). I'll be back tomorrow with a Christmas card for this week's new challenge over at Create With Connie and Mary. Until then, happy stampin'!


Stampin' Up! Supplies Used:

Table built using Product Table Builder by The Crafty Owl - Independent Stampin' Up! Demonstrator.

Halloween Night Card and Treat Box

by Joanne James26. October 2016 10:00

Today I have more Halloween fun for you, with a card and some co-ordinating Halloween treats that are again perfect for this week's TGIF Challenge where treats are most definitely the order of the day:


So I've made both a treat box and a matching card today using one of the gorgeous foil specialty sheets in my Halloween Night DSP pack. Here's my treat box, which holds a stack of chocolate coins adorned with spiders and filled with popping candy:


So much shine with all that foil! Here's a close up of my treat box:

My treat box measures 4 1/2" x 1 1/2" finished size, and is made from a piece of designer series paper measuring 7 1/2" x 6". I added a little trick or treat banner tag and a silver mini tassle tied on with black baker's twine. Instructions to make if you'd like to have a go are as follows:

  • Score paper on short side at 1 3/8", 2 6/8", 4 1/8" and 5 1/2"
  • Score paper on long side at 1/2", 1 1/2", 6" and 7"
  • Cut an aperture in one of the long central sections using your Big Shot and Project Life Cards and Labels Framelits
  • Fold on the score lines on the short side to make a long thin box, then pinch the ends and glue/staple one end, fill with chocolate then pinch and glue/staple the other end closed.
  • Add tag and twine to complete.

 Finally, here's my card featuring those large Letter Framelits again: 


Check out the cute dangling spider in the 'O' - isn't he just so fun?! I stamped him in Versamark and heat embossed him in silver then coloured him in with my black Stampin' Write marker. 

Here is the visual summary of the key products used on today's projects for you to pin for easy reference:


You can see all of my 'How To' summaries on my 'How To - Tips and Techniques' Pinterest board in case you've missed any. 

Enjoy your day and I'll be back tomorrow with a card (or two!) for this week's Connie and Mary Challenge. Until then, happy stampin'!


Stampin' Up! Supplies Used:

Table built using Product Table Builder by The Crafty Owl - Independent Stampin' Up! Demonstrator.

Thoughtful Branches Family Tree Home Decor Frame

by Joanne James3. August 2016 10:00

Happy Wednesday everyone! As promised, I have another project today using the limited time stamp set and thinlits bundle 'Thoughtful Branches' - a home decor frame that includes my family tree. As soon as I saw this set I knew it would be perfect for a family tree idea that I've had in mind for a while, so combined with my 'Letters For You' stamp set and co-ordinating Large Letters Framelits I set to work. Here is my finished project:


This is a rather large project - it has a finished frame size of 9" x 19 3/4" - so was something of a challenge to photograph - but I absolutely love it! 

Here's the low-down on today's project:

Letters For You - I recently invested in this letters bundle - 'invested' being the key word here, as at £119.50 the bundle is the most expensive in the catalogue - but so worth it for projects like this one. The set has the whole alphabet along with useful punctuation and just like the Large Numbers Framelits and Number of Years stamp set, it is a set that can be used for so many projects and is timeless - a definite 'keeper'. I stamped my letters in Early Espresso and cut them out using my Big Shot and co-ordinating framelits, then substituted the 'I' in 'FAMILY' with my family tree.

Thoughtful Branches Tree - I stamped and cut out my tree trunk, then in order to create a tree big enough to comfortably accommodate my family members, I cut three treetops and layered them to create a fuller tree. Each one was backed with another base (so I cut 6 tree tops in all) for rigidity and I layered them together for added dimension. 

Family Touches - I stamped the names of each of my family members in black onto Whisper White cardstock using the modern Labeler Alphabet and cut them out by hand, then placed them in my tree in descending order of age and with a couple of birds to identify the parents and the apples identifying my children. Here's a close up of the tree so that you can see all of the elements in more detail:

This took longer to work out and put together than explain - but I am so pleased with the end result and am looking forward to hanging it on the wall. You are so going to want to get the Thoughtful Branches Bundle this month!

Here is the visual summary of the key products used on today's project for you to pin for easy reference:


You can see all of my 'How To' summaries on my 'How To - Tips and Techniques' Pinterest board in case you've missed any. 

I'm linking today's project up with the team over at SUO Challenges where the theme this week is 'Delightful Dies' - the two I've used on this project are definitely firm favourites.

Enjoy your day; I'm off for a bike ride and some fresh air whilst the unpredictable British weather holds! I'll be back tomorrow with this week's new challenge over at Create With Connie and Mary. Until then, happy stampin'!


Stampin' Up! Supplies Used:

Table built using Product Table Builder by The Crafty Owl - Independent Stampin' Up! Demonstrator.

Mini Catalogue

BROWSE THE CATALOGUE

The mini catalogue is now live! Read and download your copy here.

Shop Online

Access my online shop 24 x 7, 365 days of the year:

Current April hostess code:

VDKNV7BH

Shop Online

Join My Team

It's always a great time to join Stampin’ Up! New team members can get £130 worth of products for only £99 + free business supplies + free shipping + all the fun being a part of Stampin’ Up! Stampin' Up! has something for everyone: join my growing team and benefit from my support to enjoy Stampin' Up! however you choose.

If you're interested, call me for a chat to understand how I can help you realise your goals. Alternatively, if you have already decided to sign up and you just can't wait, please click here for the link to the online form where you can sign up and order your starter kit right away! 

Latest Kit!

Stampin Cut and Emboss

The Rock Legend Kit has all you need to make 8 cards with coordinating envelopes. Along with the new Panda Friends Kit, both are available from January 4th for just £14 each - get yours here!

2023-24 Annual Catalogue

BROWSE THE CATALOGUE

Click on the catalogue for a full list of current SU! supplies - if you would like to order any of the items featured, please drop me a line at [email protected] or give me a call on 07773 421446 - I'd be happy to help.

New Online Exclusives

There are new products available exclusively in the online store from 5 March - check them out here.

About Me

Hi I'm Joanne and live in Northampton and when I'm not looking after my husband and two beautiful children, am an avid crafter with a passion for all things Stampin' Up!

I must confess that I have never been a big rubber stamper - until I discovered Stampin' Up! that is. I love the fact that I can get such great results with co-ordinating stamps, inks, papers and punches - the possibilities are endless! Join me on my stamping journey as I share the things I love and be inspired to create amazing things yourself!

Follow Me

Monthly Newsletter

Box Builder

Click the button above to use Box Buster to create your custom box design using the Envelope Punch Board!

Kits Collection Now Available!

Stampin Cut and Emboss

The new Kits Collection from Stampin' Up! is now available!

Click here to see the current kits available and order yours online today.

I Design For


Stampin' Up Stuff

This is my personal blog and is not endorsed by Stampin’ Up! I hope you find it a plentiful source of ideas and personal inspiration but please don't copy my designs for contest submission or use for classes, publication or sale without express permission.