Bee My Valentine Bee Mine FMS628

by Joanne James25. March 2024 16:33

Today I've a quick post to squeak in a card I made for this week's Freshly Made Sketches challenge with a great layout chosen by Narelle:


I loved the way DT member Amy used the Stitched With Whimsy Dies to frame the aperture on her card this week and it inspired me to use them in the same way, but as a 'trail' for my buzzy bee - take a look:


A well-chosen pattern from the Be My Valentine designer series papers and the perfectly-sized sentiment complete my simple card.


Here is the visual summary of the key products used on today's project for you to pin for easy reference:


You can see all of my 'How To' summaries on my 'How To - Tips and Techniques' Pinterest board in case you've missed any. 

Enjoy your day and I'll be back tomorrow with another project. Until then, happy stampin'!


Stampin' Up! Supplies Used:

Table built using Product Table Builder by The Crafty Owl - Independent Stampin' Up! Demonstrator.

Just My Type Key To My Heart Valentine Card

by Joanne James14. February 2024 21:00

Happy Valentine's lovely readers! It seems only right that I should share a Valentine's card today; actually I made this card to send to the DH to celebrate our wedding anniversary, which is next week, but it would work for either. I made my card with a couple of challenges in mind:


Inkspirational have a word prompt of 'heart' and the theme over at Inspire.Create is 'All About Love'. I went for a relatively clean and simple card with lots of fun details that focuses on the sentiment - take a look:


Here's the low-down on today's card:

The sentiment comes from the 'Just My Type' stamp set and I found a tiny vintage key trinket in my embellishment stash that I thought paired with it perfectly. A Bee Builder Punch heart and a selection of designer paper snippets, diecuts and gems complete my card:


Pretty yet not overly feminine - I really like the finished result and hope that the Hubby will too. 

Here is the visual summary of the key products used on today's project for you to pin for easy reference:


You can see all of my 'How To' summaries on my 'How To - Tips and Techniques' Pinterest board in case you've missed any. 

I have enjoyed a pleasant Valentine's dinner with the youngest of the James Juniors, catching up on the events of the day, the highlight of which was a hockey 2nd XI win, which is always worth celebrating! I'll be back on Friday with another project. Until then, happy stampin'!


Stampin' Up! Supplies Used:

Table built using Product Table Builder by The Crafty Owl - Independent Stampin' Up! Demonstrator.

So Much Love Hearts Trio

by Joanne James13. February 2024 18:41

Happy Galentine's Day everyone! It has been so wet and miserable here in the UK today - thank heavens for the opportunity to escape to my craft room! Today I'm sharing a card made with tomorrow - Valentine's Day - in mind that combines a few current challenges:


Here's my clean and simple Valentine's card:


Here's the low-down on today's card:

Today's card is all heart - perfect for the challenge over at Addicted to CAS. I took my favourite trio of reds and pinks (Real Red, Sweet Sorbet and Flirty Flamingo) for the challenge over at Color Hues and used the sketch layout over at Sunday Stamps to create a trio of oversize hearts. I paired them with an oversize sentiment from the Love For You Dies and a stamped 'For You' from a retired set:


A trio of sparkly enamel dots complete my card. I'm also linking my Valentine up over at CAS on Friday as that's their theme this week too.

Here is the visual summary of the key products used on today's project for you to pin for easy reference:


You can see all of my 'How To' summaries on my 'How To - Tips and Techniques' Pinterest board in case you've missed any. 

That's all from me; I have a late pickup this evening as the youngest of the James Juniors has been taking part in the House Singing Competition at school. I'll be back tomorrow with another project. Until then, happy stampin'!


Stampin' Up! Supplies Used:

Table built using Product Table Builder by The Crafty Owl - Independent Stampin' Up! Demonstrator.

Heartfelt Hellos Love You More Card

by Joanne James9. February 2024 10:00

I haven't managed much in the way of crafty time this week (it's amazing how a car breakdown can take up hours of your time!) so today I'm sharing a clean and simple card yet one that still packs a punch! I used the current Sketch Saturday layout and a sentiment with this week's challenge over at Just Us Girls in mind:


I'm fully embracing red and hearts for a sweet Valentine's card full of love - take a look:


Here's the low-down on today's card:

A simple layered panel, tied with twine and a focal sentiment pretty much sum up today's card. I'm loving the new Everyday Details Dies, one of which I used to diecut my sentiment label. The other two main elements - the heart patterned Most Adored designer series paper that I used for my panel and the sentiment from the 'Heartfelt Hellos' stamp set - are both items that you can choose FREE with a £45 purchase during the current Sale-A-Bration promotion: bonus! I added a single red resin heart below my stamped sentiment for a final tie in to that pretty paper:

This is the perfect sentiment for the person in your life who has one of those never-ending conversations "Love you". "Love you more." "No, love you more." and so on - you know the ones?! The youngest of the James Juniors often uses this as a bedtime-stalling tactic, even now he's in his teens. Clearly, it works!

Here is the visual summary of the key products used on today's project for you to pin for easy reference:


You can see all of my 'How To' summaries on my 'How To - Tips and Techniques' Pinterest board in case you've missed any. 

You have until the end of February to take advantage of Sale-A-Bration, whilst supplies last - so time to get shopping! Enjoy your day; I'm off to do some shopping of a different kind (grocery shopping - apparently craft supplies don't make a nutritious dinner!) but I'll be back early tomorrow with another project. Until then, happy stampin'!


Stampin' Up! Supplies Used:

Table built using Product Table Builder by The Crafty Owl - Independent Stampin' Up! Demonstrator.

Bee Mine Valentines Card PP675

by Joanne James4. February 2024 08:00

Today it's Sunday and time for this week's new challenge over at The Paper Players! It's my turn to host this week and I have a timely theme challenge for us to work with:
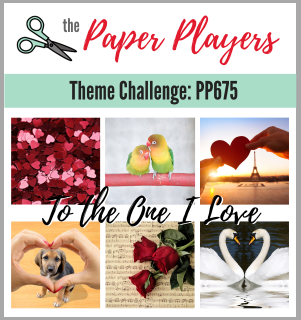
       

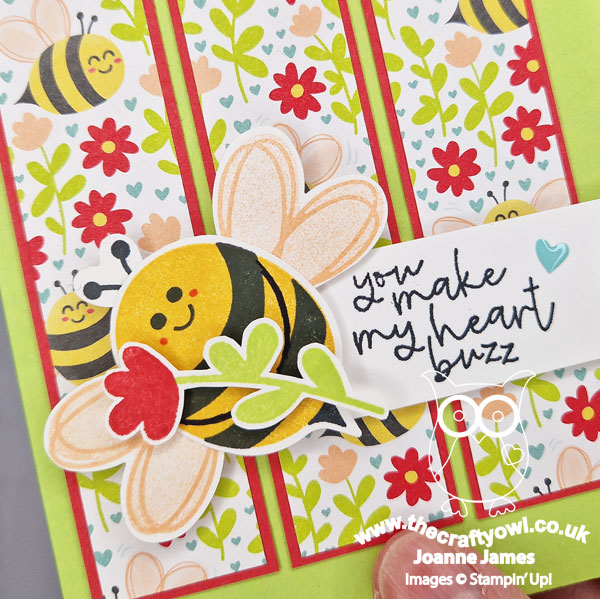
This week it's theme week and since February is here and Valentine's Day is around the corner, I chose the theme of 'Love'. Your card doesn't have to be a Valentine's card - it could be for a wedding anniversary or simply to say 'I love you', but should be made with a loved one in mind. I almost went with a pink and red heart-filled creation, but more of that later in the week! For today I wanted to make a bright and colourful Valentine's card featuring those cheerful bees and the Bee Mine suite - I just can't get enough of them! I used the sketch over at Try A Sketch On Tuesday for my layout and this is what I came up with:
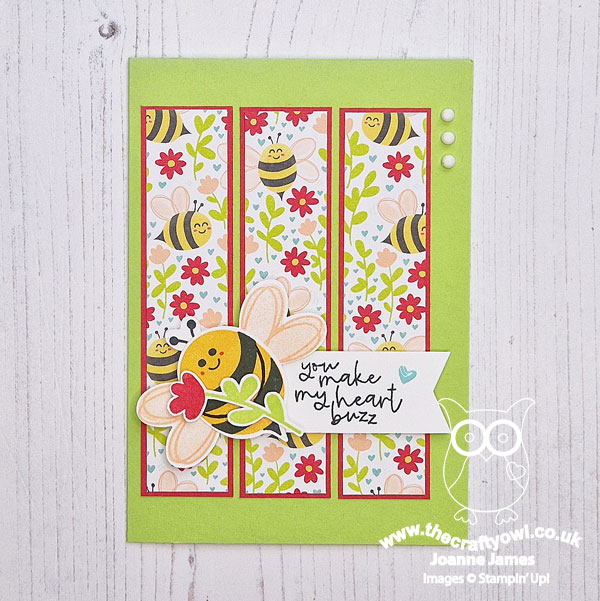
 

Here's the low-down on today's card:

Bee Mine - I cut three panels of Bee Mine designer series paper and mounted them onto Sweet Sorbet cardstock before adding to my Lemon Lime Twist cardbase. In hindsight I should have made them shorter and positioned them higher to be more faithful to the TSOT sketch, but I was so keen to show off as much of the pattern as possible I overlooked that detail when I adhered them to my card and positioned them more centrally. Hopefully the ladies over there will forgive me ;-)

Bee My Valentine - I anchored my sentiment from the 'Bee My Valentine' stamp set with a bee, stamped from the same set and punched out with the Bee Builder Punch. This punch really is so versatile; it will punch the bee's body and wings, but also has a small heart that can be used as a heart or to punch out the bee's antennae. The wings double-up as larger heart too and the bee body could also work as a speech bubble - so many creative possibilities! I love a punch that has multiple uses!

Armed With A Tip - I made my bee in the likeness of one of the ones in the designer series paper pattern. I added a couple of dots of red to her cheeks and a pair of arms, to hold her fussy cut flower. And so to my tip! If you are not confident adding your arms freehand, you can use the negative space of the punched bee body as a stencil: simply place the rounded 'head' of the stencil onto the body and draw in the arms with a Stampin' Write marker. You're welcome! 
I'm also linking today's card up with my friends over at SUO Challenges where the theme is 'Valentine's Day'. This card is going to be my Valentine's card for the youngest of the James Juniors; not too girly, blue hearts and a punny sentiment - I think it might just be considered acceptable for a discerning teenager!

Here is the visual summary of the key products used on today's project for you to pin for easy reference:
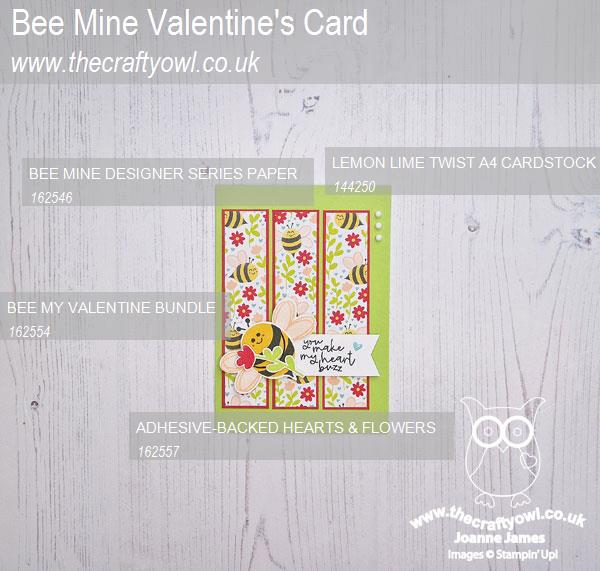
 

You can see all of my Product and 'How To' summaries on my 'How To - Tips and Techniques' Pinterest board in case you've missed any. 

Before you reach for your ink and papers, check out what our amazing team has created to inspire you this week:

Here's a quick recap of our challenge rules:
 
1.  Create a new paper project
2.  Upload your creation to your blog with a link back to us and provide a direct link to the post featuring your challenge submission.
3.  Please link your card to no more than four challenges, TOTAL.
4.  Have FUN!

Enjoy your day; I'll be back tomorrow with another project. Until then, happy stampin'!


Stampin' Up! Supplies Used: 
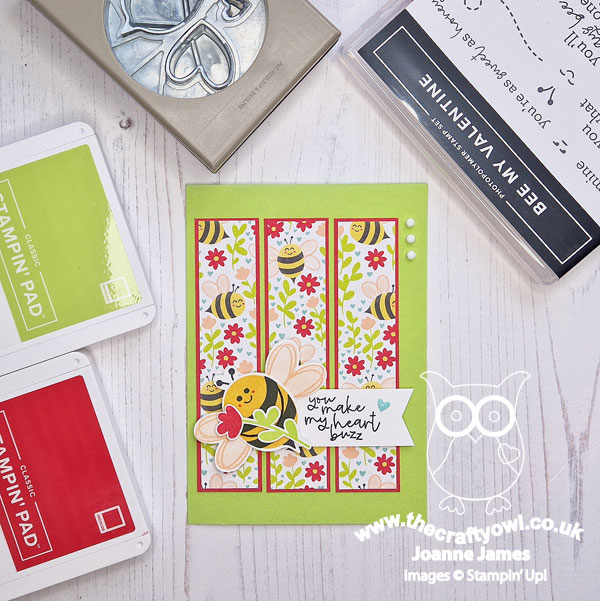
Table built using Product Table Builder by The Crafty Owl - Independent Stampin' Up! Demonstrator.

Hot Air Balloon Love Is In The Air Clean And Simple

by Joanne James30. January 2024 09:00

Today I'm sharing a card that I made with a a few challenges in mind:


As we approach Valentine's Day next month love is definitely in the air, so I decided to have some fun and grabbed a little 'something old, something new' and set to work. Take a look at what I came up with:


You may be wondering how inspiration can come from a variety of sources - well, read on and all will become clear! Here's the low-down on today's card:

Stencil Times Two I so wanted to play with the ladies over at Just Us Girls where this week it's anything goes with stencils; I decided to go clean and simple and create a stencilled sky then when I saw the badge over at TGIF Challenges I thought 'why not make my sky heart-shaped?' so it decided me on my layout, a pink sky inset within a heart. These were both stencils I created myself using dies in my collection. Firstly, I placed my heart stencil, then using my Bubble Bath ink and blending brush I overlaid my cloud stencil and working down the heart, added in clouds across my soft pink sky - which is also perfect for the challenge over at Addicted to CAS this week.

Love is ... - I decided to have some fun with my sentiment, so took the 'Love' die from the Love For You Die set, diecut it then snipped the L away from the OVE, and adhered them to my card base, overlaying my stencilled heart sky, leaving space for my hot air balloon in place of the O. I completed my sentiment with a stamp from the old retired stamp set 'Sunshine Sayings'.


...in the Air - Having seen the optional theme of 'Love is in the air' over at AAA Cards, I thought this would be a great time to feature the heart-shaped hot air balloon in the new Hot Air Balloon bundle, which I think worked perfectly in place of the O in the word LOVE. Nothing else needed for my card which, for something so simple, actually involved much thought and was inspired by each of the above challenges in their own way. This sweet card would work perfectly for Valentine's or any time to let someone know you love them.

Here is the visual summary of the key products used on today's project for you to pin for easy reference:


You can see all of my 'How To' summaries on my 'How To - Tips and Techniques' Pinterest board in case you've missed any. 

Enjoy your day and I'll be back tomorrow with another project. Until then, happy stampin'!


Stampin' Up! Supplies Used:

Table built using Product Table Builder by The Crafty Owl - Independent Stampin' Up! Demonstrator.

Love For You Trifold Valentines Card PP625

by Joanne James29. January 2023 08:00

Today it's Sunday and time for this week's new challenge over at The Paper Players! It's my turn to host this week and I have my favourite, a sketch challenge, for you to work with:


I took my inspiration from the pink and red hearts and flowers in the top right corner of the Hand Stamped Sentiments inspiration board and decided to make a slightly fancier card for a loved one today featuring the Love For You bundle - take a look:


Here's the low-down on today's card:

Today's card is a trifold card. I wanted to use the Love For You layered dies in a different way, so decided to make a two-colour tri fold card and cut each piece out of the alternating layers. I cut the largest aperture from the front section, then cut the second aperture from the second flap, having first added a piece of gingham to the centre of the panel:


 The last skinny set of diecuts were adhered to the inside of the card, with the 'so much love' being adhered with foam sheets for added dimension. I also added a small stamped sentiment and a sprinkle of hearts. The card has a double ribbon bow tie closure, tied through a couple of diecut slits. Here's another photo of the front that shows the detail of the layering, depth and dimension, along with the the pretty stamped pearl-centred flowers and diecut leaves that I used to accent my focal sentiment:


 A few hearts and a sprinkle of in-colour dots complete my card. I love the layered effect of these dies and the trifold really steps it up, yet is easy to achieve. What do you think? I'd love to hear your thoughts - do leave me a comment below.

Here is the visual summary of the key products used on today's project for you to pin for easy reference:


You can see all of my Product and 'How To' summaries on my 'How To - Tips and Techniques' Pinterest board in case you've missed any. 

Before you reach for your ink and papers, check out what our amazing team has created to inspire you this week:

Here's a quick recap of our challenge rules:
 
1.  Create a new paper project
2.  Upload your creation to your blog with a link back to us and provide a direct link to the post featuring your challenge submission.
3.  Please link your card to no more than four challenges, TOTAL.
4.  Have FUN!

Enjoy your day; I'll be back tomorrow with another project. Until then, happy stampin'!


Stampin' Up! Supplies Used: 

Table built using Product Table Builder by The Crafty Owl - Independent Stampin' Up! Demonstrator.

Love For You Love You So Much Valentine AYSI291

by Joanne James27. January 2023 12:00

Today I'm sharing my design team card for our new challenge over at As you See It where it's time for a colour challenge, chosen by me:


I love this colour combo, but when I saw the fabulous creations by the rest of the team I did wonder if my creation truly did them justice! I went for another Valentine's card - inspired by the words over at Time Out and perfect for the challenge over at Paper Craft Crew where I haven't played for a while and love is in the air too - and created another card for someone I love; take a look:


 Here's the low-down on today's card:

I went with a skinny diecut sentiment courtesy of the Love For You Dies and allowed it to overhang my diecut circle, and decorated the edge with a selection of hearts and flowers stamped and cut from the same bundle. I thought the blues were a nice contrast to the pinks and great for a not-too-girly Valentine's or anniversary card; I added some of the new Essentials Enamel Dots in Night of Navy to the centre of my flowers for added embellishment: 

For my card base I used one of the Tea Boutique pre-printed notelets in Turquoise Tide - I love the faux-texture of the finish on this paper. The same pattern can be found in the Tea Boutique DSP pack too if you wanted to make your own base. 

I really love the combination of these colours and can't wait to see what everyone does with them for this challenge!

Here is the visual summary of the key products used on today's project for you to pin for easy reference:


You can see all of my 'How To' summaries on my 'How To - Tips and Techniques' Pinterest board in case you've missed any. 

Here's a summary of our challenge rules:

  • Create any card, scrapbooking page, 3D project or packaging project that fits the challenge.
  • Please include the challenge graphic and link back to the challenge in your blog post. Turn off word verification so we can leave you lots of lovely comments. Make sure you link the post not the whole blog to the Linky. Use #AYSIXXX when uploading to a public gallery.
  • If you’re unsure about ‘the rules’, check the details under the Challenge Guidelines tab on the As You See It Challenge homepage.
  • In a colour challenge, black or other neutral can be used in outlines and sentiments but no other colours should be included. Stampin’ Up colours are used for reference but colours that are a close match are welcome.
We look forward to seeing your creations in the AYSI gallery.

Enjoy your day and I'll be back tomorrow with another project. Until then, happy stampin'!


Stampin' Up! Supplies Used:

Table built using Product Table Builder by The Crafty Owl - Independent Stampin' Up! Demonstrator.

Tech Support Clean and Simple Valentine Card

by Joanne James19. January 2023 10:40

Today I'm sharing a second entry for the challenge over at Just Us Girls where the word of the week is 'heart', this time using the sketch over at TGIF Challenges (turned through 90 degrees):  


I decided it was time to make my Valentine's Day card for my DH so I pulled a not-yet used stamp set from the shelf that I had purchased with him in mind and set to work - take a look:


 Here's the low-down on today's card:

Tech Support - Stampin' Up! suggests that the Tech Support stamp set is perfect to “Captcha” the heart of your computer-savvy loved ones and i couldn't agree more! My husband is a lover of all things tech and I knew from the moment I saw it this word be the perfect set for cards to make him smile. It is perfect for a clean, and uncluttered Valentine's card - and I love that the 'autocomplete' options also has a tongue-in-cheek reference to one of my favourite films too, that won't go unnoticed. 

A Binary Message - Did you know that the stamp that has two rows of 1s and 0s actually spells a message in binary code, the language used in digital computers? I am reliably informed it spells 'for you' - who knew?! I stamped this repeatedly to achieve the banner effect of the TGIF sketch, stamping directly onto my cardbase, rather than use another layer. 

All About Alignment - The trickiest part on today's card was creating the banner element. I used my trusty Stamp-a-ma-jig to repeatedly stamp the two rows of 1s and 0s down the centre of my card; you could of course use a Stamparatus stamping platform too, but for repeats that are so close together I prefer the former. I will confess, I took a few attempts before I had a perfect cardfront - I accidentally smudged a few, but got there in the end. I added a Sweet Sorbet heart to my message block for a final pop of colour - I did take the Just Us Girls theme this week quite literally, and used just one heart - I love that it has a digital appearance too and is in keeping with the other stamps in the Tech Support set:

I added a mat layer of Sweet Sorbet too just to add a little more colour, although this card is intentionally neutral - it is a man's card after all, so too much pink would not be welcome! I am so glad I have inked up this set at last - the punny sentiments are perfect for the tech geeks in our lives!

Here is the visual summary of the key products used on today's project for you to pin for easy reference:


You can see all of my 'How To' summaries on my 'How To - Tips and Techniques' Pinterest board in case you've missed any. 

Enjoy your day; I have some crafting time today which is awesome so will be getting a few extra makes together to share with you. I'll be back tomorrow with another project. Until then, happy stampin'!


Stampin' Up! Supplies Used:

Table built using Product Table Builder by The Crafty Owl - Independent Stampin' Up! Demonstrator.

Sweet Talk BFF Galentines Card

by Joanne James9. February 2022 12:00

Today I'm sharing a quick card that uses the colours and inspiration photo over at Color Dare that is perfect for the JUGS Challenge this week too:


I thought this pattern in the 'Sweet Talk' designer series paper pack, covered in love hearts is pretty much all of the colours in the inspiration photo, would be perfect for a quick card for your 'Galentine' (apparently that is a word!) - take a look:


I snipped off the corner and placed another pattern from this pack (it just so happens to be the reverse of the main sheet) underneath, adding a heart diecut border cut with one of the dies in the Floral Hearts Dies set across the join, and finished with a diecut heart in Petal Pink that I retrieved from my scrap box (it was actually cut from the centre of the large floral die in the aforementioned set) and adding a trio of 'BFF' white letters cut with my Playful Alphabets Dies for my very own 'love heart' focal point:


Super simple, no stamping and a great way to let the paper do all the hard work - I love that jumble of colourful hearts!

So is it me, or do teenagers use acronyms such as 'BFF' ('best friend forever' in case you're not familiar!) more and more these days? They creep into our family WhatsApp chats such that sometimes I feel like I need a translator to understand what's going on - I must be getting old lol! (there's another one!) And for anyone out there not familiar with the concept of 'Galentine's Day' - this is celebrated on February 13th and is a combination of the words 'gal' and 'valentine' and was coined as the perfect day to celebrate female friendships - so there's something else to add to the cardmaking calendar!

Here is the visual summary of the key products used on today's project for you to pin for easy reference:


You can see all of my 'How To' summaries on my 'How To - Tips and Techniques' Pinterest board in case you've missed any. 

Enjoy your day and I'll be back tomorrow with another project. Until then, happy stampin'!


Stampin' Up! Supplies Used:

Table built using Product Table Builder by The Crafty Owl - Independent Stampin' Up! Demonstrator.

New Online Exclusives

There are new products available exclusively in the online store from 5 November - check them out here.

Latest Kits!

Stampin Cut and Emboss

The Perpetual Beauty Calendar Kit and Cherry Blossoms Treat Boxes Kit are the latest kits in the online store - get yours here!

Shop Online

Access my online shop 24 x 7, 365 days of the year:

Current December hostess code:

9NKXDTTR

Shop Online

Mini Catalogue

BROWSE THE CATALOGUE

'Tis The Season - the new Stampin' Up! Mini Catalogue is here! For more details and to download your copy click here

Scrapbooking

Stampin' Up! has introduced a new range of 12x12" scrapbooking product and kit - the full range is now available to purchase online. To download a copy of the new digital Scrapbooking Catalogue click here.

2024-25 Annual Catalogue

BROWSE THE CATALOGUE

Click on the image to download your copy of the 2024-25 annual catalogue. For a full list of current SU! supplies, go to my online store. If you would like any help or advice, please drop me a line at joanne@thecraftyowl.co.uk or give me a call on 07773 421446 - I'd be happy to help.

Join My Team

It's always a great time to join Stampin’ Up! New team members can get £130 worth of products for only £99 + free business supplies + free shipping + all the fun being a part of Stampin’ Up! Stampin' Up! has something for everyone: join my growing team and benefit from my support to enjoy Stampin' Up! however you choose.

If you're interested, call me for a chat to understand how I can help you realise your goals. Alternatively, if you have already decided to sign up and you just can't wait, please click here for the link to the online form where you can sign up and order your starter kit right away! 

About Me

Hi I'm Joanne and live in Northampton and when I'm not looking after my husband and two beautiful children, am an avid crafter with a passion for all things Stampin' Up!

I must confess that I have never been a big rubber stamper - until I discovered Stampin' Up! that is. I love the fact that I can get such great results with co-ordinating stamps, inks, papers and punches - the possibilities are endless! Join me on my stamping journey as I share the things I love and be inspired to create amazing things yourself!

Follow Me

Monthly Newsletter

Box Builder

Click the button above to use Box Buster to create your custom box design using the Envelope Punch Board!

Kits Collection Now Available!

Stampin Cut and Emboss

The new Kits Collection from Stampin' Up! is now available!

Click here to see the current kits available and order yours online today.

I Design For


Stampin' Up Stuff

This is my personal blog and is not endorsed by Stampin’ Up! I hope you find it a plentiful source of ideas and personal inspiration but please don't copy my designs for contest submission or use for classes, publication or sale without express permission.

DSP Special Release

Check out 3 popular designer series paper designs in fresh new colourways! Available exclusively in the online store from 3 December - check them out here