Black and White Bethlehem for FF0140

by Joanne James4. August 2023 09:00

Today I have my card for the new challenge over at Festive Friday Card Making and Paper Crafting Challenge


The challenge that we are celebrating this week is 'World Photography Day' which is on 19th August. Remember the fun thing is that at Festive Friday you do not need to actually celebrate the occasion; your goal is to simply use three or more items from the inspiration list on your project. We have a number of keen photographers in our house, but I chose to go in a totally different direction today. I used black, white, rhinestones and landscape/cityscape from the inspo list and this is what I came up with:


Here's the low-down on today's card:

I used some retired Peaceful Place starry night sky paper and my retired Bethlehem Edgelits to create a monochrome Christmas card that is something of a CASE of a previous card I made using this set (you can see that card here), adding my cityscape diecuts with dimensionals for a little extra lift. I heat embossed my 'O Holy Night' sentiment from the retired stamp set 'Illuminated Christmas' in white on black, and highlighted the embossed stars on the designer paper with a single rhinestone - the star of Bethlehem, perhaps?


I am linking today's card up with the team over at Time Out who are asking us to create monochrome cards for their current challenge; there is something so elegant about a single colour scheme, for sure.

Here is the visual summary of the key products used on today's project for you to pin for easy reference:


You can see all of my 'How To' summaries on my 'How To - Tips and Techniques' Pinterest board in case you've missed any. 

I did place a pre-order for Christmas goodies from the new mini catalogue yesterday, so will have some lovely new things to share with you in the coming weeks, but it has been fun to give some love to favourite sets of old this week and of course it's always good to use up retired designer series paper!

How does our board inspire you? I can’t wait to see what YOU create! For more inspiration, be sure to visit the rest of the Festive Friday Card Making and Paper Crafting Challenge Design team:

Enjoy your day and I'll be back tomorrow with another project. Until then, happy stampin'!


Peaceful Place And A Festive Escape

by Joanne James6. December 2021 10:15

Happy Monday everyone! It's the start of a busy week here in the James household and I'm squeeking in with an early post using Cecile's fabulous sketch over at Freshly Made Sketches before I get ready for my final online card class of the year! Here is Cecile's sketch:


I still had those Peaceful Place papers out on my desk over the weekend and was cutting out log cabins with abandon, so knew that I had to use the sketch to feature another one - take a look:


Here's the low-down on today's card:

I fussy cut another house and coloured my log cabin scene with my watercolour pencils and blended them with a blender pen, adding a liberal coat of clear Wink of Stella to the trees and snowy roof. Then came my moment of indecisiveness! I added a fussy cut fir tree for one of the sketch elements and I had decided that I was going to use my Stitched Snowflake Dies to add two snowflake impressions into my card base for the other two, however when I created my background in basic white it seemed a little flat. So I cut another panel, this time in Shimmery White, which was a little better, but still seemed to lack a little sparkle. So I went all-out and used a panel of (retired) white glimmer paper. This I LOVE - but it did prove difficult to photograph so that you could see the diecut snowflakes, amidst all that sparkle! I'm hoping you can see the idea a little better below:


As tricky as it was to capture on film, I absolutely love the sparkle and shimmer that a whole panel of glimmer paper adds and the diecut cut snowflake impressions are really effective in real life. A simple sentiment was all I needed to complete my card. So what do you think - is there ever something such as too much sparkle? I think not, but if you disagree, feel free to comment below! My super sparkly snowflakes are also perfect for a second play over at Inspired By this week - the first of their inspiration photos suggests they love a bit of snowflake sparkle!

Here is the visual summary of the key products used on today's project for you to pin for easy reference:


You can see all of my 'How To' summaries on my 'How To - Tips and Techniques' Pinterest board in case you've missed any. 

It is so grey, wet and miserable here today I would definitely rather escape to my little log cabin in the snow. Alas, no such luck - my class ladies are calling and wouldn't be too impressed! Enjoy your day and I'll be back tomorrow with another project. Until then, happy stampin'!


Stampin' Up! Supplies Used:

Table built using Product Table Builder by The Crafty Owl - Independent Stampin' Up! Demonstrator.

Peaceful Place Evergreen Winter Wonderland PP570

by Joanne James5. December 2021 08:00

Today it's Sunday and time for this week's new challenge over at The Paper Players! It's the turn of the fabulous Jaydee to host this week and she has a festive theme challenge for us to work with:


We've had snow twice this week in my part of the world and the current freezing temperatures are definitely showing early signs of a winter wonderland! I decided to make another card using the current colours over at The Color Throwdown and decided to get creative with my Peaceful Place designer series papers and create my own idyllic winter wonderland - take a look:


Here's the low-down on today's card:

Peaceful Place - I decided to fussy cut one of the log cabins from the Peaceful Place designer paper, across the upper horizon including some trees, and added this to a precut white circle, that I had added Polished Pink ink to with a blending brush and stamped on some snowflakes in Encore silver. I allowed the trees to overhang the circle border and liberally brushed the snowy areas of the scene with clear Wink of Stella. It's difficult to see on the photos, but this card is so sparkly in real life!

Evergreen Forest - I used another sheet of Peaceful Place designer series paper for my background, this time the sparkly silver snowflakes on a mottled grey background. I ran this panel through the Evergreen Forest Embossing folder to add a row of embossed fir trees to the background for added interest. Again, it's easier to see in real life - the texture adds subtle additional detail. I used the pink for my sentiment banner and borders for a pop of colour against the silver and grey:


Don't Forget The Inside - I carried the winter wonderland theme over to the inside of my card, adding a strip of the sparkly snowflake paper along with a couple of fussy-cut trees and a sentiment from the 'Snowflake Wishes' stamp set:


Doesn't that cosy log cabin look inviting? I could totally hole myself up there with my craft supplies and a roaring log fire for a week or two! 

Here is the visual summary of the key products used on today's project for you to pin for easy reference:


You can see all of my Product and 'How To' summaries on my 'How To - Tips and Techniques' Pinterest board in case you've missed any. 

Before you reach for your ink and papers, check out what our amazing team has created to inspire you this week:

Here's a quick recap of our challenge rules:
 
1.  Create a new paper project
2.  Upload your creation to your blog with a link back to us and provide a direct link to the post featuring your challenge submission.
3.  Please link your card to no more than four challenges, TOTAL.
4.  Have FUN!

You can see all of my 'How To' summaries on my 'How To - Tips and Techniques' Pinterest board in case you've missed any. 

Enjoy your day; I'll be back tomorrow with another project. Until then, happy stampin'!


Stampin' Up! Supplies Used: 

Table built using Product Table Builder by The Crafty Owl - Independent Stampin' Up! Demonstrator.


Peaceful Place Well Defined Winter

by Joanne James4. December 2021 20:00

Today I have a card that was inspired by this week's Color Throwdown colours that finally gave me the opportunity to get out on paper an idea that's been floating around in my head for a while:


The Peaceful Place designer series papers have some great designs that are perfect for adding colour to or creating scenes and the grey and silver were perfect with the addition of some Polished Pink to create a scenic Winter Wonderland - take a look:


Here's the low-down on today's card:

Peaceful Place - One of the designs in the Peaceful Place pack comprises 4 6"x6" designs of a landscape of snowy trees. I cut the sheet into 4 then cut the bottom off each square and using a blending brush, I added some Polished Pink ink to the outer edges of the panel. I also added some stamped pink snowflakes, before flicking the paper with water then Frosted shimmer paint for splatter detail. I added another contrasting piece of paper for a border along the bottom of my card, along with a double ribbon bow.


Well Defined - I split the 'winter' sentiment in the 'Well Defined' stamp set and added the first part to a label on the front of my card, with the remainder on the inside to complete my sentiment:


I carried the winter wonderland theme over to the inside of my card, adding a strip of the sparkly snowflake paper along with a couple of fussy-cut trees and a sentiment from the 'Snowflake Wishes' stamp set.

I liked this card so much I made a second one at the same time - here's a shot of them both together:


I made two of these in the same colours to save time, but I think it would look great in other colours too. I think I'm going to cut up more of my paper and make some with Balmy Blue ink next.  

I'm also linking today's card up for a second entry into the current Christmas challenge over at SUO Challenges.

Here is the visual summary of the key products used on today's project for you to pin for easy reference:


You can see all of my Product and 'How To' summaries on my 'How To - Tips and Techniques' Pinterest board in case you've missed any. 

Enjoy your evening; I'll be back tomorrow with another project using these papers, this time for our new challenge over at The Paper Players. Until then, happy stampin'!


Stampin' Up! Supplies Used: 

Table built using Product Table Builder by The Crafty Owl - Independent Stampin' Up! Demonstrator.

Delicate Baubles Joy To The World Christmas Card

by Joanne James22. November 2021 20:32

I have a late post today, having spent the day catching up with an old friend who I haven't seen in too long - we had such a lovely day! Today I'm sharing a card that uses both the sketch and photo inspiration over at Fusion:

I love the red/white/grey colour palette in the inspiration photo and decided that I would use the sketch to create a card that highlights one of the Delicate Baubles Dies that I've yet to share with you here on my blog - take a look at what I created:


Here's the low-down on today's card:

I added a piece of Peaceful Place designer paper with a subtle pattern to the edge of my card, then added a trio of offset baubles, with my 'joy' layered bauble cut with the Delicate Baubles Dies as my centrepiece. The two red diecut baubles were using retired baubles dies as I wanted them to be smaller in size. I added a silver twine bow and some red rhinestone berries to the holly on my 'joy' bauble and finished my sentiment with a sentiment from the retired set 'Peace and Joy':


Once I'd figured out how to size and balance the baubles in a way that I was happy with, the card came together pretty quickly. I do seem to be on a bit of a grey/white/black/red thing lately - this is my second card with this colour combo in two days!

Here is the visual summary of the key products used on today's project for you to pin for easy reference:


You can see all of my 'How To' summaries on my 'How To - Tips and Techniques' Pinterest board in case you've missed any. 

Enjoy your evening and I'll be back tomorrow with another project. Until then, happy stampin'!


Stampin' Up! Supplies Used:

Table built using Product Table Builder by The Crafty Owl - Independent Stampin' Up! Demonstrator.

Strawberry Builder Punch Gnome Art PP568

by Joanne James21. November 2021 08:00

Today it's Sunday and time for this week's new challenge over at The Paper Players! It's the turn of the fabulous Laurie to host this week and she has a fun Clean and Simple challenge for you to work with:


I couldn't resist another crack at Kim's fabulous layout over at Freshly Made Sketches this week and paired with the colours over at Color Dare (I added Cherry Cobbler red as my fourth colour) for today's card - take a look:


Here's the low-down on today's card:

I started out planning today's card with some trepidation; whilst I still have my retired 'Gnome for the Holidays' stamp set, I have no other current gnome stamp sets. I decided though that I would rise to the challenge and embark on trying to create one using some current supplies to fashion some gnome punch art. A quick perusal of Pinterest, I chose a cute cuddly gnome to base my design on, grabbed some current supplies and tools and set to work! I used the largest of the skinny Christmas trees from the Christmas Tree Dies and my Strawberry Builder Punch to make my gnome. I used some offcuts of Peaceful Place designer paper for my gnome body and the top horizontal strip above my sentiment, along with some Snowy White Velvet Paper for his beard and moustache for some subtle texture and a matt dot for his nose. A piece of snowflake behind and a tiny one on his hat, along with a sentiment from 'Penguin Place' complete my clean and simple gnome card:

I created a basic crib sheet so that you can see the main elements of my gnome and how I trimmed them, in case you fancy having a go at making one yourself - feel free to save this for future use:

I based the design of my punch art gnome on one of the ones in the retired 'Gnome For The Holidays' stamp set, which I stamped on the inside of my card for added decoration:

 As you can see, I decided I liked this card so much I made another - I think these little gnomes are rather cute, even if I say so myself!

I think I did a pretty good job of meeting the 'clean and simple' brief too - remember in addition to featuring a gnome (or elf, or fairy!) on your card it should also be clean and simple:

  • minimal layers
  • little/no embellishments
  • lots of clean white space (no pattern)
Here is the visual summary of the key products used on today's project for you to pin for easy reference:


You can see all of my Product and 'How To' summaries on my 'How To - Tips and Techniques' Pinterest board in case you've missed any. 

Before you reach for your ink and papers, check out what our amazing team has created to inspire you this week:

Here's a quick recap of our challenge rules:
 
1.  Create a new paper project
2.  Upload your creation to your blog with a link back to us and provide a direct link to the post featuring your challenge submission.
3.  Please link your card to no more than four challenges, TOTAL.
4.  Have FUN!

You can see all of my 'How To' summaries on my 'How To - Tips and Techniques' Pinterest board in case you've missed any. 

Enjoy your day; mine is shaping up to be a rather uneventful one - here's hoping anyway! I'll be back tomorrow with another project. Until then, happy stampin'!


Stampin' Up! Supplies Used: 

Table built using Product Table Builder by The Crafty Owl - Independent Stampin' Up! Demonstrator.
 
Edit: This card was a WINNER! Kim chose me as her Queen of Clean for FMS512 - woohoo!
 

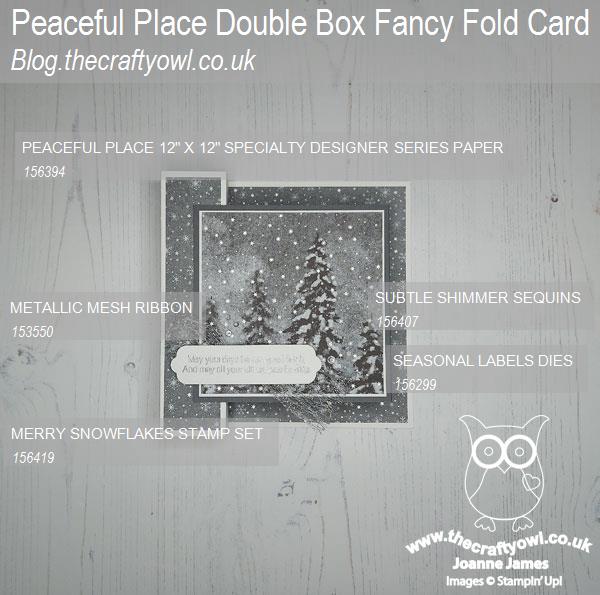
Peaceful Place Double Box Fancy Fold Christmas Cards PP567

by Joanne James14. November 2021 08:00

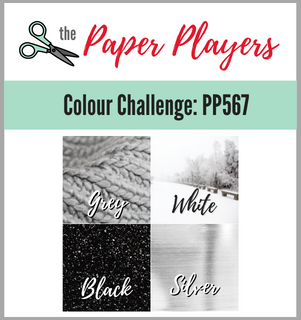
Today it's Sunday and time for this week's new challenge over at The Paper Players! It's my turn to host this week and I have a colour challenge for you to work with:
 

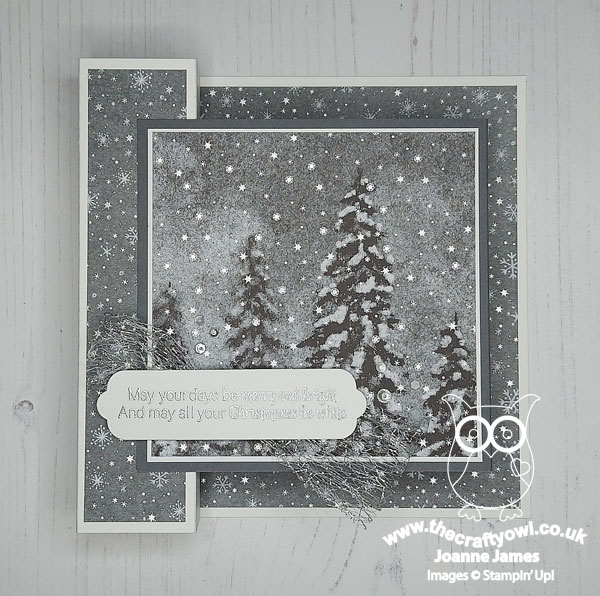
I made a couple of cards to share with you today, both variations on the same theme. Here's the first one - take a look:
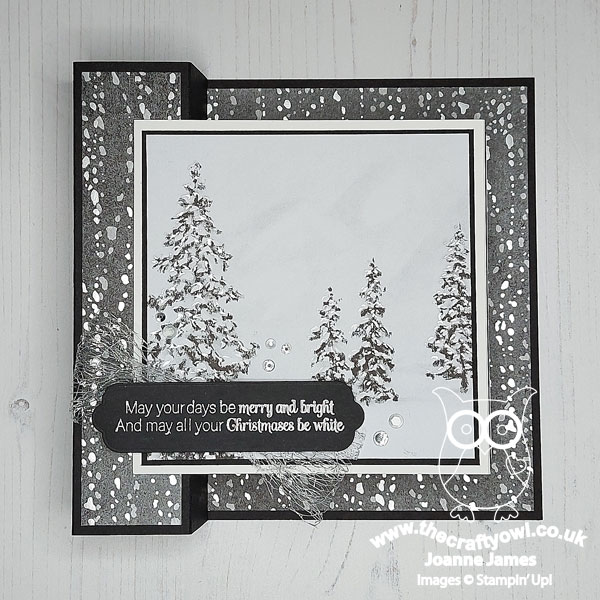
 

Here's the low-down on today's card:

Peaceful Place - So I had an ulterior motive in choosing today's colour combination. I've had a pack of Peaceful Place Specialty Designer Series Paper in my collection since I did my mini catalogue preorder in August, but had yet to use it. I had a feeling that would be the case; I love these papers, but didn't buy the bundle that features in the Peaceful Place Suite. I chose the colour combination that is found in these papers for this week's challenge because it would both force me to cut into these papers and also I am hoping the gallery will have lots of inspiration for me too! I used a combination of two paper patterns from the pack on each of my cards, one for the main panel and a contrasting or co-ordinating one to frame it. The papers are stunning, with beautiful silver foil detailing. Great for special cards!

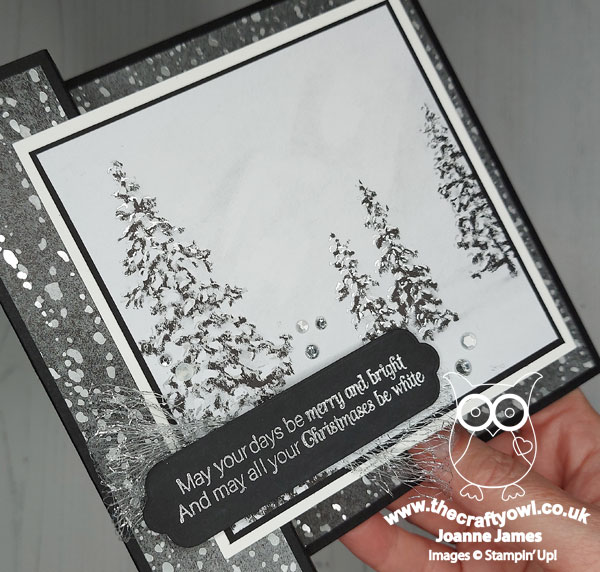
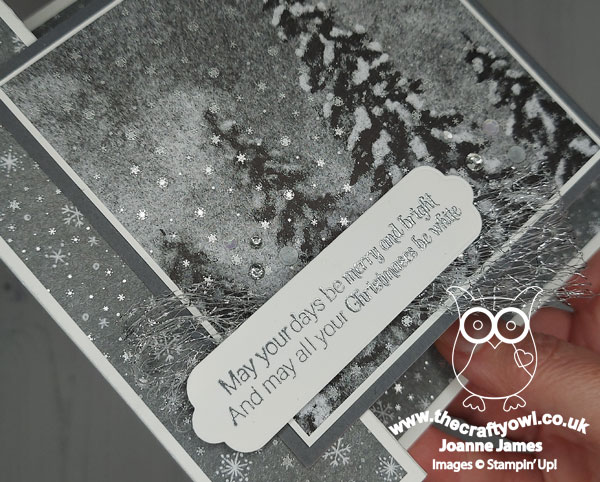
Merry Snowflakes Seasonal Label - Fancy fold aside (more about that in a moment), today's cards really are a showcase of these beautiful papers. Apart from some sequins, rhinestones and a mesh ribbon bow, the only other element to my card is a heat-embossed sentiment from the Merry Snowflakes set, in silver on black or white respectively, and cut out with one of the Seasonal Labels Dies. The words of this sentiment seemed to be perfectly suited to the snowy scenes on my card:
 

 The only other stamping is on the reverses of the card, where I've stamped a further greeting and left space for a personal message:
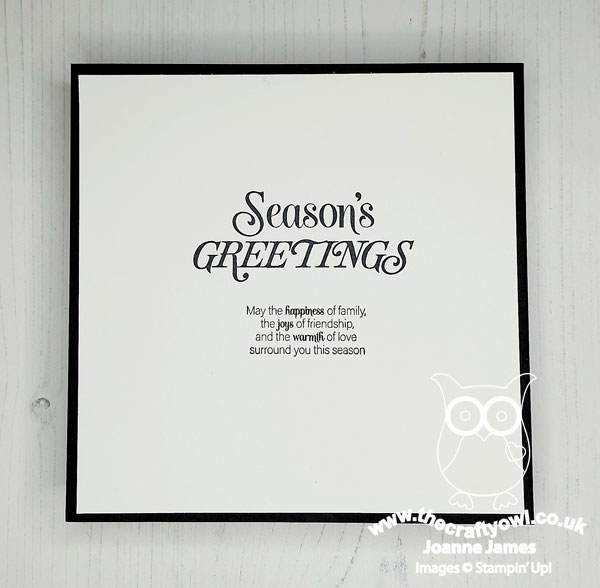
 

A Fancy Fold - I thought for today's card I would ring the changes with a fancy fold. I decided on a double box fancy fold because I wanted something with a feature panel and this card is really quite straightforward to create. I had seen this design in an A6 card size on the internet, but adapted the basic principle to suit my own requirements. My finished card measures 6"x6" and easily folds flat for posting, which is a bonus! 
  

I struggled to photograph this one so well - I'm blaming the dark, winter days that we are experiencing here now - so here's another at an angle to try and capture the sentiment detail of the embossed silver against the white:
 

If anyone is interested in the measurements I sued to create my version of a double box fancy fold card, then do leave me a message below and I'll add them in to my post (I would write them in now but don't have them to hand). 

Here is the visual summary of the key products used on today's project for you to pin for easy reference:
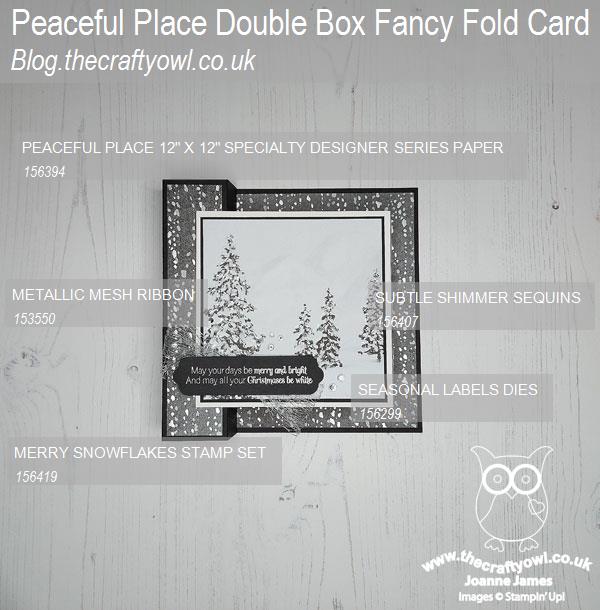
 

And here's the second one:
 

You can see all of my Product and 'How To' summaries on my 'How To - Tips and Techniques' Pinterest board in case you've missed any. 

So what do you think? Which of today's cards do you prefer and what do you think of today's fancy fold? Please do leave me a comment below - I'd love to hear your thoughts!

Before you reach for your ink and papers, check out what our amazing team has created to inspire you this week:

Here's a quick recap of our challenge rules:
 
1.  Create a new paper project
2.  Upload your creation to your blog with a link back to us and provide a direct link to the post featuring your challenge submission.
3.  Please link your card to no more than four challenges, TOTAL.
4.  Have FUN!

You can see all of my 'How To' summaries on my 'How To - Tips and Techniques' Pinterest board in case you've missed any. 

Enjoy your day; Ben is on parade with the other army cadets from school at a Remembrance Day parade and service this morning, so this afternoon will be spent completing homework and the like. I'll be back soon with another project. Until then, happy stampin'!


Stampin' Up! Supplies Used: 

Table built using Product Table Builder by The Crafty Owl - Independent Stampin' Up! Demonstrator.

New Online Exclusives

There are new products available exclusively in the online store from 5 November - check them out here.

Latest Kits!

Stampin Cut and Emboss

The Layered Landscapes Kit and Nature's Paintings Kit are the latest kits in the online store - get yours here!

Shop Online

Access my online shop 24 x 7, 365 days of the year:

Current November hostess code:

9NKXDTTR

Shop Online

Mini Catalogue

BROWSE THE CATALOGUE

'Tis The Season - the new Stampin' Up! Mini Catalogue is here! For more details and to download your copy click here

Scrapbooking

Stampin' Up! has introduced a new range of 12x12" scrapbooking product and kit - the full range is now available to purchase online. To download a copy of the new digital Scrapbooking Catalogue click here.

2024-25 Annual Catalogue

BROWSE THE CATALOGUE

Click on the image to download your copy of the 2024-25 annual catalogue. For a full list of current SU! supplies, go to my online store. If you would like any help or advice, please drop me a line at joanne@thecraftyowl.co.uk or give me a call on 07773 421446 - I'd be happy to help.

Join My Team

It's always a great time to join Stampin’ Up! New team members can get £130 worth of products for only £99 + free business supplies + free shipping + all the fun being a part of Stampin’ Up! Stampin' Up! has something for everyone: join my growing team and benefit from my support to enjoy Stampin' Up! however you choose.

If you're interested, call me for a chat to understand how I can help you realise your goals. Alternatively, if you have already decided to sign up and you just can't wait, please click here for the link to the online form where you can sign up and order your starter kit right away! 

About Me

Hi I'm Joanne and live in Northampton and when I'm not looking after my husband and two beautiful children, am an avid crafter with a passion for all things Stampin' Up!

I must confess that I have never been a big rubber stamper - until I discovered Stampin' Up! that is. I love the fact that I can get such great results with co-ordinating stamps, inks, papers and punches - the possibilities are endless! Join me on my stamping journey as I share the things I love and be inspired to create amazing things yourself!

Follow Me

Monthly Newsletter

Box Builder

Click the button above to use Box Buster to create your custom box design using the Envelope Punch Board!

Kits Collection Now Available!

Stampin Cut and Emboss

The new Kits Collection from Stampin' Up! is now available!

Click here to see the current kits available and order yours online today.

I Design For


Stampin' Up Stuff

This is my personal blog and is not endorsed by Stampin’ Up! I hope you find it a plentiful source of ideas and personal inspiration but please don't copy my designs for contest submission or use for classes, publication or sale without express permission.