Loveliest Layers Double Stencilled Card TTT200

by Joanne James16. March 2023 16:00

It's Thursday and time for a new challenge over at TicTacToe! It's the turn of Team X to host this week and the lovely Vicky is our featured designer this week. This is the fun board that we are playing along with for our 200th (yes, 200th!) challenge: 


I went on the diagonal from bottom left to top right with stencil, flower, sentiment and took the opportunity to have another play with my Loveliest Layers Decorative Masks, this time using both the flower and background stencil and a little fussy cutting - take a look:


Here's the low-down on today's card:

Double Decorative Masks - I wanted to play along with this month's challenge over at The Flower Challenge where they are using floral diecuts or stencils, so stencilled a flower and leaves using the floral stencil, but instead of stencilling directly onto my card base as I have previously, I fussy cut it and set it to one side whilst I created a background using the other stencil in the set. I created an ombre background using the same shade of pink and purple that I used for my flower using my blending brushes, then used my background stencil to apply shimmery white embossing paste over the top. This adds both a touch of sparkle and some textural interest; be sure to clean your stencil quickly though once you've used is with paste, to avoid it drying onto it and proving difficult to remove. You can see the detail of both stencils more clearly below:

Best Family Ever - The sentiment on my card comes from a stamp set called 'Best Family Ever' - so useful for customisable greetings and great value too. I stamped it in Highland Heather onto a white circle punched with my 1 3/4" circle punch.

Online Exclusives - Before you wonder where the word 'retired' was in front of the reference above to my 1 3/4" circle punch, fear not - it's not there because circle punches are back! Well a 1 3/4" and a 2" version at least, as part of the Online Exclusives range that launched at the start of the month. As you would expect, these items can be found under the 'Online Exclusives' section of my online store - they can be ordered online directly or by placing your order with me, but the important thing to note is that just like our range of craft and card kits, they will not appear in any catalogue publications. Purchase your circle punch and see the rest of the current Online Exclusives range in my online store here

I finished my card with some sparkly ribbon, twine and a collection of pearls, gems and enamel dots to compliment my colour scheme.

Here is the visual summary of the key products used on today's project for you to pin for easy reference:


You can see all of my Product and 'How To' summaries on my 'How To - Tips and Techniques' Pinterest board in case you've missed any. 

A tictactoe board offers so many creative possibilities - how does this week's board inspire you? Why not have a go? We would love to see you in the gallery and who knows - you might be selected for Designer's Choice and be eligible to be a guest designer on a future challenge. 

Enjoy your day; my day has been a busy one, but since I have a Parents' School Exchange Meeting at school this evening, I am being rewarded with dinner out with the youngest of the James Juniors in order that we can fit everything in - what a treat! I'll be back tomorrow with another project. Until then, happy stampin'!


Stampin' Up! Supplies Used: 

Table built using Product Table Builder by The Crafty Owl - Independent Stampin' Up! Demonstrator.

Shimmer Embossed Snowflake Wishes

by Joanne James4. November 2020 22:00

Today I'm sharing a quick card I made that was inspired by this picture inspiration from the recent challenge over at Time Out:


I'm too late to link up, but I really liked the mandala design on the rustic wood background and it inspired me to create a Christmas card using one of the Snowflake Wishes dies and some shimmery embossing paste - take a look:


I created a mask using the largest of the Snowflake dies that cuts out a relief snowflake and used it to layer shimmery white embossing paste onto my rustic background, courtesy of the In Good Taste designer series paper. Tricky to see the dimension in the above shot - it's a little clearer below:


I added a sentiment and embellished with a green jingle bell and retired silver grey twine and tassel from my stash, but the snowflake is the real star of the show. The ladies that attended my Creative Escapes luxury weekend craft retreat last month all had a pot of shimmery white embossing paste in their kits, so I wanted to be able to give them some other ideas and ways that they could use it. Hope you like it ladies!

Here is the visual summary of the key products used on today's project for you to pin for easy reference:


You can see all of my 'How To' summaries on my 'How To - Tips and Techniques' Pinterest board in case you've missed any. 

Enjoy your evening and I'll be back tomorrow with another project. Until then, happy stampin'!


Stampin' Up! Supplies Used:

Table built using Product Table Builder by The Crafty Owl - Independent Stampin' Up! Demonstrator.

Beautiful Boughs Meets Rooted in Nature for a Woodland Christmas PP466

by Joanne James3. November 2019 09:00

Today it's Sunday and time for this week's new challenge over at The Paper Players! It's the turn of the fabulous Anne Marie to host this week and she has a fun theme challenge for you to work with:


I had a few ideas for Ann Marie's 'woodsy' theme today and decided to really go all-out to incorporate as many wood-themed elements into my card as possible. I decided to continue with another Christmas card to add to my collection and ended up creating something a little different (for me!) - take a look:


Here's the low-down on today's card:

Knock on Wood - My card has lots of elements that tie in to the wood theme: some woodland background dry embossing, a panel of retired Wood Textures DSP, the tree trunk stamp from Rooted in Nature (stamped in Crumb Cake and then sponged with Early Espresso around the edge), as well as some greenery and a couple of pine cones that could easily be spotted on a walk through the woods.

Texture, Texture - There are lots of layers and textural elements on today's card too: in addition to the dry embossing, I added shimmery white embossing paste to my greenery for  textured snow and the glimmer paper and twine bow also adds contrast. I originally started out using Jen's sketch over at Freshly Made Sketches (you can see that sketch here), but ended up adding so many layers and bits and pieces I rather lost my usual 'clean' look. Whilst I love the finished result, I will need to go back to the drawing board if I'm to put in an FMS entry this week!

Woodland Sparkle - All that wood made for a rather neutral card, with only the greens adding colour to the mix of browns. I decided to add a silver glimmer 'merry' diecut for some festive sparkle, along with some frosted epoxy droplet 'berries' and a silver and linen twine bow. I really like the finished effect.

Here is the visual summary of the key products used on today's project for you to pin for easy reference:


You can see all of my Product and 'How To' summaries on my 'How To - Tips and Techniques' Pinterest board in case you've missed any. 

I'm also linking up today's card to the Festive Friday Challenge (my card features silver, wood, texture, circles and green from the inspo list) and the challenge over at Paper Craft Crew where I went across the middle of the board: embossing paste/rustic/gone wild and the top left-bottom right diagonal: found in the forest/rustic/sponging)

Before you reach for your ink and papers, check out what our amazing team has created to inspire you this week:

Here's a quick recap of our challenge rules:
 
1.  Create a new paper project
2.  Upload your creation to your blog with a link back to us and provide a direct link to the post featuring your challenge submission.
3.  Please link your card to no more than four challenges, TOTAL.
4.  Have FUN!

Enjoy your day; we are enjoying the last day of the half-term holiday before returning the school tomorrow. We have some hockey planned and a trip to the farm shop, along with preparations for my classes this week. I'll be back tomorrow with another project. Until then, happy stampin'!


Stampin' Up! Supplies Used: 

Table built using Product Table Builder by The Crafty Owl - Independent Stampin' Up! Demonstrator.

Textured Beautiful Blizzard Christmas Card

by Joanne James6. December 2018 22:00

Well it's taken me a few days as I've had a couple of classes and am knee-deep in all that comes with the preparations for the festive season, but today I'm here and sharing the last of the three cards that I designed for a recent technique class using the Beautiful Blizzard bundle - take a look:


Here's the low-down on today's card:

A Swirly Snowflake Blizzard - This card has the simplest of stamped backgrounds. I used a variety of the swirls and snowflake stamps in the set in both blues to create a stamped swirly snowflake blizzard. This is one of those very forgiving, easy stamped projects, perfect for a beginner and would work on a single layer card too.

Shimmery White Textured Snowflakes - The real 'wow' on this card is very difficult to see on the above photo: I made a mask using the Blizzard Thinlits and added a layer of textured snowflakes using shimmery white embossing paste. This looks so sparkly in real life and adds real texture and interest to the card design. I finished with some diecut snowflakes and a simple heat embossed sentiment.

A Sweet Sentiment - The sentiment on the inside of my card is one that just makes me go all warm and fuzzy inside:

Isn't that just so sweet?!

Here is the visual summary of the key products used on today's project for you to pin for easy reference:


You can see all of my 'How To' summaries on my 'How To - Tips and Techniques' Pinterest board in case you've missed any. 

Enjoy your evening and I'll be back soon with another project. Until then, happy stampin'!


Stampin' Up! Supplies Used: 

Table built using Product Table Builder by The Crafty Owl - Independent Stampin' Up! Demonstrator.

At Home With You Birthday Surprise Card PP384

by Joanne James11. March 2018 09:00

Firstly, an apology to my regular readers for my lack of blog posts this week; I was well and truly wiped out following the craft retreat I hosted last weekend! I had a fabulous time, but following my class at the start of this week I needed to take a few days out to catch up on some family things and get my office straight in order to start again.

As it's Sunday, I'm back with this week's new challenge over at The Paper Players! It's my turn to host this week and I have my personal nemesis, a colour challenge for you to work with:


Now since it's Mothering Sunday here in the UK today, you might think I would have a Mother's Day card to share with you, or maybe something floral - but no, instead I have a rather girly birthday card to share with you this week, with a fun surprise element too - take a look:


Here's the low-down on today's card:

Pretty In Pink - I chose to feature a combination of Pink Pirouette and Melon Mambo on my card today - who wouldn't love a pink house with a pink front door, right?! Using the stamps and framelits in the At Home With You bundle featured in the annual catalogue, I also added a pretty spring floral wreath and two flower pots, all coloured with my Stampin' Write markers to complete my doorstep scene.

A Birthday Surprise - The At Home Framelits Dies include a framelit that cuts and scores a hinged door, that allows for a fun feature and a hidden birthday surprise - take a look:


A birthday message and a gift too!

Textured Brick Wall - I continued the house theme by adding some textured bricks around the door using embossing paste and a stencil - I think it gives my card something of a cottage feel. I continued my stamping inside my card and onto my envelope for a finishing touch.

Here is the visual summary of the key products used on today's project for you to pin for easy reference:


You can see all of my Product and 'How To' summaries on my 'How To - Tips and Techniques' Pinterest board in case you've missed any. 

Before you reach for your ink and papers, check out what our amazing team has created to inspire you this week:

Here's a quick recap of our challenge rules:
 
1.  Create a new paper project
2.  Upload your creation to your blog with a link back to us and provide a direct link to the post featuring your challenge submission.
3.  Please link your card to no more than four challenges, TOTAL.
4.  Have FUN!

I can't wait to see what you create with this week's colours and look forward to visiting your blogs this week! Enjoy the rest of your weekend as it will be over all too quickly. I have had an early start today as I needed to be up at 4am to see one of my James Juniors off to school to board the coach for a week long school trip to Normandy, so I suspect that my day will involve a lot of caffeine and need to finish rather earlier than usual! I'll be back tomorrow with another project; until then, happy stampin'!


Stampin' Up! Supplies Used: 

Table built using Product Table Builder by The Crafty Owl - Independent Stampin' Up! Demonstrator.

Oh So Eclectic 2017-18 Stampin' Up! Annual Catalogue Cover Stepped Up CASE

by Joanne James21. July 2017 06:00

Today I have another Oh So Eclectic card from this month's technique class which is the second CASE from the front cover of the current 2017-18 Annual Stampin' Up! catalogue.

As I mentioned in my previous post, the eye-catching front cover was in part what attracted my ladies to the Oh So Eclectic Bundle in the first place, so it seemed only right that we should make some of the cards showcased. This card is so very detailed though even for a technique class and I'm sure at one point my ladies were wondering what they had let themselves in for! Here is my version of the card:

Here's the low-down on today's card:

Step It Up - This cover card embodies for me, a rather clean and layered kind of gal, what is the ultimate in stepped-up cards. It uses the Oh So Eclectic suite of products to the full and whilst its roots are in the Oh So Eclectic stamp set, it also utilises a number of other tools, accessories and techniques in its construction, including:

  • Naturally Eclectic Designer Series Paper
  • Die Cutting using the Eclectic Layers Thinlits and the Lovely Words Thinlits
  • Dry embossing using the Eclectic Layers Thinlits
  • Textured background using embossing paste and the Pattern Party Decorative Masks
  • Heat embossing using Versamark and white embossing powder for the sentiment
  • Rock and roll ink technique for the flower centre
  • Lot of accessories including gold foil, mini sequin trim, Berry Burst Crinkled Seam Binding Ribbon and wooden Touches of Nature Elements.

That's a lot of activity for one card and whilst time-consuming to create, results in a beautiful, multi-layered card that in addition to needing a box rather than an envelope to send it, also creates something with so much detail you can spend ages looking at it and truly admiring the level of skill that has gone into it.

We had a lot of fun making this card in our extended class and everyone was justly proud of the end result. 

Join A Class - If you are local to me and would like to know more about my classes, you can find details here on my website or here under 'events' on my Crafty Owl Facebook business page.


My next technique class is on Tuesday 1st August and features the Beautiful Bouquet Bundle, followed by one the following week on Monday 7th August featuring the Eastern Palace Suite. Booking for my Beautiful Bouquet class closes next Monday and there are still a couple of spaces available - why not join me?

Here is the visual summary of the key products used on today's project for you to pin for easy reference:


You can see all of my 'How To' summaries on my 'How To - Tips and Techniques' Pinterest board in case you've missed any. 

I'll be back soon with another card featuring the versatile Oh So Eclectic product suite. Until then, happy stampin'!


Stampin' Up! Supplies Used:

Table built using Product Table Builder by The Crafty Owl - Independent Stampin' Up! Demonstrator.

Banners For You Embossed Stars and Stripes

by Joanne James27. June 2017 14:00

Today I'm sharing a card with a patriotic vibe which is perfect for the current challenges over at Fusion and SUO Challenges:


Ben needed a card for one of his school friends who is about to leave the UK and go to live in America, so a little stars and stripes were the order of the day:


Here's the low-down on today's card:

Textured Stars and Stripes - I got my textured embossing paste out again for this card and using two retired stencils, in turn created my stars and stripes design. I love the depth the embossing paste gives to the overall finish and is really different to any of my previous patriotic designs. This is the third card featuring embossing paste I've shared in recent days and I'm having lots of fun with it. If you would like to learn more and get 'hands on' with this fun new product, it will be featuring in my upcoming technique class featuring the Oh So Eclectic Suite on 11th July - read more about it here and get in touch by the weekend if you'd like to book a place. The lovely people at Stampin' Up! have also made a short video to show easy embossing paste is to use - check it out here:

Get Glossy - I wanted a shine to contrast with the texture of my stars and stripes, so used glossy cardstock for my background and simply swiped my Real Red and Night of Navy ink pads in turn diagonally across my card base and waited for this to dry before adding the embossing paste. I love the shine this adds to the colour, although must confess it did cause the red to bleed through my embossing paste more than I would have liked, even with a second application, I think maybe because it is less absorbent than regular cardstock. 

A Banner For You - I finished my card with a two-tone double banner created with the 'Banners For You' stamp set and cut it out with the co-ordinating Bunch of Banners framelit and reversed the colours to contrast with my flag-inspired background.

Here is the visual summary of the key products used on today's project for you to pin for easy reference:


You can see all of my 'How To' summaries on my 'How To - Tips and Techniques' Pinterest board in case you've missed any. 

I'll be back tomorrow with another project. Until then, happy stampin'!


Stampin' Up! Supplies Used:

Table built using Product Table Builder by The Crafty Owl - Independent Stampin' Up! Demonstrator.

Grown With Love For The Paper Players 350

by Joanne James25. June 2017 10:00

It's Sunday and time for this week's new challenge over at The Paper Players! Our amazing leader Nance is the hostess this week and she has a sketch for us to work with:
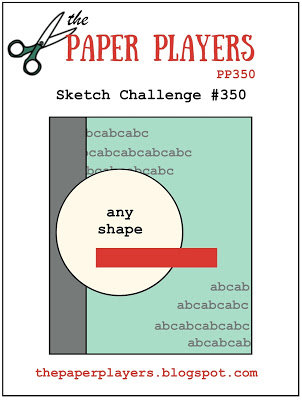
 

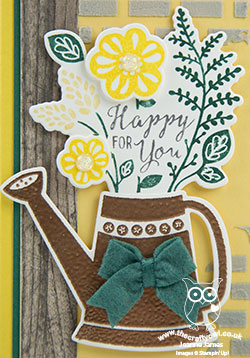
I love a good sketch and this one has lots of creative possibilities. I couldn't resist trying out another technique with my embossing paste, this time adding colour to it and creating a brick wall  - take a look:
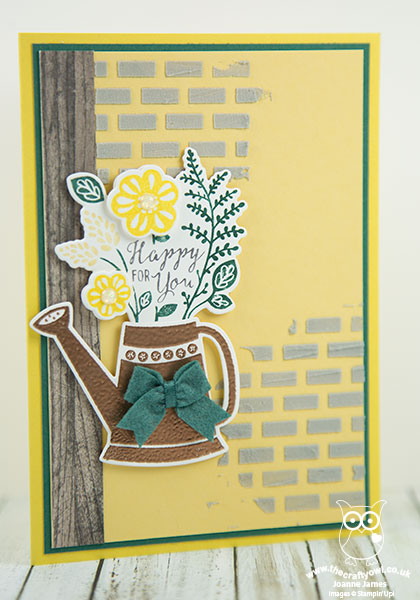
 

Here's the low-down on today's card:

Add Colour To The Texture - I am having fun with my embossing paste and for my card today I decided to add a little Smoky Slate re-inker to my paste before spreading it across my brick Pattern Party Decorative Mask, to create my brickwork background. This paste is so easy to colour - just add a few drops of re-inker and mix with a palette knife and it's good to go.

Grown With Love - I was inspired to use the 'Grown With Love' stamp set, with my bright yellow flowers and copper-embossed watering can, by the recent challenge picture over at Just Add Ink. This is challenge is from a couple of weeks ago but the photo stayed with me and I was keen to create something with this source of inspiration and Nance's sketch offered the perfect fit. I've included the picture here so that you can see what I mean:
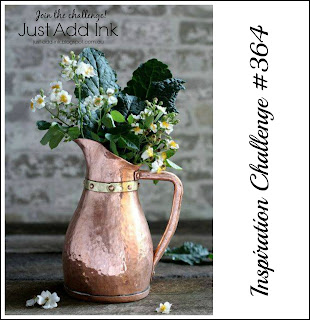
I loved the combination of copper, brick and wood, along with the white and yellow flowers and the dark green foliage - you can see how I've incorporated them on my card. I added a Tranquil Tide In-Color Bitty Bow to my jug in lieu of the horizontal banner on Nance's sketch. Normally I would have used this for a sentiment, however as the sentiment is in the centre of the flowers I thought a bow would make a nice alternative, if less literal, interpretation.

Another Border, Another Wood Texture - As with last week's card, I decided to use another strip of the Wood Textures designer series paper for the border edge, this time in a grey wood to tone in with my bricks. Whilst I love these papers, I wasn't sure how I was going to use them on my projects, so I'm enjoying experimenting with the patterns in small quantities to add texture and pattern to my cards.

Here is the visual summary of the key products used on today's project for you to pin for easy reference:
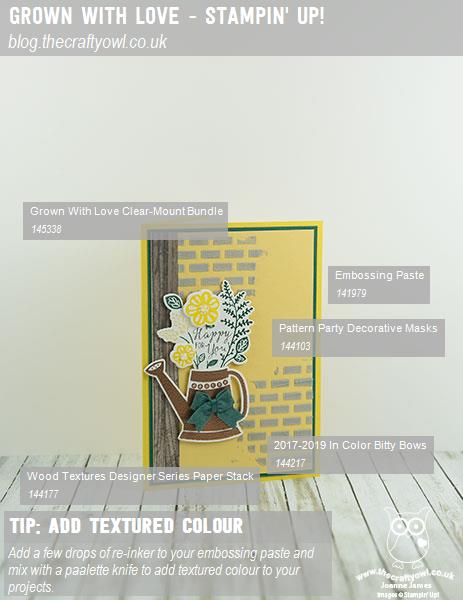
 

You can see all of my Product and 'How To' summaries on my 'How To - Tips and Techniques' Pinterest board in case you've missed any. 

Before you reach for your ink and papers, check out what our amazing team has created to inspire you this week:

The Paper Players Design Team
 
If your read our winner's post yesterday, you will also have seen that we have some goodbyes and hellos this weekend too! We are saying goodbye to the lovely Valentyna and Crystal who have created some amazing projects this last six months. We are delighted that Deanne is going to stay with us for another 6 month term and we are excited that she will be joined by the super-talented Jan Clothier and Annie Abrahamson - welcome ladies, we are thrilled that you will be joining us at the start of July. 
 
Here's a quick recap of our challenge rules:
 
1.  Create a new paper project
2.  Upload your creation to your blog with a link back to us and provide a direct link to the post featuring your challenge submission.
3.  Please link your card to no more than four challenges, TOTAL.
4.  Have FUN! 


I look forward to seeing what you create with our sketch this week. Enjoy the rest of your weekend as it will be over all too quickly; I'll be back soon with another project; until then, happy stampin'!


Stampin' Up! Supplies Used:

Table built using Product Table Builder by The Crafty Owl - Independent Stampin' Up! Demonstrator.

Pattern Party Copper Embossed Medallion

by Joanne James24. June 2017 10:44

It's the weekend and an activity-filled one here in the James household! Today I'm sharing a card for this week's challenge over at Freshly Made Sketches where the lovely Karren has an interesting sketch to work with:

I'm on a bit of a roll with my FMS cards lately -thank you Kim for choosing me as your Princess of Clean last week (if you missed it, you can see that card here) so thought I'd try my hand with Karren's sketch. I've been playing with embossing paste this week and this sketch was perfect for something I wanted to try - take a look:


Here's the low-down on today's card:

Pattern Party - The sweeping arch on the right-hand side of Karren's sketch was perfect for creating a textured design using my embossing paste and this medallion-inspired design with one of the Pattern Party Decorative Masks. The decorative design of the mask was such that I could use it to make my textured panel a real feature of my card.

Metallic Medallion - There is lots you can do with embossing paste: you can use it 'neat', colour it with re-inkers and also add colour using sponge daubers or Stampin' Spritzers. Here though I decided to see what it would look like if I sprinkled my wet embossing paste with copper embossing powder and heat set it to give a shiny metallic finish. This was really easy to do and whilst it doesn't give a perfect finish, it's easy to get pretty even coverage and it adds additional texture and interest as well as shine to the card. Along with the copper foil mat, this card has a real luxurious feel - I love it!

Dapper Denim Ombre - I used a piece of Dapper Denim ombre paper from the Color Theory designer series paper stack for the background to my textured medallion. It adds just enough additional interest without detracting from the star of the show. I added a circular sentiment from the Eastern Beauty stamp set to finish - it's in broadly the right place when compared to Karren's sketch, but I have used a little artistic licence here as it worked for my card.

Here is the visual summary of the key products used on today's project for you to pin for easy reference:


You can see all of my 'How To' summaries on my 'How To - Tips and Techniques' Pinterest board in case you've missed any. 

If you liked this card do pop back over the next few days, as I have additional examples of cards I've made using embossing paste and a variety of different techniques. Enjoy your day; I'm off to spend the rest of mine at the swimming pool (spectating rather than swimming!) and I'll be back tomorrow with another project for this week's new challenge over at The Paper Players. Until then, happy stampin'!


Stampin' Up! Supplies Used:

Table built using Product Table Builder by The Crafty Owl - Independent Stampin' Up! Demonstrator.

New Online Exclusives

There are new products available exclusively in the online store from 5 November - check them out here.

Latest Kits!

Stampin Cut and Emboss

The Layered Landscapes Kit and Nature's Paintings Kit are the latest kits in the online store - get yours here!

Shop Online

Access my online shop 24 x 7, 365 days of the year:

Current November hostess code:

9NKXDTTR

Shop Online

Mini Catalogue

BROWSE THE CATALOGUE

'Tis The Season - the new Stampin' Up! Mini Catalogue is here! For more details and to download your copy click here

Scrapbooking

Stampin' Up! has introduced a new range of 12x12" scrapbooking product and kit - the full range is now available to purchase online. To download a copy of the new digital Scrapbooking Catalogue click here.

2024-25 Annual Catalogue

BROWSE THE CATALOGUE

Click on the image to download your copy of the 2024-25 annual catalogue. For a full list of current SU! supplies, go to my online store. If you would like any help or advice, please drop me a line at joanne@thecraftyowl.co.uk or give me a call on 07773 421446 - I'd be happy to help.

Join My Team

It's always a great time to join Stampin’ Up! New team members can get £130 worth of products for only £99 + free business supplies + free shipping + all the fun being a part of Stampin’ Up! Stampin' Up! has something for everyone: join my growing team and benefit from my support to enjoy Stampin' Up! however you choose.

If you're interested, call me for a chat to understand how I can help you realise your goals. Alternatively, if you have already decided to sign up and you just can't wait, please click here for the link to the online form where you can sign up and order your starter kit right away! 

About Me

Hi I'm Joanne and live in Northampton and when I'm not looking after my husband and two beautiful children, am an avid crafter with a passion for all things Stampin' Up!

I must confess that I have never been a big rubber stamper - until I discovered Stampin' Up! that is. I love the fact that I can get such great results with co-ordinating stamps, inks, papers and punches - the possibilities are endless! Join me on my stamping journey as I share the things I love and be inspired to create amazing things yourself!

Follow Me

Monthly Newsletter

Box Builder

Click the button above to use Box Buster to create your custom box design using the Envelope Punch Board!

Kits Collection Now Available!

Stampin Cut and Emboss

The new Kits Collection from Stampin' Up! is now available!

Click here to see the current kits available and order yours online today.

I Design For


Stampin' Up Stuff

This is my personal blog and is not endorsed by Stampin’ Up! I hope you find it a plentiful source of ideas and personal inspiration but please don't copy my designs for contest submission or use for classes, publication or sale without express permission.