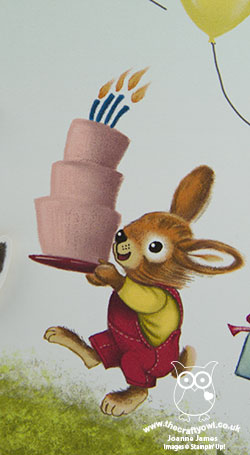
Let The Good Times Roll Extended Rollercoaster Card

by Joanne James30. April 2018 07:00

Happy Monday everyone! I have the first of this month's technique classes today so my day will be a busy one but I'm early with today's post - yay! I'm sharing a card for this week's challenge over at Freshly Made Sketches where Amy has the following sketch:

I needed a couple of birthday cards for young boys, so decided to break out my 'Let The Good Times Roll stamp set and create a fun rollercoaster scene - take a look:


 Here's the low-down on today's card:

A Thrilling Ride - The wide central panel of Amy's sketch allows for lots of options and what could be better for a child's birthday card than a brightly coloured rollercoaster with presents and balloons? The space allowed me to create a fun little scene and whilst I haven't used the pop-up elements that make these thinlits unique, I did pop the rollercoaster and a couple of clouds up on dimensionals for a little extra lift. 

The Longest Rollercoaster EVER! - Having had the idea for my card, I wanted the rollercoaster to extend across the entire width of my cardfront, whereas the actual stamp covers only about two-thirds of the card. I overcame this by masking off the left edge and base, and then having stamped the rollercoaster stamp once in its entirety on the right-hand side, I inked it again and matched up the top of the largest curve with the left-hand edge to continue it across the page. I then drew in the closing edge and baseline with my Crumb Cake Stampin' Write marker. This sounds more complicated than it was to execute, especially as the stamp is photopolymer so easy to line up.

Birthday Memories Stripes - I used the rainbow stripes of the retiring Birthday Memories designer series paper for the background panel and as the inspiration for the bright colour scheme for the rest of my card, picking out 4 key colours for my rollercoaster. I also added a sentiment and another rollercoaster car complete with gift to the inside of my card too, just to finish off:


Here is the visual summary of the key products used on today's project for you to pin for easy reference:


You can see all of my 'How To' summaries on my 'How To - Tips and Techniques' Pinterest board in case you've missed any. 

Enjoy your day and I'll be back tomorrow with another project and news of a fabulous new suite that is on early release from the new annual catalogue - exciting stuff! Until then, happy stampin'!


Stampin' Up! Supplies Used:

Table built using Product Table Builder by The Crafty Owl - Independent Stampin' Up! Demonstrator.

Label Me Pretty Sweet Cupcake Card

by Joanne James28. October 2017 19:00

It's the weekend - hurrah! It's always nice when the weekend rolls around, although I must confess this week has been a little easier than usual in terms of my usual activity schedule, with both James Juniors being on their half term holiday break. We have been enjoying time with friends, indoor climbing and outdoor play, making the most of the mild autumnal weather. I need to make the most of this weekend as that is all-change again come Monday with one of them at least back to school.

So, today I have a change from Christmas! I'm sharing a card for this week's challenge over at Just Add Ink where the challenge is all about cake:

 My card features cake two ways - take a look:


Here's the low-down on today's card:

A Neat Trick With Birthday Friends - The little girl holding the cupcake on my card has come straight from the Birthday Memories designer series paper (currently available as part of the 'buy3, get 1 free' paper promotion) but I didn't have to fussy-cut her; one of the framelits in the Birthday Friends Framelits set fits her shape perfectly. I simply lined them up on the big Shot, ran them through and voila - one little girl, complete with cupcake, and not a paper snip in sight!  

A Co-ordinated Background - I wanted to add some detail to my background without detracting from my sentiment or sweet little girl, so decided to continue the 'cake' theme with some tone-on-tone stamping in Blushing Bride using the cupcake in the 'Sweet Cupcake' stamp set to create a subtle background wallpaper.

From My Kitchen - I think the little girl has a slightly mischievious look about her and certainly looks like she is peeking around the side of something. I decided to make a feature of the sentiment and this one from the 'Label Me Pretty' stamp set is the perfect fit. 

All in all a sweet card - all I need now is a home-baked cupcake to go with it!

Here is the visual summary of the key products used on today's project for you to pin for easy reference:


You can see all of my 'How To' summaries on my 'How To - Tips and Techniques' Pinterest board in case you've missed any. 

So tomorrow it will be back to Christmas with my card for this week's new challenge over at The Paper Players, however in the meantime I would really like to hear your thoughts: I'm mindful that I have been sharing a lot of Christmas projects lately as it is often what I'm making at this time of year, but as my readers how do you feel about this? Are you happy to get as much Christmas inspiration as possible, or would you prefer a mix of projects? Do leave me a comment below - I'd really love to hear your thoughts on this. 

Until tomorrow - happy stampin'!


Stampin' Up! Supplies Used:

Table built using Product Table Builder by The Crafty Owl - Independent Stampin' Up! Demonstrator.

Birthday Memories Big Birthday Card For The Paper Players

by Joanne James27. August 2017 10:00

I've been absent from my blog for a few days - once again precious time with my Juniors this week as we make the most of our school summer holidays hasn't left me time for blogging during the latter part of this week. Luckily for you today it's Sunday and time for this week's new challenge over at The Paper Players! The lovely Laurie is the hostess this week and she has a sketch for us to work with:
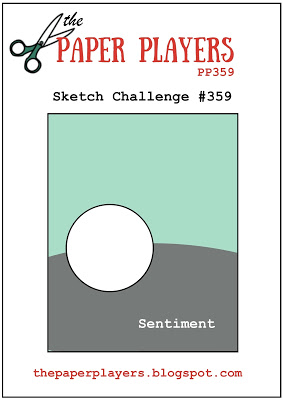
 

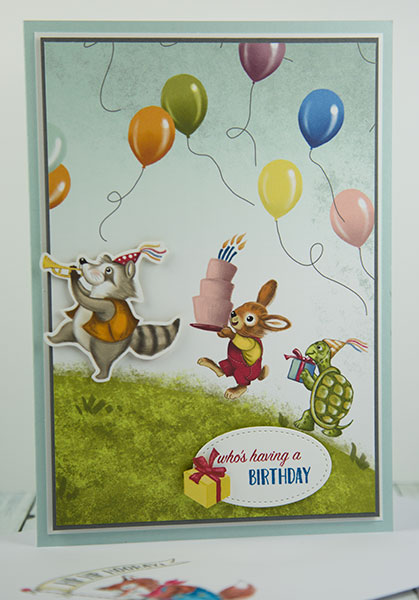
I tried a few different things for my card today, but kept wanting to put a sentiment in the circle! Since I was trying to be truly faithful to Laurie's sketch, I kept at it then it hit me - the answer was in a piece of paper I have been saving for just such an opportunity! Take a look:
 

Here's the low-down on today's card:

What Birthday Memories Are Made Of -  In the end this card makes me feel like a little bit of a cheat, since there is very little stamping and the gorgeous sheet of Birthday Memories Designer Series Paper does all the hard work! There are some gorgeous papers in this pack, all of which contain intricate and colourful birthday imagery reminiscent of days gone by. The sheet I've used today is a design that covers the whole of the 12" x12" sheet and is really one that is hard to cut into. It makes a beautiful gift box lid or gift bag where you can see the entire animal parade.

Big Is Beautiful - I happened to have a half-width of this sheet of designer paper left over from another project, so decided to upsize my card to the larger size of 14.9cm x 21cm in order to accommodate as much of the design as possible, including those fun floating balloons. To emphasise the shape of the sketch, which I represented with the little racoon, I decided to fussy-cut another identical racoon out of one of the other sheets of DSP and pop it up on dimensionals, allowing it to hang over the edge of my central panel. 

Don't Forget The Envelope - The only stamping on my card front was for my sentiment I couldn't resist embellishing with a gift that I also cut out of the DSP too), and on the inside. I also used the 'Birthday Delivery' stamp set to stamp and decorate my envelope front and back though - a special handmade card shouldn't stop at the card front, although I don't often photograph mine to share with you. For some great examples of this be sure to check out my teamie Nance's blog - her cards always look as fabulous on the inside as on the outside :-)

Here is the visual summary of the key products used on today's project for you to pin for easy reference:
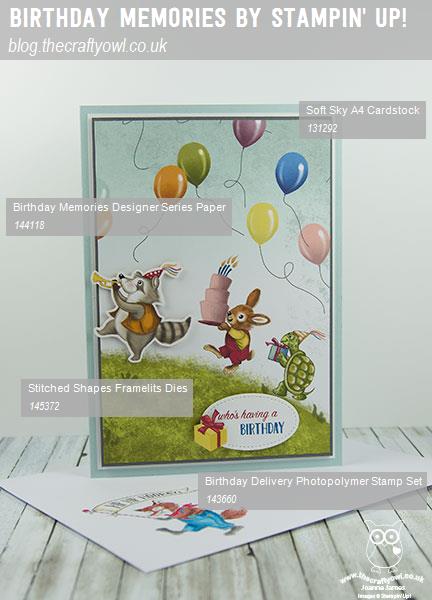
 

You can see all of my Product and 'How To' summaries on my 'How To - Tips and Techniques' Pinterest board in case you've missed any. 

This paper is truly gorgeous and it's almost as if it was made for Laurie's sketch this week. I love this card - I just need to find a special little person to send it it to now! 

Before you reach for your ink and papers, check out what our amazing team has created to inspire you this week:

The Paper Players Design Team
 
 
Here's a quick recap of our challenge rules:
 
1.  Create a new paper project
2.  Upload your creation to your blog with a link back to us and provide a direct link to the post featuring your challenge submission.
3.  Please link your card to no more than four challenges, TOTAL.
4.  Have FUN! 


I look forward to seeing what you create with our sketch this week. Enjoy the rest of your weekend as it will be over all too quickly; we are lucky that we have a Bank Holiday here in the UK so it's a slightly longer one than usual - I'm hoping for some sunshine! I'll be back this week with some of the projects from my last class and maybe even another sneak peak or two of some great sets from the upcoming Autumn-Winter seasonal catalogue, so stay tuned. Until then, happy stampin'!


Stampin' Up! Supplies Used:

Table built using Product Table Builder by The Crafty Owl - Independent Stampin' Up! Demonstrator.

Sorry For Everything And Confessions Of A Cardmaker

by Joanne James14. June 2017 20:00

Wednesday already - where is the week going?! I'm late posting my card today as whilst I had it made, I am behind with photographing and have had a busy day today getting ready for a special birthday in the James household - more on that tomorrow! Today I'm sharing a card that I made for the sketch challenge over at TGIF Challengestake a look:


This is one of those layouts that can be used in so many ways - I decided that it was the perfect sketch for me to send a message - take a look:


Here's the low-down on today's card:

Sorry For... Everything - Today's sketch is perfect for a split sentiment, especially one that has an extra-large element such as the 'sorry' here. So here's the thing: I might be a cardmaker, but I am one of the world's worst at getting cards sent on time. It's not for a shortage of cards - I always have lots! - rather, it's because I never have the 'right' card and like to make something specifically with the recipient in mind. Trouble is, my cards then often arrive late or the special card never gets made and a belated card is in order. So this stamp set was made for me! I love the large 'sorry' greeting and then a whole range of additional sentiments that work on a wide range of cards when an apology or sympathy is required. I stamped my 'Sorry' in Cherry Cobbler, then inked up the second part of the greeting with my Cherry Cobbler and Pacific Point Stampin' Write markers and stamped it onto my Blushing Bride Banner. I also added the 'forgive me?' sentiment to the inside, that you can see above at the start of my post.

Birthday Memories - I chose the bold red and white birthday patterned paper from the Birthday Memories designer series paper pack for the background to my card. This paper is bright and has a busy pattern so is the perfect background for my white sentiment panel. 

Make Framelits Your Friend - I added a little birthday present instead of a bow to finish my card - take a close look at my and you'll see it's not stamped though. Fussy cut? No - I used my Birthday Friends Framelits to crop this adorable gift from a sheet of Birthday Memories designer series paper. I love how a number of the framelits cut out not only the images from the 'Birthday Delivery' stamp set but the painted image from the designer series paper. This is the ultimate in co-ordinating suites!

Here is the visual summary of the key products used on today's project for you to pin for easy reference:


You can see all of my 'How To' summaries on my 'How To - Tips and Techniques' Pinterest board in case you've missed any. 

That's all from me - I'll be back tomorrow with another project. Until then, happy stampin'!


Stampin' Up! Supplies Used:

Table built using Product Table Builder by The Crafty Owl - Independent Stampin' Up! Demonstrator.

Happy Birthday Thinlits Brights

by Joanne James5. June 2017 12:00

I'm a little later posting today as I had the first of this month's technique classes this morning and I wasn't quite organised enough to post beforehand. Anyway, I'm here now with a bright and colourful card to cheer your day! I have another birthday card for you - this time one that uses the current sketch over at the Fab Friday Challenge:


This circle could be so many things, but I really felt it needed words - in fact, two big ones! Take a look:


 Here's the low-down on today's card:

Happy Birthday - It's big, it's bold and says it all right there: the Happy Birthday Thinlits Die really does make a big impact! Whether you pair it with flowers or balloons (the bundled stamp set 'Happy Birthday Gorgeous' has both), this die makes a statement when used on a card front or birthday packaging. Here I've layered it and offset both diecuts, for added impact. This is one die that is going to get lots of use, for sure.

Reversing Birthday Memories - The paper I've used on my card today is from the Birthday Memories designer series paper from the product suite of the same name. You will no doubt like me swoon over this fabulous paper and it's adorable hand painted colourful children's illustrations, however the reverse side should also not be overlooked - it includes some great repeat patterns, along with a wonderful rainbow striped pattern and the dotty pattern that I've used on my card today. 

Blue With A Touch Of Citrus - My choice of patterned paper inspired my colour choices today, although I switched out the Soft Sky for Pool Party as I wanted a warmer blue to balance my zingy citrus colours of Lemon-Lime Twist and Pumpkin Pie. Here's today's colour combination for you to save to inspire your future creations too:

Here is the visual summary of the key products used on today's project for you to pin for easy reference:


You can see all of my 'How To' summaries on my 'How To - Tips and Techniques' Pinterest board in case you've missed any. 

Enjoy your day and I'll be back tomorrow with another project. Until then, happy stampin'!


Stampin' Up! Supplies Used:

Table built using Product Table Builder by The Crafty Owl - Independent Stampin' Up! Demonstrator.

New Online Exclusives

There are new products available exclusively in the online store from 5 November - check them out here.

Latest Kits!

Stampin Cut and Emboss

The Layered Landscapes Kit and Nature's Paintings Kit are the latest kits in the online store - get yours here!

Shop Online

Access my online shop 24 x 7, 365 days of the year:

Current November hostess code:

9NKXDTTR

Shop Online

Mini Catalogue

BROWSE THE CATALOGUE

'Tis The Season - the new Stampin' Up! Mini Catalogue is here! For more details and to download your copy click here

Scrapbooking

Stampin' Up! has introduced a new range of 12x12" scrapbooking product and kit - the full range is now available to purchase online. To download a copy of the new digital Scrapbooking Catalogue click here.

2024-25 Annual Catalogue

BROWSE THE CATALOGUE

Click on the image to download your copy of the 2024-25 annual catalogue. For a full list of current SU! supplies, go to my online store. If you would like any help or advice, please drop me a line at joanne@thecraftyowl.co.uk or give me a call on 07773 421446 - I'd be happy to help.

Join My Team

It's always a great time to join Stampin’ Up! New team members can get £130 worth of products for only £99 + free business supplies + free shipping + all the fun being a part of Stampin’ Up! Stampin' Up! has something for everyone: join my growing team and benefit from my support to enjoy Stampin' Up! however you choose.

If you're interested, call me for a chat to understand how I can help you realise your goals. Alternatively, if you have already decided to sign up and you just can't wait, please click here for the link to the online form where you can sign up and order your starter kit right away! 

About Me

Hi I'm Joanne and live in Northampton and when I'm not looking after my husband and two beautiful children, am an avid crafter with a passion for all things Stampin' Up!

I must confess that I have never been a big rubber stamper - until I discovered Stampin' Up! that is. I love the fact that I can get such great results with co-ordinating stamps, inks, papers and punches - the possibilities are endless! Join me on my stamping journey as I share the things I love and be inspired to create amazing things yourself!

Follow Me

Monthly Newsletter

Box Builder

Click the button above to use Box Buster to create your custom box design using the Envelope Punch Board!

Kits Collection Now Available!

Stampin Cut and Emboss

The new Kits Collection from Stampin' Up! is now available!

Click here to see the current kits available and order yours online today.

I Design For


Stampin' Up Stuff

This is my personal blog and is not endorsed by Stampin’ Up! I hope you find it a plentiful source of ideas and personal inspiration but please don't copy my designs for contest submission or use for classes, publication or sale without express permission.