Basket Builder Easter Chocolate Bunny Treats

by Joanne James13. April 2017 22:31

We are into our school Easter holidays with a vengeance here in the James household and it is leaving little time for crafting! I just wanted to pop buy and share with you a cute little Easter bunny basket treat using the Basket Bunch stamp set and Basket Builder Framelit dies - retiring, but still available at a great discount at present:


These little 3D baskets are so easy to make with a 1 1/4" wide piece of cardstock, scored twice to create a U-shape, attached between each basket piece to hold the chocolate Lindt bunny then decorated with some stamped and cut out out flowers and a bow. I made these for each of my ladies that  attended a class with me this month as a thank you Easter treat and it's fair to say they were definitely well received!

You've still time to make these if you have the product or alternatively snap up a bargain now and be super-prepared for next year!

Here is the visual summary of the key products used on today's project for you to pin for easy reference:


You can see all of my 'How To' summaries on my 'How To - Tips and Techniques' Pinterest board in case you've missed any. 

I'll be back tomorrow with another project. Until then, happy stampin'!


Stampin' Up! Supplies Used:

Table built using Product Table Builder by The Crafty Owl - Independent Stampin' Up! Demonstrator.

Window Box Thinlits Easter Basket and Punch Art Easter Bunny

by Joanne James2. April 2017 09:00

It's Sunday and time for this week's new challenge over at The Paper Players! It's the turn of the lovely Laurie to host this week and she has a fun and timely theme challenge for us to work with:


I took the opportunity to take a break from cards this week and have a couple of quick and easy 3D items perfect for Easter treats for you to choose from. The first one is a basket made with the Window Box Thinlits to hold these cute chocolate carrots that I found when out shopping recently:


The Window Box Thinlits are so versatile and make the cutest Easter baskets! Of course I had to add a little tag with a bunny and fun sentiment and some Peek-a-boo Peach ribbon bows for decoration.

Sticking with the Easter bunny theme, I also made a punch art 'bow bunny' to decorate my little bucket of chocolate mini eggs:


I made my bunny using a combination of my Bow Builder, Festive Flower Builder and Owl Builder Punches, adding a few pearl eyes and some whiskers drawn in with my Stampin' Write marker. Not so sure about this one (I think perhaps his eyes are too far apart!)  Still, an easy way to decorate a treat container or Easter package.

Here is the visual summary of the key products used on today's projects for you to pin for easy reference:


You can see all of my Product and 'How To' summaries on my 'How To - Tips and Techniques' Pinterest board in case you've missed any. 

Before you reach for your ink and papers, check out what our amazing team has created to inspire you this week:

The Paper Players Design Team
 
 
Here's a quick recap of our challenge rules:
 
1.  Create a new paper project
2.  Upload your creation to your blog with a link back to us and provide a direct link to the post featuring your challenge submission.
3.  Please link your card to no more than four challenges, TOTAL.
4.  Have FUN! 


I look forward to seeing what you create with our fun theme this week. Enjoy the rest of your weekend as it will be over all too quickly; I'll be back tomorrow with another project; until then, happy stampin'!


Stampin' Up! Supplies Used: 

Table built using Product Table Builder by The Crafty Owl - Independent Stampin' Up! Demonstrator.
 
Table built using Product Table Builder by The Crafty Owl - Independent Stampin' Up! Demonstrator.

Easter Basket Bunch For The Paper Players

by Joanne James26. March 2017 09:00

To all my UK readers - Happy Mother's Day! It is of course Sunday and time for this week's new challenge over at The Paper Players! My good friend the super-talented Claire is the hostess this week and she has a sketch for us to work with:
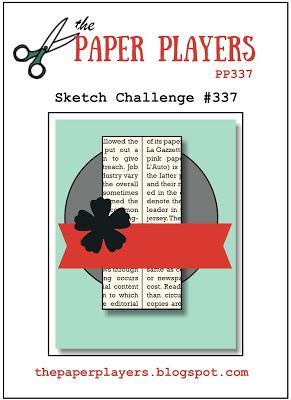
       

I love a good sketch and this one has some great layering options. I decided that I would use the pretty Spring colours over at Fab Friday to create a basket of flowers for an Easter card - take a look:
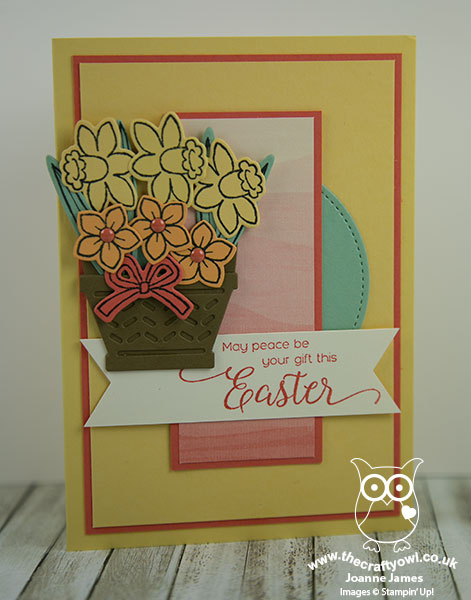
 

Here's the low-down on today's card:

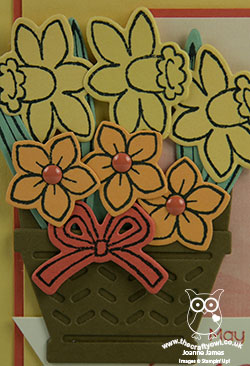
I kept my layers fairly neutral - a stitched circle in Mint Macaron, a panel of Calypso Coral By The Shore designer series paper - and used the Easter sentiment from the 'Suite Sentiments' set on a Very Vanilla banner, with the real focal point for my card being my basket of flowers. I cut and layered my basket using the Basket Builder framelits then stamped my daffodils and peach flowers in Memento Black onto solid colour cardstock using the Basket Bunch set and cut the out with the co-ordinating framelits, finishing them with some Calypso Coral subtles candy dots. I love the Basket Bunch bundle, not only for the Easter eggs and bunny, but also the perfect daffodils (well, I am Welsh so it is to be expected!). The framelits make cutting out these little pieces so easy and offer some great layering options too.

I'm also linking up with those lovely ladies over at As You See It too - for me, there is nothing that says Spring more than daffodils. They are so bright and cheery and inexpensive and I love to have them cut in a vase, but also to see them along the banks and hedgerows as I drive around the countryside. At the moment there are rows and rows of them on my journey driving Ben to school - they never fail to brighten my day!

Here is the visual summary of the key products used on today's project for you to pin for easy reference:
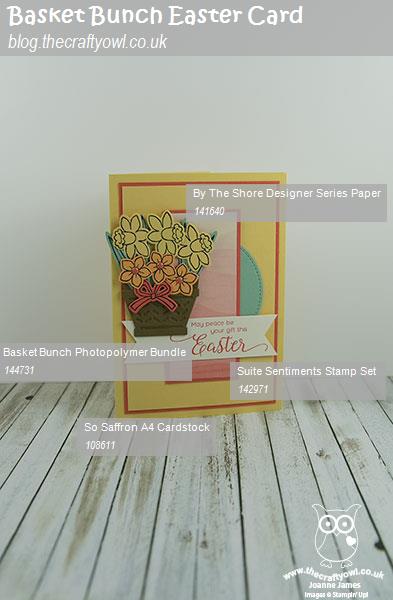
 

You can see all of my Product and 'How To' summaries on my 'How To - Tips and Techniques' Pinterest board in case you've missed any. 

Before you reach for your ink and papers, check out what our amazing team has created to inspire you this week:

The Paper Players Design Team
 
 
Here's a quick recap of our challenge rules:
 
1.  Create a new paper project
2.  Upload your creation to your blog with a link back to us and provide a direct link to the post featuring your challenge submission.
3.  Please link your card to no more than four challenges, TOTAL.
4.  Have FUN! 


I look forward to seeing what you create with our sketch this week. Enjoy the rest of your weekend as it will be over all too quickly; I'm looking forward to a family lunch and maybe, just maybe, a sneaky visit into my craft room this afternoon. I'll be back tomorrow with another project; until then, happy stampin'!


Stampin' Up! Supplies Used:

Table built using Product Table Builder by The Crafty Owl - Independent Stampin' Up! Demonstrator.

Basket Bunch Easter Egg Hunt Card

by Joanne James27. February 2017 20:44

Happy Monday everyone! I hope you've had a good day. I've had a busy start to the week with preparation for next week's classes followed by a pleasant hour watching Rebecca swim in a school swimming gala (she won all her races and the team won overall, so smiles all round.) Rebecca came second in her competition race yesterday too and had a new personal best time, so all good. Anyway, to today's cards - yes, two! I've made a couple of cards on the same theme using the same colours for a couple of different challenges:

Visit the Paper Craft Crew and play along with Card Sketch 232. #pcc2017 #cardsketch #papercraftcrew  www.papercraftcrew.com   

I decided I needed to get cracking (excuse the pun!) with my Easter makes, so today it's all about the Basket Bunch bundle  - take a look:


Paper Craft Crew have a great sketch this week and I really love the CAS Colours & Sketches colour combination - I will be so sad to see Cucumber Crush leave us in June! - and thought it was perfect for a little Easter egg hunt through the grass. I stamped and die cut a selection of eggs and interspersed them between my strip of grass. I layered it onto a piece of basket weave patterned paper from the Sale-A-Bration Carried Away Designer Series Paper and finished with this fun sentiment from the Basket Bunch stamp set, cut out with my Layering Ovals. May all your chocolate be solid - I love it!

Having completed this card, I thought it was probably a little too layered to qualify as truly 'clean and simple' for the lovely ladies over at CAS Colours and Sketches, so I die cut a few more pieces and created something a little more in keeping: 


Clean and simple with an alternative sentiment, yet no less colourful!

Here is the visual summary of the key products used on today's projects for you to pin for easy reference:


And for my second card:


You can see all of my 'How To' summaries on my 'How To - Tips and Techniques' Pinterest board in case you've missed any. 

Enjoy your day and I'll be back tomorrow with another project. Until then, happy stampin'!


Stampin' Up! Supplies Used:

Table built using Product Table Builder by The Crafty Owl - Independent Stampin' Up! Demonstrator.

New Online Exclusives

There are new products available exclusively in the online store from 5 November - check them out here.

Latest Kits!

Stampin Cut and Emboss

The Layered Landscapes Kit and Nature's Paintings Kit are the latest kits in the online store - get yours here!

Shop Online

Access my online shop 24 x 7, 365 days of the year:

Current November hostess code:

9NKXDTTR

Shop Online

Mini Catalogue

BROWSE THE CATALOGUE

'Tis The Season - the new Stampin' Up! Mini Catalogue is here! For more details and to download your copy click here

Scrapbooking

Stampin' Up! has introduced a new range of 12x12" scrapbooking product and kit - the full range is now available to purchase online. To download a copy of the new digital Scrapbooking Catalogue click here.

2024-25 Annual Catalogue

BROWSE THE CATALOGUE

Click on the image to download your copy of the 2024-25 annual catalogue. For a full list of current SU! supplies, go to my online store. If you would like any help or advice, please drop me a line at joanne@thecraftyowl.co.uk or give me a call on 07773 421446 - I'd be happy to help.

Join My Team

It's always a great time to join Stampin’ Up! New team members can get £130 worth of products for only £99 + free business supplies + free shipping + all the fun being a part of Stampin’ Up! Stampin' Up! has something for everyone: join my growing team and benefit from my support to enjoy Stampin' Up! however you choose.

If you're interested, call me for a chat to understand how I can help you realise your goals. Alternatively, if you have already decided to sign up and you just can't wait, please click here for the link to the online form where you can sign up and order your starter kit right away! 

About Me

Hi I'm Joanne and live in Northampton and when I'm not looking after my husband and two beautiful children, am an avid crafter with a passion for all things Stampin' Up!

I must confess that I have never been a big rubber stamper - until I discovered Stampin' Up! that is. I love the fact that I can get such great results with co-ordinating stamps, inks, papers and punches - the possibilities are endless! Join me on my stamping journey as I share the things I love and be inspired to create amazing things yourself!

Follow Me

Monthly Newsletter

Box Builder

Click the button above to use Box Buster to create your custom box design using the Envelope Punch Board!

Kits Collection Now Available!

Stampin Cut and Emboss

The new Kits Collection from Stampin' Up! is now available!

Click here to see the current kits available and order yours online today.

I Design For


Stampin' Up Stuff

This is my personal blog and is not endorsed by Stampin’ Up! I hope you find it a plentiful source of ideas and personal inspiration but please don't copy my designs for contest submission or use for classes, publication or sale without express permission.