Country Flowers CAS Frame Card CCS 538

by Joanne James4. June 2024 13:00

It's Tuesday and time for a new challenge over at CAS Colours & Sketches. Shannon is hosting this month and our first challenge is a colour challenge: 


Shannon's fresh colour palette are perfect for summer and I decided to use them for some pretty florals. I grabbed the new layout over at Sketch Saturday and a few new products and set to work. This is what I came up with:


Here's the low-down on today's card:

I used a sentiment from the new 'Country Wishes' stamp set and added it to a label from the Unbounded Love Dies, adding a second one in Daffodil Delight for a hint of shadow. I stamped a floral bouquet from Country Wishes and coloured it in the challenge colours with my Stampin' Blends and popped it up on some dimensionals:

A twist of (retired) Daffodil Delight ribbon, tied with white baker's twine completes my clean and simple card.

Here is the visual summary of the key products used on today's project for you to pin for easy reference:


You can see all of my 'How To' summaries on my 'How To - Tips and Techniques' Pinterest board in case you've missed any. 

As a reminder, for our colour challenges, you must use all of the stated challenge colours. You may also use neutral colours; however, the challenge colours should be the most noticeable ones featured on your card. We use Stampin' Up! colour names for reference, but you are welcome to use any other companies' products as long as you match the challenge colours as closely as possible.

Enjoy your day and I'll be back tomorrow with another project. Until then, happy stampin'!


Stampin' Up! Supplies Used:

Table built using Product Table Builder by The Crafty Owl - Independent Stampin' Up! Demonstrator.

Faith Hope Love CCS 537

by Joanne James21. May 2024 13:00

It's Tuesday and time for a new challenge over at CAS Colours & Sketches.This week's challenge is a sketch challenge and Patricia has asked that we add a panel with 3 banners behind. Feel free to flip or rotate the sketch when making your card.


For my card today I decided to do another showcase of one of the beautiful designs in the Thoughtful Journey paper pack on that panel - take a look:


Here's the low-down on today's card:

I used one of the Nested Essentials Dies to cut out my scenic panel and decided to highlight three of the colours in the sky and use those for my horizontal strips. I heat-embossed my sentiment onto each in white and used words from the 'Unbounded Love' stamp set that worked well together. How gorgeous are these papers? 

A trio of co-ordinating pearls complete my card front, with a corresponding sentiment added to the inside of my card:


What do you think? This is a great design that is quick to make and really does showcase the pretty papers.

Here is the visual summary of the key products used on today's project for you to pin for easy reference:


You can see all of my 'How To' summaries on my 'How To - Tips and Techniques' Pinterest board in case you've missed any. 

As a reminder, for our colour challenges, you must use all of the stated challenge colours. You may also use neutral colours; however, the challenge colours should be the most noticeable ones featured on your card. We use Stampin' Up! colour names for reference, but you are welcome to use any other companies' products as long as you match the challenge colours as closely as possible.

Finally, a quick reminder that all orders placed today over £60 are eligible for free shipping - so a great time to stock up on your new annual catalogue favourites.

Enjoy your day and I'll be back tomorrow with another project. Until then, happy stampin'!


Stampin' Up! Supplies Used:

Table built using Product Table Builder by The Crafty Owl - Independent Stampin' Up! Demonstrator.

Unbounded Love CAS Birthday Wreath CCS536

by Joanne James7. May 2024 13:00

It's Tuesday and time for a new challenge over at CAS Colours & Sketches. Patricia is hosting this month and our first challenge is a colour challenge: 


I used the layout over at AAA Cards to make a birthday card using some of my new catalogue goodies - take a look: 


Here's the low-down on today's card:

I decided to use Pebbled Path as my card base for a change and added some Pebbled Path ink with a blending brush to the the area where I was going to build my wreath to add depth. In addition to a wide variety of labels and frames, there are lots of great little foliage dies in the Unbounded Love bundle and I thought they would make a neat clean and simple wreath. I combined three different pieces and then added in some flowers with pearl centres from the Lovely & Sweet Dies set too:

 A silver twine bow and a fussy cut sentiment complete my card. I really like the finished result, especially with the darker card base.

Here is the visual summary of the key products used on today's project for you to pin for easy reference:


You can see all of my 'How To' summaries on my 'How To - Tips and Techniques' Pinterest board in case you've missed any. 

As a reminder, for our colour challenges, you must use all of the stated challenge colours. You may also use neutral colours; however, the challenge colours should be the most noticeable ones featured on your card. We use Stampin' Up! color names for reference, but you are welcome to use any other companies' products as long as you match the challenge colours as closely as possible.

Enjoy your day; I'm having new carpets fitted today so my day will be a busy one. I'll be back tomorrow with another project. Until then, happy stampin'!


Stampin' Up! Supplies Used:

Table built using Product Table Builder by The Crafty Owl - Independent Stampin' Up! Demonstrator.

Hello Friend Tortoise CCS535

by Joanne James16. April 2024 13:00

It's Tuesday and time for a new challenge over at CAS Colours & Sketches. First up - a confession! I got my dates mixed up and I actually used this sketch last week for my Tuesday post - you can see that card here if you missed it - but since this week is actually CAS Colours and Sketches week, I'm showing you another way to use it! This week's challenge is a sketch challenge and Rachel has asked that we use a trio of balanced shapes. Feel free to flip or rotate the sketch when making your card and remember the shapes you choose don't have to be squares. 


I paired Rachel's fun sketch with the 'take 5' challenge over at Color Dare this week (I ended up using all 5 colours) and created a simple notecard to say hello to a friend - take a look:


Here's the low-down on today's card:

I tweaked Rachel's sketch slightly and balanced my stamped and diecut tortoise from 'Playing In The Rain' onto a stacked sentiment from the 'Biggest Wish' stamp set, stamped in Flirty Flamingo. In place of the sentiment on the sketch, I added some flowers - perhaps the meadow where my tortoise had picked his daisy? 


My colours do seem a little off today for some reason, with my pink letters looking almost coral; my sage greens are also looking a little darker than they are in real life; notwithstanding, I like this second take on the sketch and the stacked sentiment is a fun idea too. The 'Biggest Wish' stamp set is retiring at the end of this month, although its companion set 'More Wishes' is staying, so if you are wanting to take advantage of the full combination of greetings, be sure to pick up this set before it's too late.

Here is the visual summary of the key products used on today's project for you to pin for easy reference:


You can see all of my 'How To' summaries on my 'How To - Tips and Techniques' Pinterest board in case you've missed any. 

Enjoy your day and I'll be back tomorrow with another project. Until then, happy stampin'!


Stampin' Up! Supplies Used:

Table built using Product Table Builder by The Crafty Owl - Independent Stampin' Up! Demonstrator.

Hey Chuck Rise And Shine CCS535

by Joanne James9. April 2024 13:00

It's Tuesday and time for a new challenge over at CAS Colours & SketchesThis week's challenge is a sketch challenge and Rachel has asked that we use a trio of balanced shapes. Feel free to flip or rotate the sketch when making your card and remember the shapes you choose don't have to be squares. 


I paired Rachel's fun sketch with the bright colour combo over at Just Us Girls this week that was perfect for what I had in mind - take a look:


Here's the low-down on today's card:

Those retiring lists I mentioned in yesterday's post are now well and truly live and so for today's card I just had to highlight one of my favourite retiring sets: Hey Chuck. As a previous chicken owner, I knew I'd never be able to resist these comical feathered friends! They are great for colouring, especially if you're a beginner as there is only a small area to focus on at a time. In addition to the chickens themselves, the dies contain a bunch of 'extras' in addition to those that cut out the chickens; on today's card I used the semi-circle sunshine to make a stencil so that I could stencil in my morning sun (this is something I've done previously here too) and the weather vane - so great for creating fun scenes, the possibilities are endless! The dies are also discounted as part of the retiring sale - so if you buy the stamps and the dies, you get a better deal if you purchase them separately than if you purchase them as a bundle. Here's my colourful poultry in close up:

A trio of sparkly Gorgeous Grape enamel dots complete my fun card (I've provided a link to one that is similar below). 

Here is the visual summary of the key products used on today's project for you to pin for easy reference:


You can see all of my 'How To' summaries on my 'How To - Tips and Techniques' Pinterest board in case you've missed any. 

This will be the perfect card to send to my daughter on her return to university - students in general are not known for being early risers so I suspect this will make her smile!

Enjoy your day and I'll be back tomorrow with another project. Until then, happy stampin'!


Stampin' Up! Supplies Used:

Table built using Product Table Builder by The Crafty Owl - Independent Stampin' Up! Demonstrator.

Timeless Arrangements Thank You Card CCS534

by Joanne James2. April 2024 13:00

It's Tuesday and time for a new challenge over at CAS Colours & Sketches. Rachel is hosting for the month of April and our first challenge is a colour challenge: 


For my card today I used the layout over at Sketch Saturday and used Rachel's fresh colour combination for a pretty floral thank you card - take a look:


Here's the low-down on today's card:

I stamped my sentiment from the 'Timeless Arrangements' stamp set onto a label from the same set, and backed it with a selection of diecuts in the challenge colours. I also stamped and coloured a couple of flower stems and added them to the mix. I used diecuts that broadly followed the diagonal shape of the lines on the sketch and added seven scored lines with my scoring tool to my white cardbase - you can see the detail if you look closely below:


The scored lines add a real touch of elegance to the card and are a great way to incorporate the stripes in a more subtle way. A trio of pink pearls was all I needed to complete my card. 

I will so miss the Timeless Arrangements bundle when it retirees - it makes the prettiest thank you cards.

Here is the visual summary of the key products used on today's project for you to pin for easy reference:


You can see all of my 'How To' summaries on my 'How To - Tips and Techniques' Pinterest board in case you've missed any. 

As a reminder, for our colour challenges, you must use all of the stated challenge colours. You may also use neutral colours; however, the challenge colours should be the most noticeable ones featured on your card. We use Stampin' Up! colour names for reference, but you are welcome to use any other companies' products as long as you match the challenge colours as closely as possible.

Enjoy your day and I'll be back tomorrow with another project. Until then, happy stampin'!


Stampin' Up! Supplies Used:

Table built using Product Table Builder by The Crafty Owl - Independent Stampin' Up! Demonstrator.

Bee Mine Sweet As Honey CCS 533

by Joanne James19. March 2024 13:00

It's Tuesday and time for a new challenge over at CAS Colours & Sketches. I am hosting this month and this week's challenge is a sketch challenge:


The sketch features six elements and an overlapping sentiment. The six elements don't need to be circles, they can be any shape, and they don't all have to be identical, however there should be a common theme to your chosen images. Feel free to flip or rotate the sketch when creating your card. Most of all, have fun! 

For my card today I got out my paper snips once more and spent some time fussy cutting a variety of honey pots from the Bee Mine designer series paper - take a look:


Here's the low-down on today's card:

There's so much value to be had in a pack of designer paper - especially if you have the patience to get your scissors out and start snipping! I arranged my pots across the centre of my card and then stamped my sentiment from the 'Bee My Valentine' stamp set in Tuxedo black ink, highlighting the word 'sweet' by inking it with my Sweet Sorbet in-colour marker, and after fussy cutting that too, popped it up on dimensionals and laid it over my honey pots::


Another clean and simple card - I'm sure Winnie the Pooh would approve!

Here is the visual summary of the key products used on today's project for you to pin for easy reference:


You can see all of my 'How To' summaries on my 'How To - Tips and Techniques' Pinterest board in case you've missed any. 

Enjoy your day; it's raining here (again!) so I will be spending the day indoors, trying to distract myself from doing the housework by poring over the new Stampin' Up! annual catalogue that I received yesterday! I'll be back tomorrow with another project. Until then, happy stampin'!


Stampin' Up! Supplies Used:

Table built using Product Table Builder by The Crafty Owl - Independent Stampin' Up! Demonstrator.

Lavender Blue Dilly Dilly CCS532

by Joanne James5. March 2024 13:00

It's Tuesday and time for a new challenge over at CAS Colours & Sketches. I have the pleasure of hosting this month and our first challenge is a colour challenge: 


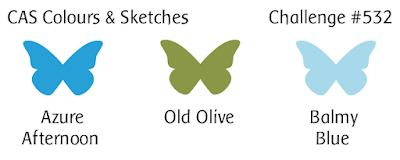
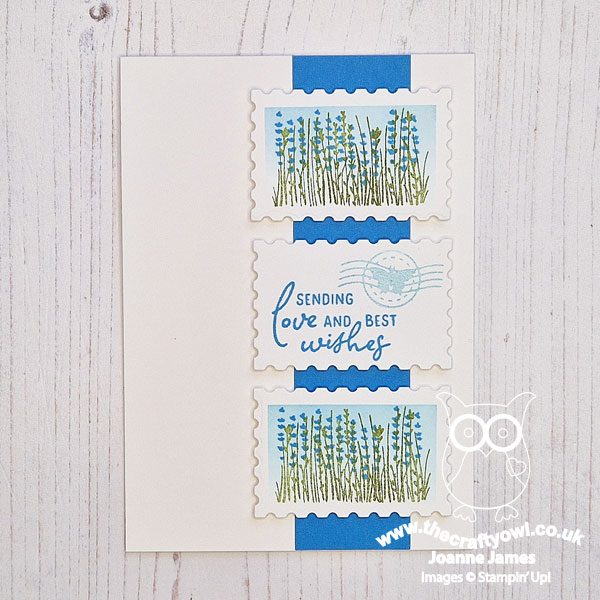
For my colour palette today, I chose the most recent addition to my ink pad collection (Azure Afternoon), the very first ink pad I ever purchased (Old Olive) and Balmy Blue to balance the mix. Just like the lullaby that inspired the title of today's blog post, I thought these colours would be perfect for lavender, so I grabbed my 'Painted Lavender' stamp set and my Perennial Postage bundle and set to work. This is what I came up with: 


Here's the low-down on today's card:

Painted Lavender - I chose the tiny lavender sprigs to feature on two of my three postage die pieces, repeat stamping them in Azure Afternoon and Old Olive to fill the space. 

Masked Perennial Postage - To give the appearance of a postage stamp, I masked off the edges of my diecut and then used a blending brush to add a Balmy Blue 'sky' to the centre of the rectangle, blending from top to bottom. I then removed the masking tape to reveal the crisp, white borders - lovely! 

Inked Embossing - I stamped my sentiment on the central diecut piece, off-centering it so that I could add an embossed postmark. This die is from the Perennial Postage Dies; to make it standout I added Balmy Blue ink to the die before embossing it onto the diecut, so that it leaves both and inked and embossed detail; you can see it more closely below:

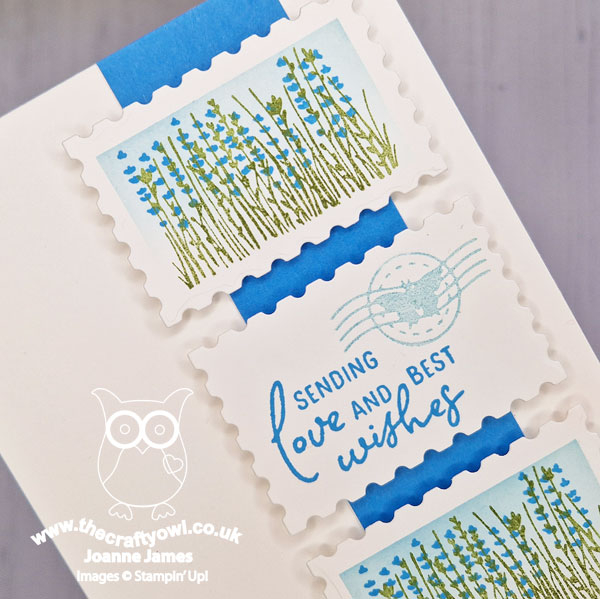
I love the addition of the postmark - such a neat detail! I used a strip of Azure Afternoon cardstock to bring my 3 postage diecuts together and complete my card.

Here is the visual summary of the key products used on today's project for you to pin for easy reference:


You can see all of my 'How To' summaries on my 'How To - Tips and Techniques' Pinterest board in case you've missed any. 

As a reminder, for our colour challenges, you must use all of the stated challenge colours. You may also use neutral colours; however, the challenge colours should be the most noticeable ones featured on your card. We use Stampin' Up! colour names for reference, but you are welcome to use any other companies' products as long as you match the challenge colours as closely as possible.

Enjoy your day and I'll be back tomorrow with another project. Until then, happy stampin'!


Stampin' Up! Supplies Used:

Table built using Product Table Builder by The Crafty Owl - Independent Stampin' Up! Demonstrator.

Sending Smiles Sunny Days CCS 531

by Joanne James20. February 2024 13:00

It's Tuesday and time for a new challenge over at CAS Colours & SketchesThis week's challenge is a sketch challenge and Michal has asked that we include a large focal sentiment on a bordered panel:


Feel free to flip or rotate the sketch when making your card. For my card today I wanted to showcase more of the free Sale-A-Bration papers before they go away - so I paired them with one of my favourite large sentiment sets for a cheery card - take a look:


Here's the low-down on today's card:

There is only a small area of designer series paper showing on my card (we are aiming for clean and simple, after all) but the bold and colourful flowers of the Sunny Days paper can still be seen. I paired them with sentiment from the Sending Dies and 'Sending Smiles' co-ordinating stamp set and added a trio of tiny diecut flowers for an added pop of colour to tie in with the paper:


That pattern is my absolute favourite in the Sunny Days pack so I had to show real restraint to use so little of it! If you would like some, you have another 9 days to place an order of £45 or more in order to receive a pack of this paper for FREE.

Here is the visual summary of the key products used on today's project for you to pin for easy reference:


You can see all of my 'How To' summaries on my 'How To - Tips and Techniques' Pinterest board in case you've missed any. 

Enjoy your day; today I'm going out to lunch with hubby to celebrate my 25th wedding anniversary - where did those years go?! I'll be back tomorrow with another project. Until then, happy stampin'!


Stampin' Up! Supplies Used:

Table built using Product Table Builder by The Crafty Owl - Independent Stampin' Up! Demonstrator.

Thoughtful Moments Happy Day Rainbow CCS 530

by Joanne James6. February 2024 13:00

It's Tuesday and time for a new challenge over at CAS Colours & Sketches. The talented Michal is hosting this month and our first challenge is a colour challenge: 


I don't mind admitting, this trio of colours properly threw me for a loop! I couldn't get past the fact that they would make a great Pixar ball image and struggled to use them to make a card featuring anything else! I made a few discarded cards for today's challenge, before finally going uber-simple and paring my card back to the basics - take a look: 


Here's the low-down on today's card:

A simple red frame, a panel cut with one of the Everyday Details Dies for a little border interest, and a sentiment from the Thoughtful Moments hybrid embossing folder and die set. A diecut rainbow from the same set for a final pop of colour completes my card. There are some great little dies in this set in addition to those that cut out the embossed sentiments that are perfect for clean and simple cards or an extra embellishment. I decided to go with an all-white sentiment with no colour outline:


A little unusual, but I actually quite like it! 

Here is the visual summary of the key products used on today's project for you to pin for easy reference:


You can see all of my 'How To' summaries on my 'How To - Tips and Techniques' Pinterest board in case you've missed any. 

As a reminder, for our colour challenges, you must use all of the stated challenge colours. You may also use neutral colours; however, the challenge colours should be the most noticeable ones featured on your card. We use Stampin' Up! color names for reference, but you are welcome to use any other companies' products as long as you match the challenge colours as closely as possible.

Enjoy your day and I'll be back tomorrow with another project. Until then, happy stampin'!


Stampin' Up! Supplies Used:

Table built using Product Table Builder by The Crafty Owl - Independent Stampin' Up! Demonstrator.

Promotions


Get an additional 10% off die bundles, and mini and full size die cutting machines, between 5-30 June - get yours here!

Shop Online

Access my online shop 24 x 7, 365 days of the year:

Current June hostess code:

3NR3FB9W

Shop Online

2024-25 Annual Catalogue

BROWSE THE CATALOGUE

Click on the image to download your copy of the 2024-25 annual catalogue. For a full list of current SU! supplies, go to my online store. If you would like any help or advice, please drop me a line at [email protected] or give me a call on 07773 421446 - I'd be happy to help.

Join My Team

t's always a great time to join Stampin’ Up! New team members can get £130 worth of products for only £99 + free business supplies + free shipping + all the fun being a part of Stampin’ Up! Stampin' Up! has something for everyone: join my growing team and benefit from my support to enjoy Stampin' Up! however you choose.

If you're interested, call me for a chat to understand how I can help you realise your goals. Alternatively, if you have already decided to sign up and you just can't wait, please click here for the link to the online form where you can sign up and order your starter kit right away! 

Latest Kits!

Stampin Cut and Emboss

The Expressions of Kindness kit makes 8 cards and costs £22; along with the fabulous Scenic Route Travel Journal Kit at £21 both are available from June 5th - get yours here!

New Online Exclusives

There are new products available exclusively in the online store from 5 March - check them out here.

About Me

Hi I'm Joanne and live in Northampton and when I'm not looking after my husband and two beautiful children, am an avid crafter with a passion for all things Stampin' Up!

I must confess that I have never been a big rubber stamper - until I discovered Stampin' Up! that is. I love the fact that I can get such great results with co-ordinating stamps, inks, papers and punches - the possibilities are endless! Join me on my stamping journey as I share the things I love and be inspired to create amazing things yourself!

Follow Me

Monthly Newsletter

Box Builder

Click the button above to use Box Buster to create your custom box design using the Envelope Punch Board!

Kits Collection Now Available!

Stampin Cut and Emboss

The new Kits Collection from Stampin' Up! is now available!

Click here to see the current kits available and order yours online today.

I Design For


Stampin' Up Stuff

This is my personal blog and is not endorsed by Stampin’ Up! I hope you find it a plentiful source of ideas and personal inspiration but please don't copy my designs for contest submission or use for classes, publication or sale without express permission.