Clean and Simple Whale Done Congratulations Card PP554

by Joanne James15. August 2021 08:00

Today it's Sunday and time for this week's new challenge over at The Paper Players! It's the turn of the fabulous Anne Marie to host this week and she has a clean and simple challenge for you to work with:


With GCSE exam results announced here in the UK last week, I have had the need for lots of exam congratulations cards, including some for boys, so today's clean and simple masculine challenge gave me the perfect opportunity to come up with another quick and easy-to-replicate design - take a look:


Here's the low-down on today's card:

I used Jen Timko's fabulous sketch over at Freshly Made Sketches this week for my layout and kept things simple by creating only in 'shades of blue', in keeping with the colour challenge over at Less Is More. I used a piece of retired Whale Of A Time designer series paper featuring ombre blue waves inside my oval aperture, and added a Night of Navy stamped whale and sentiment from the 'Whale Done' stamp set. I kept my card base white and didn't add any additional embellishments in order to preserve that all-important 'white space' and masculine feel:

Super simple and not at all girly - this whale has been getting lots of use lately! Perfect to send congratulatory wishes. This week was a big one for the James family: my nephew received A Level results and Rebecca received her GCSE results. Both of them had worked very hard and did very well, with a full set of A*s and As between them, so we had lots to celebrate. More importantly, they both achieved everything they need to move on to the next stage of their education, which is the most important thing. This year has been tough for all those in examination years and I think all GCSE and A Level students should be mighty pleased with their achievements at all levels. 

Here is the visual summary of the key products used on today's project for you to pin for easy reference:


You can see all of my Product and 'How To' summaries on my 'How To - Tips and Techniques' Pinterest board in case you've missed any. 

Before you reach for your ink and papers, check out what our amazing team has created to inspire you this week:

Here's a quick recap of our challenge rules:
 
1.  Create a new paper project
2.  Upload your creation to your blog with a link back to us and provide a direct link to the post featuring your challenge submission.
3.  Please link your card to no more than four challenges, TOTAL.
4.  Have FUN!

You can see all of my 'How To' summaries on my 'How To - Tips and Techniques' Pinterest board in case you've missed any. 

Enjoy your day; no big plans here, so hoping I'm lucky enough to squeeze in some crafting!  I'll be back tomorrow with another project. Until then, happy stampin'!


Stampin' Up! Supplies Used: 

Table built using Product Table Builder by The Crafty Owl - Independent Stampin' Up! Demonstrator.

Whale-y Well Done Congratulations Card CCS 430

by Joanne James27. July 2021 12:00

It's Tuesday and time for a new challenge over at CAS Colours & Sketches. Holly is hosting this month and our final challenge this month is a sketch challenge featuring stripes: 


Feel free to flip or rotate the sketch when making your card.

For my card today I was also inspired by the photo inspiration over at Just Us Girls and the similar nautical theme over at Festive Friday (I chose blue, red and twine) to create another clean and simple congratulations card using my whale builder punch - take a look:


Here's the low-down on today's card:

I flipped the colours in the bottom-right JUGS inspiration photo and added a simple navy blue punched whale to a set of red and white cardstock stripes. with a sentiment from the 'Whale Done' stamp set and this time adding a cute mortar board to my whale since once again exam congratulations are in order. To create my mortar board, I handcut a diamond shape from black cardstock and added it to a small rectangle then threaded some basic black twine through it and secured at the back before unravelling it to create my tassel

The tassel was the fussiest part of today's card, which otherwise is super clean and simple. Great for a masculine congratulations card I'm thinking - nothing too fussy!

Here is the visual summary of the key products used on today's project for you to pin for easy reference:


You can see all of my 'How To' summaries on my 'How To - Tips and Techniques' Pinterest board in case you've missed any. 

As a reminder, for our colour challenges, you must use all of the stated challenge colours. You may also use neutral colours; however, the challenge colours should be the most noticeable ones featured on your card. We use Stampin' Up! color names for reference, but you are welcome to use any other companies' products as long as you match the challenge colours as closely as possible.

Enjoy your day; I'll be dodging the thunderstorms! I'll be back tomorrow with another project. Until then, happy stampin'!


Stampin' Up! Supplies Used:

Table built using Product Table Builder by The Crafty Owl - Independent Stampin' Up! Demonstrator.

Whale Done Congratulations Card CCS 428

by Joanne James13. July 2021 12:00

It's Tuesday and time for a new challenge over at CAS Colours & Sketches. This week's challenge is a sketch challenge and Holly has asked that we include a diamond shape on the front of our card:


Feel free to flip or rotate the sketch when making your card.

Holly's layout was perfect for the idea I had for my Card Concept card for their summer challenge too - check out that gorgeous inspiration photo! I was particularly taken with that tricolour whale in the inspiration photo but was also inspired by the white starfish and sand dollars, and the wavy design and texture of the white cushion in the background to create my clean and layered card today - take a look:


Here's the low-down on today's card:

I stamped my whale in Night of Navy onto both Basic White and Balmy Blue, then used my whale punch to punch out the various pieces and then pieced them together to create my fun whale. I positioned it on a square of (retired) Whale of a Time designer series paper featuring ombre waves and added some punched water from the same paper above the whale's blowhole.


I layerered this square onto a white square embossed with the (retired) Seabed embossing folder; you can't see much of this detail, but it has lots of little starfish, coral, seaplants and such on it and it adds a nice additional detail. I added another piece of the whale paper to create an ombre border between my base layers and finished with a 'whale done!' sentiment from the stamp set of the same name. 

Here is the visual summary of the key products used on today's project for you to pin for easy reference:


You can see all of my 'How To' summaries on my 'How To - Tips and Techniques' Pinterest board in case you've missed any. 

A friend's daughter just graduated from university with a First in Psychology, so this card will be making it's way to her with our congratulations - I know she will appreciate the punny sentiment! With my own daughter and her friends having sat GCSEs and a few more friends having sat A-Levels this year, I'm going to be needing a few more congratulations cards in the coming weeks, so I think I need to get cracking!

Enjoy your day and I'll be back tomorrow with another project. Until then, happy stampin'!


Stampin' Up! Supplies Used:

Table built using Product Table Builder by The Crafty Owl - Independent Stampin' Up! Demonstrator.

Whale of A Time Porthole Birthday Card

by Joanne James20. August 2020 12:00

Thursday? Where has the week gone?! I have had a class this week and another online demonstration session this morning and it's the summer holidays of course; I did some making on Tuesday but am super behind with my blogging, so you will see a few posts from me today as I'm in catch-up mode! The first is this card that I made using this week's CAS(E) This Sketch layout and if I'm quick I can just squeeze in a link up:

The minute I saw that sketch I knew it would be perfect for one of the papers I had in my Whale of a Time paper pack - take a look:


Here's the low-down on today's card:

That shoal of colourful swimming fish was crying out to be framing a 'faux porthole' that I used to highlight my embossed sentiment, then decorated with a stamped and punched whale and some sea coral. Check out my co-ordinating inside decoration too:


Here is the visual summary of the key products used on today's project for you to pin for easy reference:


You can see all of my 'How To' summaries on my 'How To - Tips and Techniques' Pinterest board in case you've missed any. 

Enjoy your day and I'll be back later with another couple of projects. Until then, happy stampin'!


Stampin' Up! Supplies Used:

Table built using Product Table Builder by The Crafty Owl - Independent Stampin' Up! Demonstrator.
 

Whale of A Time Turtles Galore PP501

by Joanne James26. July 2020 09:00

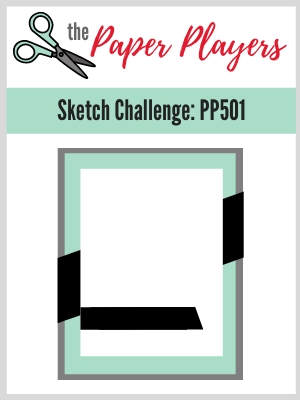
Today it's Sunday and time for this week's new challenge over at The Paper Players! It's the turn of the wonderful Anne Marie to host and this week it's my favourite, a sketch challenge:
 

I deliberated over this week's sketch then decided to go with an idea that I had been mulling over - take a look at my finished card:
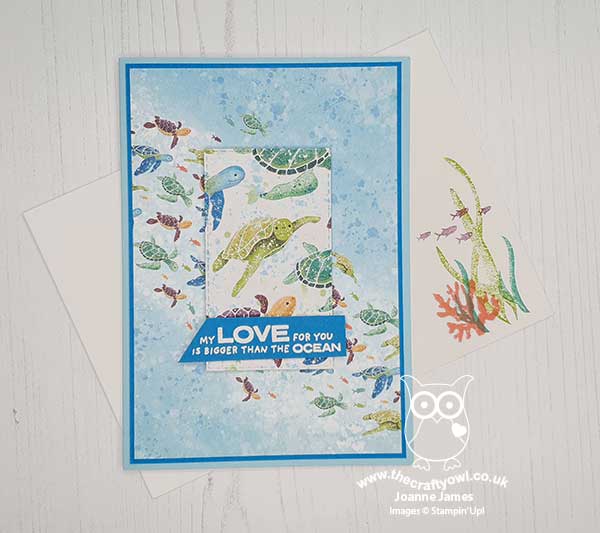
 

Here's the low-down on today's card:

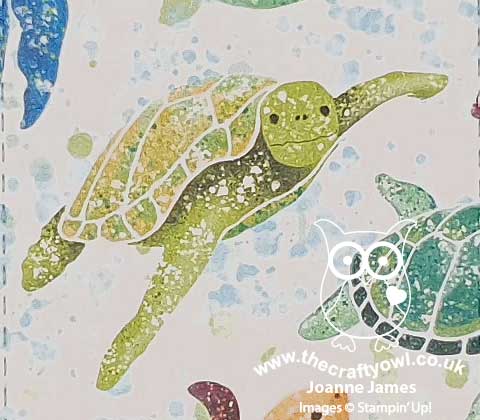
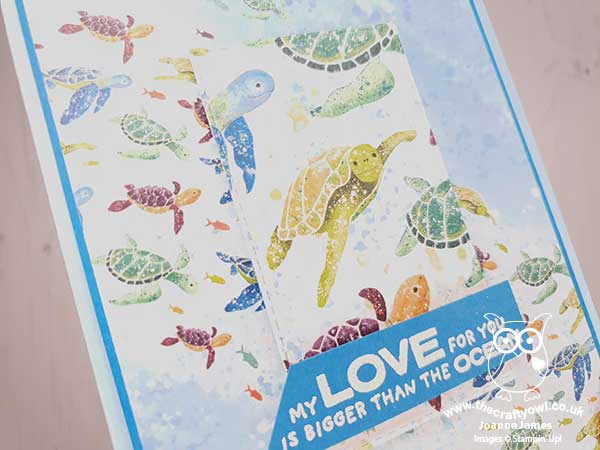
Whale of A Time - My whole card this week was based on a couple of my favourite patterns in the Whale Of A Time DSP pack. There are some amazing patterns in this pack but the ones featuring the turtles stole my heart the minute I set eyes upon them! I have had so many special encounters with turtles when scuba diving that these graceful sea creatures will always be special to me. I could happily never have cut these papers, but when I saw Anne Marie's sketch this week I saw a way to use these patterns in a fun way. I used the piece with the small turtles swimming on the current for my base, then added a section featuring the larger turtles for the central section. I wanted it to appear almost as if the turtles on the central panel were a magnified version of the turtles behind. Furthermore, I was careful to choose which piece to cut for my central panel; doesn't that green turtle in the centre appear to be looking at you head on? Here's a close-up so you can see what I mean:
Flip The Sketch - It was the diagonal on the sketch that made me think of the paper design featuring the turtles travelling on the current, but they weren't swimming in the right direction. To solve the issue, I flipped the sketch along the vertical edge and inverted all of the elements. I also made the central rectangle smaller and borderless (I didn't want to obscure the diagonal of turtles too much) and my sentiment banner slightly longer to accommodate my chosen sentiment. My interpretation of the sketch is less literal this week, however you can still clearly see all of the elements.

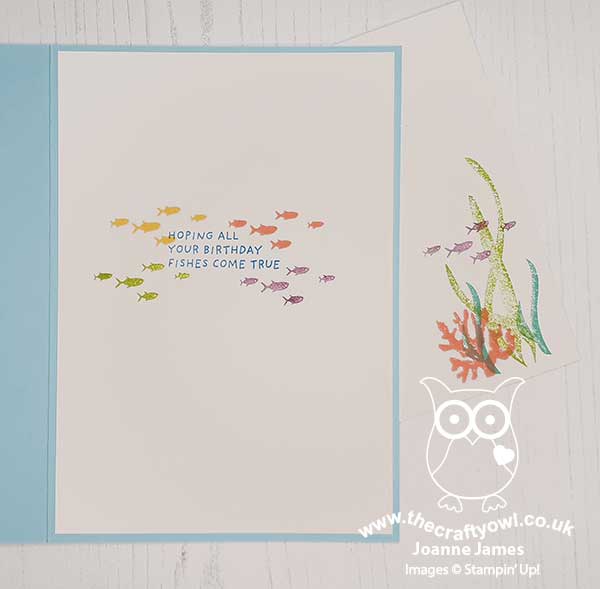
It's Not All About The Paper - Whilst the front of my card most definitely focuses on my chosen papers, this card is not all about the paper! I added some stamping to the corner of my envelope and added this cute punny sentiment inside along with some colourful shoals of fish to complete my card:
Whilst at first glance my card may appear simple, it actually took a lot of thought to bring my ideas to fruition. So what do you think? Do you like the end result? Do leave me a comment below - I would love to hear your thoughts!

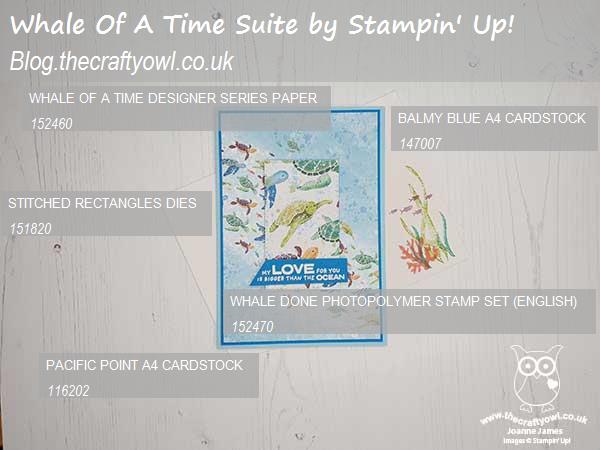
Here is the visual summary of the key products used on today's project for you to pin for easy reference:
 

You can see all of my Product and 'How To' summaries on my 'How To - Tips and Techniques' Pinterest board in case you've missed any. 

Before you reach for your ink and papers, check out what our amazing team has created to inspire you this week:

Here's a quick recap of our challenge rules:
 
1.  Create a new paper project
2.  Upload your creation to your blog with a link back to us and provide a direct link to the post featuring your challenge submission.
3.  Please link your card to no more than four challenges, TOTAL.
4.  Have FUN!

You can see all of my 'How To' summaries on my 'How To - Tips and Techniques' Pinterest board in case you've missed any. 

Enjoy your day; we are hoping to dodge the thunderstorms and go cycling today as well as do some baking amongst other things. I'll be back tomorrow with another project. Until then, happy stampin'!


Stampin' Up! Supplies Used: 

Table built using Product Table Builder by The Crafty Owl - Independent Stampin' Up! Demonstrator.

Thanks A Ton With Whale Done TTT72

by Joanne James9. July 2020 12:00

It's Thursday and time for a new challenge over at TicTacToe! It's the turn of Team X to host this week and the lovely Amy is our featured designer this week. This is the fun board that we are playing along with: 


I used this week's CAS(E) This Sketch layout and went down the central column of patterned paper/sea creatures/purple for my card today - take a look:


Here's the low-down on today's card:

Whale Of A Time - I used a piece of the 'Whale of A Time' designer paper as the basis for today's card - this sheet covered in swimming whales makes the perfect centrepiece, or rather backdrop for that striking diagonal and punny sentiment.

Thanks A Ton - My sentiment comes from the 'Whale Done' stamp set and actually appears differently on the stamp itself (you can see that on the stamp set product image below). I wanted my sentiment to run in a single line so carefully masked and stamped it in two separate movements to achieve the desired effect. I added a heart to accent it, which also comes from the same set.

Inside Action - The front of my card came together pretty quickly and was mostly about getting the angles and corners even on each of the layers, which I always find quite tricky where diagonals are involved. I did have time to add a little extra stamping to the inside of my card in the same colours to echo the design on the front and I punched out my whale using the co-ordinating punch to save masking my seaweed:


Here is the visual summary of the key products used on today's project for you to pin for easy reference:


You can see all of my Product and 'How To' summaries on my 'How To - Tips and Techniques' Pinterest board in case you've missed any. 

A tictactoe board offers so many creative possibilities - how does this week's board inspire you? Why not have a go? We would love to see you in the gallery and who knows - you might be selected for Designer's Choice and be eligible to be a guest designer on a future challenge. 

Enjoy your day; I did all of my jobs yesterday so I am getting crafty today with a Zoom session this morning all about Stampin' Write markers and hopefully time for more crafty makes too. I'll be back tomorrow with another project. Until then, happy stampin'!


Stampin' Up! Supplies Used:  

Table built using Product Table Builder by The Crafty Owl - Independent Stampin' Up! Demonstrator.

Mini Catalogue

BROWSE THE CATALOGUE

The mini catalogue is now live! Read and download your copy here.

Shop Online

Access my online shop 24 x 7, 365 days of the year:

Current March hostess code:

S9F2XJJW

Shop Online

Join My Team

It's always a great time to join Stampin’ Up! New team members can get £130 worth of products for only £99 + free business supplies + free shipping + all the fun being a part of Stampin’ Up! Stampin' Up! has something for everyone: join my growing team and benefit from my support to enjoy Stampin' Up! however you choose.

If you're interested, call me for a chat to understand how I can help you realise your goals. Alternatively, if you have already decided to sign up and you just can't wait, please click here for the link to the online form where you can sign up and order your starter kit right away! 

Latest Kit!

Stampin Cut and Emboss

The Rock Legend Kit has all you need to make 8 cards with coordinating envelopes. Along with the new Panda Friends Kit, both are available from January 4th for just £14 each - get yours here!

2023-24 Annual Catalogue

BROWSE THE CATALOGUE

Click on the catalogue for a full list of current SU! supplies - if you would like to order any of the items featured, please drop me a line at [email protected] or give me a call on 07773 421446 - I'd be happy to help.

New Online Exclusives

There will be new products available exclusively in the online store from 5 March - check them out here.

About Me

Hi I'm Joanne and live in Northampton and when I'm not looking after my husband and two beautiful children, am an avid crafter with a passion for all things Stampin' Up!

I must confess that I have never been a big rubber stamper - until I discovered Stampin' Up! that is. I love the fact that I can get such great results with co-ordinating stamps, inks, papers and punches - the possibilities are endless! Join me on my stamping journey as I share the things I love and be inspired to create amazing things yourself!

Follow Me

Monthly Newsletter

Box Builder

Click the button above to use Box Buster to create your custom box design using the Envelope Punch Board!

Kits Collection Now Available!

Stampin Cut and Emboss

The new Kits Collection from Stampin' Up! is now available!

Click here to see the current kits available and order yours online today.

I Design For


Stampin' Up Stuff

This is my personal blog and is not endorsed by Stampin’ Up! I hope you find it a plentiful source of ideas and personal inspiration but please don't copy my designs for contest submission or use for classes, publication or sale without express permission.