Friendly Hello Birthday Card TTT150

by Joanne James24. February 2022 16:00

It's Thursday and time for a new challenge over at TicTacToe! It's the turn of Team X to host this week and the lovely Vicky is our featured designer this week. This is the fun board that we are playing along with: 


Vicky chose some great options this week and I could have gone in any direction! In the end I went across the top of the board with pastel colours/designer paper/diecut and grabbed some of my designer paper and paper snips and set to work:


Here's the low-down on today's card:

Friendly Hello Times Two - I decided to use both the 'Friendly hello' stamp set and the co-ordinating papers on today's card. I set to work fussy cutting one of the multi-coloured sheets and created a layered image of the bird surrounded by leaves and flowers. The stamping on my card is limited to my sentiment on the front, that I stampsed twice, once onto the base and then again onto some Pool Party cardstock and fussy-cut the word 'friend' for a contrasting look. I also stamped a birthday sentiment inside and used some left over flowers to decorate my insert:


These papers are gorgeous - I even used a piece to decorate the envelope flap for a card that is pretty both inside and out!

Dots and Circles - I layered my bird, flowers and foliage onto a circle of Granny Apple Green with a black scalloped mat - you can just see it peeking through below all of that fussy-cut goodness below:


I grounded the decorative circle with a strip of dotty paper which is another design in the same Friendly Hello pack.

Still Time To Sale-A-Brate - The 'Friendly Hello' bundle is available FREE with a £90 purchase during Stampin' Up!'s current Sale-A-Bration promotion. If it's still on your wish list, you have until next Monday when the promotion ends to order yours before it's gone forever. Just click on the links below to go to my online store to get yours - remember to add the current host code for a special thank you from me.

Here is the visual summary of the key products used on today's project for you to pin for easy reference:


You can see all of my Product and 'How To' summaries on my 'How To - Tips and Techniques' Pinterest board in case you've missed any. 


Today's card uses the sketch over at Atlantic Hearts for the layout (I did move the sentiment though - and it's my first time of playing too!). There are also lots of dots and circles so I'm linking up over at Global Design Project as that's their theme this week and I'm linking up over at TGIF Challenges where they, like me, are all about Sale-A-Bration (thanks too for chooing me as your winner last week ladies!)

A tictactoe board offers so many creative possibilities - how does this week's board inspire you? Why not have a go? We would love to see you in the gallery and who knows - you might be selected for Designer's Choice and be eligible to be a guest designer on a future challenge. 

Enjoy your day; I'll be back tomorrow with another project. Until then, happy stampin'!


Stampin' Up! Supplies Used: 

Table built using Product Table Builder by The Crafty Owl - Independent Stampin' Up! Demonstrator.

Sweet Talk Love You TTT148

by Joanne James10. February 2022 18:00

It's Thursday and time for a new challenge over at TicTacToe! It's the turn of Team X to host this week and the lovely Felicita is our featured designer this week. This is the fun board that we are playing along with: 
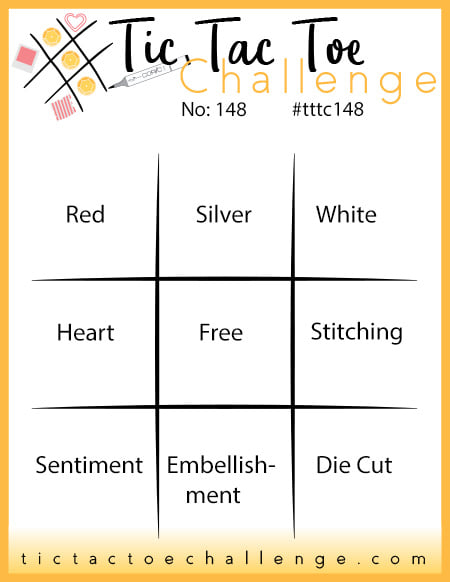
       

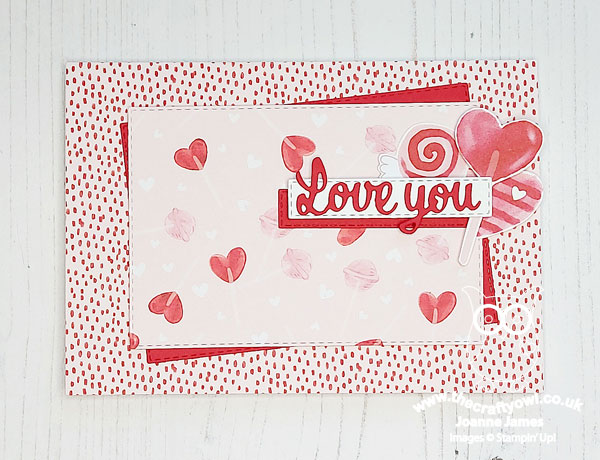
I went down the first column with red/heart/sentiment (my card also works for the middle row of heart/free/stitching) and I used the lovely red and pink hearts inspo over at Double D and the fabulous sketch over at Sunday Stamps (this one is a keeper ladies!) for the layout for my sweet-on-you card today - take a look:


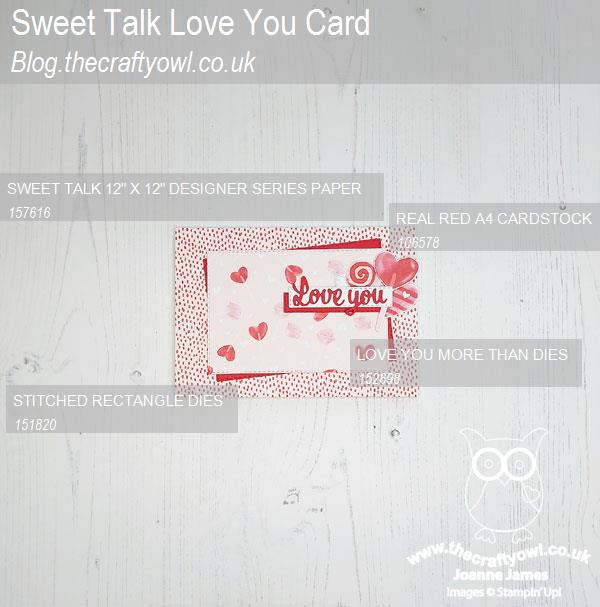
Here's the low-down on today's card:

Sweet Talk - The Sunday Stamps sketch was crying out for a showcase of some lovely patterned paper (check out the DT cards on the link above - they are amazing!) so I decided to go all-out pink and red hearts and use another two contrasting patterns from the Sweet Talk paper pack that I used for yesterday's card. I used one for my card base, then with a layer of Real Red in between, added a panel decorated with pink and red lollipops and hearts - so sweet!

All About The Angles - Today card is all about the angles, or more specifically, rectangles! I used two large ones for the central tilted panels, then two smaller ones for the sentiment detail. The Stitched Rectangle Dies are such a great way to frame a piece of paper or scene and add subtle detail, without detracting from the main event. 

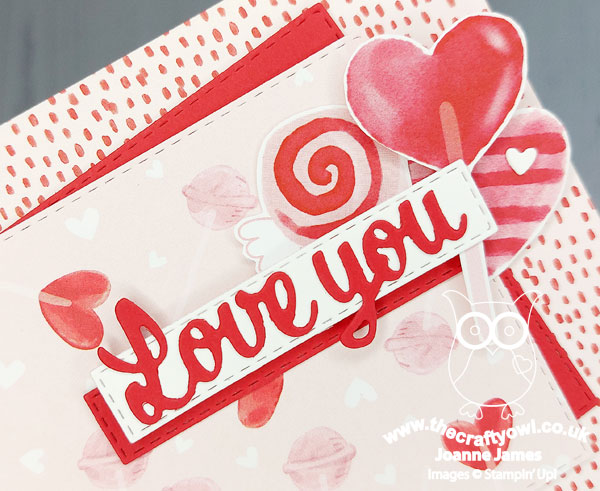
All About Love - The die cut 'love you' sentiment on the front of my card is actually part of the larger diecut sentiment in the 'Love You More Than' Dies set, where I just used the first two words. I love to look at diecut word sets to see how they can be repurposed or reused with other sets to expand their range of use:

I fussy cut some lollipops and sweets from another of the sheets of Sweet Talk patterned paper and tucked these in just beneath my sentiment for an extra fun touch.

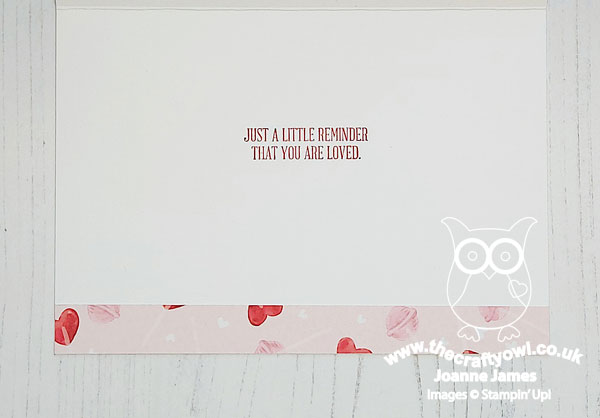
I added a sentiment from 'A Wish For Everything' to the inside of my card - this is one of my favourite sentiment sets:

My card can be used at any time to remind the recipient that they are loved - after all, to love is for always, not just for Valentine's!

Here is the visual summary of the key products used on today's project for you to pin for easy reference:


You can see all of my Product and 'How To' summaries on my 'How To - Tips and Techniques' Pinterest board in case you've missed any. 

A tictactoe board offers so many creative possibilities - how does this week's board inspire you? Why not have a go? We would love to see you in the gallery and who knows - you might be selected for Designer's Choice and be eligible to be a guest designer on a future challenge. 

Enjoy your evening; I am out this evening attending a music recital that includes a performance of a piece of music that Rebecca wrote for her GCSE Music exam earlier this year. When I asked if she'd like to come with me, she said 'Why would I want to do that? I wrote it, so I know what it sounds like - I'm off to hockey training!' And that was the end of that - you can't fault teenage logic!

I'll be back tomorrow with another project. Until then, happy stampin'!


Stampin' Up! Supplies Used: 

Table built using Product Table Builder by The Crafty Owl - Independent Stampin' Up! Demonstrator.

For The Record Valentine TTT146

by Joanne James27. January 2022 18:00

It's Thursday and time for a new challenge over at TicTacToe! It's the turn of Team X to host this week and the lovely LeAnne is the featured designer this week. This is the fun board that we are playing along with: 


I went with the first column of pink/Valentine or heart/white for my card today and took the layout from Fusion (I made it horizontal to fit everything in0!) and red, pink and black from the 'cool winter love' colour palette over at Sunday Stamps and used some new papers and a new stamp set too - take a look:


Here's the low-down on today's card:

For The Record - The 'For The Record' stamp set on page 74 of the mini catalogue is most definitely the star of today's card! With sentiments for a range of occasions, this set is sure to be a hit with vinyl collectors and music lovers alike and has a fun retro vibe! Both my record and sentiment come from this set.

Sweet Talk - I decided to go all-out with the sweet talking on today's card, not only with the fun sentiment but also this heart-filled background designer series paper that is from the Sweet Talk pack. 

Shimmer and Shine - The detail on this record is great and totally lends itself to being heat embossed, to show the ridges and grooves. I stamped and heat-embossed the heart at the centre of the record again in black on Real Red cardstock then fussy cut it out, then filled it with Shimmery Crystal Effects for added sparkle and shine:


This card is bold, bright and full of fun - perfect for the favourite song in your life!

Here is the visual summary of the key products used on today's project for you to pin for easy reference:


You can see all of my Product and 'How To' summaries on my 'How To - Tips and Techniques' Pinterest board in case you've missed any. 

A tictactoe board offers so many creative possibilities - how does this week's board inspire you? Why not have a go? We would love to see you in the gallery and who knows - you might be selected for Designer's Choice and be eligible to be a guest designer on a future challenge. Also, if you like this layout, spoiler alert - I used the same Fusion sketch as the starting point for tomorrow's card too for our new challenge over at As You See It - although that card couldn't be more different! Come back tomorrow to see my second take on this great layout.

Enjoy your evening; until tomorrow, happy stampin'!


Stampin' Up! Supplies Used: 

Table built using Product Table Builder by The Crafty Owl - Independent Stampin' Up! Demonstrator.

Beauty of The Earth Wintry Thank You TTT144

by Joanne James13. January 2022 18:00

It's Thursday and time for a new challenge over at TicTacToe! It's the turn of Team X to host this week and I am the featured designer this week. This is the fun board that we are playing along with: 


I went down the first column with Winter/Sentiment/Circle and made a simple wintry thank you card - take a look:


Here's the low-down on today's card:

Wintry Blues - The Beauty of the Earth designer papers contain lots of wonderful leafy images featuring trees and greenery and I used lots of them during the autumn in particular and I have been wanting to create something with this beautiful blue and grey watercolour-inspired pattern. I didn't get the opportunity to incorporate it into a Christmas card, but thought it would made a lovely centrepiece for a simple wintry thank you. 

A Surprise Sentiment - When looking for the right sentiment for my card, I came across this one that was perfect - and actually from a set that couldn't be further from the winter season. Do you recognise it? It actually comes from the 'Sweet Ice Cream' stamp set. I thought it would work just as well with a frosty scene, paired with a simple 'thank you' on the inside of my card from the same set. What do you think? Always worth perusing the catalogue - you may be surprised what you will find. Have you ever made any other unusual stamp and paper pairings? Do let me know in the comments below - I'd love to hear about them!

A Subtle Sparkle - Finally, honestly, too difficult to see on the photo, but I brushed each of the watercoloured trees with my clear Wink of Stella brush for an oh so pretty subtle sparkle. I also added a single rhinestone to my heart for a more obvious shine:


Here is the visual summary of the key products used on today's project for you to pin for easy reference:


You can see all of my Product and 'How To' summaries on my 'How To - Tips and Techniques' Pinterest board in case you've missed any. 

A tictactoe board offers so many creative possibilities - how does this week's board inspire you? Why not have a go? We would love to see you in the gallery and who knows - you might be selected for Designer's Choice and be eligible to be a guest designer on a future challenge. 

I'm also linking today's card up over at The Alphabet Challenge blog where they are currently on 'T is for Trees'. 

Enjoy your day; I'll be back tomorrow with another project for our new challenge over at As You See It. Until then, happy stampin'!


Stampin' Up! Supplies Used: 

Table built using Product Table Builder by The Crafty Owl - Independent Stampin' Up! Demonstrator.

Snowflake Wishes Wintry 3D Embossed Thank You TTT142

by Joanne James1. December 2021 18:00


It's Thursday and time for a new challenge over at TicTacToe! It's the turn of Team X to host this week and the lovely Betty is our featured designer this week. This is the fun board that we are playing along with: 


Betty made a fabulous board this week and I really was spoiled for choice! Having finally taken receipt of my Wintry 3D embossing folder this week after a very protracted wait, I knew I would have to use it on today's card. I went down the middle column of the grid with snowflakes/free/winter and used both the sketch layout over at Try Stamping on Tuesday and the sparkly snowflake in this week's Inspired By photo for a wintry card that is choc full of snowflakes and sparkle in equal measure - take a look:


Here's the low-down on today's card:

A Wintry Ombre - I embossed two panels of basic white cardstock and another of ombre glimmer paper with the snowflake Wintry 3D embossing folder for some textured panels - I love how the snowflakes appear to swirl with the design. On the ombre glimmer paper, which is in hues of Night of Navy, I lightly sanded the embossed areas to highlight the texture and detail - you can see it more closely on the photo below:

The ombre glimmer paper is gorgeous and embosses beautifully - I just love the effect!

Tag-tastic - I used one of my Tailored Tag Dies to cut my tag as per the sketch, and stamped it with snowflakes and swirls, adding a sentiment heat-embossed onto a stitched label. I added an over-the-top bow using some sparkly ribbons and accented my tag with some glimmer paper snowflakes in white and navy. I cut these with my Stitched Snowflakes Dies; if you've had your eye on these and not yet ordered, I'm afraid you will be disappointed as they were one of the first things to fly off yesterday's 'Last Chance Products' retiring items list. If you missed that post, check it out here.

Merry Snowflakes Inside - I used the 'Snowflake Wishes' stamp for the details and sentiment on the front of my card, but added decoration and a further sentiment from the 'Merry Snowflakes' set to decorate the inside:

I know I made today's card as a seasonal thank you, but I think it's still ok to have a Christmassy sentiment on the inside too, don't you think? 

Here is the visual summary of the key products used on today's project for you to pin for easy reference:


You can see all of my Product and 'How To' summaries on my 'How To - Tips and Techniques' Pinterest board in case you've missed any. 

A tictactoe board offers so many creative possibilities - how does this week's board inspire you? Why not have a go? We would love to see you in the gallery and who knows - you might be selected for Designer's Choice and be eligible to be a guest designer on a future challenge. 

Enjoy your day; I'll hopefully be back tomorrow with another project, but no promises - the Christmas rush is getting the better of me! Until next time, happy stampin'!


Stampin' Up! Supplies Used: 

Table built using Product Table Builder by The Crafty Owl - Independent Stampin' Up! Demonstrator.

Happy Holly Days Robin Wreath TTT140

by Joanne James18. November 2021 12:00

It's Thursday and time for a new challenge over at TicTacToe! It's the turn of Team X to host this week and the lovely Vicky is our featured designer this week. This is the fun board that we are playing along with: 


I used the sketch over at TGIF Challenges for my layout today - I thought that circle would be the perfect spot for a festive wreath to frame my colourful robin - and went across our tictactoe grid with layers/wreath/bird for my card today. Take a look:


Here's the low-down on today's card:

I used one of my favourite patterns from the Painted Christmas paper pack for the base of my card, added a couple of diecut wreaths, along with a few extra pieces of diecut holly leaves, a bow of glittered organdy ribbon and my sentiment, which I anchored with a robin from the Happy Holly Days stamp set, stamped and coloured with my Stampin' Blends. I added a few garden gems for a little extra sparkle to finish my card:


When it comes to colouring, I'm no expert but I do love it - so theraputic! A little extra stamping on the inside completes my card:


Here is the visual summary of the key products used on today's project for you to pin for easy reference:


You can see all of my Product and 'How To' summaries on my 'How To - Tips and Techniques' Pinterest board in case you've missed any. 

A tictactoe board offers so many creative possibilities - how does this week's board inspire you? Why not have a go? We would love to see you in the gallery and who knows - you might be selected for Designer's Choice and be eligible to be a guest designer on a future challenge. 

Enjoy your day; a slightly earlier post from me today as I'm going to watch one of the James Juniors play hockey at school this afternoon; not something I get the opportunity to do often, but definitely a benefit of working for yourself that you can flex your hours to enjoy life's simple pleasures! Then the other of my charges is on a late pickup, as he has swim squad training after school. I'll be back tomorrow with another project. Until then, happy stampin'!


Stampin' Up! Supplies Used: 

Table built using Product Table Builder by The Crafty Owl - Independent Stampin' Up! Demonstrator.

Seasonal Swirls Autumn Leaf Wreath Thankful Card TTT138

by Joanne James4. November 2021 18:00

It's Thursday and time for a new challenge over at TicTacToe! It's the turn of Team X to host this week and the lovely Felicita is our featured designer this week. This is the fun board that we are playing along with: 


I also used Jen M's great sketch over at Freshly Made Sketches this week for my layout, the colours over at Color Dare and my final entry over at Just Us Girls this week where Bobby's wild card is 'leaves'. I went across the middle of this week's Tic Tac Toe board with Autumn/Free/Wreath for my card today, but it also works for the middle column of thankful sentiment/free/any colour too. when I saw the Color Dare inspo photo of Holly Hobby this week I was taken right back to my childhood - and more recently, to my retired designer series paper pile! I had some old Comfort Cafe paper that I thought would be perfect for the challenge as it featured bluesm yellows and browns and would also provide a suitable background for my wooden, leafy wreath - take a look:


Here's the low-down on today's card:

Seasonal Swirls - I went for a simple layered wreath of twigs and leaves today, as I didn't want to do too much to detract from the pretty background paper. I added a trio of Cajun Craze flowers, cut using my Floral Squares dies, that echo the detail on the paper, and centred each with a pearl, along with a linen thread bow and backed it with a very vanilla circle stamped with a simple sentiment from the 'Sparkle of the Season' set.

Added Texture - I love how the patterned paper has a faux-texture for added detail and interest. Having decided to add a Pool Party band to the front of my card, it looked a little too stark, so in a further nod to the paper, I added a layer of vellum over the top that I had embossed with my (retired) Subtles embossing folder. This was just enough to take the vibrancy out of the colour whilst also adding another level of detail; you can see the detail of it more closely below:


I really like this card - the paper is great for autumn and it's good to be using up more of my paper stash. If you're not a paper hoarder like me, you could easily recreate this card using the current Harvest Meadow papers, for example. A shoutout to Jen too for the perfect sketch to showcase a wreath - I think I might have to use it again this week!!

Here is the visual summary of the key products used on today's project for you to pin for easy reference:


You can see all of my Product and 'How To' summaries on my 'How To - Tips and Techniques' Pinterest board in case you've missed any. 

A tictactoe board offers so many creative possibilities - how does this week's board inspire you? Why not have a go? We would love to see you in the gallery and who knows - you might be selected for Designer's Choice and be eligible to be a guest designer on a future challenge. 

Enjoy the rest of your evening; I'll be back tomorrow with another project. Until then, happy stampin'!


Stampin' Up! Supplies Used: 

Table built using Product Table Builder by The Crafty Owl - Independent Stampin' Up! Demonstrator.

Delicate Baubles Christmas Tree TTT136

by Joanne James21. October 2021 18:00

It's Thursday and time for a new challenge over at TicTacToe! It's the turn of Team X to host this week and the lovely LeAnne is our featured designer this week. This is the fun board that we are playing along with: 


I decided to give my Delicate Baubles Dies another outing - the Christmas tree was calling my name! - so I too the first column on the Tic Tac Toe board with Christmas Tree/Bow/Green and in a fun twist decided to pair with the colour palette over at Just Us Girls this week for a rather unconventional Christmas card colour scheme - take a look:


Here's the low-down on today's card:

This And That - The key to making today's card work is the piece of retired This and That Epic Day design series paper that I used for the frame on my card. It does such a good job of bringing all three colours together and makes the bright bauble tone in rather stand out in a way that jars, I think.

Delicate Baubles - Another bauble paper-pieced in block of the JUGS challenge colours, with some sparkly enamel dots to highlight the starbursts and a gold enamel star to top the tree. I trimmed the base of the bauble on this one so that it didn't have a double border edge.

Add A Bow - I could have added a diecut bow using the die in the Delicate Baubles die set that I used on my previous bauble cards, but decided that something more showy was needed so added a triple bow in Pool Party sheer ribbon - so pretty!


A simple 'Noel' sentiment from the 'Trimmings & Tidings' stamp set completes my card. So what do you think - is this colour scheme too unconventional for a Christmas card? Do leave me a comment below - as always, I'd love to know your thoughts.

Here is the visual summary of the key products used on today's project for you to pin for easy reference:
 

You can see all of my Product and 'How To' summaries on my 'How To - Tips and Techniques' Pinterest board in case you've missed any. 

A tictactoe board offers so many creative possibilities - how does this week's board inspire you? Why not have a go? We would love to see you in the gallery and who knows - you might be selected for Designer's Choice and be eligible to be a guest designer on a future challenge. 

Enjoy your day; as of this afternoon, both of the James Juniors will be officially enjoying their half term break, so I am looking forward to spending more quality time with them next week. I'll be back tomorrow with another project. Until then, happy stampin'!


Stampin' Up! Supplies Used: 

Table built using Product Table Builder by The Crafty Owl - Independent Stampin' Up! Demonstrator.

Giving Gifts Autumn Leaves Thank You Card TTT134

by Joanne James7. October 2021 18:00

It's Thursday and time for a new challenge over at TicTacToe! It's the turn of Team X to host this week and I am the featured designer this week. This is the fun board that we are playing along with: 


I decided to go across the middle of the grid with leaves/thanks/shades of brown for a clean and simple card. I used the layout and layering idea from the CASE The Designer challenge over at Global Design Project and the colours over at Color Throwdown that are perfect for Autumn. I will also be linking up over at Addicted to CAS, having finally managed to create something suitably clean and simple befitting their Autumn codeword - take a look:


Here's the low-down on today's card:

Beauty Of Tomorrow - I love the large sentiment in the 'Beauty of Tomorrow' stamp set which sums up the changing seasons and advent of autumn beautifully I think so I had to feature this on the front of my card. Since this doesn't directly have anything to do with my middle square of 'thanks', I added one of my favourite stamps from the 'Well Defined' set to the inside of my card:


I love the idea of sending a card to someone thanking them for being part of my world, rather than as a show of gratitude for something someone did and this sentiment is so perfect for that.

Giving Gifts Autumn Leaves - I created a cascade of falling autumn leaves that I diecut from a piece of cardstock onto which I blended a selection of oranges and browns (see below) using the leaf die in the Giving Gifts Dies set. One of my blogging friends, the lovely Kim Singdahlsen of Joyful Creations with Kim, has made some fabulous cards with the dies in this set and was a total enabler when it cam to me puchasing these dies - I could resist no longer!  I particularly love the diecut detail on each leaf; I glued each of them on one half only, so that they could be gently folded upwards to add to the sensation of falling leaves - slightly easier to see on the angled photo below:

A Surprise Find - Finally, to add a little extra autumn-inspired detail to my card, I added some Grey Granite ink using a blending brush and an old stencil I found in my stash with a large knit pattern and faded it out from opposing corners. I am seeing some wonderful stencilling in the blogosphere lately, none more so than from my fellow Paper Player designer and CAS supremo the lovely Jaydee of Stampin! With Jaydee. She has a beautiful fine-knit stencil from The Greetery that she has been using lots lately and when I found this in my stash I thought it would be a good stencil to create a similar look and feel. This was also a good way to incorporate the soft, warm grey tones of the Color Throwdown palette. 

Here is the visual summary of the key products used on today's project for you to pin for easy reference:


You can see all of my Product and 'How To' summaries on my 'How To - Tips and Techniques' Pinterest board in case you've missed any. 

This is one of those cards that for all its simplicity seemed to take forever; it took a truck load of inspiration to get me there, but I must say I love the result and ended up making a few of these to send out to friends.

A tictactoe board offers so many creative possibilities - how does this week's board inspire you? Why not have a go? We would love to see you in the gallery and who knows - you might be selected for Designer's Choice and be eligible to be a guest designer on a future challenge. 

Enjoy your day; I do not know where this week has disappeared! I am still busy harvesting produce and I made another batch of raspberry jam yesterday. Today is oddly warm for this time of year, but still rather grey and it certainly doesn't feel like the return of summer that the weather forecasters promised! I'll be back soon with another project. Until then, happy stampin'!


Stampin' Up! Supplies Used: 

Table built using Product Table Builder by The Crafty Owl - Independent Stampin' Up! Demonstrator.

A Masculine Plaid Christmas Clean and Simple TTT132

by Joanne James23. September 2021 18:00

It's Thursday and time for a new challenge over at TicTacToe! It's the turn of Team X to host this week and the lovely Betty is our featured designer this week. This is the fun board that we are playing along with: 


Lots of options on the board this week and I was tempted to create something fall-inspired, but in the end decided to go across the middle with masculine/free/patterned paper and create a Christmas card - take a look:


Here's the low-down on today's card:

Peaceful Prints - The current challenge over at CAS Christmas Card Challenge is to use plaid on a Christmas card, so the Peaceful Prints designer papers, free with an order of £45 during the current Sale-A-Bration promotion, were the perfect starting point. I'm trying to share as many of these fabulous free gifts with you as possible before the promotion ends next week on 30th September- just one more week to go so time to get those orders in!

Plaid Christmas - When considering plaid options for my card, I reached for that 'oldie but goodie' Christmas set from the annual catalogue called 'Plaid Christmas'. I ended up not using it on the front of my card at all - my small, block sentiment is courtesy of the 'Tidings and Trimmings' set - but I did use it to add a plaid Christmas tree to the inside of my card:


Pine Tree PunchI love a good sketch and the current Sunday Stamps one is a keeper - so many ways to use this layout! I couldn't wait to play along and decided to keep things simple and used the central vertical panel to showcase the negative space of my punched Christmas tree so that you could see the lovely red and black plaid below. I added a simple scored border to my rectangle for added interest. 

No fuss or frills - this is both clean and simple and masculine, after all. 

Here is the visual summary of the key products used on today's project for you to pin for easy reference:


You can see all of my Product and 'How To' summaries on my 'How To - Tips and Techniques' Pinterest board in case you've missed any. 

A tictactoe board offers so many creative possibilities - how does this week's board inspire you? Why not have a go? We would love to see you in the gallery and who knows - you might be selected for Designer's Choice and be eligible to be a guest designer on a future challenge. 

Enjoy your day; I'll be back soon with another project. Until then, happy stampin'!


Stampin' Up! Supplies Used: 

Table built using Product Table Builder by The Crafty Owl - Independent Stampin' Up! Demonstrator.

Mini Catalogue

BROWSE THE CATALOGUE

The mini catalogue is now live! Read and download your copy here.

Shop Online

Access my online shop 24 x 7, 365 days of the year:

Current March hostess code:

S9F2XJJW

Shop Online

Join My Team

It's always a great time to join Stampin’ Up! New team members can get £130 worth of products for only £99 + free business supplies + free shipping + all the fun being a part of Stampin’ Up! Stampin' Up! has something for everyone: join my growing team and benefit from my support to enjoy Stampin' Up! however you choose.

If you're interested, call me for a chat to understand how I can help you realise your goals. Alternatively, if you have already decided to sign up and you just can't wait, please click here for the link to the online form where you can sign up and order your starter kit right away! 

Latest Kit!

Stampin Cut and Emboss

The Rock Legend Kit has all you need to make 8 cards with coordinating envelopes. Along with the new Panda Friends Kit, both are available from January 4th for just £14 each - get yours here!

2023-24 Annual Catalogue

BROWSE THE CATALOGUE

Click on the catalogue for a full list of current SU! supplies - if you would like to order any of the items featured, please drop me a line at [email protected] or give me a call on 07773 421446 - I'd be happy to help.

New Online Exclusives

There will be new products available exclusively in the online store from 5 March - check them out here.

About Me

Hi I'm Joanne and live in Northampton and when I'm not looking after my husband and two beautiful children, am an avid crafter with a passion for all things Stampin' Up!

I must confess that I have never been a big rubber stamper - until I discovered Stampin' Up! that is. I love the fact that I can get such great results with co-ordinating stamps, inks, papers and punches - the possibilities are endless! Join me on my stamping journey as I share the things I love and be inspired to create amazing things yourself!

Follow Me

Monthly Newsletter

Box Builder

Click the button above to use Box Buster to create your custom box design using the Envelope Punch Board!

Kits Collection Now Available!

Stampin Cut and Emboss

The new Kits Collection from Stampin' Up! is now available!

Click here to see the current kits available and order yours online today.

I Design For


Stampin' Up Stuff

This is my personal blog and is not endorsed by Stampin’ Up! I hope you find it a plentiful source of ideas and personal inspiration but please don't copy my designs for contest submission or use for classes, publication or sale without express permission.