It's Sunday and time for this week's new challenge over at The Paper Players! Firstly, I would like to say a big thank you to everyone who joined in with our 400th anniversary celebration theme challenge these past two weeks - what an amazing gallery! You made it very difficult for us to choose our 'cut aboves' and the headliner this week for sure. We will be announcing the results of our random.org draw and the winners of all those amazing prizes donated by our generous sponsors on Wednesday; meanwhile, it's my turn to host this week and I have a bold and vibrant colour challenge for you to work with:


I've had the Serene Garden stamp set and Garden Scene Framelits out on my desk preparing for my next technique class, so decided to use them for my card today, which also uses this week's Global Design Project sketch for my layout:

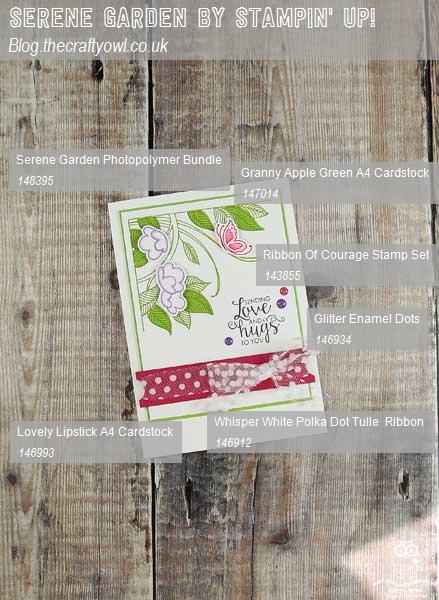
Here's the low-down on today's card:
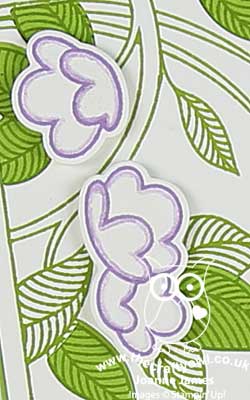
A Peek of Granny Apple Green - I've been getting to grips with the new inks in my collection following the recent colour revamp by Stampin' Up! and I chose three of my new favourite bold and bright colours for my challenge this week. That said, my card today features a lot of white in order to balance these colours and keep my card feeling light and bright and not too garish. I've stamped each of the elements of my design - leaves, flowers and butterfly - in one of the challenge colours. The colour that features most is the fresh Granny Apple Green, since I stamped the leafy corner on a mat in the same shade and then used the Garden Scene Framelits to cut out the leaf sections, to reveal the tone-on-tone image below. I toyed with stamping the flowers and butterfly tone-on-tone too, but when I put it together I decided I preferred the colours on white with a little more added with a blender pen - an altogether more subtle affair.
Words of Courage - The Serene Garden stamp set is sentiment-free, so I rooted through my stamp collection and decided these words from the Ribbon of Courage stamp set fit perfectly with my layout and immediately gave me an intended recipient too, which is always nice. The swirly font fits nicely with this stamp set, although I'm sure there will be many others that work well with it too.
Polka Dots and an Embellishment Cheat - When it came to embellishing my card, I added a strip of Lovely Lipstick cardstock with a couple of notches punched out with my 1/2" circle punch to hold my pretty white polka dot tuille. I also added a trio of one of my favourite new embellishments, the glitter enamel dots, around my sentiment and yes, here's the cheat: they are actually Gorgeous Grape and Melon Mambo in colour. They tone in beautifully with the colour scheme though,so I went with it (I know my secret is safe with you!)
Here is the visual summary of the key products used on today's project for you to pin for easy reference:
You can see all of my Product and 'How To' summaries on my 'How To - Tips and Techniques' Pinterest board in case you've missed any.
I love this colour combo and know it's one I will use again; the tuille bow is a little fussy for my generally clean style, but I do love how easy it is to work with and adds a real touch of pretty to the finished card.
Before you reach for your ink and papers, check out what our amazing team has created to inspire you this week:
The Paper Players Design Team
Here's a quick recap of our challenge rules:
1. Create a new paper project
2. Upload your creation to your blog with a link back to us and provide a direct link to the post featuring your challenge submission.
3. Please link your card to no more than four challenges, TOTAL.
4. Have FUN!
I can't wait to see what you create with this week's colours and look forward to visiting your blogs this week! Enjoy the rest of your weekend as it will be over all too quickly. Today I will be waving off the eldest of my James Juniors for a 2 week sports tour of South Africa to play hockey and netball and experience all of the tourist delights this fascinating country has to offer. As for me, I will be at home braving week 2 of the summer vacation with the youngest of the James Juniors and continuing to monitor progress on the kitchen renovation project - I know where I would rather be, for sure! I have at least managed to get a little making done over the last few days so I'll be back tomorrow with another project; until then, happy stampin'!
Stampin' Up! Supplies Used: