This week I've managed to combine both my card for the new challenge over at Festive Friday and my design team card for our new challenge over at As you See It and also used the idea I had brewing for my entry over at AAA Cards too:
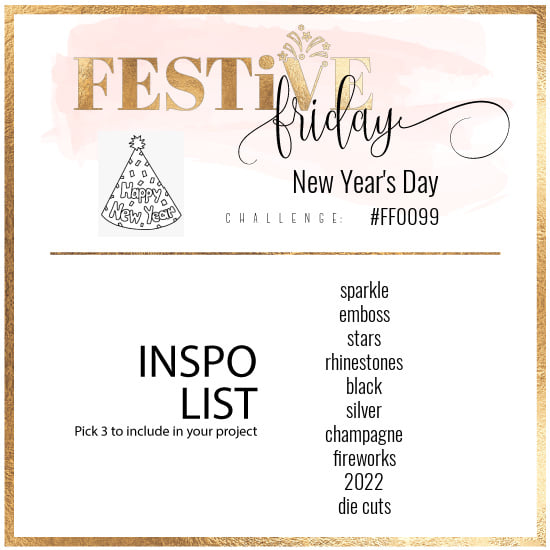
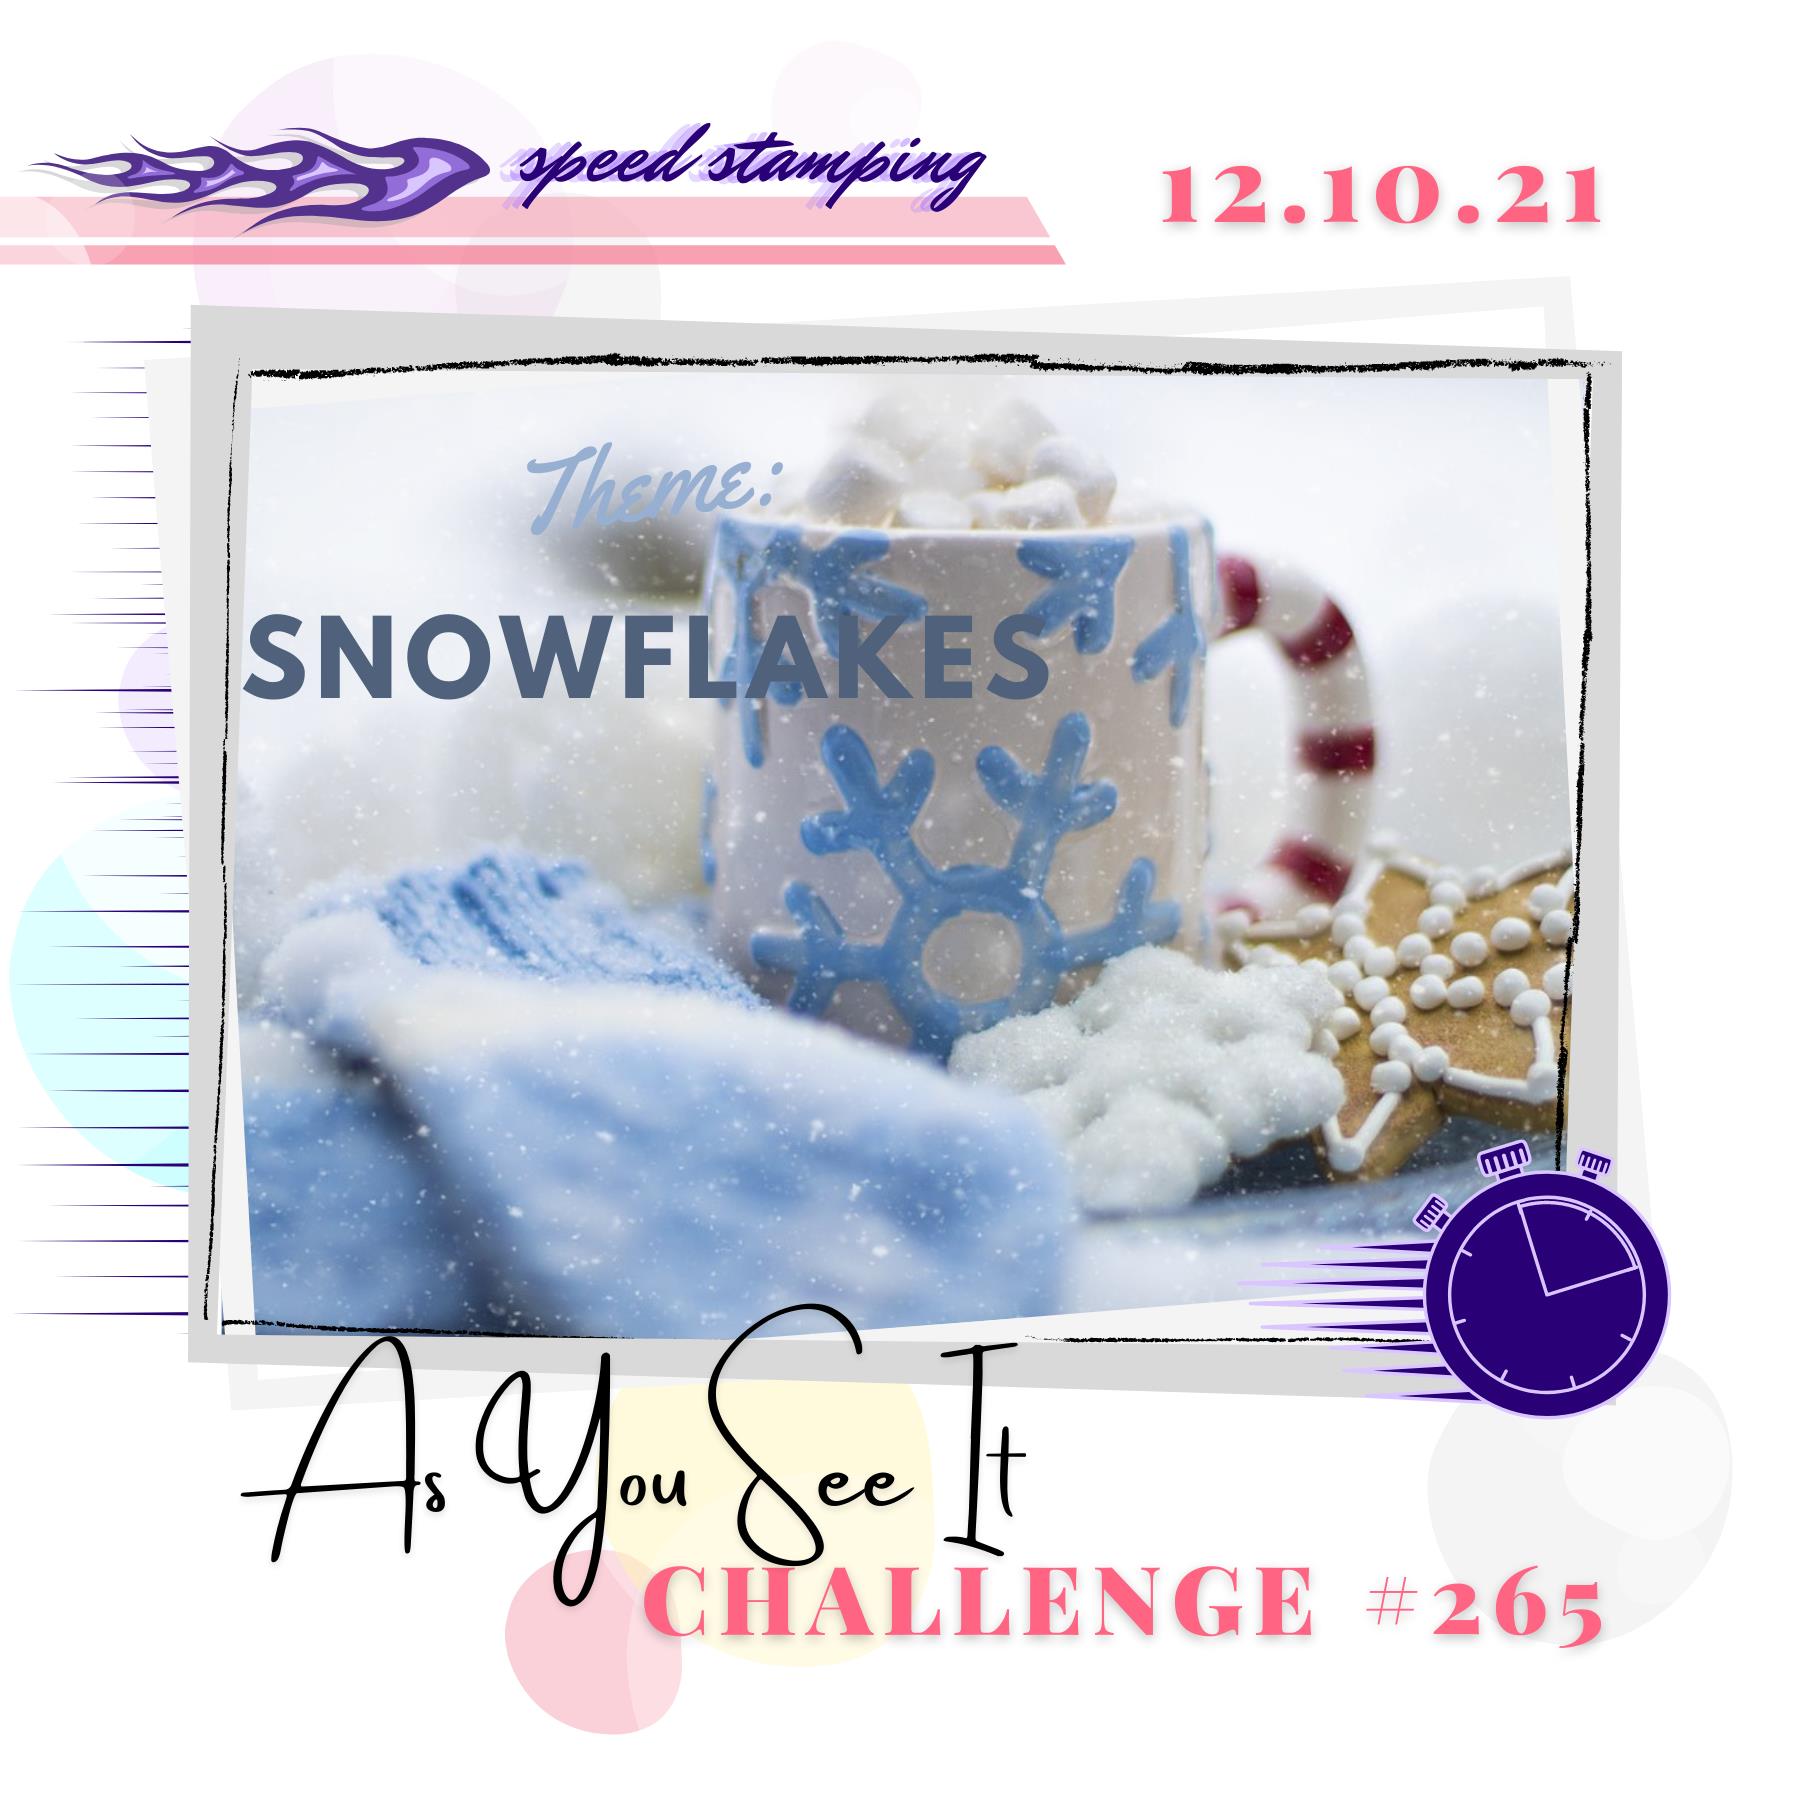

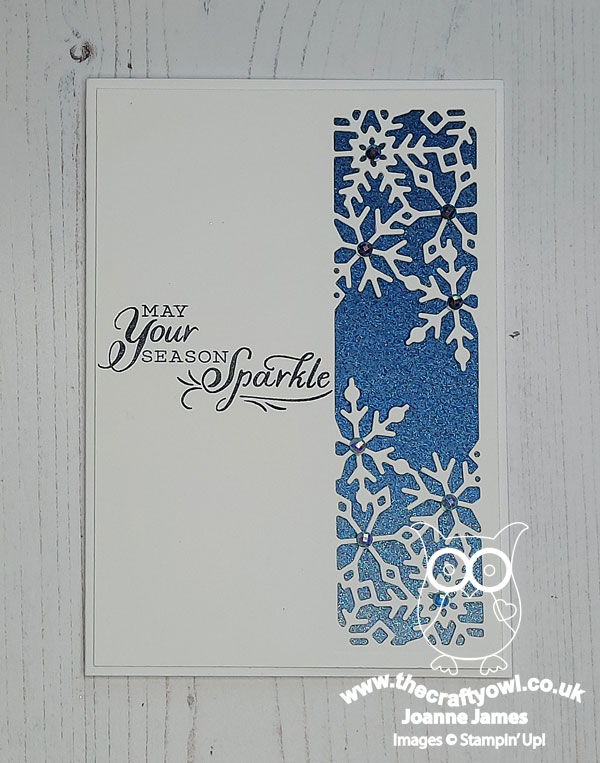
The challenge that we are celebrating this week at Festive Friday is 'New Year's Day' which is on 1st January and at As You See it we are ending the year on a timely speed stamping challenge with the theme of 'snowflakes'. Remember at Festive Friday you do not need to actually celebrate the occasion; your goal is to simply use three or more items from the inspiration list on your project. I don't usually send cards to celebrate New Year; this week I used sparkle, rhinestones and diecuts from the FF inspo list and this is what I came up with:
Here's the low-down on today's card:
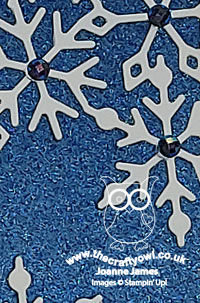
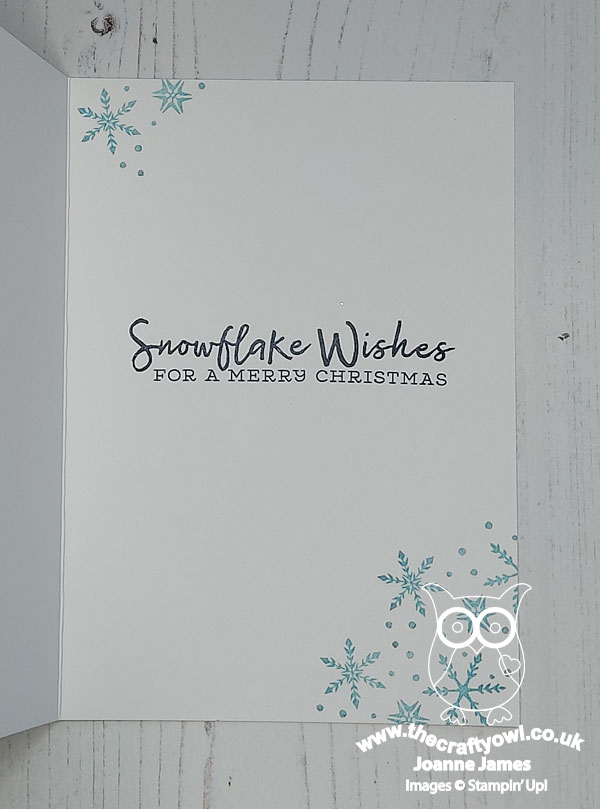
Giving Gifts Of Snowflakes - If you read Wednesday's blog post (if you didn't, you can see it here) you will recognise the snowflake border on my card. This was actually the first card in this pair that I made - clever positioning of these dies makes it easier to create this fun snowflake border detail. In keeping with the clean and simple feel of my card, I added a simple sentiment from the 'Snowflake Wishes' stamp set in Night of Navy and positioned it in the centre of my panel. I also had time for some quick stamping on the inside of my card too:
Blue Ombre Sparkle - I am having something of a love affair with the Night of Navy blue ombre glimmer paper at the moment - I could do with a whole pack of this colour on its own! I think it works really well when balanced against lots of white for a touch of festive sparkle, especially when paired with snowflakes (you can see another example of that here) so I couldn't resist using it for the inset panel behind my snowflakes. Check out the sparkle:
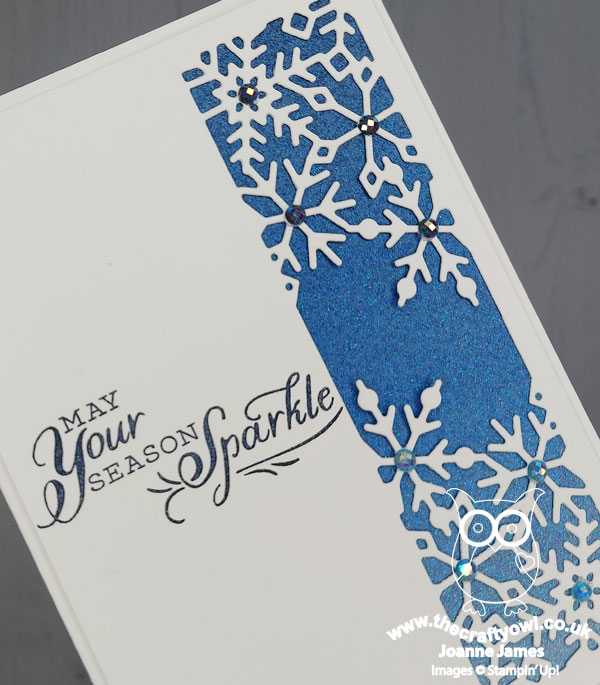
The Need For Speed - This card was super quick to put together: I finished at 6 minutes and 5 seconds and was feeling pretty pleased with my self in meeting my AYSI brief. It was at this point that I realised that having used diecuts and sparkle, I only needed one more thing from the Festive Friday inspo list and I would meet both briefs and save myself even more time, so I spent another 20 seconds adding some blue faceted gems (aka blue rhinestones!) to my snowflake centres and managed at 6 minutes 25 seconds to meet the AYSI speed brief using three things from the FF inspo list whilst still meeting the AAA Cards CAS brief, and with the option of snow too! Just 6 products, 3 challenges and less that 10 minutes - I'd say that's a result at this super-busy time of year!
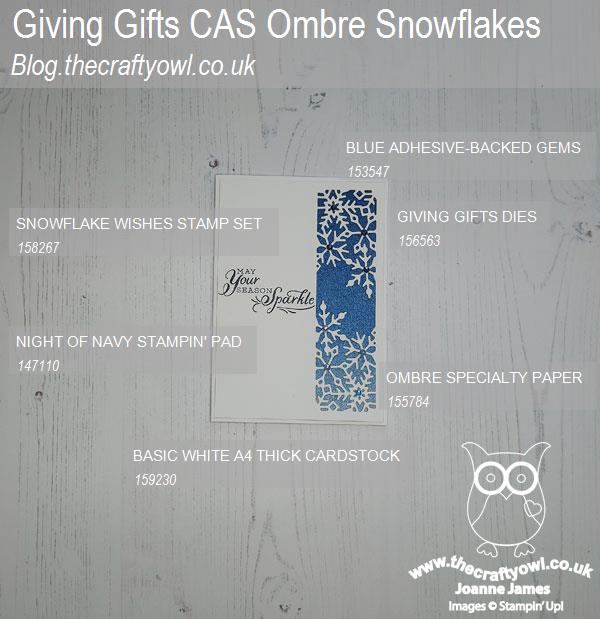
Here is the visual summary of the key products used on today's project for you to pin for easy reference:
You can see all of my 'How To' summaries on my 'How To - Tips and Techniques' Pinterest board in case you've missed any.
We all need to save a little time at this time of year, so I hope you are inspired to create something speedy today - or maybe even get a head start on your New Year cards too!
For more inspiration, be sure to visit the rest of the Festive Friday Challenge Design team:
Ann Schach
Beth McCullough
Sharon Hashimoto Burkert
Melanie Hungerford
Helen Jennings
Stephanie Lanzalotto
Melva Peters
Jaydee
Diane Evans
Joanne James
And here's a summary of the As You See It challenge rules:
- Create any card, scrapbooking page, 3D project or packaging project that fits the challenge.
- Please include the challenge graphic and link back to the challenge in your blog post. Turn off word verification so we can leave you lots of lovely comments. Make sure you link the post not the whole blog to the Linky. Use #AYSIXXX when uploading to a public gallery.
- If you’re unsure about ‘the rules’, check the details under the Challenge Guidelines tab on the As You See It Challenge homepage.
- In a speed stamping challenge, please time yourself and say in your post how long your card took to complete.
We look forward to seeing your creations in the FF and AYSI galleries.
Enjoy your day; I am interrupting my usual day of Friday chores with a coffee with a friend I haven't seen in a super long time and my pre-Christmas haircut, so it's all happening here!! I'll be back tomorrow with another project. Until then, happy stampin'!
Stampin' Up! Supplies Used: