Swirly Scribbles Tree Teacher Thank You Cards

by Joanne James6. July 2016 07:00

Happy hump day one and all! Today as promised I have this year's teacher thank you cards to share with you. Both of the James Juniors are moving schools at the end of this term so it feels like there are even more people to thank thank usual. Coupled with the fact that terms ends this week and we have all had packed social calendars, a seriously CAS card capable of mass production was the order of the day! Those of you that follow my blog will know that I generally like to send school thank you cards that are school/teacher themed, so they will often feature school imagery or apples - I don't know if it's just me, but I still think that the 'apple for a teacher' thing holds true!

Here is my final design: 


Here's the low-down on today's card:

Clean and Simple - This card is literally all about the white space! I used Whisper White Extra Thick cardstock for my base and used one simple image - the apple tree - alongside my sentiment to serve as a focal point. I added Cucumber Crush thick baker's twine to one of the cards, but didn't add it to the remainder as it was too much for my ultra clean and simple look.

Swirly Scribbles Meets Tree Builder - I could have created my tree using the Tree Builder Punch in its entirety, but I love the stylised look you get when you switch out the leaves for a Swirly Scribble diecut. I actually used two pieces from the this framelit set: the round Cucumber Crush circle is the inner piece from the large swirly scribble, and the darker Garden Green is the smaller swirly scribble die cut. So don't throw away those middles of the larger scribbles diecut - they have their uses too!

Helping Me Grow - My two-tone sentiment comes from the 'Helping Me Grow' stamp set, which as much as I love the flowers in this set, I must confess I bought it for this sentiment primarily; is there anything more fitting to put on a teacher appreciation card?

Here is the visual summary of the key products used on today's project for you to pin for easy reference:


You can see all of my 'How To' summaries on my 'How To - Tips and Techniques' Pinterest board in case you've missed any. 

I'll be back tomorrow with another project for this week's new challenge over at Create With Connie and Mary; until then, happy stampin'!


Stampin' Up! Supplies Used:

Table built using Product Table Builder by The Crafty Owl - Independent Stampin' Up! Demonstrator.

Thank You Beary Much Baby Bear

by Joanne James25. June 2016 22:42


I had a lovely day yesterday in my memory keeping workshop with a lovely group of mums, however was utterly worn out last night! I've had a busy day today however I'm squeezing in a quick post this evening with a sweet card I made this afternoon for a couple of challenges:

I love this week's Mojo Monday sketch and knew immediately what I wanted to do with it; my card today also features one of my favourite new designer series papers - perfect for this week's challenge over at SUO Challenges where this is what they are asking us to use. Here's my card:


Here's the low-down on today's card:

Thank You Beary Much Baby Bear - I was lucky enough to win this coveted Baby Bear stamp in a prize patrol at Onstage in April and whilst I've used her lots and experimented with different colours and techniques, this is the first time I've shared her on my blog. She is a triple-layer stamp and has such wonderfully textured fur, just like an old fashioned traditional teddy bear. I find it easier to stamp the images in reverse to get better alignment - here I've stamped layer 3 in Soft Suede, layer 2 in Soft Suede stamped off once and layer 1 in Crumb Cake stamped off once.

Affectionately Yours - The Affectionately Yours designer series papers are just lovely; the copper embossed papers are very special, however my favourites are the prints that include Night of Navy - they are so different to anything we've had in a while, and I just love the vibrant colours. My choice today was deliberate, both to tie in with my Crumb Cake teddy bear and also because I had a plan for those flowers - read on...

Not Just A Tree Builder Punch - I decided to add a punched flower necklace to my bear, along with a flower pinned to her head (hence her being a female bear) that would echo the print on the paper. I used the little flower on the Tree Builder Punch to create my embellishments - just the right size to pretty up my bear - and I added a few pearls to the centres to complete them.

Here is the visual summary of the key products used on today's project for you to pin for easy reference:


You can see all of my 'How To' summaries on my 'How To - Tips and Techniques' Pinterest board in case you've missed any. 

I'll be back tomorrow with another project for this week's challenge over at The Paper Players; until then, happy stampin'!


Stampin' Up! Supplies Used:

Table built using Product Table Builder by The Crafty Owl - Independent Stampin' Up! Demonstrator.

Cherry on Top Birthday Balloons Card

by Joanne James20. February 2016 21:51

Hello everyone I hope you have all been enjoying your weekend so far. I managed to snatch a quick hour between chores and swimming lessons to make a quick card today for a couple of challenges:

SIP Sketch Challenge 35 800   

Before I share today's card I would like to say thank you to the team over at Stamp Ink Paper, and in particular Sandy, who chose my white wedding card as a winner in their 'love' themed challenge last week (if you missed it, you can see that card here) - it's always great to be recognised for one's creative efforts! This week the team have a sketch to play with and since I chose to feature balloons on my card it's also perfect for a link up with the Global Design Project who have these as their theme this week and The Friday Mashup, where the theme is birthdays (with the optional mashup of stencils - I'm coming back for this one!) We have so many balloon-related products currently; I chose to use an annual catalogue mainstay, the Cherry On Top Designer Series Paper Pack, as the inspiration for today's card:

I just love the bright little balloons on this paper pattern so I decided to cover my whole card front with the paper. I added a frame to my sentiment from the 'Birthday Blooms' stamp set (the swirly sentiment reminds me of the balloon strings!) which I cut with my Big Shot and Tags and Labels Framelits - these are on this week's Wednesday Weekly Deals if you want to grab them at a bargain price! For my embellishment, I chose to echo the balloons and cloud pattern of the paper and punched a cloud in Whisper White with my Tree Builder Punch and a trio of balloons with my punch from the Party Punch Pack, which I added some silver metallic thread string to, which I loosely tied together. I added in a thin banner of Cucumber Crush to complete the sketch. I just love the bright and happy colours of this card - and balloons are the perfect way to celebrate a birthday, whether young or old.

For those of you who like a visual summary, here's something new that I will be featuring in my blog posts - a labelled photograph of the key products required to make today's card: 


These images are perfect for pinning to give you a visual reference of the supplies needed to re-create this card which can be useful if you want to come back to it at a later date. I will be pinning these to my new 'How To - Tips and Techniques' Board on Pinterest too, which you can find here.

I hope you like today's card; I'll be back with another card for tomorrow's new challenge over at The Paper Players. I'm hosting this week so you won't want to miss it! Until then, happy stampin'!


Stampin' Up! Supplies Used:

Table built using Product Table Builder by The Crafty Owl - Independent Stampin' Up! Demonstrator.

Doodling with Dots Decorative Mask For A Teacher Thank You Card

by Joanne James7. July 2015 08:00

Today I have a card using the sketch challenge over at Paper Craft Crew and the colours over at Pals Paper Arts as the inspiration for my teacher thank you card:

Paper Craft Crew Card Sketch 151. #stampinup #papercraftcrew   PPA 258 Jul. 2

Now I know I entered a teacher thank you card into last week's challenge over at Pals Paper Arts (if you missed it you can see that card here) but what can I say - I need lots of them! I love the bright colour combination here so took the opportunity to do a little doodling - take a look:

I used Night of Navy for my card base which measures 5 3/4" x 5 3/4" and matted a strip of Cucumber Crush striped envelope paper with a strip of Watermelon Wonder cardstock. For my central panel, I embossed a piece of Whisper White with the large polka dot embossing folder for added texture, although difficult to see in the photograph, and then overlaid this with my circle stencil and used my Watermelon Wonder Stampin' Write Marker to doodle an apple shape. I added my stem and leaves freehand and finished with a navy seam binding ribbon bow, some Cucumber Crush lace trim and a trio of white candy dots. I finished with the thank you sentiment from the 'Tin of Cards' stamp set - this is such a great set, I've used it lots already and haven't even made my tin of cards yet!! - stamped in Night of Navy on Watermelon Wonder, and finished with a juicy green apple punched using my tree builder punch. 

I think the colours of this card really pack a punch and my non-standard card size meant a custom envelope would be the order of the day. What better way to finish than with a co-ordinating envelope made from the gorgeous new Cucumber Crush envelope paper? This lightweight paper makes beautifully crisp envelopes and with the aid of my trusty Envelope Expert from The Crafty Owl it was easy to work out what size paper and punch markings I required (9 1/4" and 4 5/8" respectively, in case you were wondering!)

I hope you like today's card; I'll be back tomorrow with a new set of Wednesday Weekly Deals and another project for you. Until then, happy stampin'!


Stampin' Up! Supplies Used:

Table built using Product Table Builder by The Crafty Owl - Independent Stampin' Up! Demonstrator.


Sprinkles of Life Thank You Apple Tree Card

by Joanne James28. June 2015 11:00

It's Sunday and time for our new challenge over at The Paper Players! I really enjoyed our gallery full of summer treats last week; this week should be easier on the waistline though, as the lovely Nance has a great sketch challenge for us:


My card features an altogether more healthy treat this week in the form of apples, on a tree created with the Sprinkles of Life stamp set and co-ordinating tree builder punch:

My card also features three of the five new in-colours: Tip Top Taupe, Cucumber Crush and Watermelon Wonder so I am also linking up with the team over at Fab Friday as their challenge is all about the new in-colours this week. I used Tip Top Taupe for my card base, then adhered a piece of Whisper White to the card front. I embossed another piece of Taupe with my woodgrain textured embossing folder then using my Big Shot and Circles Framelits cut away a partial circle from one side before adhering this on top of the white layer. I stamped the tree trunk in Taupe onto the white panel, then stamped my leaves in Cucumber Crush and my apples in Watermelon Wonder onto Whisper White and punched them out with the co-ordinating tree builder punch. I wanted a full tree so punched three treetops and layered them to create my tree, adding the last one with a dimensional to create some lift. For my banners I used a strip of Watermelon Wonder and a piece of green patterned paper from the Cherry on Top DSP stack, tied with white baker's twine and flagged with the triple banner punch. I stamped my sentiment in white Stazon onto Basic Black and cropped it tightly. I finished with another punched apple, which I covered in Crystal Effects to make it nice and shiny, although it's hard to see in the photo above. The Sprinkles of Life Stamp stamp set is so versatile with so many creative options; not only that, every purchase benefits the Ronald McDonald House Charity too as £2 is donated for every stamp set purchased.

With only three more weeks until the end of the school year, I am needing to make more and more teacher thank you cards, so this one is definitely heading for the teacher pile. Well, an apple for the teacher as the saying goes - or in this case, six!

Before you reach for your ink and papers, check out what our amazing team has created to inspire you this week:

The Paper Players Design Team
 
 
Here's a quick recap of our challenge rules:
 
1.  Create a new paper project
2.  Upload your creation to your blog with a link back to us and provide a direct link to the post featuring your challenge submission.
3.  Please link your card to no more than three challenges, TOTAL.
4.  Have FUN! 

I love a good sketch challenge so I look forward to seeing what you make of this one in the gallery this week. If the weather holds we may manage to squeeze in another weekend BBQ - keep your fingers crossed for me!

Back tomorrow with another project; until then, happy stampin'!


Stampin' Up! Supplies Used:

Table built using Product Table Builder by The Crafty Owl - Independent Stampin' Up! Demonstrator.


Sprinkles of Life With A Cherry On Top!

by Joanne James24. May 2015 10:00

It's Sunday and time for a new challenge over at The Paper Players! There were some beautiful girly thank you cards in our gallery last week - this week it is the turn of the lovely Anne-Marie to host and she has a great sketch challenge for us to play with:

I love a good sketch and couldn't resist using this one to showcase some more 'sneak peek' products using the new in-colours, the RMHC stamp set 'Sprinkles of Life' and the co-ordinating Tree Builder Punch, the Cheery on Top DSP stack and another new product that I'm using for the first time - check out my card:


I used two of the 'Cherry on Top' patterned papers for the background and the strip across the middle, matting each onto Watermelon Wonder and then Bermuda Bay and Crushed Curry respectively and for my focal point, I kept the square shape and used it to feature yet another combination from the 'Sprinkles of Life' stamp set - a cute basket filled with flowers. I stamped the basket in Crushed Curry onto the same colour cardstock and stamped the top in Cucumber Crush on Cucumber Crush cardstock, then using the same tone on tone stamping, stamped and either punched out or fussy cut the flowers and paper pieced them, finishing the centres of the larger flowers with candy dots. I adhered this to a piece of Pool Party cardstock, and I also used this colour for my sentiment flag. The final 'sneak peek' product is the trio of In-Colour Blossom Accents that I used for the circles on the sketch - how gorgeous are they?! They add great dimension to a card and just one would be enough to make a big impact - I can see me getting through lots of these!

Before you reach for your inks and stamps, check out what our amazing team has created to inspire you this week:

The Paper Players Design Team
 
Here's a quick recap of our challenge rules:
 
1.  Create a new paper project
2.  Upload your creation to your blog with a link back to us and provide a direct link to the post featuring your challenge submission.
3.  Please link your card to no more than three challenges, TOTAL.
4.  Have FUN! 

I look forward to seeing how you interpret our sketch this week. I'm off to the tip to dispose of a couple of trailer-loads of garden rubbish and then for Sunday lunch cooked by my mother-in-law - what an exciting life I lead! 

Back tomorrow with another project; until then, happy stampin'!


Stampin' Up! Supplies Used: 

All sneak peek product today - purchase details to be updated when available. 

Double Sneak Peeks Today!

by Joanne James22. May 2015 13:47

Yay it's Friday! I really don't know where this week has gone! I started the week on such good form, yet seem to have achieved steadily less and less as the week has flown by! No matter - we have a Bank Holiday weekend to look forward to here in the UK so I'm hoping it will stay nice enough to enable me to get outside and potter in my garden and fit in a little crafty time too!

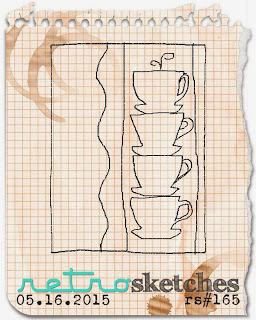
As promised, I'm back with more sneak peeks for you today and not one, but two cards. Here's the first one using this week's sketch over at Retrosketches:
I decided to get out one of my pre-order stamp sets, 'Sprinkles of Life', this year's charity stamp set benefiting the Ronald McDonald House Charity, for my card:
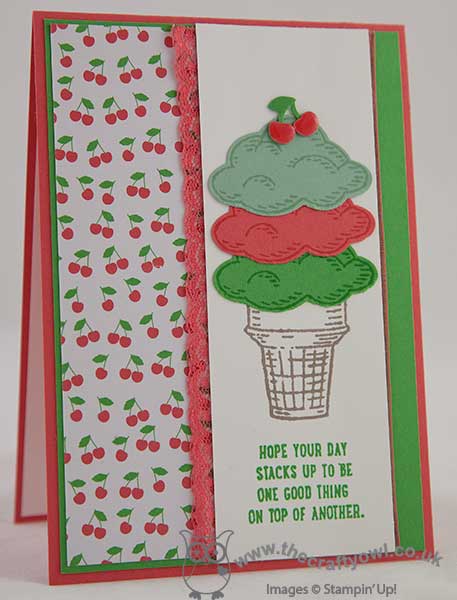
This card is an absolute cornucopia of new product: new in-colour inks Watermelon Wonder, Cucumber Crush, Mint Macaron and Tip Top Taupe, new in-colour cardstock in Watermelon Wonder, Cucumber Crush and Mint Macaron, Cherry on Top DSP stack, some Watermelon Wonder dotted lace trim and of course the Sprinkles of Life stamp set and the co-ordinating Tree Builder punch. I interpreted the stacking cups in the sketch as a very over-the-top ice cream cone with 3 scoops and finished it with a cherry punched from my Build A Cupcake punch that I paper-pieced and covered in Crystal Effects to give a lovely shiny finish. I just love these new bright in colours! 

This stamp is oh-so-versatile with so many possibilities - my second card today uses the same stamp set for a totally different look, and is combined with some sponged sunshine using the mask from my 'Simply Created Hooray It's Your Day' card kit:
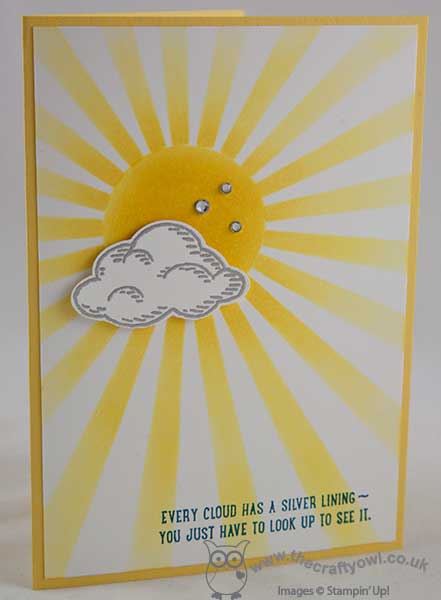
This time my ice cream is a cloud, complete with heat-embossed silver lining, and the perfect co-ordinating sentiment. How clever is that? This stamp set really is so versatile.

I'm linking this CAS card up with the lovely ladies over at Less Is More where the theme for this week's challenge is 'Hello Sunshine' - I missed linking up my water-themed card last week so am glad I've made it in with the sunshine today. 

Here's looking forward to an equally warm and sunny weekend. Back tomorrow with another project; until then, happy stampin'!


Stampin' Up! Supplies Used:

As detailed above

New Online Exclusives

There are new products available exclusively in the online store from 5 November - check them out here.

Latest Kits!

Stampin Cut and Emboss

The Layered Landscapes Kit and Nature's Paintings Kit are the latest kits in the online store - get yours here!

Shop Online

Access my online shop 24 x 7, 365 days of the year:

Current November hostess code:

9NKXDTTR

Shop Online

Mini Catalogue

BROWSE THE CATALOGUE

'Tis The Season - the new Stampin' Up! Mini Catalogue is here! For more details and to download your copy click here

Scrapbooking

Stampin' Up! has introduced a new range of 12x12" scrapbooking product and kit - the full range is now available to purchase online. To download a copy of the new digital Scrapbooking Catalogue click here.

2024-25 Annual Catalogue

BROWSE THE CATALOGUE

Click on the image to download your copy of the 2024-25 annual catalogue. For a full list of current SU! supplies, go to my online store. If you would like any help or advice, please drop me a line at joanne@thecraftyowl.co.uk or give me a call on 07773 421446 - I'd be happy to help.

Join My Team

It's always a great time to join Stampin’ Up! New team members can get £130 worth of products for only £99 + free business supplies + free shipping + all the fun being a part of Stampin’ Up! Stampin' Up! has something for everyone: join my growing team and benefit from my support to enjoy Stampin' Up! however you choose.

If you're interested, call me for a chat to understand how I can help you realise your goals. Alternatively, if you have already decided to sign up and you just can't wait, please click here for the link to the online form where you can sign up and order your starter kit right away! 

About Me

Hi I'm Joanne and live in Northampton and when I'm not looking after my husband and two beautiful children, am an avid crafter with a passion for all things Stampin' Up!

I must confess that I have never been a big rubber stamper - until I discovered Stampin' Up! that is. I love the fact that I can get such great results with co-ordinating stamps, inks, papers and punches - the possibilities are endless! Join me on my stamping journey as I share the things I love and be inspired to create amazing things yourself!

Follow Me

Monthly Newsletter

Box Builder

Click the button above to use Box Buster to create your custom box design using the Envelope Punch Board!

Kits Collection Now Available!

Stampin Cut and Emboss

The new Kits Collection from Stampin' Up! is now available!

Click here to see the current kits available and order yours online today.

I Design For


Stampin' Up Stuff

This is my personal blog and is not endorsed by Stampin’ Up! I hope you find it a plentiful source of ideas and personal inspiration but please don't copy my designs for contest submission or use for classes, publication or sale without express permission.