A Forever Greenery Hello in Just Jade and Soft Sea Foam

by Joanne James22. March 2021 18:40

As promised, I had a little extra crafty time at the weekend so I have another card to share today, this time using the current Fab Friday sketch and this week's colour palette over at The Color Throwdown:


As I was pondering two shades of green with gold and white, I was drawn to a suite from the annual catalogue that I've had for some time but barely used - take a look:


Here's the low-down on today's card:

Forever Greenery - Today's card features lots of elements from the Forever Greenery Suite. The Forever Greenery paper was the starting point for today's card. These papers have some beautiful patterns featuring lush greenery and I chose one of the simpler designs, a washed Just Jade paper with a single repeating Soft Sea Foam leaf stem. 

Forever Fern - I stamped a similar piece of leaf foliage from the Forever Fern stamp set in Just Jade onto Soft Sea Foam cardstock and diecut it with the corresponding Forever Flourishing Dies. The detail on these stamps is amazing - they are another of the Distinktive range that appear almost 3-dimensional when stamped. So pretty! 

Forever Gold - I paired my stamped stem with a couple of decorative stems from the Forever Gold laser-cut paper that is also part of the suite. I used one outline and one solid leaf stem for contrast. Along with a sprinkling of gilded gems, I think they really lift the detail in this corner of the card:

A simple 'hello' sentiment and a piece of Just Jade ribbon finish my card. I love greens and must confess that having made this card I wondered to myself why I hadn't used it more. Not that you need to restrict yourself to greens with this set; my dear friend Jan Clothier in New Zealand has made many a fabulous card with the Forever Fern stamp set and many of them in colours other than green; you can check out her Thinking Stamping blog here if you'd like to see some of her Forever Fern creations. That said, I hope you've enjoyed my greens today, as I've another card featuring this suite to share with you later this week!

Here is the visual summary of the key products used on today's project for you to pin for easy reference:


You can see all of my 'How To' summaries on my 'How To - Tips and Techniques' Pinterest board in case you've missed any. 

this is me done for today; enjoy your evening and I'll be back tomorrow with another project for our new challenge over at CAS Colours and Sketches. Until then, happy stampin'!


Stampin' Up! Supplies Used:

Table built using Product Table Builder by The Crafty Owl - Independent Stampin' Up! Demonstrator.

Woodland Wonder Concertina Birthday Card TTT104

by Joanne James11. March 2021 18:00

It's Thursday and time for a new challenge over at TicTacToe! It's the turn of Team X to host this week and I have the honour of being the featured designer this week. This is the fun board that we are playing along with: 
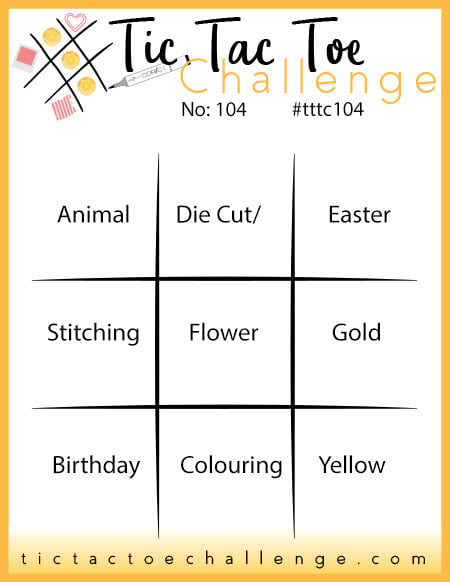
       

Lots of options for you to create with this one! I went down the first column with animal, stitching and birthday for a fun card with a difference today - take a look:
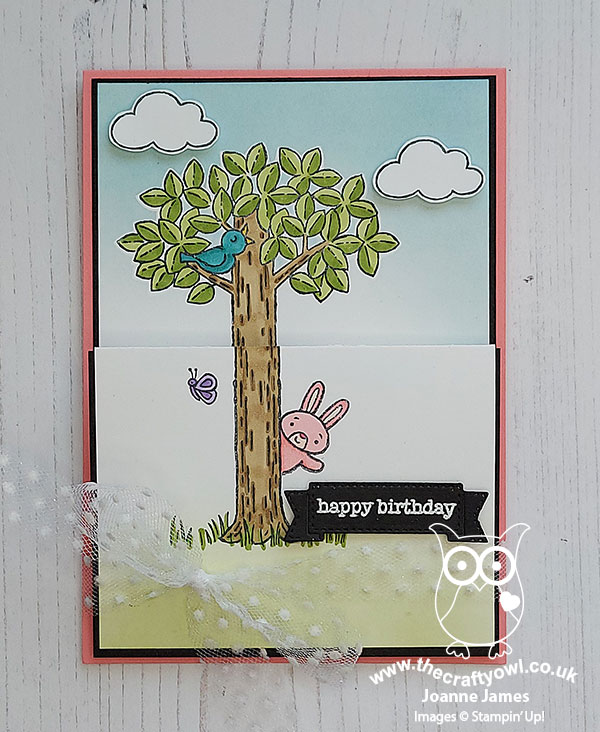
 

Here's the low-down on today's card:

Woodland Wonder - I don't have any really little people in my life, however I couldn't resist the Woodland Wonder stamp set! In addition to birthday cards, it's also great if you need to make a card from lots of people or even if you use elements of the set for a different purpose - that pink bunny could totally be going on an Easter egg hunt, right?! 

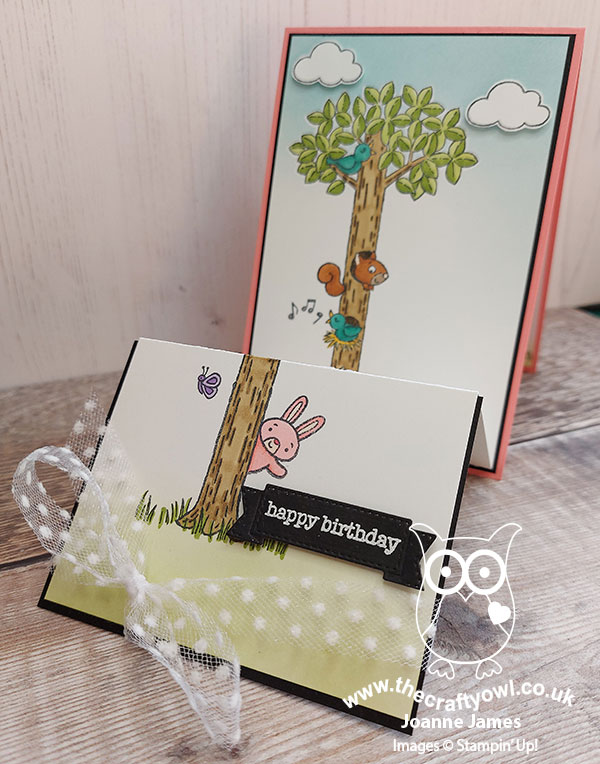
A Fun Fold - Whilst my card looks pretty standard at first glance, you may have noticed the fold across the centre - that's because it's a concertina fun fold. I loved the sample on page 53 of the January-June mini catalogue, so thought I'd have a go at making one myself. Once you slide the tulle ribbon bow off the cardfront, the card opens up to reveal the remainder of the bunny's friends:
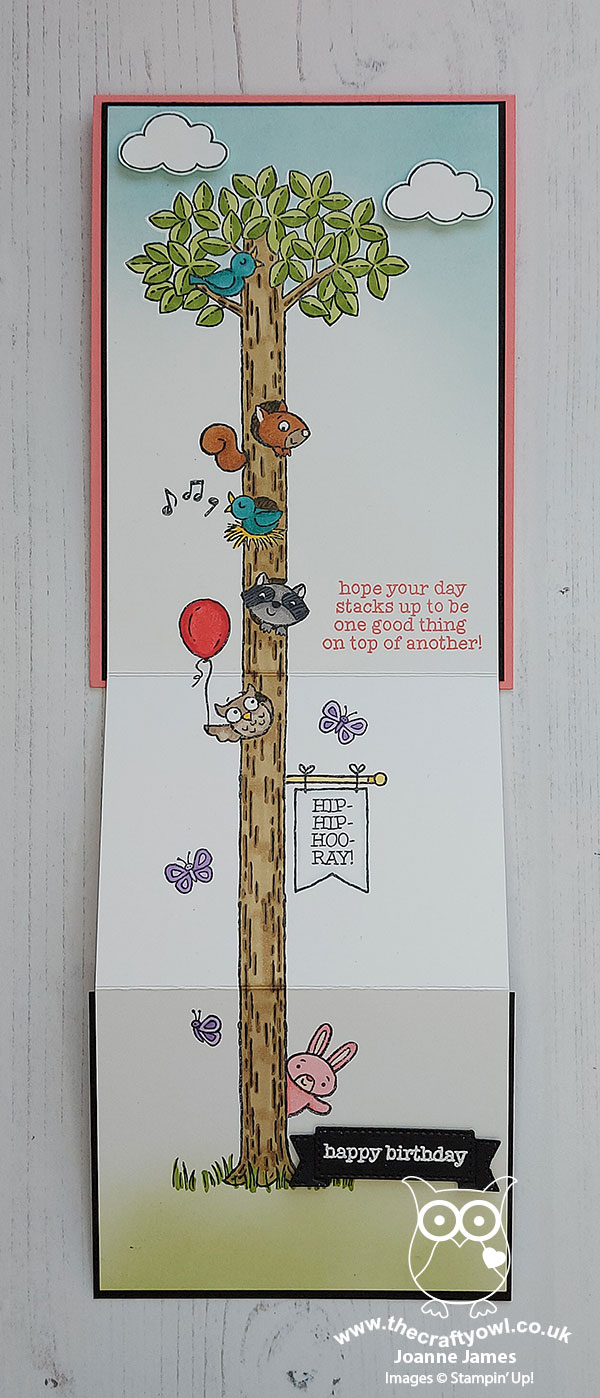
 

I had a lot of fun stamping and colouring the various elements of this card, which folds up to a standard card size. The stamps are really easy to align; my one top tip for you is that you make sure you know where the front fold will sit on your back panel when closed, so that you don't have any elements that end up being partially visible when it's closed up, such as a cloud or part of an animal (ask me how I know!!)

Behind the concertina fold the card also opens up in the conventional way, for you to write a message. I couldn't resist adding another trunk full of cute critters waving their respective birthday wishes:
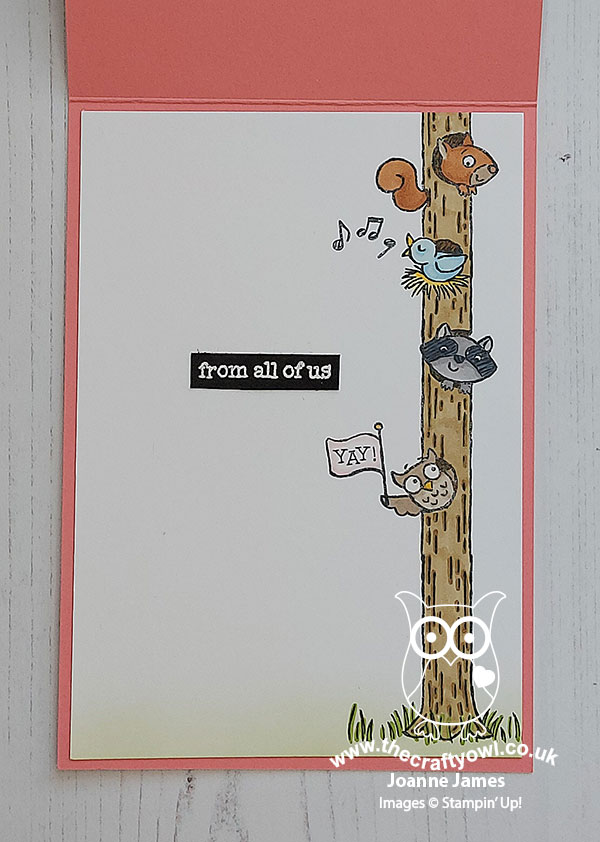
Isn't that just the cutest?! This is what the card looks like when it stands up in its concertina design:
 

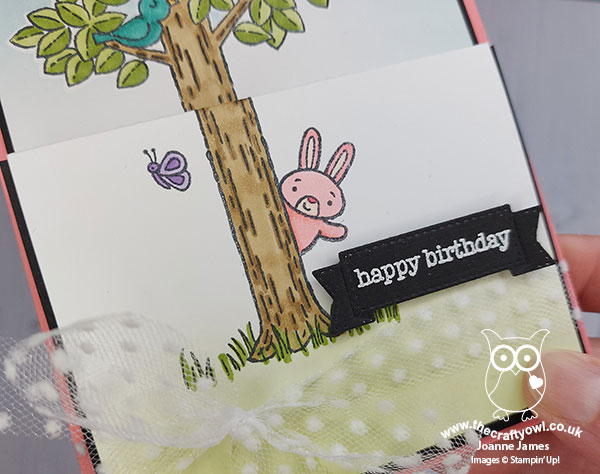
It's In The Details - There are only two other main elements to my card besides my fun fold and stamped design: the lovely soft polka dot tulle ribbon that holds the card closed for mailing, and the stitched banner diecut I used for my happy birthday sentiment, that is from the Smooth Sailing Die set - such a useful little die:
 

I think this card could be adapted for lots of other uses too, such as welcome to the team, farewell and good luck cards and more besides!  

Here is the visual summary of the key products used on today's project for you to pin for easy reference:
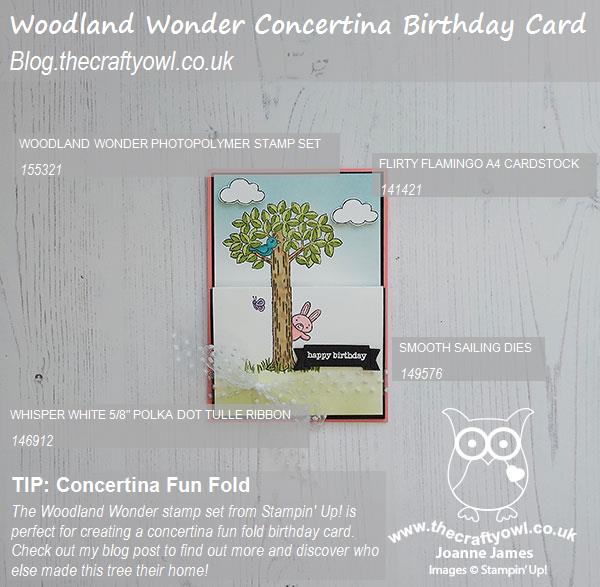
 

You can see all of my Product and 'How To' summaries on my 'How To - Tips and Techniques' Pinterest board in case you've missed any. 

I'm also linking today's card up over at Just Us Girls where the theme is 'animals' and at SUO Challenges for a second entry in the 'things that fly' - today's card has birds, butterflies an owl - and at a stretch, a balloon too!

A tictactoe board offers so many creative possibilities - how does this week's board inspire you? Why not have a go? We would love to see you in the gallery and who knows - you might be selected for Designer's Choice and be eligible to be a guest designer on a future challenge. 

Enjoy your evening; I'll be back tomorrow with another project. Until then, happy stampin'!


Stampin' Up! Supplies Used: 

Table built using Product Table Builder by The Crafty Owl - Independent Stampin' Up! Demonstrator.

Ahoy It's Your Birthday CAS Masculine Cards for PP464

by Joanne James20. October 2019 09:00

Today it's Sunday and time for this week's new challenge over at The Paper Players! It's the turn of the fabulous LeAnne to host this week and she has a great Clean and Simple challenge for you to work with:


As you are reading this, I am away entertaining a lovely group of ladies at my Creative Escapes weekend craft retreat where we will be Christmas crafting to the max. My cards for you today though are all about birthdays - and male birthdays at that! I made these cards a while ago when I was preparing for my 'Come Sail Away' technique card class, although I didn't feature them in the class itself and LeAnne's challenge this week is the perfect opportunity for me to share them with you. I made two cards in one sitting and wanted to share both with you, so first up the more clean-and-simple of the two: 


Here's the low-down on today's card:

All At Sea - Both of my cards feature a background layer embossed with the High Seas embossing folder for some subtle texture. I love the detail that this gives and it’s perfect for my nautical theme. 

Ahoy The Hand Lettered Prose Dies - I used my diecutting machine and the Hand Lettered Prose Dies to diecut an a, h, and y from my Balmy Blue card layer before I added the waves embossing. This allowed me to use the negative space to show the contrast of colour with the navy cardstock behind and gave me the opportunity to make a second card using the letters I had cut out with just a little extra effort. If you like these letters, it is worth also checking out the blog of one of our current Paper Players guest designers, SU Mohr (see the link list below), who has created many wonderful projects using them.

O It's A Ship's Wheel - I substituted the ‘o’ in the word ‘ahoy’ with a ship’s wheel from the Smooth Sailing Dies to tie in with my theme and added a frosted epoxy droplet to the centre for some subtle bling. I love playing with words to create this effect! I finished my sentiment with a stamp from the ‘Broadway Birthday’ set. The second of my two cards is below, which uses an extra layer and the positive rather than negative letters, but is otherwise the same basic card:


So what do you think? Is today's sentiment loud enough to celebrate a birthday? I’m now of an age where I’m not shout from the rooftops with each passing year, however I do love to celebrate and am thankful for the many thoughtful cards i receive from friends and family near and far. 

Here is the visual summary of the key products used on today's project for you to pin for easy reference:


You can see all of my Product and 'How To' summaries on my 'How To - Tips and Techniques' Pinterest board in case you've missed any. 

Before you reach for your ink and papers, check out what our amazing team has created to inspire you this week:

Here's a quick recap of our challenge rules:
 
1.  Create a new paper project
2.  Upload your creation to your blog with a link back to us and provide a direct link to the post featuring your challenge submission.
3.  Please link your card to no more than four challenges, TOTAL.
4.  Have FUN!

You can see all of my 'How To' summaries on my 'How To - Tips and Techniques' Pinterest board in case you've missed any. 

Enjoy your day; I'll be back later this week with another project. Until then, happy stampin'!


Stampin' Up! Supplies Used: 

Table built using Product Table Builder by The Crafty Owl - Independent Stampin' Up! Demonstrator.

True North Ship's Wheels FMS397

by Joanne James22. July 2019 14:00

Today I'm sharing a card using the current sketch over at Freshly Made Sketches that was also inspired by the current Time Out Challenge:


I went with neutrals and masculine today and with those circles on Kim's sketch offering lots of creative possibilities, I saw ship's wheels in their place - take a look:


Here's the low-down on today's card:

Sailing Home - I suddenly realised this week that despite having brought this set home with me from Onstage back in May, with the exception of my Make and Take this is the first card I've made with it (a case of new product overload as usual!) I have an upcoming class with this set and a ton of 'works in progress' on my desk, so will definitely have lots more to share in coming weeks. The only stamp I used on today's card is the sentiment - I think this makes a nice sentiment for a male anniversary card, but would also work for a mentor, teacher or coach I think; anyone who sets direction and motivates others.

Come Sail Away Compasses - I wasn't sure that I would use the paper pattern that I featured on today's card with all of those compasses and measuring instruments (there's always one in a pack that goes to the bottom of the pile, right?) so I pushed myself to cut into it and I think with some black accents it adds just enough detail to work on today's card. The stripey pattern on the reverse will definitely be more popular with me, but for now challenge accomplished! 

Smooth Sailing Ship's Wheels - My trio of ship's wheels were diecut using the Smooth Sailing Dies - check out the embossed detail on these, so lovely. I cut them from a scrap of (retired) brushed silver cardstock from my scrapbox and finished the centre of each with a black faceted dot for a little understated bling.

Here is the visual summary of the key products used on today's project for you to pin for easy reference:

You can see all of my 'How To' summaries on my 'How To - Tips and Techniques' Pinterest board in case you've missed any. 

Enjoy your day and I'll be back tomorrow with another project. Until then, happy stampin'!


Stampin' Up! Supplies Used:

Table built using Product Table Builder by The Crafty Owl - Independent Stampin' Up! Demonstrator.

New Online Exclusives

There are new products available exclusively in the online store from 5 November - check them out here.

Latest Kits!

Stampin Cut and Emboss

The Layered Landscapes Kit and Nature's Paintings Kit are the latest kits in the online store - get yours here!

Shop Online

Access my online shop 24 x 7, 365 days of the year:

Current November hostess code:

9NKXDTTR

Shop Online

Mini Catalogue

BROWSE THE CATALOGUE

'Tis The Season - the new Stampin' Up! Mini Catalogue is here! For more details and to download your copy click here

Scrapbooking

Stampin' Up! has introduced a new range of 12x12" scrapbooking product and kit - the full range is now available to purchase online. To download a copy of the new digital Scrapbooking Catalogue click here.

2024-25 Annual Catalogue

BROWSE THE CATALOGUE

Click on the image to download your copy of the 2024-25 annual catalogue. For a full list of current SU! supplies, go to my online store. If you would like any help or advice, please drop me a line at joanne@thecraftyowl.co.uk or give me a call on 07773 421446 - I'd be happy to help.

Join My Team

It's always a great time to join Stampin’ Up! New team members can get £130 worth of products for only £99 + free business supplies + free shipping + all the fun being a part of Stampin’ Up! Stampin' Up! has something for everyone: join my growing team and benefit from my support to enjoy Stampin' Up! however you choose.

If you're interested, call me for a chat to understand how I can help you realise your goals. Alternatively, if you have already decided to sign up and you just can't wait, please click here for the link to the online form where you can sign up and order your starter kit right away! 

About Me

Hi I'm Joanne and live in Northampton and when I'm not looking after my husband and two beautiful children, am an avid crafter with a passion for all things Stampin' Up!

I must confess that I have never been a big rubber stamper - until I discovered Stampin' Up! that is. I love the fact that I can get such great results with co-ordinating stamps, inks, papers and punches - the possibilities are endless! Join me on my stamping journey as I share the things I love and be inspired to create amazing things yourself!

Follow Me

Monthly Newsletter

Box Builder

Click the button above to use Box Buster to create your custom box design using the Envelope Punch Board!

Kits Collection Now Available!

Stampin Cut and Emboss

The new Kits Collection from Stampin' Up! is now available!

Click here to see the current kits available and order yours online today.

I Design For


Stampin' Up Stuff

This is my personal blog and is not endorsed by Stampin’ Up! I hope you find it a plentiful source of ideas and personal inspiration but please don't copy my designs for contest submission or use for classes, publication or sale without express permission.