Celebrate Every Day With Project Life by Stampin' Up!

by Joanne James25. January 2017 07:00

It's Wednesday already - happy hump day! Today I'm sharing a card that I made for a little challenge that I'm currently having with my team.

My team consists of people from all walks of life and each of them wants something different from their Stampin' Up! demonstratorship: whether they are actively running a business and using it as their main source of income, sellling to friends and family to provide family 'extras' or simply enjoying their hobby and enjoying a discount on their Stampin' Up! purchases, there is one thing that unites us all - a shared love of crafting! I like to set them challenges from time to time and one of our current ones is using the new 'Celebrate Every Day' Project Life memory keeping collection from Stampin' Up!

Each of my team were given a selection of cards in various sizes from the Celebrate Every Day card collection and one of the pockets from the 6" x 8" variety pocket pack and asked to come up with one or more projects that could be shared with the group, adding whatever additional accessories they had to hand. I love the bright, summery colours of this particular collection and so I couldn't wait to use some of mine to make a cheery card for a friend of mine who is going through a rough patch - take a look:


 Here's the low-down on today's card:

Celebrate The Every Day with Project Life - The Celebrate The Every Day Project Life set has some great sentiments to illustrate your Project Life pages and record those special times with loved ones. They can also work as the focal point for a card too: I've used one of the 3" x 4" cards that I cropped to focus on the sentiment, which is perfect for someone going through a rough patch to let them know you are thinking of them. I then backed this with one of the bright floral 3" x 4" cards for a burst of summer flowers and pop of colour. The final element to my card was a Watermelon Wonder Heart embellishment that I cropped out of one of my lined Project Life journalling cards with my circle Stitched Shape Framelit Dies. I love how these framelits add just the right amount of detail to frame a sentiment or image.

Co-ordinating Accessories - One of the great things about the Stampin' Up! project Life range is that it exclusively features Stampin' Up! colours. This makes it so easy to go to your craft supplies and instantly find other items that will co-ordinate. The colour palette for the Celebrate Every Day range looks like this, along with the addition of Basic Black and Whisper White as neutrals:

I chose to use some A4 Daffodil Delight cardstock for my base and mat, along with a punched circle of Watermelon Wonder and two pieces of Emerald Envy 1/8" Taffeta Ribbon on my card. Effortless co-ordination - one of the many reasons I love to craft with Stampin' Up! products!

I'm A Hoot And You Can Be Too - The Hoots are the lovely bunch that make up my Stampin' Up! team (The Crafty Owl - Hoots - get it?! ;-) ) and I would love to welcome you too. If you've ever thought about joining Stampin' Up!, now is a great time time to do so. During Sale-A-Bration, your starter kit is extra special as not only do you get your choice of £130/175 Euros worth of product for £99/129 Euros, but you get to choose an additional 2 stamp sets FOR FREE - that could be worth as much as an extra £93/126 Euros. There are so many ways in which you can benefit from being a Stampin' Up! demonstrator- please do give me a call on 07773 421446 or email me if you'd like to discuss further.

Here is the visual summary of the key products used on today's project for you to pin for easy reference:


You can see all of my 'How To' summaries on my 'How To - Tips and Techniques' Pinterest board in case you've missed any. 

Enjoy your day and I'll be back tomorrow with another project. Until then, happy stampin'!


Stampin' Up! Supplies Used:

Table built using Product Table Builder by The Crafty Owl - Independent Stampin' Up! Demonstrator.

Detailed Santa Thinlits Banner Card

by Joanne James29. October 2016 19:37

I hope you're all enjoying a lovely weekend. Today I have a card using this week's sketch over at Freshly Made Sketches:

I've finally managed to break the seal on Detailed Santa Thinlits Dies and been putting them through their paces. Today's card also features a new background stamp - take a look:


Here's the low-down on today's card:

Detailed Santa Thinlits Die - Although I haven't used it before, this Santa die was one of my first purchases from the seasonal catalogue. I adore the detail of his face and beard and there are so many ways in which he can be used. Here I've cut a section of the image in Whisper White and mounted it on a banner of Real Red. You can't see in the photograph, but the whole of the white layer has been brushed with clear Wink of Stella and has a lovely subtle shimmer to it.

Put A Label On It - I stamped my sentiment from the co-ordinating 'Greetings From Santa' stamp set and cut it out with one of my Project Life Cards and Labels Framelits, great for memory keeping but perfect for card making too.

A Merry Medley - For my base, I chose to use the 'Merry Medley' background stamp, stamped in Soft Suede onto neutral kraft cardstock. I like that it adds interest without fuss and too much detail, yet is in keeping with the festive theme of my card.

Here is the visual summary of the key products used on today's project for you to pin for easy reference:


You can see all of my 'How To' summaries on my 'How To - Tips and Techniques' Pinterest board in case you've missed any. 

I'll be back tomorrow with another santa project, this time for this week's new challenge over at The Paper Players; until then, happy stampin'!


Stampin' Up! Supplies Used:

Table built using Product Table Builder by The Crafty Owl - Independent Stampin' Up! Demonstrator.

Project Life by Stampin' Up! Hello Lovely Card

by Joanne James20. August 2016 22:08

I hope you are enjoying the weekend! I managed to squeeze in a little crafting time this afternoon and made a card for this week's challenge over at Mojo Monday:

I had been sorting through some Project Life and was struck by the lovely natural florals and phrases in my Hello Lovely card box so decided to use one of them as the focal point for my card today. Take a look:


Here's the low-down on today's card:

Hello Lovely Project Life - The Hello Lovely Project Life set has some great sentiments to illustrate your Project Life pages and record those special times with loved ones. They can also work as the focal point for a card too: I've used one of the 3" x 4" cards that I cropped to focus on the sentiment. 

Mix It Up - I am always torn when it comes to using PL cards for something other than memory-keeping; I love to use them in my recording too much! I wanted to use the leaf pattern and black and white watercolour striped cards for the circle and background elements of my card, but they both had designs on the reverse that I wanted to use for memory-keeping. How did I solve my dilemma? I found some very similar patterned papers in the retired English Garden and Go Wild designer series papers that I could use instead - crisis averted!

Pool Party Blue - Black and white are the dominant colours on my card, but the hint of green and the blue Pool Party base picked out from flowers on the PL card, belly band, twine and sequin embellishment play a key role in lightening and brightening this otherwise monochromatic colour scheme. 

Here is the visual summary of the key products used on today's project for you to pin for easy reference:


You can see all of my 'How To' summaries on my 'How To - Tips and Techniques' Pinterest board in case you've missed any. 

Enjoy your day and I'll be back tomorrow with this week's card for our new challenge over at The Paper Players. Until then, happy stampin'!


Stampin' Up! Supplies Used:

Table built using Product Table Builder by The Crafty Owl - Independent Stampin' Up! Demonstrator.

Tags: , , , , , , ,

Cards | Project Life | Shop Online

Project Life All Year Long Notecard

by Joanne James9. August 2016 22:00

I've had a busy couple of days but I wanted to pop by with a quick card that I made for this week's sketch challenge over at CAS(E) This Sketch:


Did you know that the new Project Life accessory packs now include a set of photopolymer stamps? I used the ones in the All Year Long pack to create a little notelet - take a look:


I stamped each of the little seasonal stamps and heat embossed the sentiment in gold, added a gold frame and mounted on a Crumb Cake base. Super simple, super quick!

I'll be back tomorrow with a card for this week's challenge over at Create With Connie and Mary; until then, happy stampin'!


Stampin' Up! Supplies Used:

Table built using Product Table Builder by The Crafty Owl - Independent Stampin' Up! Demonstrator.

Tags: , , , , , ,

Cards | Shop Online | Stamping

What Does The Fox Say? Foxy Friends

by Joanne James26. June 2016 09:00

It's Sunday and time for a new challenge over at The Paper Players! Thank you to everyone who joined us for our 300th anniversary celebrations last week - there were some fabulous cards in the gallery and it's your support for our challenge that keeps us going. Congratulations to all those who were winners in our grab bag prize draw - I'm looking forward to sending mine out to someone soon!

It's my turn to host again this week and I have my most favourite of all challenges, a sketch, for to play along with:


For my card this week I decided to go with some of my favourite new items from the new annual catalogue - the Little Foxy Suite:


Here's the low-down on today's card:

More Than A Little Foxy - So I'm in love with this cute fox! The 'Foxy Friends' stamp set makes all kinds of cute baby critters and woodland animals - I think this fox is just the sweetest. The fact that he comes with a co-ordinating punch - I used it here to punch out his head for extra dimension - is a bonus and the co-ordinating paper stack makes this suite a force to be reckoned with. 

Layered Layers - My card today is all about the layers. Whilst my sketch looks quite simple, I used a total of 9 separate layers on my card. In addition to my mats and patterned papers, I used the new Layering Circles Framelits to create the surrounds for my woodland scene, added to which partial diecutting of the uppermost circle and the masked stamping of the fox, tree stump and trees, adds further depth and the illusion of even more layers.

What Does The Fox Say? - I thought this would make a fun sentiment for my card today, easily created using the Labeler Alphabet, which is perfect for bespoke sentiments and cut out with the Project Life Cards and Labels Framelits. I highlighted the word 'Fox' in Calypso Coral with the solid letters and added an enamel heart too. Oh and my fox - he says "Happy Birthday!" in case you were wondering :-)

Here is the visual summary of the key products used on today's project for you to pin for easy reference:


You can see all of my 'How To' summaries on my 'How To - Tips and Techniques' Pinterest board in case you've missed any. 

Before you reach for your ink and papers, check out what our amazing team has created to inspire you this week:

The Paper Players Design Team
 
 
Here's a quick recap of our challenge rules:
 
1.  Create a new paper project
2.  Upload your creation to your blog with a link back to us and provide a direct link to the post featuring your challenge submission.
3.  Please link your card to no more than four challenges, TOTAL.
4.  Have FUN! 


I look forward to seeing what you create with my sketch this week. I have a day of sewing in store with some last minute guard costumes to make for Rebecca's school production of the Wizard of Oz this week, so my day will involve much green fur fabric - wish me luck!

Back tomorrow with another project; until then, happy stampin'!


Stampin' Up! Supplies Used:

Table built using Product Table Builder by The Crafty Owl - Independent Stampin' Up! Demonstrator.
 

Let's Get Away Project Life Bicycle Card

by Joanne James1. May 2016 09:00

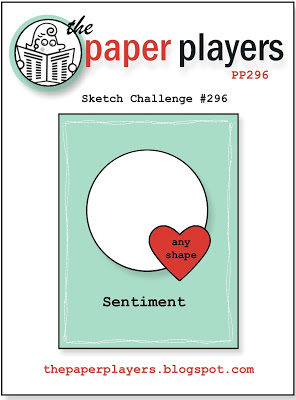
It's Sunday and time for a new challenge over at The Paper Players! It's the turn of our fearless leader Nance to host our challenge this week and she has a fun theme challenge for you to play along with:
   PPA-298-Apr28

For my card this week I decided to do something a little different and make a card featuring a couple of my Project Life cards. As a family we do a lot of cycling and it often features in my memory keeping, so it was a tough decision to actually part with this one and use it on a card! When I saw Ginger's sketch layout over at Pals Paper Arts this week it was perfect for showcasing an alternative use for my Project Life cards so I 'bit the bullet' and this is what I came up with:
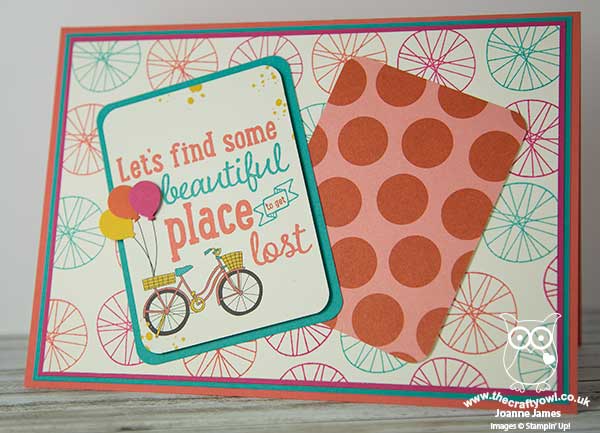
 

My card is A5, so slightly larger than usual, in order to accommodate my pair of Project Life cards, yet it really was quite straightforward to put together as the Project Life cards do so much of the creative work. That said, there are a few things worth highlighting:

Let's Get Away - The Project Life cards featured on today's card are from the 'Let's Get Away' box set. This set is perfect for documenting your travels, near and far and contains lots of transport, including cars, aeroplanes and bicycles. What's more, this set is retiring so now is the perfect time to pick it up at a bargain price. The card I chose is perfect for today's challenge, with illustration and sentiment all in one. Here's a closer look at it in all its glory:
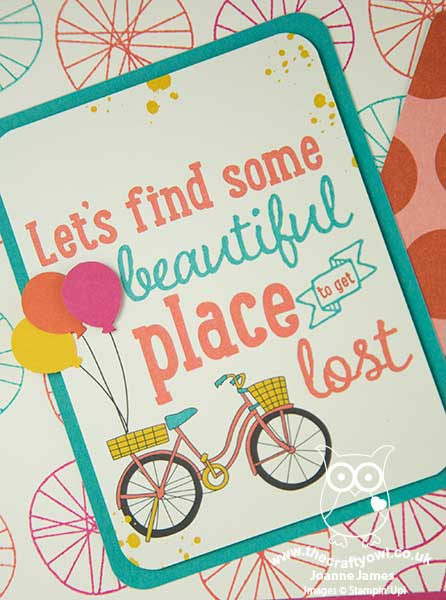
I mounted it onto a mat of Bermuda Bay for added definition and rounded the corners using my Project Life corner rounder punch. The second large polka dot card is one of the filler cards from the same set.

Bicycle Wheel Background - The stamp that I've used for my background is from the 'Balloon Celebration' set in the seasonal catalogue. I'm not exactly sure what this stamp is intended to be, but to me has always felt like a bicycle wheel - although I've no idea what that has to do with balloons! The open design works well to create interest in the background and incorporate my base and mat colours, which ties it in with my feature cards. 

Balloon Trio - As an added detail, I punched out a trio of coloured balloons using the mini balloon punch in the Party Punch Pack (you are so going to snap this up before it retires at the end of this month!) and adhered them over the top of the original ones that decorated the Project Life card, popping the pink one on a dimensional. They are slightly larger than the printed ones, so create a nice overhang and cover completely the printed balloons without any further work being required.

Here is the visual summary of the key products used on today's project for you to pin for easy reference:
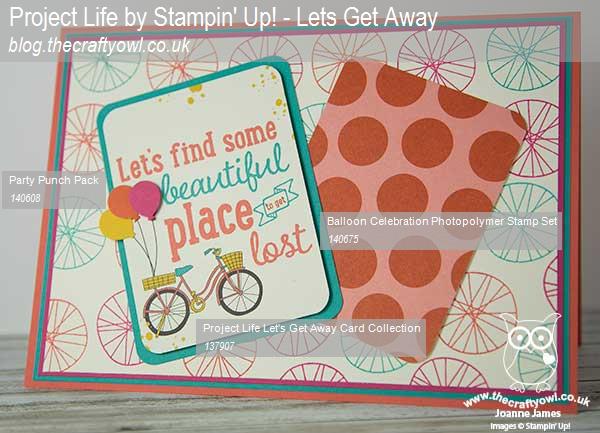
 

You can see all of my 'How To' summaries on my 'How To - Tips and Techniques' Pinterest board in case you've missed any. 

Before you reach for your ink and papers, check out what our amazing team has created to inspire you this week:

The Paper Players Design Team
 
 
Here's a quick recap of our challenge rules:
 
1.  Create a new paper project
2.  Upload your creation to your blog with a link back to us and provide a direct link to the post featuring your challenge submission.
3.  Please link your card to no more than four challenges, TOTAL.
4.  Have FUN! 


I look forward to seeing what you make of our theme this week. We are off to basketball this morning but no hockey today as the season has officially ended. If the weather forecast is correct and we are in for an afternoon of rain, we will be snuggling up on the sofa for a family movie afternoon watching the classic 'The Wizard of Oz'. Rebecca has an audition for a role in a school production of this musical this week, so is keen to 'gen up' on all aspects. Her practising of 'Somewhere Over the Rainbow' is coming along nicely - Judy Garland, eat your heart out!

Back tomorrow with another project; until then, happy stampin'!


Stampin' Up! Supplies Used:

Table built using Product Table Builder by The Crafty Owl - Independent Stampin' Up! Demonstrator.

Let It Snow Snowflakes Card

by Joanne James6. December 2015 10:00

It's Sunday and time for a new challenge over at The Paper Players! This week it is the turn of my good friend Claire to host and she has a fun theme to get our creative juices flowing this week:


I had an idea brewing in my mind all week for this challenge, but I had rather less time to craft this week than I would have liked so ended up in the end going with something altogether more clean and simple! I was intrigued by this week's sketch over at CAS(E) This Sketch and was sad to see that Hayley and Tara are winding up the Colour Me...! blog after this week's challenge. I had such a lovely time when I did my DT stint over there I just had to play along for this their final challenge (although I did take a little liberty by adding in silver to my monochromatic colour scheme - well ladies, it is Christmas!) I'm also linking with CAS-UAL Fridays, since my card today features snowflakes - take a look:


I used a base of Soft Sky then added some strips of silver glimmer paper, before adding my Whisper White panel. On this panel, I stamped the small snowflake from the Project Life Hello December set in Versamark and heat embossed it in silber. I then cut a stencil with my 1 1/4" circle punch and sponged around the snowflakes in Soft Sky ink. I then took my 'let it snow' sentiment from the Sparkly Season stamp set and having  curved it on my block, I stamped just the first two words in Versamark and heat embossed that in silver too. For my 'snow' to finish the sentiment, I used the coordinating die cut from the same set and cut three in extra-thick Whisper White and one in silver glimmer paper and layered them together to create my stacked sentiment. In retrospect I would change the placement of the 'let it' (it should be above the 'snow' rather than below it) but I was against the clock and didn't have time to make a second panel. That aside, I like the card -there is something soothing about the soft blue colour and the pattern is an interesting one. Oh and it's got silver glimmer paper, which I seem to be using everywhere lately!

Before you reach for your ink and papers, check out what our amazing team has created to inspire you this week:

The Paper Players Design Team
Anne Marie Hile - on leave
 
 
Here's a quick recap of our challenge rules:
 
1.  Create a new paper project
2.  Upload your creation to your blog with a link back to us and provide a direct link to the post featuring your challenge submission.
3.  Please link your card to no more than three challenges, TOTAL.
4.  Have FUN! 


I look forward to seeing your snowy creations this week. I'm off for a morning of basketball and then I've some final preparations for the last of my Christmas card classes tomorrow, hopefully time for a spot of crafting, then Ben is attending a birthday party in the afternoon. Oh and we are going to attempt to put the Christmas tree up - not much to be going on with then!

Back tomorrow with another project; until then, happy stampin'!


Stampin' Up! Supplies Used:

Table built using Product Table Builder by The Crafty Owl - Independent Stampin' Up! Demonstrator.


Christmas Cheer With Project Life Seasonal Snapshot 2015

by Joanne James2. December 2015 11:46

It's Wednesday already? The week is zipping by! I'm sure that time moves quicker the nearer to Christmas we get! I have a great festive monochromatic Christmas card for you today: big on layers, easy to recreate - just what we like at this time of year! I made today's card with a couple of challenges in mind:

    CYCI#97

The sketch over at CAS(E) This Sketch this week is a classic and I just love the inspiration photo at CanYouCaseIt - so much shine! I took my inspiration from the red and white elements and the shiny foil which I incorporated into the border frame for my card:

Isn't that striped Holiday vellum just gorgeous? I matted it on a piece of Whisper White cardstock before adhering to my Real Red base so that the red foil stripes would really stand out. For the focal point of my card, I used the sentiment from the 'Cheer All Year' stamp set - so versatile - and my little hot cocoa mugs are from the 'Project Life Hello December 2015' stamp set - another one of those sets that is useful for so much more than its designed purpose.

Are any of you out there joining in with the #decemberdaily project? I love to create a Project Life mini-album each December documenting the goings on in the James household during the festive season, so the above stamp set was a must for me to decorate this year's journalling, along with the Hello December 2015 Project Life Card Collection and Accessory Kit:

I'm mindful that I don't often share my Project Life documenting here on my blog - I just tend to get on with it! - but I'm trying to consciously change that, so throughout December I will be sharing some of the inspiration for my daily journalling and occasionally some of my completed pages in the hope that they will inspire you to get involved in active memory keeping too. Yesterday's page will feature the arrival of our Christmas Elf Charlie, who often gets up to mischief in the run up to Christmas and yesterday appeared with a fun piece of home decor I made to remind the James Juniors that good behaviour is important more now than ever since the elf will be reporting back to Santa on everything he sees and hears:

Isn't that fun? Surprisingly easy to create with the help of my e-cutter and some Stampin' Up! cardstock. Here's a picture of Charlie as he made his first appearance of the year:

This morning Ben was out of bed, up and dressed in record time and off on the hunt for Charlie to see what mischief he had got up to overnight; he eventually found him hiding in the basil pot amongst the herbs on the kitchen windowsill. Here's to more mayhem as the month progresses!

If you would like to join me in documenting your December, it's not too late to order the supplies to create your own album; just click on the links below to go to the online store or give me a call and I would be happy to place an order for you. More tips and Project Life #decemberdaily inspiration to come! Equally, if you would like to share your own #decemberdaily memories, feel free to upload them to my Facebook page here - I would love to feature them.

That's all from me today; I'll be back tomorrow with a festive card for this week's new challenge over at Create With Connie and Mary. until then, happy stampin'!


Stampin' Up! Supplies Used:

Table built using Product Table Builder by The Crafty Owl - Independent Stampin' Up! Demonstrator.


Project Life #dailydecember Stampin' Up! Supplies Used:

Table built using Product Table Builder by The Crafty Owl - Independent Stampin' Up! Demonstrator.


Thankful For You Seasonal Snapshot Project Life Card

by Joanne James3. November 2015 14:45

Today is a special day - I received my badge and pass for Stampin' Up's Onstage Live Event in the post today and I am SOOO excited; only 8 more sleeps to go! I'm looking forward to spending some quality time with some of my teamies, getting a sneak peek at lots of new SU! product and attending my first Centre Stage Live.

Today's card is another on the theme of thankfulness, but with something of a twist! I was documenting some Project Life at the weekend and decided to use one of my cards from the 2015 Project Life Seasonal Snapshot kit to make a card. This is something I do rarely, as I usually want to use everything in my PL documenting, but decided it was a good idea so that you can see  the sheer versatility of the Project Life product range. So here is my card:


I'd like to say this card took me ages, but that would be so untrue! It uses a PL card for the cardfront, with one of the wooden embellishments from the Seasonal Snapshot accessory kit adhered to the front with glue dots, and the words and letters and little leaves are all self-adhesive elements from the accessory pack that I adhered directly to my base, popping the 'thankful' up on a couple of dimensionals for a little lift. I added a black candy dot and some SAB Tangelo Twist thick baker's twine from my stash and my card was complete! So easy and yet so effective - I love the rich colours of the plaid and the negative space leaf really draws you in. The leaf itself made it into my Project Life folder with my photos  - bonus! Project Life sets are great for cardmakers too - if you can bear to part with them of course! 

It's remix week over at TGIF Challenges so I decided to use their theme - thankful - and sketch for my card, which I am also linking up to SUO Challenges as it fits with their theme too and the inspiration over at Curtain Call where my background looks just like their rug! 


I am thankful for many things, but today I am mostly thankful that the carbon monoxide detector that set off its alarm this morning is nothing serious and that our relatively new gas boiler has not sprung an unexplained leak. The National Grid engineer that came out on the emergency call determined it was simply a blip - at least we know the alarm is working!

I'm off to get some jobs done before heading out on the school run and then to take one of my little pianists for a piano exam - wish Rebecca luck! Back tomorrow with another project - Christmas this time! Until then, happy stampin'!


Stampin' Up! Supplies Used:

Table built using Product Table Builder by The Crafty Owl - Independent Stampin' Up! Demonstrator.


Tags: , , , , , , ,

Cards | Shop Online | Stamping

Sentiment-Free Sunflower Card

by Joanne James28. August 2015 19:00

A quick card from me today showcasing some of the lovely papers in the Into The Woods DSP collection from the new catalogue and a rather new style of card for me: the ladies over at SUO Challenges are looking for 'cards without a sentiment' this week so I decided to have a go at creating a collage-style card. I love these, although my style is rather more 'clean and layered' so for me they are something of a challenge. Anyway, here goes - my card for today: 

I was inspired by the lovely sunflowers my CCMC colleague Connie Babbert has been creating recently - you can see one of them in the SUO Challenge DT cards for this very challenge, although I chose to create mine with the Flower Medallion punch rather than the new Poinsetta punch (still waiting for that one to arrive!) I took a selection of Into the Woods papers, using my Project Life framelits to cut a rectangle and then punched a trio of flowers in my brown and yellow colour scheme and then adhered a mix of ribbons and some fine gold twine before adhering them to my card. I layered my flower and added further texture with some candy dots to represent my sunflower seeds.

I'm not sure this is the best example of a collage card, but I do love the bright colours and textures/layers and because the card is sentiment-free, I can use this card for any number of purposes. I think it would make a nice 'get well soon' card - the yellow is so cheery. 

That's all from me today; I am having a lovely week at the seaside, but can honestly say that a week without a phone signal or internet connection is proving difficult for me! Back soon with another project; until then, happy stampin'!


New Online Exclusives

There are new products available exclusively in the online store from 5 November - check them out here.

Latest Kits!

Stampin Cut and Emboss

The Layered Landscapes Kit and Nature's Paintings Kit are the latest kits in the online store - get yours here!

Shop Online

Access my online shop 24 x 7, 365 days of the year:

Current November hostess code:

9NKXDTTR

Shop Online

Mini Catalogue

BROWSE THE CATALOGUE

'Tis The Season - the new Stampin' Up! Mini Catalogue is here! For more details and to download your copy click here

Scrapbooking

Stampin' Up! has introduced a new range of 12x12" scrapbooking product and kit - the full range is now available to purchase online. To download a copy of the new digital Scrapbooking Catalogue click here.

2024-25 Annual Catalogue

BROWSE THE CATALOGUE

Click on the image to download your copy of the 2024-25 annual catalogue. For a full list of current SU! supplies, go to my online store. If you would like any help or advice, please drop me a line at joanne@thecraftyowl.co.uk or give me a call on 07773 421446 - I'd be happy to help.

Join My Team

It's always a great time to join Stampin’ Up! New team members can get £130 worth of products for only £99 + free business supplies + free shipping + all the fun being a part of Stampin’ Up! Stampin' Up! has something for everyone: join my growing team and benefit from my support to enjoy Stampin' Up! however you choose.

If you're interested, call me for a chat to understand how I can help you realise your goals. Alternatively, if you have already decided to sign up and you just can't wait, please click here for the link to the online form where you can sign up and order your starter kit right away! 

About Me

Hi I'm Joanne and live in Northampton and when I'm not looking after my husband and two beautiful children, am an avid crafter with a passion for all things Stampin' Up!

I must confess that I have never been a big rubber stamper - until I discovered Stampin' Up! that is. I love the fact that I can get such great results with co-ordinating stamps, inks, papers and punches - the possibilities are endless! Join me on my stamping journey as I share the things I love and be inspired to create amazing things yourself!

Follow Me

Monthly Newsletter

Box Builder

Click the button above to use Box Buster to create your custom box design using the Envelope Punch Board!

Kits Collection Now Available!

Stampin Cut and Emboss

The new Kits Collection from Stampin' Up! is now available!

Click here to see the current kits available and order yours online today.

I Design For


Stampin' Up Stuff

This is my personal blog and is not endorsed by Stampin’ Up! I hope you find it a plentiful source of ideas and personal inspiration but please don't copy my designs for contest submission or use for classes, publication or sale without express permission.