Paper Florist Meet Petal Patterns PP685

by Joanne James14. April 2024 08:00


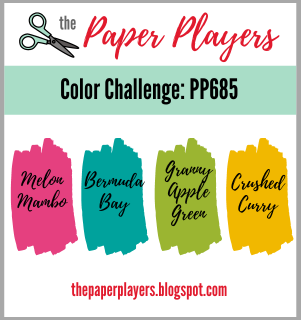
Today it's Sunday and time for this week's new challenge over at The Paper Players! It's the turn of the fabulous Claire to host this week and she has a bright colour challenge for us to work with:
          Tic Tac Toe Challenge #245

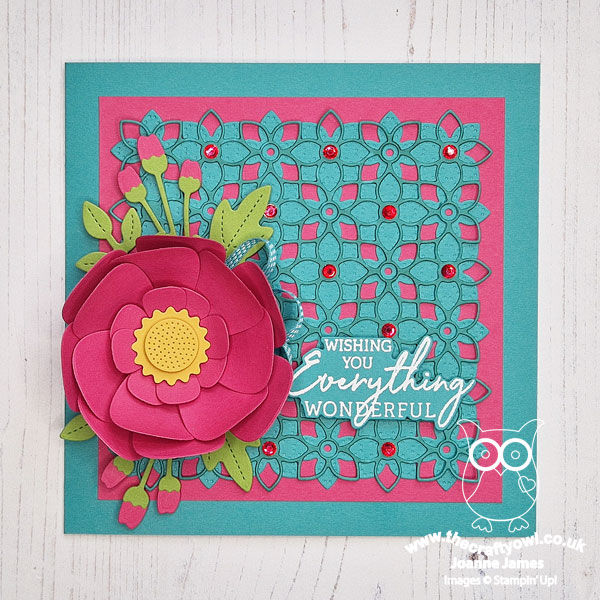
I love brights so was excited to get to work with Claire's chosen colours this week. I decided to go square this week and use the fabulous Jen T's sketch over at Freshly Made Sketches this week for the layout of my special birthday card - take a look:
 

Here's the low-down on today's card:

Petal Patterns Background - Since I was going with a square card today, I decided to use my Petal Patterns Dies for my background. I diecut them in Bermuda Bay and layered them onto a piece of Melon mambo onto my Bermuda Bay cardbase. I offset the top layer and before I glued it to the solid layer, I went over the outline die with my light Bermuda Bay Stampin' Blends marker to make it stand out more. I also added some rhinestones that I had coloured with my Melon Mambo Stampin' Blends marker to the centre of the flowers to highlight the pink. 

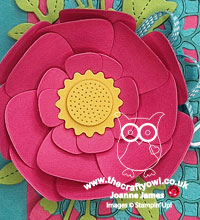
Paper Florist Dies Flower - The background would look pretty on its own, but the focal point of today's card is most certainly the over-the-top flower that I created using the Paper Florist Dies. I wanted to create a peony-type flower that was full of dimension, so I layered the centre then kept adding the outer petals until I was happy. I added some diecut leaves and flower buds behind it and a few loops of Bermuda Bay ribbon from my stash - isn't it pretty?
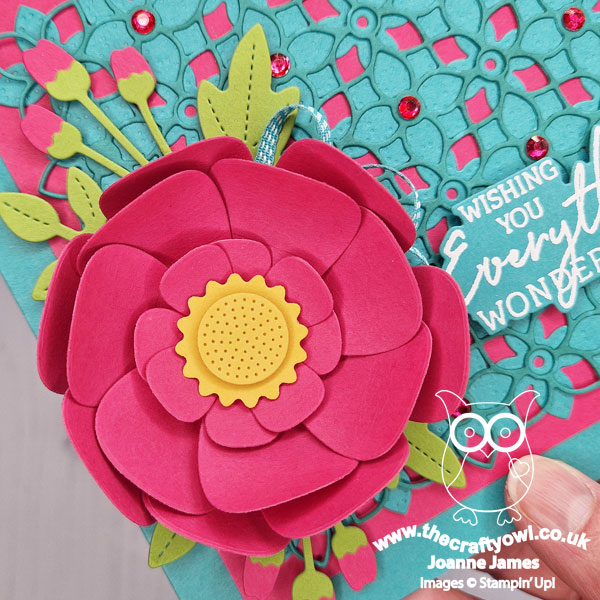
All those layers make this the perfect card to share with the team over at The Flower Challenge where their current challenge is to 'add layers'.

And A Charming Sentiment - I finished my card with a heat-embossed sentiment from the 'Charming Sentiments' stamp set, diecut with the co-ordinating Sentiment Silhouettes Dies. This is also the final part of my middle column for the challenge over at TicTacToe Challenge this week (square card/diecut/embossing)

Here is the visual summary of the key products used on today's project for you to pin for easy reference:
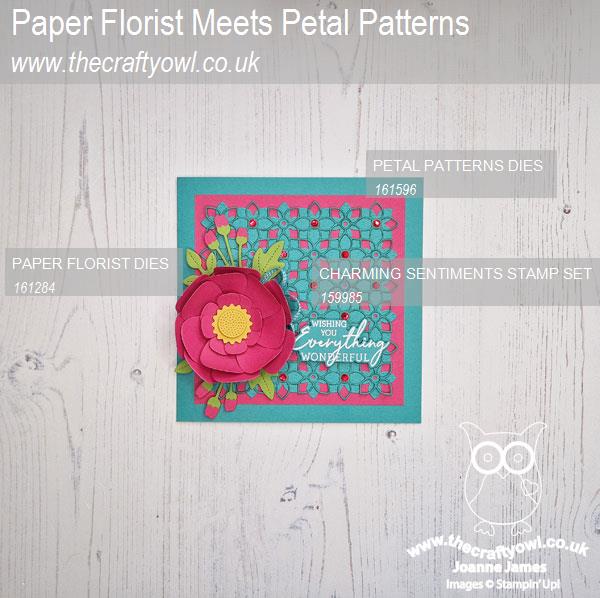
 

You can see all of my Product and 'How To' summaries on my 'How To - Tips and Techniques' Pinterest board in case you've missed any. 

Since this card won't fit into an envelope, I am going to make a co-ordinating box to present it in. This is a special card for someone with a milestone birthday later in the year, so it will be worth the effort. I really love the 3D effect of this card! Everything on this card is either retired (Bermuda Bay) or is due to retire at the end of the month; this will be the last opportunity to purchase any of the dies or the stamp set that I used on today's card, so if they are on your wishlist, you don't have long to act.

Before you reach for your ink and papers, check out what our amazing team has created to inspire you this week:

Here's a quick recap of our challenge rules:
 
1.  Create a new paper project
2.  Upload your creation to your blog with a link back to us and provide a direct link to the post featuring your challenge submission.
3.  Please link your card to no more than four challenges, TOTAL.
4.  Have FUN!

Enjoy your day; the hubby is off to Washington DC for the week today, so it will be just the youngest of the James Juniors and I at home. Since there is another week of school holiday to go, I am taking the opportunity to get some decorating done so my week will be a busy one. Never fear - I have some things to share here too though so be sure to pop by this week.  I'll be back tomorrow with another project. Until then, happy stampin'!


Stampin' Up! Supplies Used: 
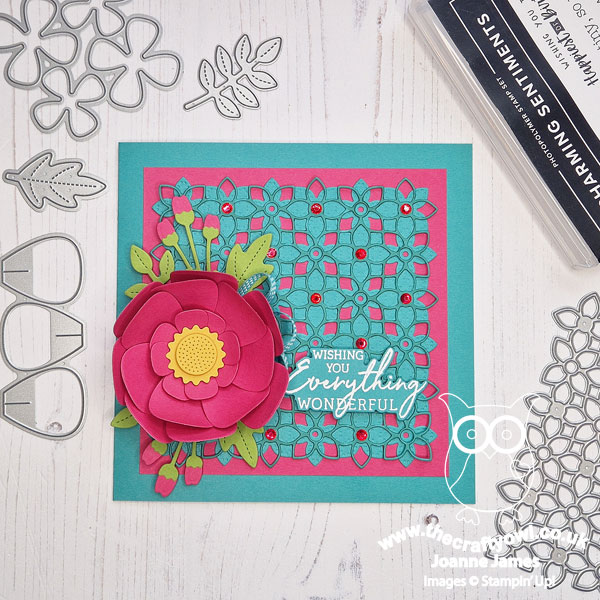
Table built using Product Table Builder by The Crafty Owl - Independent Stampin' Up! Demonstrator.

Paper Florist Sweet Daisy Card

by Joanne James26. March 2024 20:27

Today I've a quick post to share a clean and simple card that was inspired by the cute daisy in the photo over at Inspired By this week and the code word over at Addicted to CAS - Bloom: 


There's something about that smiley daisy that made me want to recreate it for a sunny notecard - this is what I came up with:


Here's the low-down on today's card:

I chose a pale Lemon Lolly background inspired by the background cushion in the photo, then set about recreating my daisy using a petal from the Paper Florist Dies set and a flower centre using a circle from the Stylish Shapes Dies. My smiley face is courtesy of the (retired) 'Cute Fruit' stamp set and my sentiment is from the 'Sweetest Cherries' stamp set. I fussy cut the word 'sweet' and popped it up on dimensionals:


Super simple but so cute and I know just the person to send it to!

Here is the visual summary of the key products used on today's project for you to pin for easy reference:


You can see all of my 'How To' summaries on my 'How To - Tips and Techniques' Pinterest board in case you've missed any. 

Enjoy your evening and I'll be back tomorrow with another project. Until then, happy stampin'!


Stampin' Up! Supplies Used:

Table built using Product Table Builder by The Crafty Owl - Independent Stampin' Up! Demonstrator.

Paper Florist Lucky Clover For PP681

by Joanne James17. March 2024 08:00

Today it's Sunday and time for this week's new challenge over at The Paper Players! It's my turn to host this week and it's clean and simple challenge week with a 'good luck' theme:


Remember, this is a CLEAN and SIMPLE challenge.  When The Paper Players use the term “clean and simple”, we mean cards that:
  • Have minimal layers and embellishments
  • Have plenty of open space
  • Are simple and uncluttered

With two teens still in education where exams are a reasonably frequent occurence, I always need a supply of good luck cards on hand. Since it's St Patrick's Day next week and I haven't yet made a card featuring a shamrock or four leaf clover yet this year, I thought I'd take this opportunity to put that right. So today is all about the green - take a look:


Here's the low-down on today's card:

I stamped my large 'Sending' sentiment from the 'Sending Smiles' stamp set in Shaded Spruce and finished with a truncated sentiment heat embossed in gold beneath it. I decorated my card with a cascade of lucky four leaf clovers, made from the Paper Florist Dies. I popped them up on dimensionals to make the standout a little too:


Simple, clean and full of luck - box ticked! I'm also linking today's card up over at Inkspirational where they are also celebrating all things clean and simple (no optional balloon for me though!)

Here is the visual summary of the key products used on today's project for you to pin for easy reference:


You can see all of my Product and 'How To' summaries on my 'How To - Tips and Techniques' Pinterest board in case you've missed any. 

Before you reach for your ink and papers, check out what our amazing team has created to inspire you this week:

Here's a quick recap of our challenge rules:
 
1.  Create a new paper project
2.  Upload your creation to your blog with a link back to us and provide a direct link to the post featuring your challenge submission.
3.  Please link your card to no more than four challenges, TOTAL.
4.  Have FUN!

Enjoy your day; I am enjoying a rare weekend away and will be visiting the eldest of the James Juniors today, which I am looking forward to - it's been a while! I'll be back tomorrow with another project. Until then, happy stampin'!


Stampin' Up! Supplies Used: 

Table built using Product Table Builder by The Crafty Owl - Independent Stampin' Up! Demonstrator.

Heartfelt Hellos Mothers Day Card FMS620

by Joanne James29. January 2024 14:50

Today I'm sharing a card that I made using Jacquie's layout over at Freshly Made Sketches that also showcases the colour palette over at Hand Stamped Sentiments:


I couldn't resist a quick FMS entry this week since Jacquie's sketch is something of a 'go to' layout for me; the large circle works to showcase either a sentiment or an image with the smaller elements also offering lots of options. Today I decided to go with a sentiment from one of my Sale-A-Bration stamp sets, called 'Heartfelt Hellos' - take a look:


Here's the low-down on today's card:

Heartfelt Hellos - I previously showcased the 'hello' from this set (if you missed that card, you can see it here) so today I thought I'd go with the larger Mother's Day sentiment (ages away, I know but it pays to be organised!) The 'heartfelt hellos' set has 6 different sentiments that work for lots of occasions: Easter, Mother's Day, Father's Day, Dad's Birthday, Valentine's Day, Anniversary, Birthdays and general wishes too. What's more it's FREE with a product purchase of £45 or more - bonus!

Paper Florist Bold Blooms - I used my Paper Florist Dies to create two bold blooms to accent my sentiment circle. I love the bold colour palette from Hand Stamped Sentiments, but needed to add in some white to balance these strong colours. I love how quickly these diecut flowers come together and here they pack a colourful punch:

Basics Embossing - Finally, I decided to emboss the base of my card with one of the 3D Basics Embossing Folders. I haven't used this EF on anything before, but decided that these deep colours and my otherwise clean and uncluttered card could take the addition of the embossed finish. What do you think - do you like the added texture? Do leave me a comment below - I'd love to hear your thoughts.

Here is the visual summary of the key products used on today's project for you to pin for easy reference:


You can see all of my 'How To' summaries on my 'How To - Tips and Techniques' Pinterest board in case you've missed any. 

I'm having a crafty start to my week so I'm off to get back to it! Enjoy the rest of your day and I'll be back tomorrow with another project. Until then, happy stampin'!


Stampin' Up! Supplies Used:

Table built using Product Table Builder by The Crafty Owl - Independent Stampin' Up! Demonstrator.

Paper Florist Slimline Birthday Card PP651

by Joanne James30. July 2023 08:00

Today it's Sunday and time for this week's new challenge over at The Paper Players! It's the turn of the fabulous Jaydee to host this week and as it's the fifth Sunday of the month she has a fun tic-tac-toe challenge for us to work with:


I had chosen a collection of products that would enable me to meet a number of the boxes on Jaydee's grid; by the time I'd finished my card I actually covered the whole of the grid with the exception of 'masculine'! Atlantic Hearts have a great slimline sketch this week so I combined it with this week's Color Throwdown colours and decided to make a special birthday card - take a look:


Here's the low-down on today's card:

I have been spending time experimenting with the various combinations of pieces in the Paper Florist Dies recently so I decided I would put my time to good use and create a cascade of using the 'Best Family Ever' stamp set.  flowers in my favourite new Bubble Bath and Lemon Lolly colours, with bright green leaves, clustered around a central sentiment label, onto which I heat embossed a customised sentiment:

This stamp set is perfect to create all kinds of special sentiments; the set doesn't actually include the word 'NANNA', so I created it by combining letters from other names in the set. I also added some stencilling to the card base using a retired decorative mask and some Azure Afternoon ink, blending out from the centre and fading into the white of the base. Stencilling is a great way to add extra detail to the background, without distracting from the detail of the flowers themselves. I'm also linking today's card up over at Inkspirational where they are asking us to use stencils this week too. A couple of loops of Bubble Bath ribbon and a trio of pink pearls complete my card. This card is for the James Juniors to send to their Nanna for her birthday; it's still a few months away, but hey it can't hurt to be organised!

Here is the visual summary of the key products used on today's project for you to pin for easy reference:


You can see all of my Product and 'How To' summaries on my 'How To - Tips and Techniques' Pinterest board in case you've missed any. 

Before you reach for your ink and papers, check out what our amazing team has created to inspire you this week:

Here's a quick recap of our challenge rules:
 
1.  Create a new paper project
2.  Upload your creation to your blog with a link back to us and provide a direct link to the post featuring your challenge submission.
3.  Please link your card to no more than four challenges, TOTAL.
4.  Have FUN!

Enjoy your day; I'm off to Nottingham for more hockey today, so cross your fingers for a fine day! I'll be back soon with another project. Until then, happy stampin'!


Stampin' Up! Supplies Used: 

Table built using Product Table Builder by The Crafty Owl - Independent Stampin' Up! Demonstrator.

Paper Florist Flowers Purple Birthday Card AYSI 302

by Joanne James30. June 2023 12:00

It's been a quiet week here on the blog - I have been enjoying some post-exam time with the James Juniors to have some fun and blogging hasn't been high on the agenda - although I do have two posts for you today! First up I'm sharing my design team card for our new challenge over at As You See It where it's time for my favourite, a sketch challenge:


Not only do we have a sketch challenge, this layout, chosen by my friend and teamie Jan, is my all-time favourite 'go to' - if you peruse my blog you will find lots of cards that follow this layout style. What's more, in a complete stroke of fortuitous serendipity, the ladies over at Color Throwdown have one of my all-time favourite colour combos too, so I just knew I would have to combine the two! I used my favourite Gorgeous Grape purple for my card base and decided to go full-on bright florals - take a look:


Here's the low-down on today's card:

I created an arc of flowers using the Paper Florist Dies, to frame my sentiment from 'Something Fancy'. The Paper Florist Dies are a set of standalone dies easily overlooked - you can find them on page 165 of the annual catalogue and they are showcased on projects on page 33. They make fabulous large flowers that are great for 3D projects, home decor and to decorate gift packaging. I made up a tone of flowers so that I could experiment with the shapes, sizes and flower combinations, but settled on these three for my card:


A trio of enamel dots and a simple happy birthday sentiment inside was all I needed to complete today's card. I just love this card - is it ok to send a card to yourself if you love it so much?!

Here is the visual summary of the key products used on today's project for you to pin for easy reference:


You can see all of my 'How To' summaries on my 'How To - Tips and Techniques' Pinterest board in case you've missed any. 

Here's a summary of our challenge rules:

  • Create any card, scrapbooking page, 3D project or packaging project that fits the challenge.
  • Please include the challenge graphic and link back to the challenge in your blog post. Turn off word verification so we can leave you lots of lovely comments. Make sure you link the post not the whole blog to the Linky. Use #AYSIXXX when uploading to a public gallery.
  • If you’re unsure about ‘the rules’, check the details under the Challenge Guidelines tab on the As You See It Challenge homepage.
  • In a sketch challenge, you are welcome to rotate or flip a sketch. You can replace shapes used such as substituting a circle panel for a square panel. However, we must be able to still see the basis of the original sketch in your finished product.
We look forward to seeing your creations in the AYSI gallery.

Enjoy your day and I'll be back tomorrow with another project. Until then, happy stampin'!


Stampin' Up! Supplies Used:

Table built using Product Table Builder by The Crafty Owl - Independent Stampin' Up! Demonstrator.

Wanted To Say Feel Better Soon PP642

by Joanne James28. May 2023 08:00

Today it's Sunday and time for this week's new challenge over at The Paper Players! It's the turn of the fabulous LeAnne to host this week and she has my favourite, a sketch challenge for us to work with:


I decided to take the bright trio of colours over at Just Add Ink and use them to make a cheerful get well soon card - take a look:


Here's the low-down on today's card:

I initially considered using that vertical panel to showcase some designer paper, but decided instead it would be the perfect place to showcase a new die-only set from page 167 of the new annual catalogue, the Wanted to Say Dies. There are four sentiments in this set and each consists of two layers:

In place of the circle I added a layered flower and leaves, made using another new die-only set - Paper Florist Dies. These are so cool - you can make so many awesome dimensional flowers using these dies - they will be great for packaging and home decor too. These bright and cheery colours are perfect for a feel better soon greeting - I find yellow so uplifting, so it had to be the main colour focus on my card. And not a stamp in sight!

Here is the visual summary of the key products used on today's project for you to pin for easy reference:


You can see all of my Product and 'How To' summaries on my 'How To - Tips and Techniques' Pinterest board in case you've missed any. 

Before you reach for your ink and papers, check out what our amazing team has created to inspire you this week:

Here's a quick recap of our challenge rules:
 
1.  Create a new paper project
2.  Upload your creation to your blog with a link back to us and provide a direct link to the post featuring your challenge submission.
3.  Please link your card to no more than four challenges, TOTAL.
4.  Have FUN!

Enjoy your day; I will be enjoying the sunshine and marvelling at the fact that we are having a fine weather Bank Holiday here in the UK - yay! I'll be back soon with another project. Until then, happy stampin'!


Stampin' Up! Supplies Used: 

Table built using Product Table Builder by The Crafty Owl - Independent Stampin' Up! Demonstrator.

New Online Exclusives

There are new products available exclusively in the online store from 5 November - check them out here.

Latest Kits!

Stampin Cut and Emboss

The Layered Landscapes Kit and Nature's Paintings Kit are the latest kits in the online store - get yours here!

Shop Online

Access my online shop 24 x 7, 365 days of the year:

Current November hostess code:

9NKXDTTR

Shop Online

Mini Catalogue

BROWSE THE CATALOGUE

'Tis The Season - the new Stampin' Up! Mini Catalogue is here! For more details and to download your copy click here

Scrapbooking

Stampin' Up! has introduced a new range of 12x12" scrapbooking product and kit - the full range is now available to purchase online. To download a copy of the new digital Scrapbooking Catalogue click here.

2024-25 Annual Catalogue

BROWSE THE CATALOGUE

Click on the image to download your copy of the 2024-25 annual catalogue. For a full list of current SU! supplies, go to my online store. If you would like any help or advice, please drop me a line at joanne@thecraftyowl.co.uk or give me a call on 07773 421446 - I'd be happy to help.

Join My Team

It's always a great time to join Stampin’ Up! New team members can get £130 worth of products for only £99 + free business supplies + free shipping + all the fun being a part of Stampin’ Up! Stampin' Up! has something for everyone: join my growing team and benefit from my support to enjoy Stampin' Up! however you choose.

If you're interested, call me for a chat to understand how I can help you realise your goals. Alternatively, if you have already decided to sign up and you just can't wait, please click here for the link to the online form where you can sign up and order your starter kit right away! 

About Me

Hi I'm Joanne and live in Northampton and when I'm not looking after my husband and two beautiful children, am an avid crafter with a passion for all things Stampin' Up!

I must confess that I have never been a big rubber stamper - until I discovered Stampin' Up! that is. I love the fact that I can get such great results with co-ordinating stamps, inks, papers and punches - the possibilities are endless! Join me on my stamping journey as I share the things I love and be inspired to create amazing things yourself!

Follow Me

Monthly Newsletter

Box Builder

Click the button above to use Box Buster to create your custom box design using the Envelope Punch Board!

Kits Collection Now Available!

Stampin Cut and Emboss

The new Kits Collection from Stampin' Up! is now available!

Click here to see the current kits available and order yours online today.

I Design For


Stampin' Up Stuff

This is my personal blog and is not endorsed by Stampin’ Up! I hope you find it a plentiful source of ideas and personal inspiration but please don't copy my designs for contest submission or use for classes, publication or sale without express permission.