Gorgeous Garden Glittered Christmas Amaryllis TTT238

by Joanne James7. December 2023 18:00

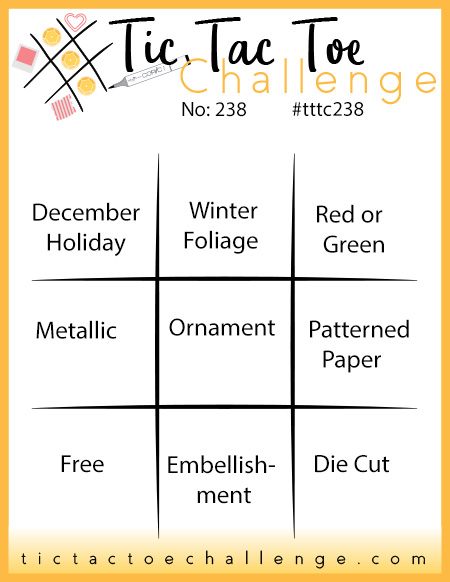
It's Thursday and time for a new challenge over at TicTacToe! It's the turn of Team X to host this week and the lovely Felicita is our featured designer this week. This is the fun board that we are playing along with: 
    May be an image of flower and text that says '#156 Real Red TI COLOUR NKSPIRATION CHALLENGES Shaded Spruce Basic White Basic Black'   

I went down the right-hand column with red or green (I used both), patterned paper and diecut, and paired it with the fabulously festive colours over at Colour Inkspiration and made a card that is perfect for the 'add glitter' challenge over at Inkspirational - there's definitely plenty of that! I'm definitely in full-on Christmas mode still, so couldn't resist another Christmas card - or two! - take a look:
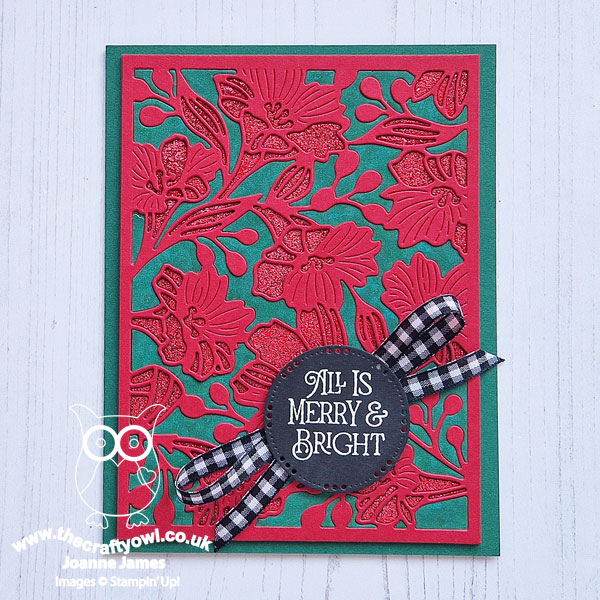
 

Here's the low-down on today's card:

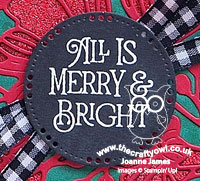
Gorgeous Garden - I decided to use a die that you possibly don't immediately consider as a Christmas one. The Gorgeous Garden Dies feature both a leaf coverplate and a floral coverplate die. The floral die reminds me of amarylllis flowers, that are often associated with the festive season, so I decided to create a card using red and green as my chosen colours to add to the Christmassy feel. 

All That Glitters - Whilst my card looks quite simple and straightforward, it actually showcases a neat technique. I covered a two-ply cardstock panel with an adhesive sheet, then placed the die on top and ran it through my diecutting machine so that the adhesive sheet was cut but the cardstock based remained intact. I then firstly removed the backing paper from the green sections, and having diecut another floral plate out of the mottled Shaded Spruce pattern in the Joy of Christmas designer series paper set, added the negative space green diecut pieces to the adhesive background. The pattern is subtle, but it adds just a little more interest than a plain green. Next, I removed the backing paper from the negative space of the flowers themselves, then sprinkled this with some Real Red glittered embossing powder that I found in my drawer. I heated it to set the powder, then finally removed the main piece of backing paper and add a double-layered diecut coverplate in Real Red. I just love the finished effect - check out the sparkle on the close up below:
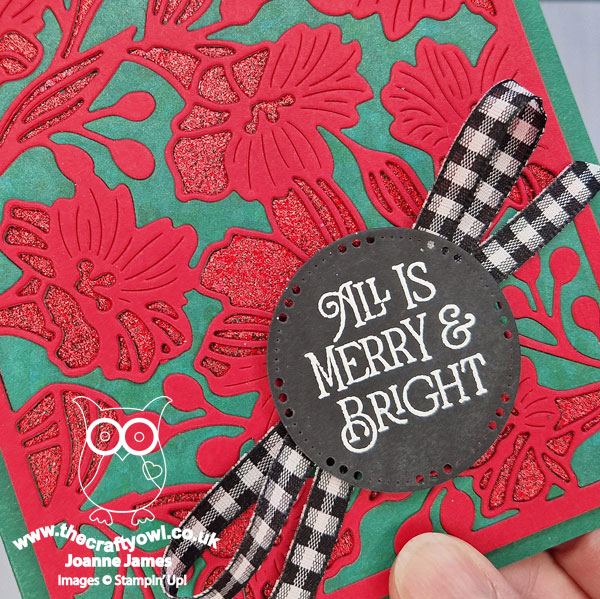
 

 I also made a second version of this card, this time using pure fine red glitter. This wasn't Stampin' Up! branded glitter, so the colour is slightly deeper. I gives a slightly more textured finish - just as effective though:
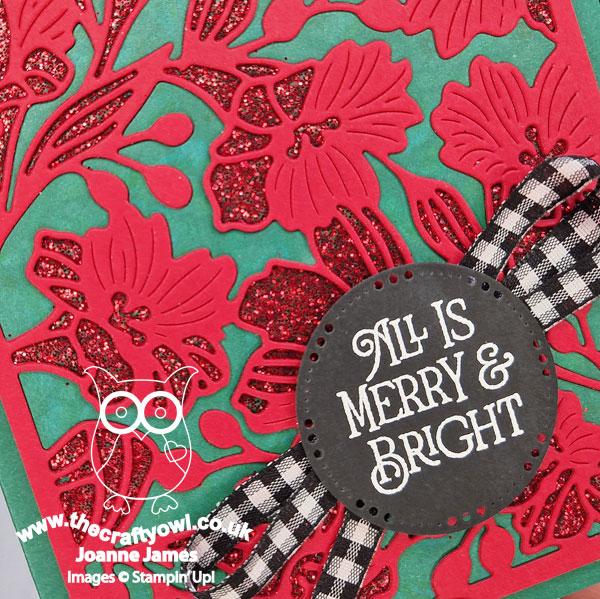
 

The glitter just needs to be pressed firmly against the adhesive paper; any stray excess can be removed with the sticky end of your Take Your Pick tool. I know glitter is ecologically out-of-fashion right now (although there are eco-friendly versions available), but if you have old tubs of fine glitter hanging around like I do, this is a fun way to use it up. Here's another photo of both cards together so that you can see the subtle difference between the two:
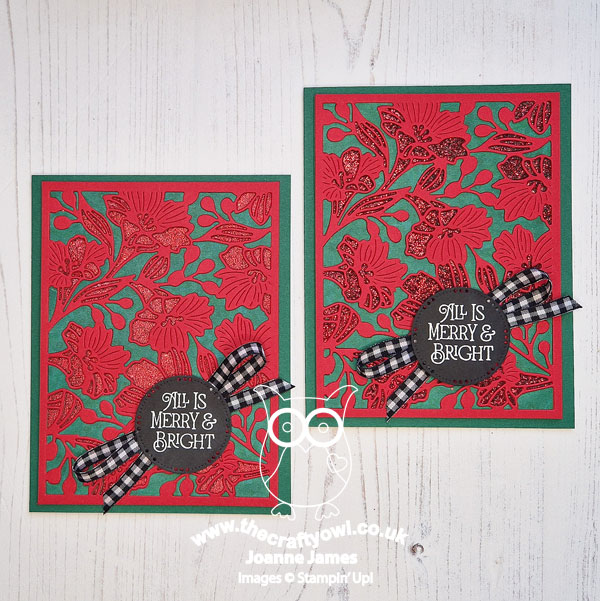
 

Which one do you prefer? Do leave me a comment below - I'd love to hear your thoughts.

Brightest Glow - Finally, the sentiment on the front of my card is from the oh-so-useful festive sentiment set in the annual catalogue called 'Brightest Glow', heat-embossed in white on Basic Black for a little more emphasis against that red and green background and added some black and white gingham ribbon too. I added another sentiment from the same set to the inside of my card:
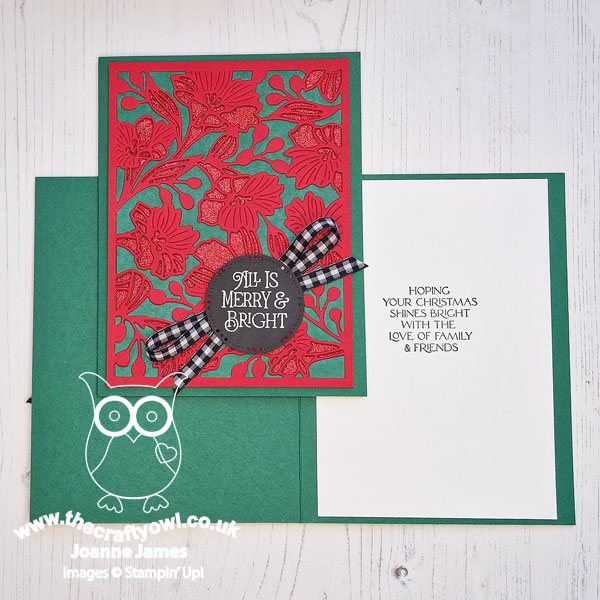
 

So what do you think? I absolutely love these Gorgeous Garden Dies - I think they are one of the unsung heroes of the annual catalogue, since they are standalone dies. You will definitely be seeing more of them in the weeks and months to come - watch this space!

Here is the visual summary of the key products used on today's project for you to pin for easy reference:
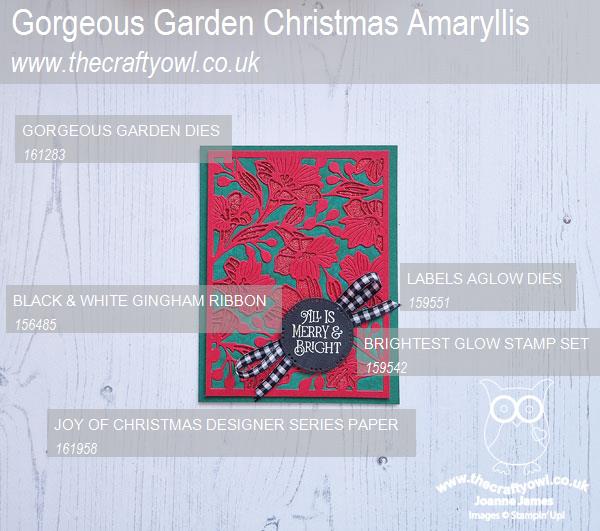
 

You can see all of my Product and 'How To' summaries on my 'How To - Tips and Techniques' Pinterest board in case you've missed any. 

One last thing to mention: this will be my last challenge with the TicTacToe Challenge team. I have absolutely loved being a part of this team and will miss Felicita and everyone very much; moving into 2024 I will be reducing my design commitments to allow me to focus on other opportunities. A tictactoe board offers so many creative possibilities - how does this week's board inspire you? Why not have a go? We would love to see you in the gallery and who knows - you might be selected for Designer's Choice and be eligible to be a guest designer on a future challenge. 

Enjoy your day; I'll be back tomorrow with another project. Until then, happy stampin'!


Stampin' Up! Supplies Used: 
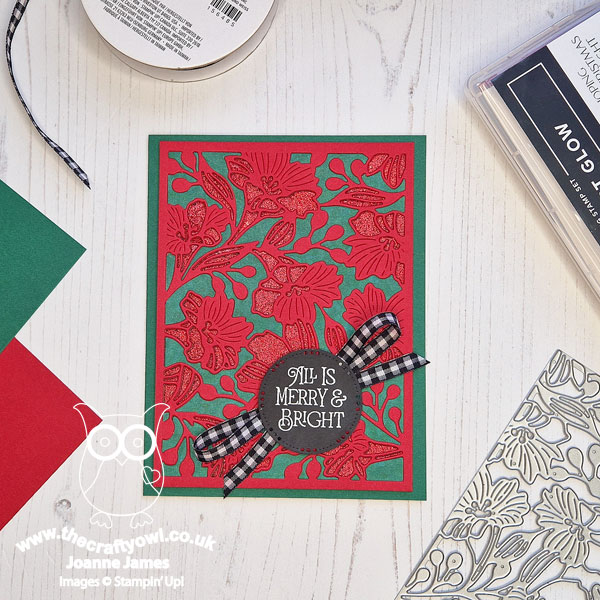
Table built using Product Table Builder by The Crafty Owl - Independent Stampin' Up! Demonstrator.


Winter Meadow Christmas Deer PP668

by Joanne James26. November 2023 08:00

Today it's Sunday and time for this week's new challenge over at The Paper Players! It's the turn of the fabulous Ann to host this week and she has my favourite, a sketch challenge for us to work with:


I had the idea that the central panel would be a great way to showcase one of the Winter Meadow designer series paper designs - take a look:


Here's the low-down on today's card:

One of the designs in the Winter Meadow designer series paper pack has a deer pattern that can be split into 6 and used as card fronts. I took the one that had the deer on the right hand side of the panel and cut it down to fit my central rectangle. I added a background panel of Moody Mauve and scored in the diagonal lines (these are quite difficult to see in the photos I'm afraid, but add a lovely subtle detail in real life) and fussy cut a couple of berry stems from another of the sheets in the paper pack to decorate my sentiment, which is from the 'Brightest Glow' stamp set and cut with one of the Labels Aglow dies:

I really liked this card, although I did think that I lost a lot of the impact of the deer panel once I'd cut it down. Whilst I had the papers out on my desk, I decided to make a second card using another panel of the deer paper, this time using Kim's open layout over at Freshly Made Sketches this week:

I cut the single panel into three and built up the central section with a couple of layers of black and white cardstock, adding my sentiment from the 'Christmas Classics' stamp set onto a stitched label:


I let the paper do all the work as far as this card is concerned and added only a trio of three pale silver sequins to complete my card:


So two cards for you today - hope you like them! I'm also linking my first card up over at Time Out Challenges where the current challenge is Winter/Holiday.

Here is the visual summary of the key products used on today's projects for you to pin for easy reference:


You can see all of my Product and 'How To' summaries on my 'How To - Tips and Techniques' Pinterest board in case you've missed any. 

Before you reach for your ink and papers, check out what our amazing team has created to inspire you this week:

Here's a quick recap of our challenge rules:
 
1.  Create a new paper project
2.  Upload your creation to your blog with a link back to us and provide a direct link to the post featuring your challenge submission.
3.  Please link your card to no more than four challenges, TOTAL.
4.  Have FUN!

Enjoy your day; I'll be back later in the week with another project. Until then, happy stampin'!


Stampin' Up! Supplies Used: 

Table built using Product Table Builder by The Crafty Owl - Independent Stampin' Up! Demonstrator.


Inked and Tiled Clean and Simple Notecard FMS612

by Joanne James20. November 2023 14:53

Today I'm squeaking in a quick post before I head out on the school run to share a super quick card I made using Linda's layout over at Freshly Made Sketches this week:

I spent absolutely ages considering what I was going to do with those two long, thin columns and none of my layered ideas were working out, so in the end I went super simple and decided to make a very clean and simple notecard using the 'Inked & Tiled stamp set - take a look:


Here's the low-down on today's card:

I used the stamps to represent the layers and inked them using my Stampin' Write markers, which enabled me to easily stamp the flower petals and stem in one go, and achieve a slight variegated look to the petals my adding in a little Berry Burst to my Melon Mambo:


An unconventional colour scheme, especially when you add in the navy stem and leaves, but I rather like it. I added a few white opaque sequins and picked up the Bubble Bath colour of my background 'squiggle' for my label, although in hindsight I think I might have made this white too. Do you ever use your Stampin' Write markers to ink your rubber stamps in this way? It really is so easy and is great if you are short on ink pads too - The 'Inked & Tiled' stamp set is perfect for #SimpleStamping. And so quick - I even had time to repeat the flower on the front of my envelope too :-)

Here is the visual summary of the key products used on today's project for you to pin for easy reference:


You can see all of my 'How To' summaries on my 'How To - Tips and Techniques' Pinterest board in case you've missed any. 

I'm off on the school run; I'll be back with another post later as I've news of this year's Last Chance Discount Lists to share. Until then, happy stampin'!


Stampin' Up! Supplies Used:

Table built using Product Table Builder by The Crafty Owl - Independent Stampin' Up! Demonstrator.

Labels Aglow Clean and Simple Notecard

by Joanne James4. November 2023 19:00

Yay - it's the weekend! Today I'm sharing a clean and simple notecard that was inspired by a few challenges that came together in an interesting way:


The colour scheme at AAA Cards caught my eye and the circular balloon image got me thinking of the SUO Challenges theme of circles and I decided to combine the two. The sketch layout over at Just Add Ink gave me the perfect layout to execute my idea (and is considerably less involved than my winning card last week - thank you ladies for the pick!) - take a look:


Here's the low-down on today's card:

I wanted a design that exclusively featured circles and I decided to use the Labels Aglow Dies which are all based around tiny diecut circles. I diecut the large round pattern comprising lots of tiny circles twice from thick white cardstock and before I glued them down, I embossed an imprint of the die onto the card base and used my Stampin' Blends in the AAA Cards challenge colours to randomly colour the dots, similar to the inspiration photo. You can see the detail more closely on the photo below:


I finished with a simple sentiment from the 'Ringed With Nature' stamp set which I heat-embossed in white onto a Night of Navy label cut with another of the dies in the set for an extra pop of colour. The Labels Aglow Dies carried over into the annual catalogue from the seasonal catalogue this time last year and are often used for Christmas-themed and seasonal cards, especially as it was bundled with the co-ordinating 'Brightest Glow' stamp set so this is a great way to show how they can be used effectively for a non-festive card too. This is a simple notecard that is great to have on standby for those times when you need to pop a quick note in with something and would work in any colour too.  

Here is the visual summary of the key products used on today's project for you to pin for easy reference:


You can see all of my 'How To' summaries on my 'How To - Tips and Techniques' Pinterest board in case you've missed any. 

Enjoy your day; following a dry evening and a fantastic fireworks display yesterday evening, I've spent my afternoon sheltering at the side of a wet and windy hockey pitch today - winter has definitely arrived! I'll be back tomorrow with my card for our new challenge over at The Paper Players. Until then, happy stampin'!


Stampin' Up! Supplies Used:

Table built using Product Table Builder by The Crafty Owl - Independent Stampin' Up! Demonstrator.

Celebrate With Labels Aglow FMS589

by Joanne James12. June 2023 12:00

Summer has finally arrived here in the UK and yes, you've guessed it - I'm sharing a Christmas card! I was intrigued by the layout that the lovely Linda Callaghan came up with for her Freshly Made Sketches design this week - check it out:


I managed to grab a little crafty time over the weekend so decided to have a go at creating something that made the most of her unique layering and this is what I came up with:


Here's the low-down on today's card:

I almost went with a wreath for the circular element, but couldn't work out how to incorporate that vertical column effectively. I finally settled on using the fabulous circular die in the Labels Aglow set for the circular element and layering it with some (retired) Lights Aglow designer paper in festive Cherry Cobbler with a pattern of dots in vanilla and gold that tied nicely in with the gold dots of the circular element. I also lined my envelope with the same paper. I did take a liberty with the sentiment, in as much as whilst I retained the position I didn't have a skinny one that I liked. I thought I would try the 'Celebrate' diecut from the 'Wanted To Say' die set which never seems to leave my desk at the moment and I really liked the effect:


Whilst my card is designed for Christmas - I used a festive sentiment from the 'Brightest Glow' stamp set on the inside of my card - it occurs to me you wouldn't know from the outside that this card was designed with Christmas in mind. Hopefully the peeps over at Happy Little Stampers will appreciate my understated take on Christmas - which is perfect for their die challenge too (the only stamping is on the inside of today's card). For a card with 7 layers, the design is still clean and uncluttered - just how I like it! This isn't a layout that I would usually be drawn to, but I really love the finished effect - thanks Linda for a thought-provoking sketch!

Here is the visual summary of the key products used on today's project for you to pin for easy reference:


You can see all of my 'How To' summaries on my 'How To - Tips and Techniques' Pinterest board in case you've missed any. 

Enjoy your day and I'll be back tomorrow with another project. Until then, happy stampin'!


Stampin' Up! Supplies Used:
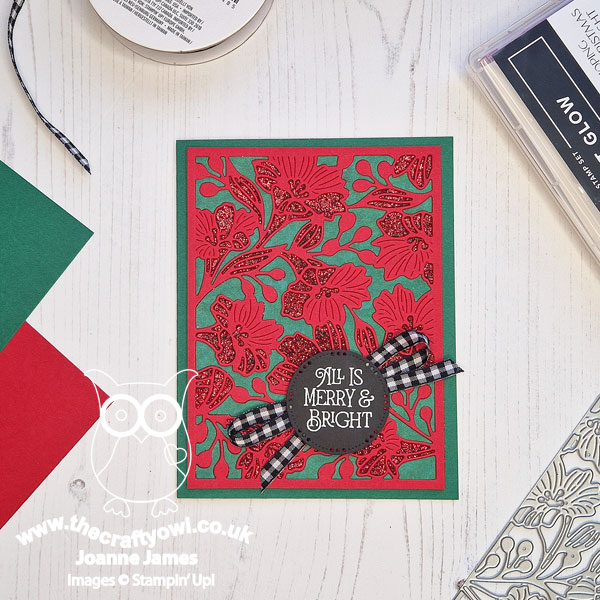
Table built using Product Table Builder by The Crafty Owl - Independent Stampin' Up! Demonstrator.
 

Celebrate Chinese New Year of the Rabbit with FF125

by Joanne James6. January 2023 10:00

Today I have my card for the new challenge over at Festive Friday Card Making and Paper Crafting Challenge


The challenge that we are celebrating this week is 'Chinese New Year' which is on 22nd January. Remember the fun thing is that at Festive Friday you do not need to actually celebrate the occasion; your goal is to simply use three or more items from the inspiration list on your project. This week I used red, gold, rabbit, envelopes, heat embossing and new year sentiment and decided I would stick with our theme this week and create a card for Chinese new year - this is what I came up with:


Here's the low-down on today's card:

Year of the Rabbit - Since this Chinese new year is the Year of the Rabbit, my new Easter Rabbit punch came in handy! I used a punched rabbit for the centrepiece of my card; whilst my whole card was in red and gold, I wanted it to stand out a little more without adding in another colour, so I swiped my Poppy Parade cardstock with my ink pad in the same colour for a deeper shade - the photo below shows the difference:


Brightest Glow - I used a new year sentiment from the 'Brightest Glow' stamp set and another of the co-ordinating diecuts from the Labels Aglow Dies to reveal the gold foil of my mat layer to 'frame' the rabbit:


Red Envelopes - I completed my card with a few envelopes snipped from the 'Full of Love' stamp set that I heat embossed in gold on red. Did you know that red envelopes, often with gold detailing and containing money or gift cards, are traditionally given to children to celebrate Chinese new year and are considered to bring good luck, health and prosperity?

Here is the visual summary of the key products used on today's project for you to pin for easy reference:


You can see all of my 'How To' summaries on my 'How To - Tips and Techniques' Pinterest board in case you've missed any. 

I'm also linking today's card up over at Global Design Project where their theme is 'party'.

How does our board inspire you? I can’t wait to see what YOU create! For more inspiration, be sure to visit the rest of the  Festive Friday Card Making and Paper Crafting Challenge Design team:


Enjoy your day; mine will be a busy one, as I'm going into Birmingham for some shopping and a trip to the theatre this evening - exciting! I'll be back tomorrow with another project. Until then, happy stampin'!


Stampin' Up! Supplies Used:

Table built using Product Table Builder by The Crafty Owl - Independent Stampin' Up! Demonstrator.

New Online Exclusives

There are new products available exclusively in the online store from 5 November - check them out here.

Latest Kits!

Stampin Cut and Emboss

The Layered Landscapes Kit and Nature's Paintings Kit are the latest kits in the online store - get yours here!

Shop Online

Access my online shop 24 x 7, 365 days of the year:

Current November hostess code:

9NKXDTTR

Shop Online

Mini Catalogue

BROWSE THE CATALOGUE

'Tis The Season - the new Stampin' Up! Mini Catalogue is here! For more details and to download your copy click here

Scrapbooking

Stampin' Up! has introduced a new range of 12x12" scrapbooking product and kit - the full range is now available to purchase online. To download a copy of the new digital Scrapbooking Catalogue click here.

2024-25 Annual Catalogue

BROWSE THE CATALOGUE

Click on the image to download your copy of the 2024-25 annual catalogue. For a full list of current SU! supplies, go to my online store. If you would like any help or advice, please drop me a line at joanne@thecraftyowl.co.uk or give me a call on 07773 421446 - I'd be happy to help.

Join My Team

It's always a great time to join Stampin’ Up! New team members can get £130 worth of products for only £99 + free business supplies + free shipping + all the fun being a part of Stampin’ Up! Stampin' Up! has something for everyone: join my growing team and benefit from my support to enjoy Stampin' Up! however you choose.

If you're interested, call me for a chat to understand how I can help you realise your goals. Alternatively, if you have already decided to sign up and you just can't wait, please click here for the link to the online form where you can sign up and order your starter kit right away! 

About Me

Hi I'm Joanne and live in Northampton and when I'm not looking after my husband and two beautiful children, am an avid crafter with a passion for all things Stampin' Up!

I must confess that I have never been a big rubber stamper - until I discovered Stampin' Up! that is. I love the fact that I can get such great results with co-ordinating stamps, inks, papers and punches - the possibilities are endless! Join me on my stamping journey as I share the things I love and be inspired to create amazing things yourself!

Follow Me

Monthly Newsletter

Box Builder

Click the button above to use Box Buster to create your custom box design using the Envelope Punch Board!

Kits Collection Now Available!

Stampin Cut and Emboss

The new Kits Collection from Stampin' Up! is now available!

Click here to see the current kits available and order yours online today.

I Design For


Stampin' Up Stuff

This is my personal blog and is not endorsed by Stampin’ Up! I hope you find it a plentiful source of ideas and personal inspiration but please don't copy my designs for contest submission or use for classes, publication or sale without express permission.