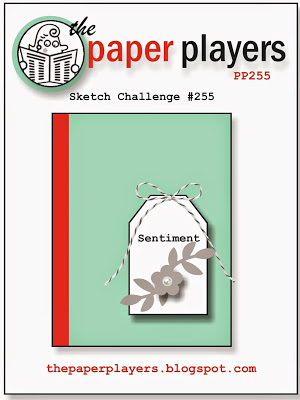
by Joanne James26. July 2015 11:00It's Sunday and you know what that means: time for a new challenge over at The Paper Players! This week it is the tun of the super-talented Sandy to host and she has my favourite kind of a challenge for you - yes, it's a sketch:

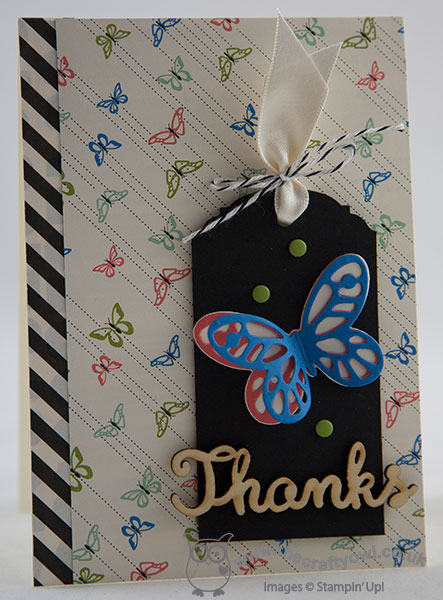
This is a great sketch and gave me the opportunity to use some of my very favourite items from the annual catalogue: another Expressions Natural Element sentiment, some Pretty Petals DSP and a butterfly cut with the Bold Butterfly Framelits - take a look at my card today:

I used a cardbase of Very Vanilla for my card today, with a border strip of Typeset DSP to compliment the diagonal lines of the Pretty Petals paper that I used to cover the rest of my cardfront. I decided to use Basic Black for my tag, punched with the Ornate Tag Topper Punch, to give a strong contrast to the vanilla elsewhere and I created a layered butterfly that echoes the design of those in the paper pattern, with a solid vanilla base then two of the Bold Butterfly thinlit butterflies - one in Calypso Coral adhered directly to the base butterfly, and one in Pacific Point that I adhered in the middle only so that the layer beneath could be seen. I did reverse the positioning of the butterfly and sentiment on my tag to the sketch - I thought the sentiment was too heavy to put above the butterfly as I didn't want to overshadow it - what do you think, smart move or should I have stuck to the sketch more literally? A few Old Olive candy dots, some satin Very Vanilla ribbon and some black and white baker's twine finish my card. No stamping on this one - not on the outside, anyway! I'm also linking up with the ladies over at Just Add Ink this week where the theme is 'Butterflies'.
Before you reach for your ink and papers, check out what our amazing team has created to inspire you this week:
The Paper Players Design Team
Here's a quick recap of our challenge rules:
1. Create a new paper project
2. Upload your creation to your blog with a link back to us and provide a direct link to the post featuring your challenge submission.
3. Please link your card to no more than three challenges, TOTAL.
4. Have FUN!
The tag on this week's sketch is a real fun detail; I look forward to seeing how you interpret it and the rest of Sandy's sketch in the gallery this week. Time for me to return to my sunbed to top up my tan - enjoy the rest of your weekend, however you choose to spend it.
Back tomorrow with another project; until then, happy stampin'!
Stampin' Up! Supplies Used:
b92e8e70-3d4a-462d-abdd-c563b3044a1e|0|.0|96d5b379-7e1d-4dac-a6ba-1e50db561b04
Tags: Big Shot, Bold Butterfly Framelits, Butterfly Thinlits Dies, Expressions Natural Elements, Ornate Tag Topper Punch, Pretty Petals, Shop online, Shop Stampin' Up online, Stampin' Up, Stampin' Up Card, Stampin' Up Card ideas, Stampin' Up Supplies, The Paper Players, Typeset, Candy Dots
Cards | Stamping
by Joanne James24. July 2015 20:38So as I type this sat in blisteringly hot temperatures (I'm not complaining - the sun is heavenly!) I can't quite believe that today I'm going to share a Christmas card with you. Yes, that's right - a Christmas card!! Today I've been able to get my first look at the new Autumn-Winter seasonal catalogue that will be available to customers September 1st - and all I can say is, my wish list is long!!! I will be sharing more on that in coming weeks once our pre-order period starts, however right now if you can't wait for your copy, then get in touch with me and lets chat about becoming a demonstrator - I would love you to join the 'ooos' and 'aaahs' that I'm having with my current team members as we drool over the catalogue sneak-peek together!
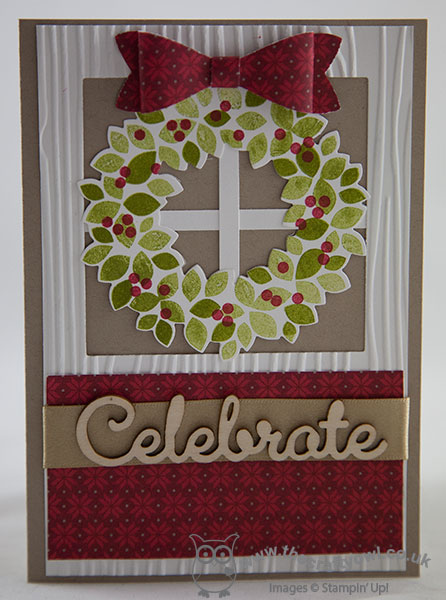
Meanwhile, you may have noticed that Stampin' Up! has reintroduced a permanent line of Christmas stamps and papers in our annual catalogue too - great news for those of us who like to prepare for Christmas all year round! - and some of the stamps included are some favourites from last Christmas, such as the one that features on today's card: Wondrous Wreath. I made this card at our recent team quarterly training session, which was all about making use of what is already avialable to get a jump start on preparing for the festive season. Here's my card:

This card was designed by Monica Gale and is similar in concept to one I designed last season which you can see here. This one is easier to recreate and uses the Woodgrain embossing folder to create the wooden effect on the door. It also features some other products that can now be found in the annual catalogue that are perfect for festive projects: the Bow Builder Punch, the Merry Moments DSP and my favourite Expressions Natural Elements.
That's all the festive fun I have for today - I'm off to get a cooling glass of Sangria after all that typing! Back tomorrow with another project; until then, happy stampin'!
Stampin' Up! Supplies Used:
44657e38-9e97-4f1e-9f91-b6095206178e|0|.0|96d5b379-7e1d-4dac-a6ba-1e50db561b04
Tags: Expressions Natural Elements, Merry Moments, Woodgrain TIEF, Wondrous Wreath, Wonderful Wreath Framelits, Stampin' Up, Stampin' Up Card, Stampin' Up Card ideas, Stampin' Up Supplies, Shop online, Shop Stampin' Up online, join my team, join Stampin' Up, Christmas
Cards | Join My Team | Stamping
by Joanne James22. June 2015 09:09Good morning everyone - it's Monday! I am saying that with more optimism than I feel, but as usual there is lots to achieve this week so I'd best get on! Today I'm here with a card that I made for the challenge over at TGIF Challenge! this week, however firstly a big thank you to James Weber and the TGIF Team for choosing me as their TGIF Fave for my Build a Birthday card last week:

If you missed it, you can see my winning card here. I am honoured to be a fave pick of this talented bunch of designers; I also got a shout out for my rule-breaking card for the TGIF Throwdown challenge; you can see my card here. There is still the rest of the month to enter this one, so watch this space for my bona fide entry which is still to come! Meanwhile onto today's card which is as mentioned for this week's TGIF Challenge where the theme is 'Togetherness', so weddings, anniversaries and the like; I also used this week's Colour Q colour palette and the sketch over at Pals Paper Arts as inspiration for my card:


Without further ado, let me get to today's card:

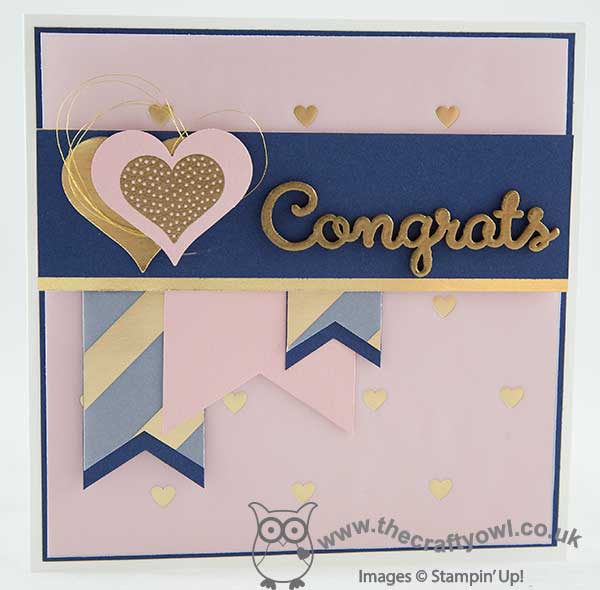
I saw the Colour Q colours this week and thought they would work really well for a wedding or engagement card and I was particularly inspired by the inspiration photo of those patterned straws, which immediately took me to my gold Fancy Foil Designer Vellum. I used the new Whisper White Thick cardstock for my base (p. 149 of the catalogue with the speciality cardstocks in case you missed it) - did I tell you already how much I LOVE this cardstock? It makes such great card bases and is beautifully thick for one layer cards. I used a mat of Night of Navy and another of Blushing Bride, before adhering a layer of heart-embossed gold foil vellum over the top. This mutes the pink slightly and creates a real feeling of luxury, which I think is important for a wedding or celebratory card. I layered my banners, all punched with the new triple banner punch, again layering vellum over the navy ones, this time in gold stripes and leaving the bottoms visible for contrast. My cross panel is Night of Navy layered on a piece of Gold Foil Sheet, with two offset layered hearts - one gold foil, one Blushing Bride with one of the heart stamps from the 'Hello Life' set embossed in gold in the centre and some of the lovely new gold metallic thread wound in between. To finish, I added my sentiment which is the thing I probably love most on this card: it's one of the new Expressions Natural Elements wooden diecuts, which I decided to double heat-emboss in gold to tie in with the rest of my card. I love these in their natural wood finish, but they are fun to jazz up too!
This is one of those cards that I didn't have a clear idea about when I started work and it sort of evolved as I went along. I love it though - I just need someone to announce their engagement or get married so that I can send it now!
I hope you like today's card' I'll be back tomorrow with another project, so stay tuned. Until then, happy stampin'!
Stampin' Up! Supplies Used: