
Cookie Cutter Skeleton Halloween Card

by Joanne James17. October 2016 07:00

Happy Monday everyone! I'm here with a nice early blog post - let's hope that the week continues in this vein! Today I have a card for this week's CASOLOGY challenge where the code word is 'spooky', that uses this week's TGIF Challenge sketch and the colours over at Colour Q:


I decided I had to ink up one of my Cookie Cutter Halloween stamps for today's card - take a look:


A spooky skeleton - how cute is he?! Here's the low-down on today's card:

Not Just For Christmas - What's better than a punch and a co-ordinating stamp set? Why, a punch and TWO co-ordinating stamp sets! The skeleton I used on my card today is from the Cookie Cutter Halloween stamp set. This is a second set that, like Cookie Cutter Christmas, also co-ordinates with the Cookie Cutter Builder Punch and has a number of fun Halloween characters, including a scarecrow that is also perfect for autumn cards. I stamped him in Archival Black onto Very Vanilla cardstock and punched him out.

Ways With Washi - I used some retired Halloween washi tape to create my striped panel behind my skeleton. The newsprint includes stories about Halloween and the skulls provided a contrast whilst still fitting in with my skeletal theme. 

He's All Heart - My spot of colour really is just that, in the form of a bright Real Red enamel heart shape. It adds just enough dimension and shine to really make the colour pop!

Here is the visual summary of the key products used on today's project for you to pin for easy reference:


You can see all of my 'How To' summaries on my 'How To - Tips and Techniques' Pinterest board in case you've missed any. 

I have a day of appointments and errands today, so will be kept more than busy. Enjoy your day and I'll be back tomorrow with another project; until then, happy stampin'!


Stampin' Up! Supplies Used:

Table built using Product Table Builder by The Crafty Owl - Independent Stampin' Up! Demonstrator.

Cookie Cutter Christmas Santa

by Joanne James6. October 2016 08:05

Today it's time for a new challenge over at Create With Connie and Mary and this week we have a sketch for you:


I decided to use this sketch for one of the cards that I made in my Christmas Stamp-A-Stack class earlier this week - take a look:


Here's the low-down on today's card:

Something Old - I decided to feature a die cut 'merry' sentiment using my Christmas Greetings Thinlits and finish with some stamped words from the co-ordinating 'Holly Jolly Greetings' set. Last season I used these thinlits more times than I can count and in all the excitement of the Autumn-Winter catalogue I forgot that they had moved into the annual catalogue until I was browsing its Christmas section. For me they are a keeper and it felt like renewing acquaintance with an old friend to get them out and use them on my card today.

Something New - I paired my sentiment with a fun Santa from the Cookie Cutter Christmas set, punched out with the Cookie Cutter Builder Punch and some of the new Candy Cane Lane DSP; I recommend you stock up on this during the current 'buy 3, get 1 free' offer on Designer Series Paper this month - I know I will be! My cute Father Christmas was coloured in with my Stampin' Write markers for a bold finish, with a  liberal dose of clear Wink of Stella to accent his fur trim. 

A Perennial Favourite - Last but not least, I embossed my top Whisper White layer in my favourite embossing folder of all time: the Softly Falling Textured Impressions Embossing Folder. I'm not big into dry embossing, however I would make an exception for Softly Falling any day of the week, I just love the texture and interest that this falling snow gives a card. 

Here is the visual summary of the key products used on today's project for you to pin for easy reference:


You can see all of my 'How To' summaries on my 'How To - Tips and Techniques' Pinterest board in case you've missed any. 

Do visit the other Design Team members to see what they did with this week's sketch; there's lots of inspiration over on their blogs too!

Enjoy your day and I'll be back tomorrow with another project; until then, happy stampin'!


Stampin' Up! Supplies Used:

Table built using Product Table Builder by The Crafty Owl - Independent Stampin' Up! Demonstrator.

Cookie Cutter Halloween Scarecrow

by Joanne James12. September 2016 22:16

Monday, Monday - the start of a new week! I have been busy moving mountains today, metaphorically speaking at least, but did manage to squeeze in a little crafting time to make a card with this week's colours over at Pals Paper Arts:

Pals Paper Arts PPA317

I was attracted by this bright colour palette and thought it would be perfect for an autumn card featuring the little scarecrow from the Cookie Cutter Halloween set:

Today's card really is a triumph in purple: another of the houndstooth patterns from the Petals and Paisleys Speciality Designer Series Paper pack, this time in Rich Razzleberry, along with some of the ribbon from the co-ordinating trio pack in the same colour. I used my Stampin' Write Markers to colour in the sweet scarecrow in each of the challenge colours, then punched him out using the Cookie Cutter Builder punch. Did you realise there were two stamp sets that each contained fun little figures that could be punched out with the Cookie Cutter Builder punch? I love it when you get more use out of a punch like this! I stamped a crow and fussy cut him and attached him to the scarecrow's hand and it was this that inspired my sentiment, taken from the Acorny Thank You stamp set. He looks like he is just dropping in to say 'Hi', doesn't he?

Purple is one of my favourite colours yet I don't often use it in my card making. This card is definitely making up for it today!

Here is the visual summary of the key products used on today's project for you to pin for easy reference:


You can see all of my 'How To' summaries on my 'How To - Tips and Techniques' Pinterest board in case you've missed any. 

Back tomorrow with another project; until then, happy stampin'!


Stampin' Up! Supplies Used:

Table built using Product Table Builder by The Crafty Owl - Independent Stampin' Up! Demonstrator.

Cookie Cutter Christmas Eskimo Sneak Peek

by Joanne James18. August 2016 08:05

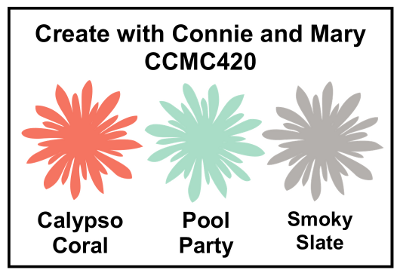
I've had a few blog-free days this week; we are in thick of the summer holidays and I've been spending time with the James Juniors, meeting up with friends, cooking and cycling and more. Crafting time has been limited and blogging time even less so, but I'm not complaining! We've been having fun and enjoying the sunshine and I'm sure that those of you out there in a similar situation understand completely! That said, today it's time for a new challenge over at Create With Connie and Mary and this week we have a colour combination for you:
    

I also used this week's sketch over at Retrosketches for my layout. I was so tempted to create a Foxy Friends card, given that these colours all appear in the A Little Foxy DSP stack; instead though, I used this paper and broke out one of my preorder Christmas stamps - wahoo! - to make my first card using my new goodies. Here's my card:
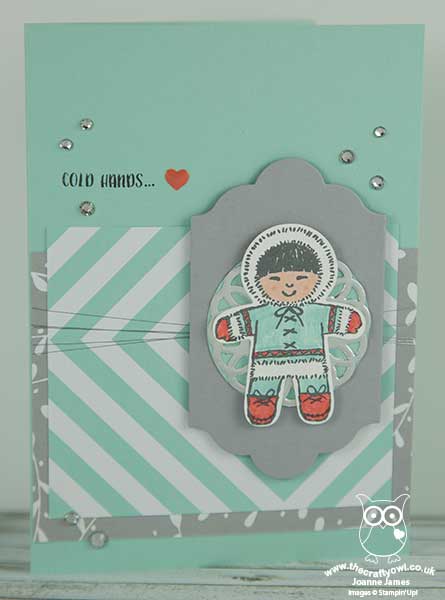
 

How cute is that little chap?! Here's the low-down on today's card:

Cookie Cutter Eskimo - This cute eskimo comes from the Cookie Cutter Christmas stamp set which is part of a bundle with the co-ordinating Cookie Cutter Builder Punch. He comes with a santa, gingerbread man, reindeer and teddy bear too but for today I thought he would look great on my card in his Pool Party outfit with Calypso Coral shoes. It's tricky to see, but I also added a liberal dose of clear Wink of Stella to his fur trim which gives it a lovely shimmer. The sentiment is perfect too: it carries on to the inside of the card with 'warm heartfelt greetings for a very merry Christmas'.

A Little Foxy For The Festive Season - I used two of the papers from the A Little Foxy DSP stack for the layered panels on my card. This is such a versatile pack with lots of great patterns that work all year round, Christmas included!

A Little Sparkle And Shine -  As my card was for Christmas, I took the opportunity to add some touches of silver for a little festive sparkle: a small silver metallic doily behind my eskimo, some silver metallic thread, a liberal sprinkling of rhinestones. Well, if you can't add some sparkle at Christmas when can you add it?!

Here is the visual summary of the key products used on today's project for you to pin for easy reference:
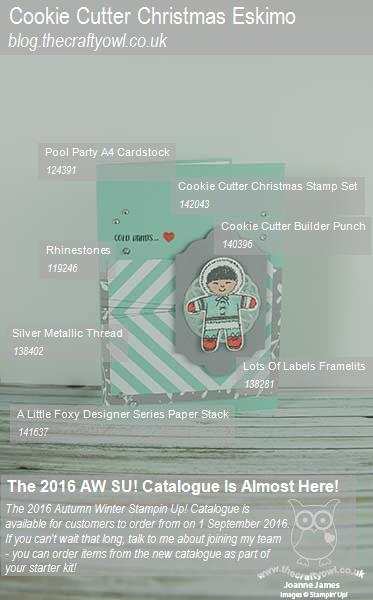
 

You can see all of my 'How To' summaries on my 'How To - Tips and Techniques' Pinterest board in case you've missed any. 

You only have to wait until the 1st of September before you can order this little chap and lots of other goodies from the seasonal catalogue - not long now! If you can't wait, talk to me about joining my team - you are able to order items from the new catalogue immediately as part of your starter kit. I am currently preparing my catalogues to be sent out to my customers; if you don't currently have a demonstrator and would like a copy of the new Autumn Winter catalogue, get in touch with me and I can add you to my list.

Do visit the other Design Team members to see what they did with this week's colours; there's lots of inspiration over on their blogs too!

Enjoy your day and I'll be back tomorrow with another project; until then, happy stampin'!


Stampin' Up! Supplies Used:

Table built using Product Table Builder by The Crafty Owl - Independent Stampin' Up! Demonstrator.

New Online Exclusives

There are new products available exclusively in the online store from 5 November - check them out here.

Latest Kits!

Stampin Cut and Emboss

The Layered Landscapes Kit and Nature's Paintings Kit are the latest kits in the online store - get yours here!

Shop Online

Access my online shop 24 x 7, 365 days of the year:

Current November hostess code:

9NKXDTTR

Shop Online

Mini Catalogue

BROWSE THE CATALOGUE

'Tis The Season - the new Stampin' Up! Mini Catalogue is here! For more details and to download your copy click here

Scrapbooking

Stampin' Up! has introduced a new range of 12x12" scrapbooking product and kit - the full range is now available to purchase online. To download a copy of the new digital Scrapbooking Catalogue click here.

2024-25 Annual Catalogue

BROWSE THE CATALOGUE

Click on the image to download your copy of the 2024-25 annual catalogue. For a full list of current SU! supplies, go to my online store. If you would like any help or advice, please drop me a line at joanne@thecraftyowl.co.uk or give me a call on 07773 421446 - I'd be happy to help.

Join My Team

It's always a great time to join Stampin’ Up! New team members can get £130 worth of products for only £99 + free business supplies + free shipping + all the fun being a part of Stampin’ Up! Stampin' Up! has something for everyone: join my growing team and benefit from my support to enjoy Stampin' Up! however you choose.

If you're interested, call me for a chat to understand how I can help you realise your goals. Alternatively, if you have already decided to sign up and you just can't wait, please click here for the link to the online form where you can sign up and order your starter kit right away! 

About Me

Hi I'm Joanne and live in Northampton and when I'm not looking after my husband and two beautiful children, am an avid crafter with a passion for all things Stampin' Up!

I must confess that I have never been a big rubber stamper - until I discovered Stampin' Up! that is. I love the fact that I can get such great results with co-ordinating stamps, inks, papers and punches - the possibilities are endless! Join me on my stamping journey as I share the things I love and be inspired to create amazing things yourself!

Follow Me

Monthly Newsletter

Box Builder

Click the button above to use Box Buster to create your custom box design using the Envelope Punch Board!

Kits Collection Now Available!

Stampin Cut and Emboss

The new Kits Collection from Stampin' Up! is now available!

Click here to see the current kits available and order yours online today.

I Design For


Stampin' Up Stuff

This is my personal blog and is not endorsed by Stampin’ Up! I hope you find it a plentiful source of ideas and personal inspiration but please don't copy my designs for contest submission or use for classes, publication or sale without express permission.