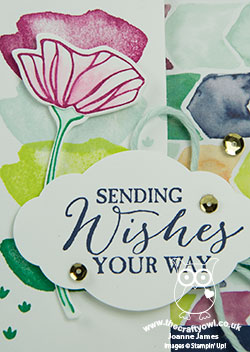
Oh So Eclectic 2017-18 Stampin' Up! Annual Catalogue Cover CASE

by Joanne James19. July 2017 11:00

Today I have another Oh So Eclectic card from this month's technique class which is actually a CASE of the card on the front cover of the current 2017-18 Annual Stampin' Up! catalogue:
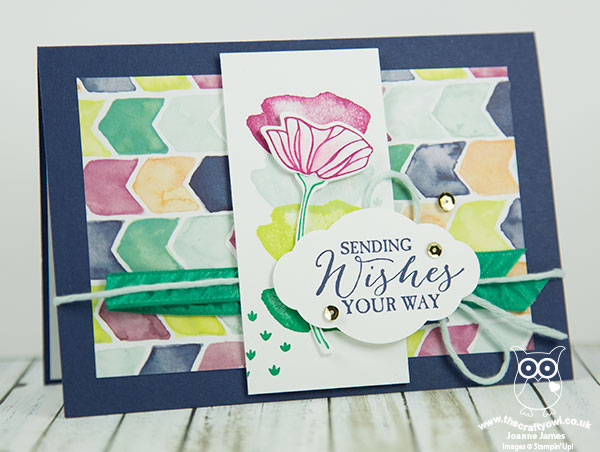
 

The eye-catching front cover was in part what attracted my ladies to the Oh So Eclectic Bundle in the first place, so it seemed only right that we should make some of the cards showcased. I thought I would use today's post to actually talk about ways in which you can use the catalogue to help you on your creative journey and inform the sets that you buy when you shop for Stampin' Up! products.

Here's the low-down on today's card:

CASE The Catalogue - The catalogue is not only the place to find the details for all of the products that Stampin' Up! sells, it is also a valuable resource of tips, tricks and ideas and serves as a source of inspiration in and of itself. It's choc-full of great examples of how many of the products can be used and I always encourage my customers to use their catalogues to their full potential, whether in doing a 'Copy and Share Everything' or 'Copy And Selectively Edit' (both fit the acronym CASE) or to use the ideas as inspiration to create something different entirely. Today's card is my CASE of the one that sits in the middle of the front cover page. I changed out the sentiment for one that I have - I used one from the 'Butterfly Basics' stamp set, a 'go to' for me - but otherwise stayed pretty true to the sample.

A Sample For Everyone - The catalogue might seem a little overwhelming at first glance, with so many stamp sets, tools and accessories and lots of colourful images showing samples galore. The trick is to look out for the clever signposts that are dotted throughout the catalogue that help you navigate your way, whatever type of crafter you are. On pages 6 and 7, there are lots of useful pointers of things to look out for as you browse, whether you are new to crafting or someone looking for more creative freedom. Either way, the catalogue has you covered. Particular signposts that I would encourage you to pay attention to are the 'quick and easy' icon:


Equally, the 'step it up' icon shows how you can start with a simple project, then 'step it up' with additional tools and embellishments:


There are also lots of tips and information panels that describe how to do lots of techniques - invaluable if you don't get to attend a class and benefit from the knowledge of your Stampin' Up! demonstrator in person or aren't able to get online to look something up, read their blog or watch a YouTube video. Last but not least, the 'You Can Make It' panels show you a project and are accompanied by a shopping list of the supplies you will need in order to recreate it yourself. Stampin' Up! really does try and make it easy for you!

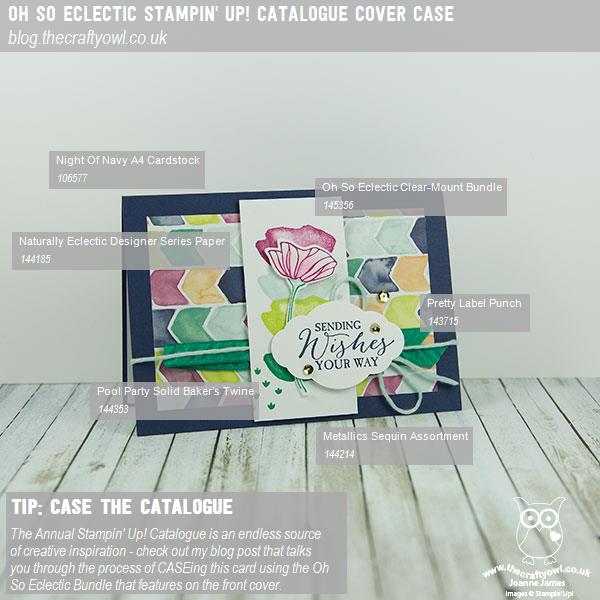
One Step Up - So the card above is the first or interim stepped-up version using the Oh So Eclectic stamp set. The central panel is stamped, however it also includes a stamped and diecut flower, a label printed with the Pretty Label Punch and a sentiment from an alternative set, along with some Naturally Eclectic Designer Series Paper, some Pool Party Solid Baker's Twine and some Emerald Envy ribbon. If you are a regular stamper and have lots of supplies, this card is a great example of how you can bring various sets and tools together, yet is still relatively quick and easy to produce. 

Here is the visual summary of the key products used on today's project for you to pin for easy reference:
 

You can see all of my 'How To' summaries on my 'How To - Tips and Techniques' Pinterest board in case you've missed any. 

I'll be back soon with another 'CASE The Catalogue Cover' card, this time showcasing the bells-and-whistles fully stepped up version using the Oh So Eclectic product suite. Until then, happy stampin'!


Stampin' Up! Supplies Used:

Table built using Product Table Builder by The Crafty Owl - Independent Stampin' Up! Demonstrator.

Butterfly Basics Reverse Panel Card

by Joanne James29. February 2016 09:00

Another Monday, another week! I have a busy week in store and am looking forward to it already! Firstly, to all those celebrating a leap year birthday today - a very happy birthday to you! Today I am sharing a card using this week's sketch over at Freshly Made Sketches and the colours over at Pals Paper Arts:

   Pals Paper Arts PPA289

I knew immediately how I wanted today's card to look and had a clear picture in my mind. My card did turn out as I hoped, save for the need to flip the sketch to its mirror image - take a look:

I turned to my 'Butterfly Basics' stamp set for my card today. I haven't used this set in ages and it's so easy to forget the great sets in the current annual catalogue when we have Sale-A-Bration and the current seasonal catalogue to keep us busy. I just knew that the long stemmed flower was going to be perfect for that long panel though. I stamped the image in Night Of Navy and coloured the flower with Blushing Bride and Pear Pizzazz inks and my blender pen. I matted this image on pink and navy, the reversed this matting for my sentiment, which I stamped in Versamark and heat embossed in white. I stamped my butterfly in Night of Navy on both sides of a piece of vellum and punched it out with my Itty Bitty Butterfly punch and adhered it to my sentiment panel. I also covered my butterfly liberally in Wink of Stella, which adds such a lovely sparkle in real life. I had to mirror-image the sketch because of the way the leaves fall on the stem - I'm hoping Jen isn't going to be too upset by this! Lastly, to finish I added a trio of Blushing Bride enamel dots from the Love Blossoms Embellishment kit. I just love these - they are so sparkly! This is one of those cards that makes great use of colour to accentuate the layers and by stamping the flower in Night of Navy instead of grey or black the whole thing really co-ordinates well. 

Here is today's visual summary for easy reference:


I have my piano lesson this morning then am off to London today for an appointment before returning in time for the school run. So a busy day in store! Back tomorrow with another project; until then, happy stampin'!


Stampin' Up! Supplies Used:

Table built using Product Table Builder by The Crafty Owl - Independent Stampin' Up! Demonstrator.

Dandelions On The Breeze

by Joanne James19. February 2016 20:51

Good evening lovely blog readers! It's finally Friday - yay! I've been enjoying the last day of the half-term holiday with the James Juniors today and haven't managed to squeeze in any crafting time (no matter - there's always tomorrow!) so I'm sharing a couple of cards I made earlier in the week for this week's Less Is More challenge, which is to create a one layer card with a stem. Now I'll be quite honest - I had something specific in mind when I created these cards and I'm not sure I achieved it. But since I haven't had time to 'try again' and I missed last week's LIM link up for the birthday white-on-white challenge (you can see my card here if you missed it), I wasn't going to miss playing along today! So here is the first of two cards:

I was keen to play with the dandelion seed stamp in the 'Balloon Celebration' set so for my first card I stamped a stem, centre and seeds in Versamark and heat embossed them in white, along with a sentiment from Butterfly Basics which works really nicely with it. I sponged a little Perfect Plum ink into the centre of my seed head then took some circle templates and sponged in some white kraft ink to create a soft bokeh effect. 

For my second card I used the same basic design, but doubled the stem, ommitted the centre and heat embossed my dandelion in silver onto Shimmery White cardstock and watercoloured in a background wash using Pool Party ink:

This card is much brighter than the first and in real life has a lovely shimmer, but I do feel that for both cards there is something missing; my urge to add layers was overwhelming! I'd love to know what you think - do leave me a little comment below with any thoughts you have on today's cards. 

I'll be back tomorrow with another project; until then, happy stampin'!


Stampin' Up! Supplies Used:

Table built using Product Table Builder by The Crafty Owl - Independent Stampin' Up! Demonstrator.


Bermuda Bay Butterfly Basics

by Joanne James26. February 2015 20:35

Thank you for all the lovely comments I've received on my 'Guy Greetings' cards these past couple of days - I'm so glad you are enjoying them. I have more of these to share, some of which I made with my lovely stamp-a-stack ladies at our class earlier today, but instead I'm having a break to share one of the cards I designed for my recent technique class featuring the Butterfly Basics stamp set and co-ordinating framelits:


I stamped the lacy butterfly onto my Very Vanilla base in Bermuda Bay ink, then used the co-ordinating framelit to cut the shape out of the top mat layer. I then added some Crumb Cake, sponged through a stencil made with my Hexagon Hive thinlit, the border stamp, a simple sentiment and some linen thread and a scattering of pearls as a final simple embellishment. I love the versatility of thinlits and how they can be used in so many ways; using the negative space gives a different look to simply using the thinlit to cut out the butterfly and attach on top. 

I'm linking today's card up with this week's challenge over at Less Is More where the theme is 'wings', which suits my butterfly perfectly.

Back tomorrow with another project; until then, happy stampin'!


Stampin' Up! Supplies Used:

Table built using Product Table Builder by The Crafty Owl - Independent Stampin' Up! Demonstrator.


Tags: , , , , , ,

Cards | Stamping

Monochrome Butterfly Basics Card

by Joanne James14. February 2015 09:00

I hope you all received lots of Valentine's cards today - I certainly sent plenty! Today I'm sharing a card that I made using the Butterfly Basics stamp set to share with the ladies that attended my technique class earlier this week. In addition to the cards that I design for us to make in the class, I produce a selection of alternative samples to provide further ideas and ways in which they can use the stamp set and practise the techniques that we have covered. There are times when one of these cards produces so many 'oohs' and 'aahs' that it makes me wonder if I should have included the card as the class card - this is one of those cards!! The ladies made me promise I would blog it share with all of you, so here it is:

A monochromatic purple card on a base of Elegant Eggplant, featuring the lovely outlined bloom in the stamp set along with the lacy butterfly. There are lots of touches of sparkle on this card which in real life really add a touch of luxury: the thin strip of silver glimmer paper, the silver heat-embossed sentiment, the sparkling rhinetones and the vanilla smooch spritz sprayed onto the Wisteria Wonder butterflies that adds a subtle pearlescent finish.

I hope you like today's card; back tomorrow with this week's card for our new challenge over at The Paper Players - and it's my first one!

Until then, happy stampin'!


Stampin' Up! Supplies Used:

Table built using Product Table Builder by The Crafty Owl - Independent Stampin' Up! Demonstrator.


Tags: , , , , , , ,

Cards | Classes | Stamping

Butterfly Thinlits Paper Pieced Butterfly

by Joanne James9. February 2015 09:00

Today is a busy day for me: I have my monthly technique class this morning and this afternoon I'm heading to Ikea to stock up on picture frames for a party at the weekend. This month's technique class features the 'Butterfly Basics' stamp set and co-ordinating Butterfly Thinlit Dies, so I have been using them to make lots of samples recently. Today's card is one of the ones I made to show the ladies that are attending my class and works wonderfully with the palette over at Colour Q this week:

The butterflies can be used in a number of ways to incorporate colour into them - having seen some interesting samples using vellum and also colouring with Blendabilites, I decided to have a go at paper-piecing a solid butterfly image. Here is my card:


Whilst this card looks deceptively simple, with its inlaid black butterfly outline and coloured wings, I can assure you it isn't altogether quick to put together! Keeping track of all the tiny pieces from the insides of the four coloured butterflies I cut was something of a challenge, but was well worth it - I love the effect of the solid, brightly coloured paper-pieced butterfly. Here's a close up of the detail:

In addition, I also have the four coloured butterflies to use for other projects - bonus!

That's all from me today. check out my Facebook page if you would like to see the fun that the ladies are getting up to in my class and what this week's cakes look like! Better still, get in touch with me and join me for next month's technique class on 9th March, when we will be using Blendabilities and the lovely Easter stamp set, 'Indescribable Gift'. You can find more details on my class schedule here.  Back tomorrow with another project; until then happy stampin'!


Stampin' Up! Supplies Used:

* Pretty In Pink cardstock - retired

Table built using Product Table Builder by The Crafty Owl - Independent Stampin' Up! Demonstrator.


Butterfly Basics For Freshly Made Sketches

by Joanne James7. February 2015 14:00

Today I'm sharing a card that I designed for my class next week using the Butterfly Basics stamp set and the co-ordinating Butterfly Thinlit Dies and this week's Freshly Made Sketch as my inspiration:


I created my card in the vertical mirror image as I wanted my ferns to lean into the centre of my card - take a look:

I used Naturals Ivory for my card today - I love the natural feel of this cardstock and it works so well when used in conjunction with nature images. I inked the fern stamp in Baked Brown Sugar and stamped it three times, without re-inking in between to create a graduated effect and some depth to the background. I layered my stamped sentiment banner on a piece of Baked Brown Sugar that I edged with the Large Scallop Edgelit and used the rope stamp for the horizontal element, then added a butterfly, stamped in Bermuda Bay, cut out with the smallest of the butterfly thinlits and finished with a small gold button and a strand of burlap tied in a bow. For the final element of the sketch I added the post mark stamp in Crisp Cantaloupe. 

I hope you like today's card, especially the ladies who are coming to class on Monday and for whom this constitutes a 'sneak peek'! Back tomorrow with our new challenge over at The Paper Players; until then, happy stampin'!


Stampin' Up! Supplies Used:

Table built using Product Table Builder by The Crafty Owl - Independent Stampin' Up! Demonstrator.


Butterfly Basics Collage Birthday Card

by Joanne James16. January 2015 09:00

It's Friday - always a great day of the week! Today I'm sharing a card made with this week's sketch layout over at Retrosketches and I also used the colour palette over at Color Throwdown:


I love the colour palette above and the fun pattern that inspired it; I have lots of birthdays coming up, so I decided to go with something less whimsy and combined with the sketch ink up my Butterfly Basics stamp set for the first time and create a birthday card:

I just love this stamp set and judging by the samples I've seen on Pinterest, I'm not the only one. You can create some amazing big and bold images with this set, particularly if you use the large intricate butterfly thinlit dies that come with it. For my card today though, I decided to create a smaller collage-style panel, layering the various images and adding a strip of washi tape and and linen thread for interest and to bring the whole thing together. For my stamped panel I used naturals ivory cardstock, as I wanted to create a more natural feel that was less stark than standard vanilla. I also used a little Pear Pizzazz for my fern; not a colour on the palette, but since Tammy over at Color Throwdown did the same and gave permission as it does appear in the inspiration photo, I thought I would take advantage (thank you Tammy!) Lastly, I stamped my butterfly in Calypso Coral onto some naturals ivory cardstock before adhering to my card. I left my Pool Party card base clean, although after putting the whole thing together did think I'm going to make another version of this card with a more detailed background (I'm all about ringing the changes - one to share another time!)

My February technique stamp class is going to feature the Butterfly Basics stamp set and will feature tips, tricks and techniques to get the most out of your thinlit dies. If you live in Northampton or the surrounding Northants/Bucks/Beds area, you are more than welcome to join me. You can find my full class schedule here - just contact me for more details and to book your place. 

I hope you all have fun weekends planned - mine will no doubt be a busy one, as usual. Back tomorrow with another project; until then, happy stampin'!


Stampin' Up! Supplies Used:

Table built using Product Table Builder by The Crafty Owl - Independent Stampin' Up! Demonstrator.


Tags: , , , , , ,

Cards | Stamping

New Online Exclusives

There are new products available exclusively in the online store from 5 November - check them out here.

Latest Kits!

Stampin Cut and Emboss

The Layered Landscapes Kit and Nature's Paintings Kit are the latest kits in the online store - get yours here!

Shop Online

Access my online shop 24 x 7, 365 days of the year:

Current November hostess code:

9NKXDTTR

Shop Online

Mini Catalogue

BROWSE THE CATALOGUE

'Tis The Season - the new Stampin' Up! Mini Catalogue is here! For more details and to download your copy click here

Scrapbooking

Stampin' Up! has introduced a new range of 12x12" scrapbooking product and kit - the full range is now available to purchase online. To download a copy of the new digital Scrapbooking Catalogue click here.

2024-25 Annual Catalogue

BROWSE THE CATALOGUE

Click on the image to download your copy of the 2024-25 annual catalogue. For a full list of current SU! supplies, go to my online store. If you would like any help or advice, please drop me a line at joanne@thecraftyowl.co.uk or give me a call on 07773 421446 - I'd be happy to help.

Join My Team

It's always a great time to join Stampin’ Up! New team members can get £130 worth of products for only £99 + free business supplies + free shipping + all the fun being a part of Stampin’ Up! Stampin' Up! has something for everyone: join my growing team and benefit from my support to enjoy Stampin' Up! however you choose.

If you're interested, call me for a chat to understand how I can help you realise your goals. Alternatively, if you have already decided to sign up and you just can't wait, please click here for the link to the online form where you can sign up and order your starter kit right away! 

About Me

Hi I'm Joanne and live in Northampton and when I'm not looking after my husband and two beautiful children, am an avid crafter with a passion for all things Stampin' Up!

I must confess that I have never been a big rubber stamper - until I discovered Stampin' Up! that is. I love the fact that I can get such great results with co-ordinating stamps, inks, papers and punches - the possibilities are endless! Join me on my stamping journey as I share the things I love and be inspired to create amazing things yourself!

Follow Me

Monthly Newsletter

Box Builder

Click the button above to use Box Buster to create your custom box design using the Envelope Punch Board!

Kits Collection Now Available!

Stampin Cut and Emboss

The new Kits Collection from Stampin' Up! is now available!

Click here to see the current kits available and order yours online today.

I Design For


Stampin' Up Stuff

This is my personal blog and is not endorsed by Stampin’ Up! I hope you find it a plentiful source of ideas and personal inspiration but please don't copy my designs for contest submission or use for classes, publication or sale without express permission.